Hey guys, is there any way to assign different shaders to the same mesh? Some of my characters have multiple shaders on one mesh, for instance both an arm and a glove which require unique ones, but at the moment 3delight only recognizes the first shader in the list and disregards the other ones.
Atom did a hack a few pages back and there was some discussion about subd surfaces and how best to handle this.
Hopefully when we get the next version a fix may be in.
In the meantime you could write a shader that has different texture pages in different uv zones (st in shading language) eg uvs in 0-1 space use tex1, uvs in 1-2 use tex2 etc etc.
I pulled down the Engine Room test scene on Blendswap. I thought that it might make a good test scene for 3Delight as well. I immediately had to return to the problem of what to do with meshes that have multiple materials? The previous solution did work for the simple scene posted, but when I tried it on a complex scene like the Engine Room I ran into Generating RIB messages for twenty minutes or more per-frame. So to create the meshes on-the-fly is not really practical at this time. But a one time conversion in the scene might not be too bad. So I thought…what we need are some tools to help working with 3Delight a little easier.
Here is a quick little script that will convert any single multi-material mesh objects into multiple single material mesh objects and remove the original from the scene.
# Break milti-material mesh into multiple meshes with one materials.
import bpy

#Atom 08282011
def bubbleSort(passedList):
    # Expects a list of like this [['1.0',face],etc...] index 0 is float, index 1 is a face.
    lst = list(passedList)
    for passesLeft in range(len(lst)-1, 0, -1):
        for i in range(passesLeft):
            if lst[i][0] > lst[i + 1][0]:
                lst[i], lst[i + 1] = lst[i + 1], lst[i]
    return lst

def rounded_tuple(tup):
    return tuple(round(value,4) for value in tup)
#Atom 08282011

scene = bpy.data.scenes[0]
objs = bpy.data.objects
# Convert multi-material meshes into individual mesh objects.
for ob in objs:
    if ob.type == 'MESH':
        # The mesh with modifiers applied.
        me = ob.to_mesh(scene,True,'RENDER')

        # A list of all the vertices.
        list_verts = []
        for vertex in me.vertices:
            list_verts.append(rounded_tuple(vertex.co.to_tuple()))

        # Fetch the vertex and face list from the provided mesh type object.
        list_faces_by_material = []
        for face in me.faces:
            x = [f for f in face.vertices]
            list_faces_by_material.append([face.material_index,x])

        c = 1
        for mat in me.materials:
            # Construct a mesh that represents only the faces for this material.
            list_faces = []

            # Sort by material index.
            temp_list = bubbleSort(list_faces_by_material)
            for f in temp_list:
                if float(f[0]) == float((c-1)):
                    #This face should be part of this mesh because of it's material index value.
                    list_faces.append(f[1])

            if len(list_faces) > 0:
                tempName = ob.name + "_" + str(int(c))          # User should never see this object in the outliner.
                me = bpy.data.meshes.new("me_" + tempName)      # Create a new blank mesh.
                me.from_pydata(list_verts,[],list_faces)        # Give this empty mesh a list of verts and faces to call it's own.
                me.update(calc_edges=True)

                tempOb = bpy.data.objects.new(tempName, me)     # Make new object linked to this special mesh.
                scene.objects.link(tempOb)                      # Link it to the scene.
                try:
                    tempOb.location = ob.location                   # Transfer location to this new object.
                    tempOb.rotation_euler = ob.rotation_euler       # Transfer rotation to this new object.
                    tempOb.scale = ob.scale                         # Transfer scale to this new object.
                except:
                    pass
                try:
                    tempOb.data.materials.append(mat)               # Add the material for this material index.
                except:
                    pass
            c = c + 1

        #scene.update()

        # Remove original source mesh from scene and memory.
        scene.objects.unlink(ob)                # Remove the object from the scene.
        ob.data.user_clear()                    # Clear all users of this material.
        bpy.data.meshes.remove(ob.data)         # Remove our created mesh from memory.

scene.update()
@broken: I ran into a surface shader that does not seem to work with your exporter, supertexmap.sl. It does compile fine, without errors. I believe it might be because some of the parameters have a 16 value array associated with them. Just thought I would report it. It looks like a useful shader. Allowing one to assign diffuse, opacity, specularity and displacement image maps all from one shader interface.
I get…
unknow py-exceptionn couln’t convert
I can post it if you are unable to locate it. I found it in the Mosaic surface shader folder. I compliled it for use with 3Delight.
Thanks, it’s the same bug that Michael W ran into earlier, and is fixed now. However it currently just draws that array of floats as a big long line, rather than a matrix as it should be - it seems blender’s UI isn’t drawing rna properties with the matrix subtype properly (at least with 16 elements here). I’ll investigate it.
ps. expect a release with these fixes in the next couple of days
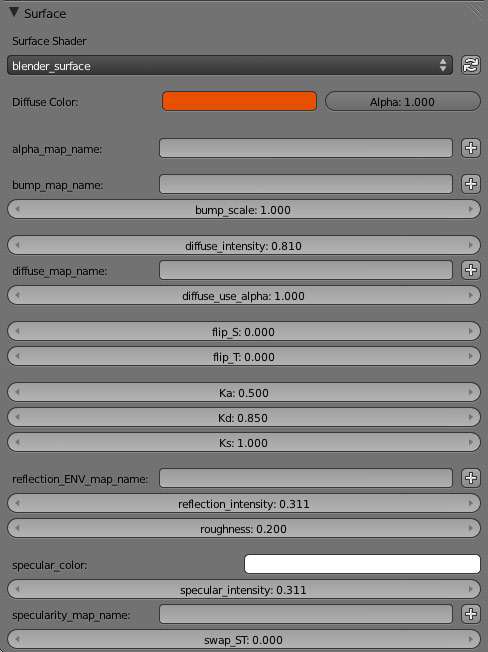
@broken: I don’t expect you to integrate or adopt this code, but it might be worth considering as a placeholder for the way shader parameters are displayed in the GUI. I have grown my first large shader so it has more than ten parameters. Yet I could find no way to control what order the parameters appeared in the GUI. I did make a companion .slmeta file to see if that worked, but no luck.
So I resulted to patching the exporter code. The patch is simple. Just alphabetize the parameter list before you pass it to the ui.py for _draw.
Here is a little code snippet in shader_parameters.pydefrna_to_shader_parameters()
def rna_to_shaderparameters(scene, rmptr, shader_type):
    parameters = []

    sptr = get_shader_pointerproperty(rmptr, shader_type)

    if sptr == None:
        return parameters

    #Atom 09122011.
    param_list = rna_to_propnames(sptr)
    param_list.sort(key=lambda x: x.lower())
    for p in param_list:
        #Atom 09122011.
        prop = getattr(sptr, p)
This small code change allows me to prefix my shader variables and give a basic form of layout control.
So all the reflection parameters appear together and so on.
Here is my shader parameter list with the above code change and a small tweak to ui.py to split out a layout.separator() when the first letter of a group of parameters changes to a new letter.
Hi, the current released version has a problem where the shader parameters aren’t shown in the order that they’re defined. It worked previously, it’s due to some changes in how hte rna properties are generated (using type() rather than exec() ). I’ve already reverted back to the old method, so that shader parameters are displayed in the order that they’re defined.
There’s also additional naming/tweaking that you can do using shader annotations - an example of this is in the gi_raytrace light shader, and there will be some more examples in the next version. I think 3delight for Maya also supports grouping parameters into panels via annotations but that’s not implemented here yet.
This contains most of the fixes mentioned lately, and also a fun feature I’ve had on the backburner for a while - point cloud global illumination. There’s more info and a quick little test video at the above link.
@atom, I still haven’t rolled in any fixes relating to imager shaders or multiple materials per object yet, that will take a bit more time and consideration, and I wanted to get this stuff out the door first. It’s on the todo list though.
Thanks for this Broken, 3delight is fast becoming my production renderer!
Point based GI is pretty fast… I almost didn’t post these images as I’m still working a lot on shaders and lighting, and am cringing slightly but rendering these both in full HD in a couple of minutes just makes me smile (especially as that’s only on 2 threads!)
Juts goes to show that just because you can displace everything it doesn’t mean you should!
I’m looking forward to seeing your planned enhancements for shading/lighting that you mention on your site!
broken - you are doing an amazing work here! One question though - is there a kind of a documentation for all these 3delight settings? I could not find any at the engine webpage and I would really like to know what’s the purpose of all these material settings (including material types).
If you mean shaders, 3delight (and renderman) doesn’t have a “fixed” set of shaders (like you do in BI) rather there’s a shading language that allows you to specify exactly how you want your render to appear.
Surface shaders are for solids and set opacity, colour, texture and response to light.
Displacement shaders are for detailing and can be used for actually deforming the surface or just for bumpmapping (or normal mapping or whatever)
Atmosphere shadersnad interior shaders are similar, Atmosphere shaders are for the space between the camera and the objects. Interior shaders are for the inside of objects… use for fog mists, volumetrics etc…
Light shaders give flexibility to write custom lights (though by default the exporter assigns them based on blender light type)
All the shaders on the pulldowns are mostly just simple examples that when you read the source file teach certain basics of teh shading language.
For basics, txtplastic allows you to have a basic spec/diffuse material with a colour texture,
“clay” is a pure diffuse shader…
“bumpy” displacement shader gives textured displacement
“lumpy” and “dented” are example procedural displacement for example
rozmiarek you might try here:
For more detail on 3delight in particular the manual is here:
Personally I bought “Advanced Renderman” and “the renderman shading language guide” as well as a fair bit of reading other peoples shaders and notes online.
Wow Michael, those images look fantastic, they are the first “production” renders I have seen on this forum, I had almost lost hope about 3Delight for Blender because all that is posted are badly lit, non-GI test renders and a lot of complex code that the average human don’t have a clue how to read
@Michael W: Great to see! It’s good to see real work being done, and not just my rough tests
@rozmiarek: There’s a definitive reference to what all the non-shader settings do in the 3Delight user manual, you can get it as PDF or HTML from the website. But that’s quite detailed and specific, to learn how it all fits together in context, I’d recommend doing some general reading on renderman. The books Michael mentioned are quite good - I have both of them and I’ve seen quite a few copies of those on others’ desks at work.
As for the parameters of the default shaders, they’re just the default ones that come with 3Delight, and they’re really quite a mess. I think they’re mainly intended as examples and not for practical usage - most facilities will write their own shaders and completely ignore those built in ones. I still intend to write a set of nice consistent, usable default shaders to be included with this addon, after which those default 3Delight shaders can be disabled, but the major problem right now is lack of available time - I should be less busy towards the end of the year.
Does that explain why none of the default shaders create nice looking glass? Or at least I haven’t been able to. Perhaps glass needs a raytracer?
Those images are impressive Micheal W, showing off the great DOF and displacement I’m hoping to exploit from Matt’s 3Delight addon.
3Delight’s perfectly capable of raytracing, but I don’t know if any of the default shaders do it well. I’ve got a nice glass/water/dielectric shader at home, I’ll try and clean it up and post it on the weekend.
You can also do reflection/retraction using an environment map. If the map is generated from the object position it can work quite well, but won’t self reflect. (eg wing mirrors won’t show in bodywork.)
Again, no example shaders for this come with 3delight.
(I must try and hack in envmap generation
Is there anyway we could get the Moderators to relocate this thread to another forum like WIP or something. Just somewhere we can actually attach images and Blends?
When I see pasteall links I just think wow, those will be dead in three months. If it were a “true” attachment it would remain with the thread.