so your not doing mesh topo for the planking just UV mapping it over side
if you can find some good high res image for that
will keep following and see how it goes
good luck
happy bl
so your not doing mesh topo for the planking just UV mapping it over side
if you can find some good high res image for that
will keep following and see how it goes
good luck
happy bl
Mesh topo would be a last resort if I can’t get texturising to work, aye.
Progress log since last update:
Here’s a handful of images:
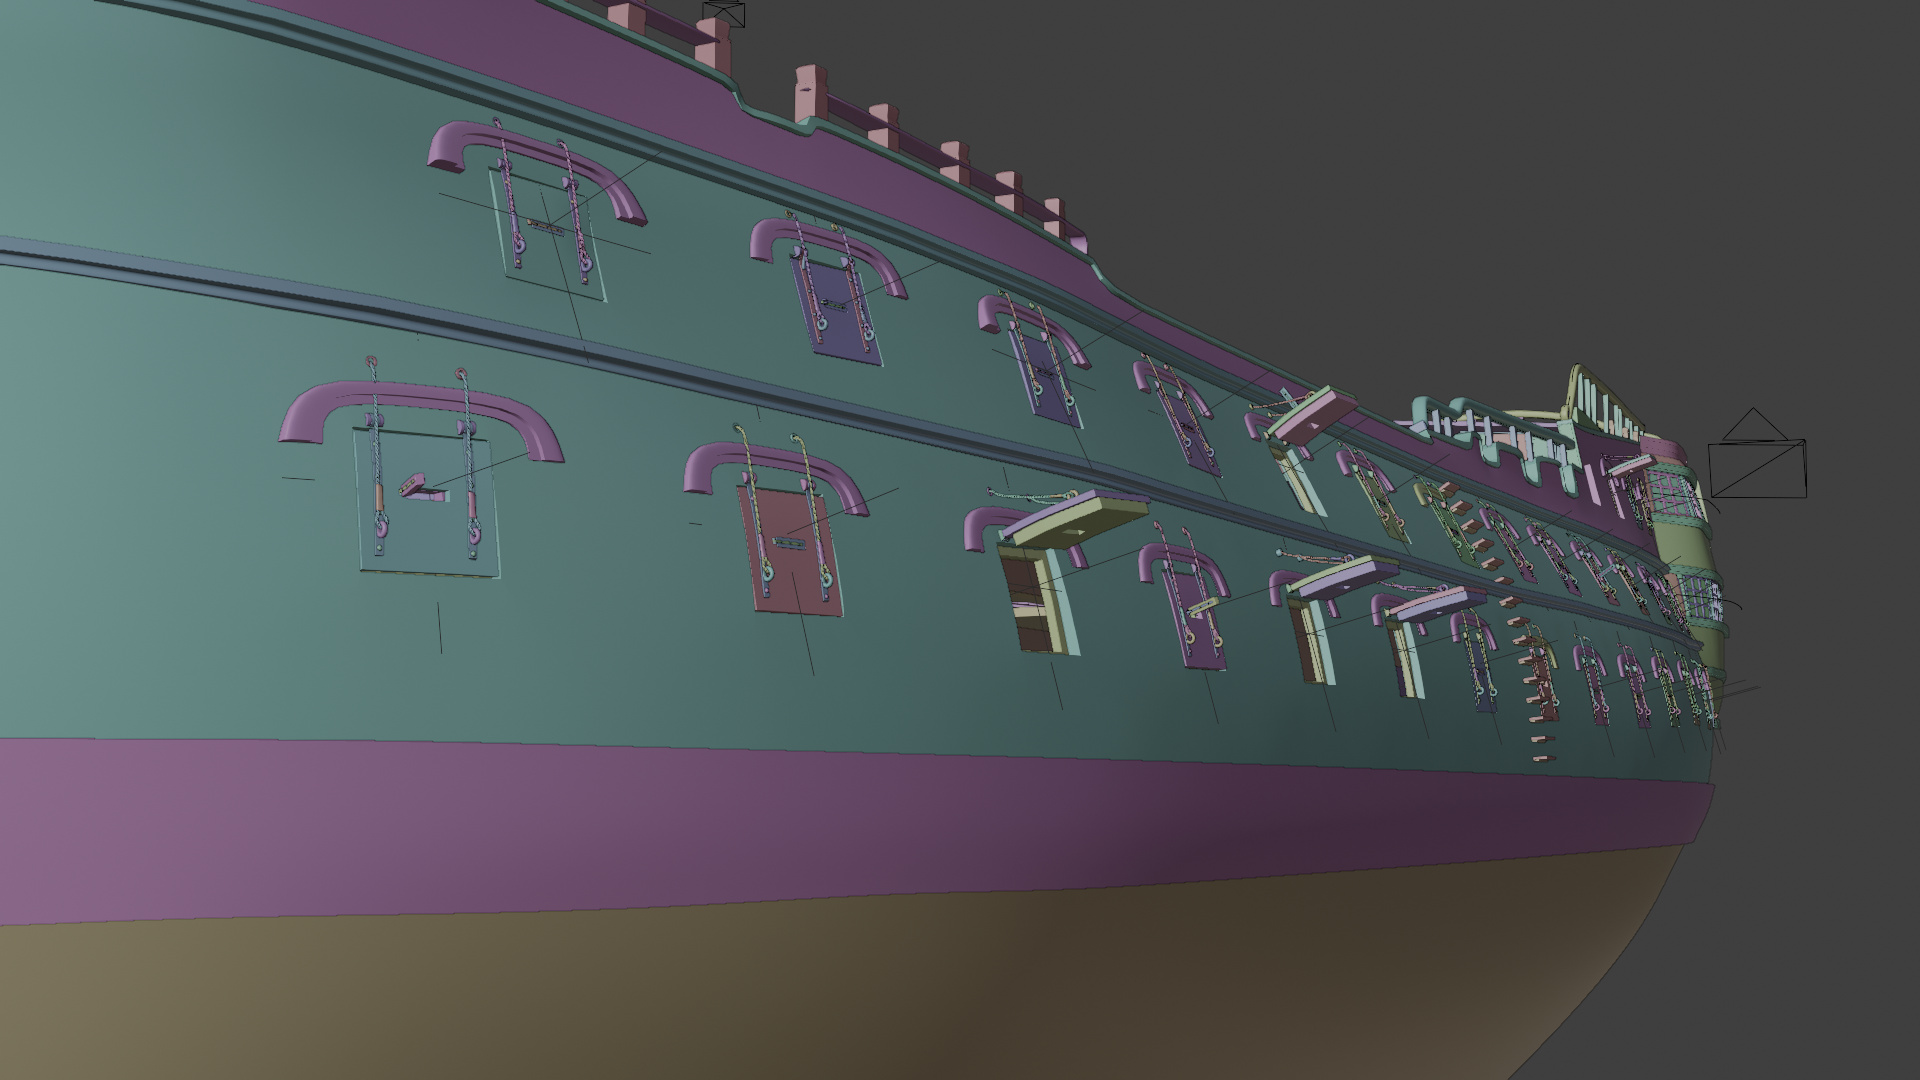
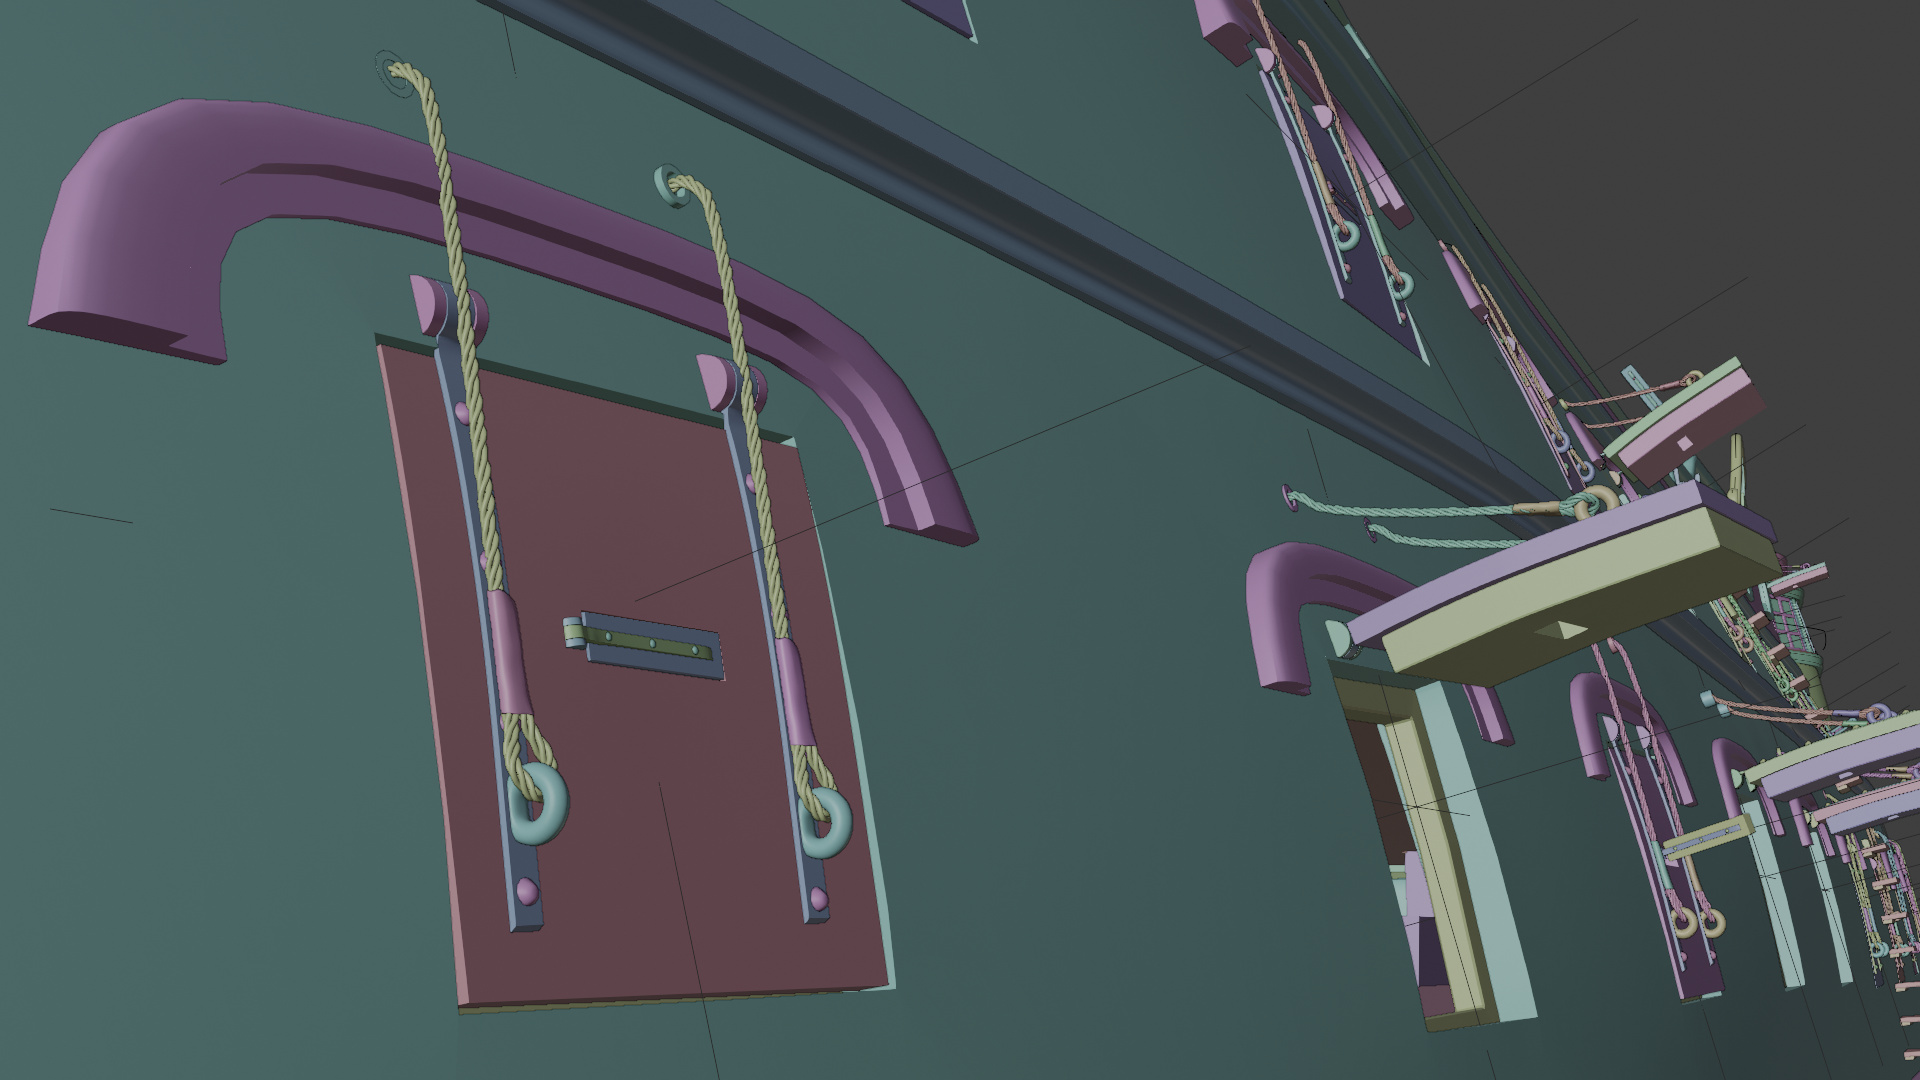
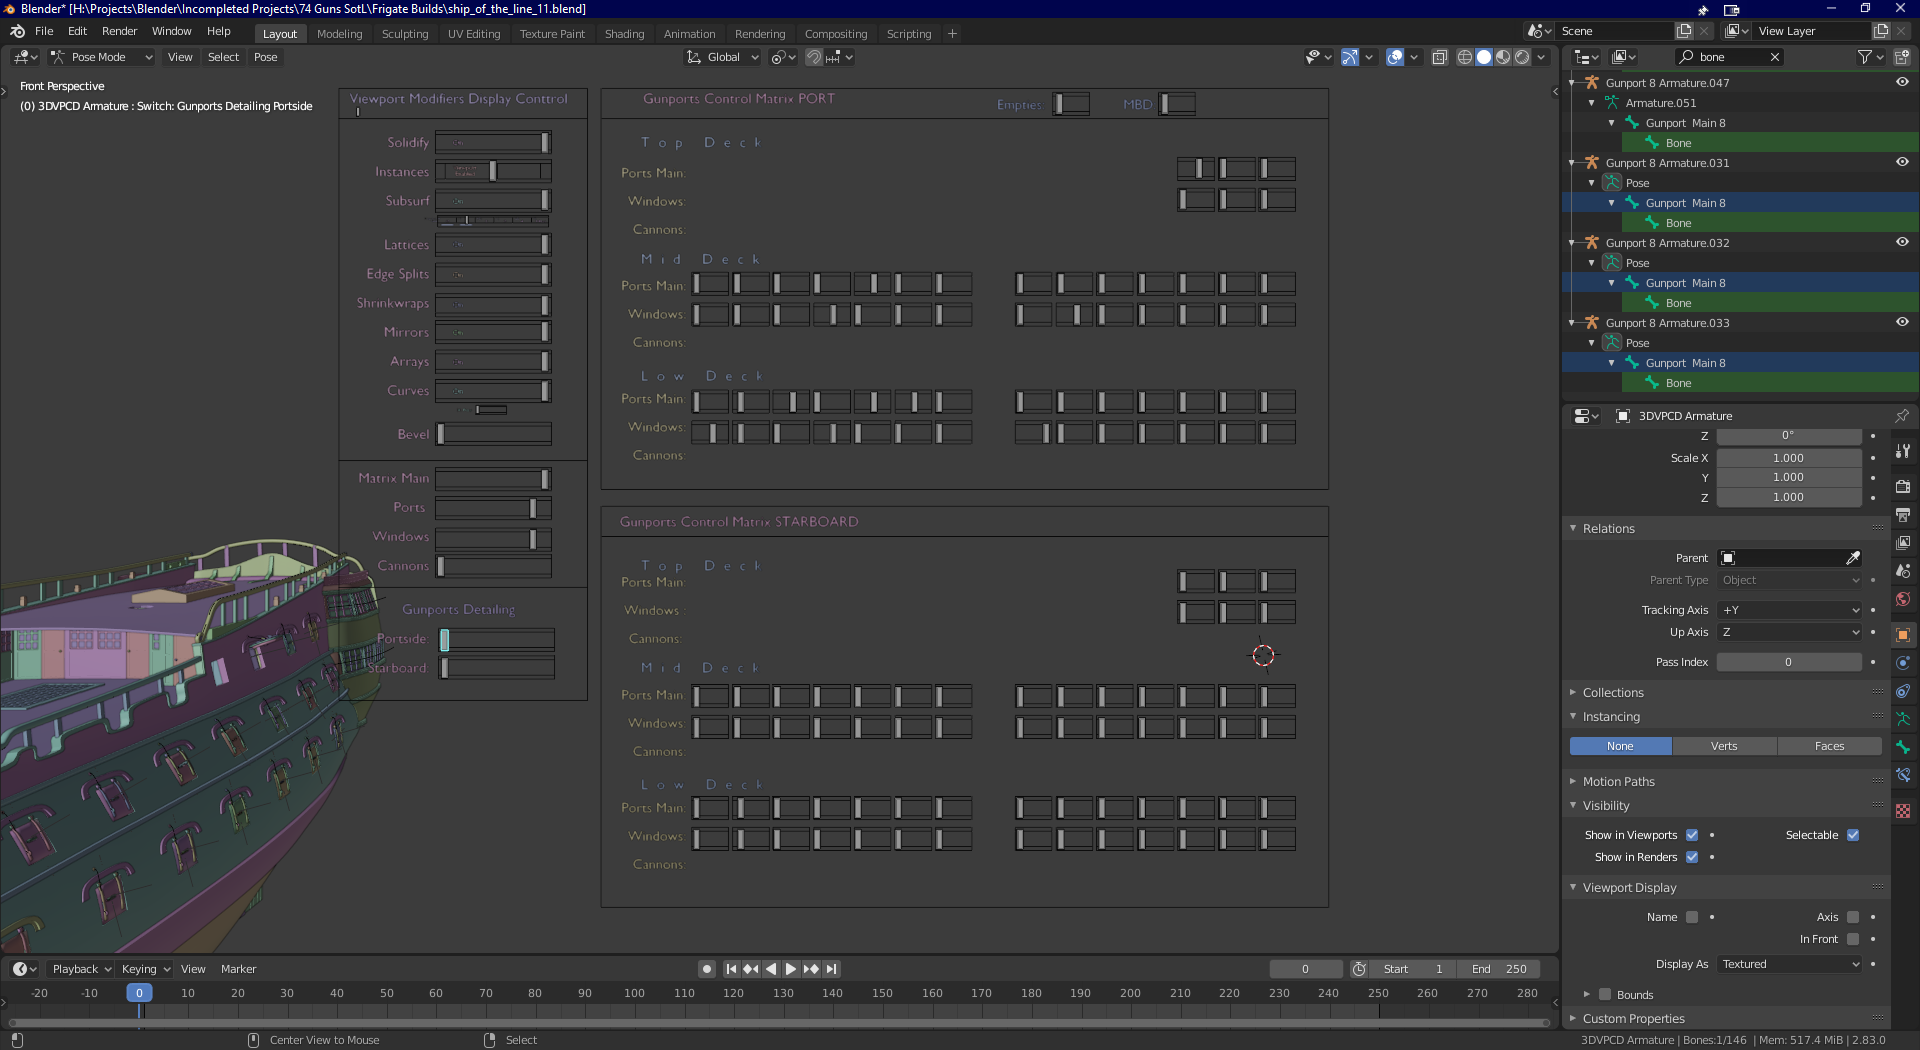
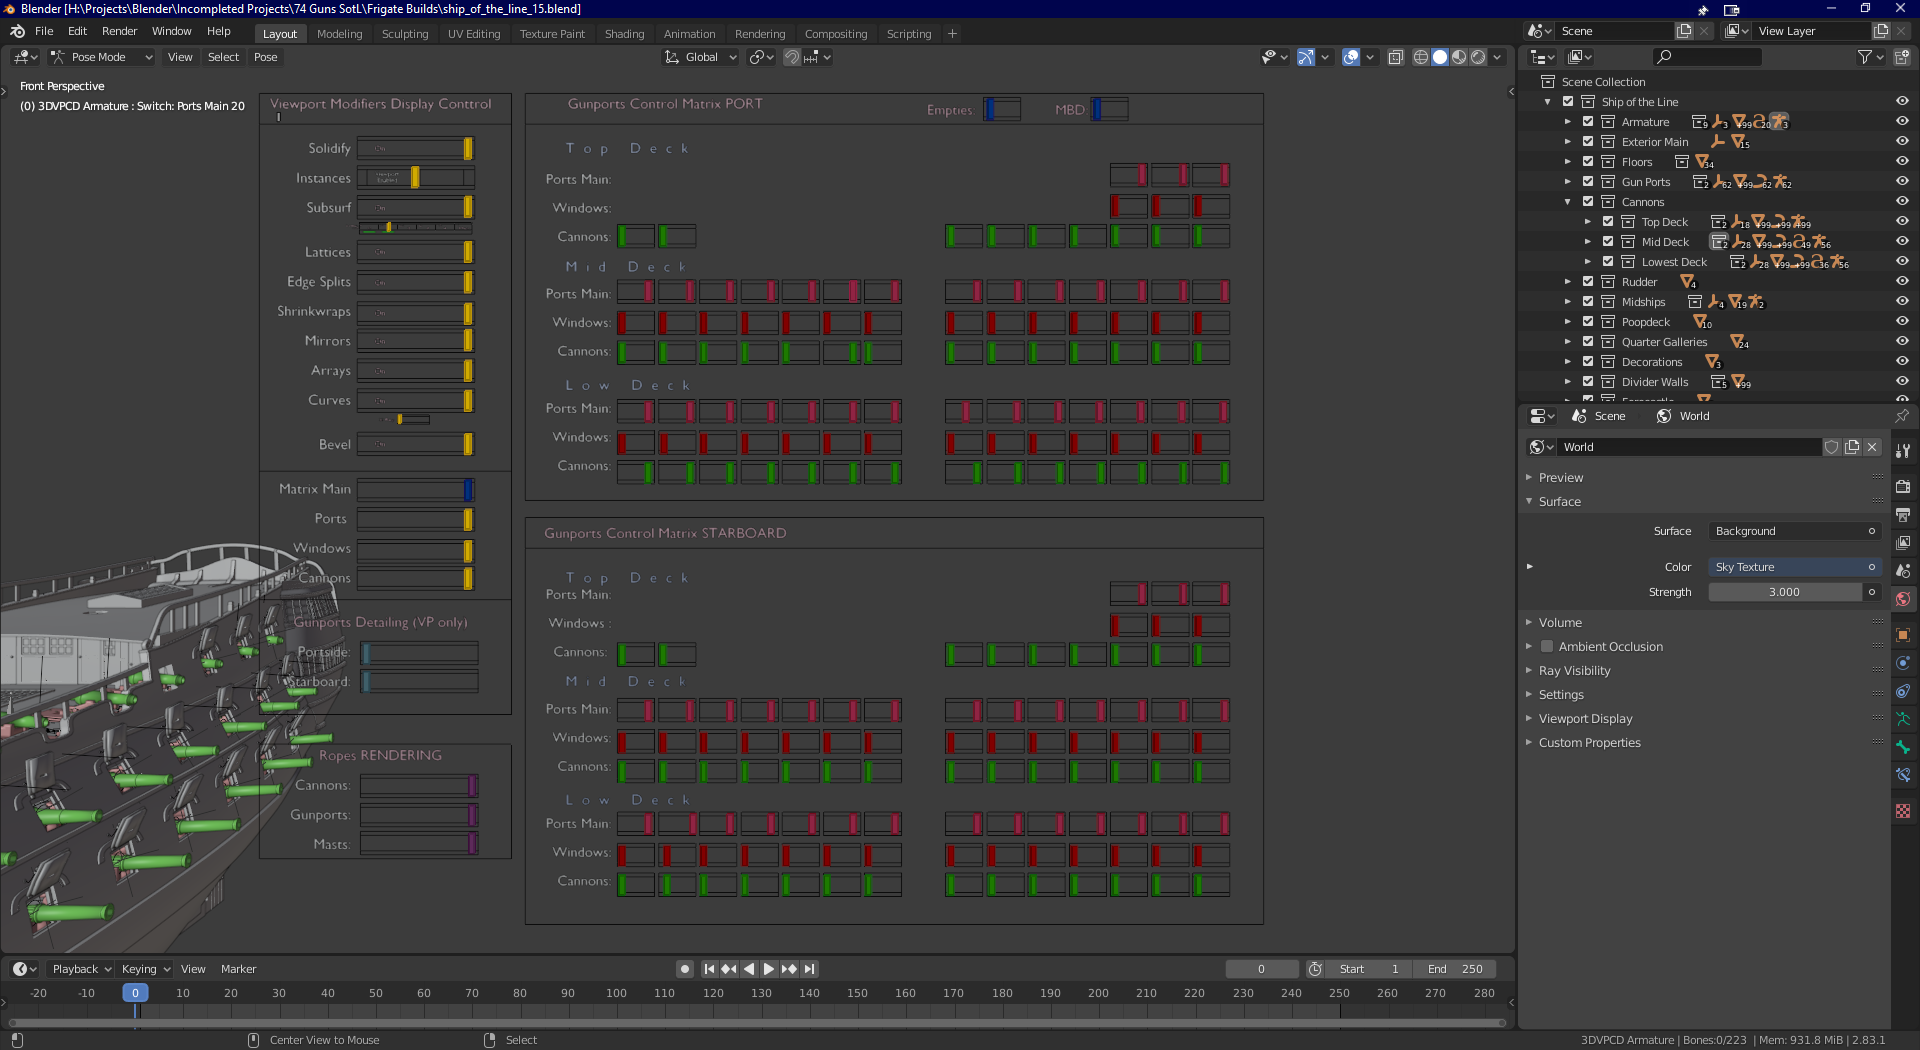
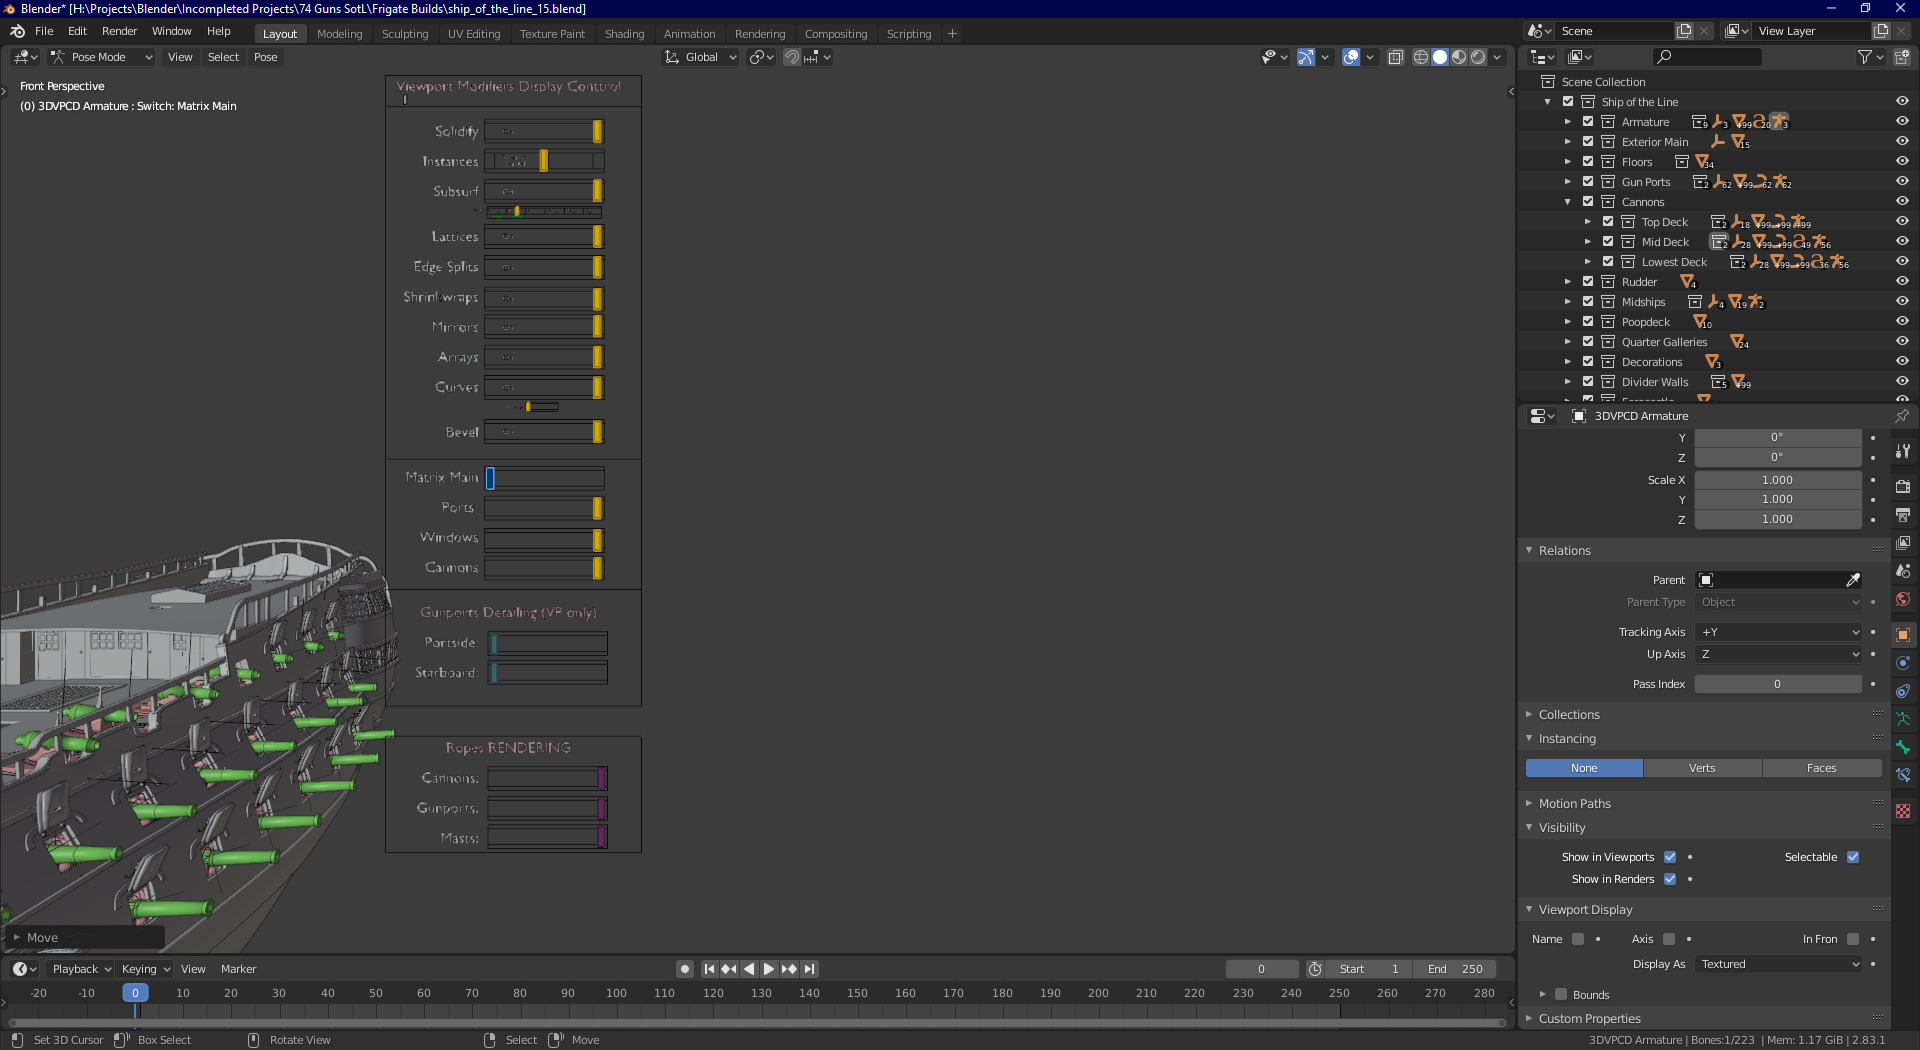
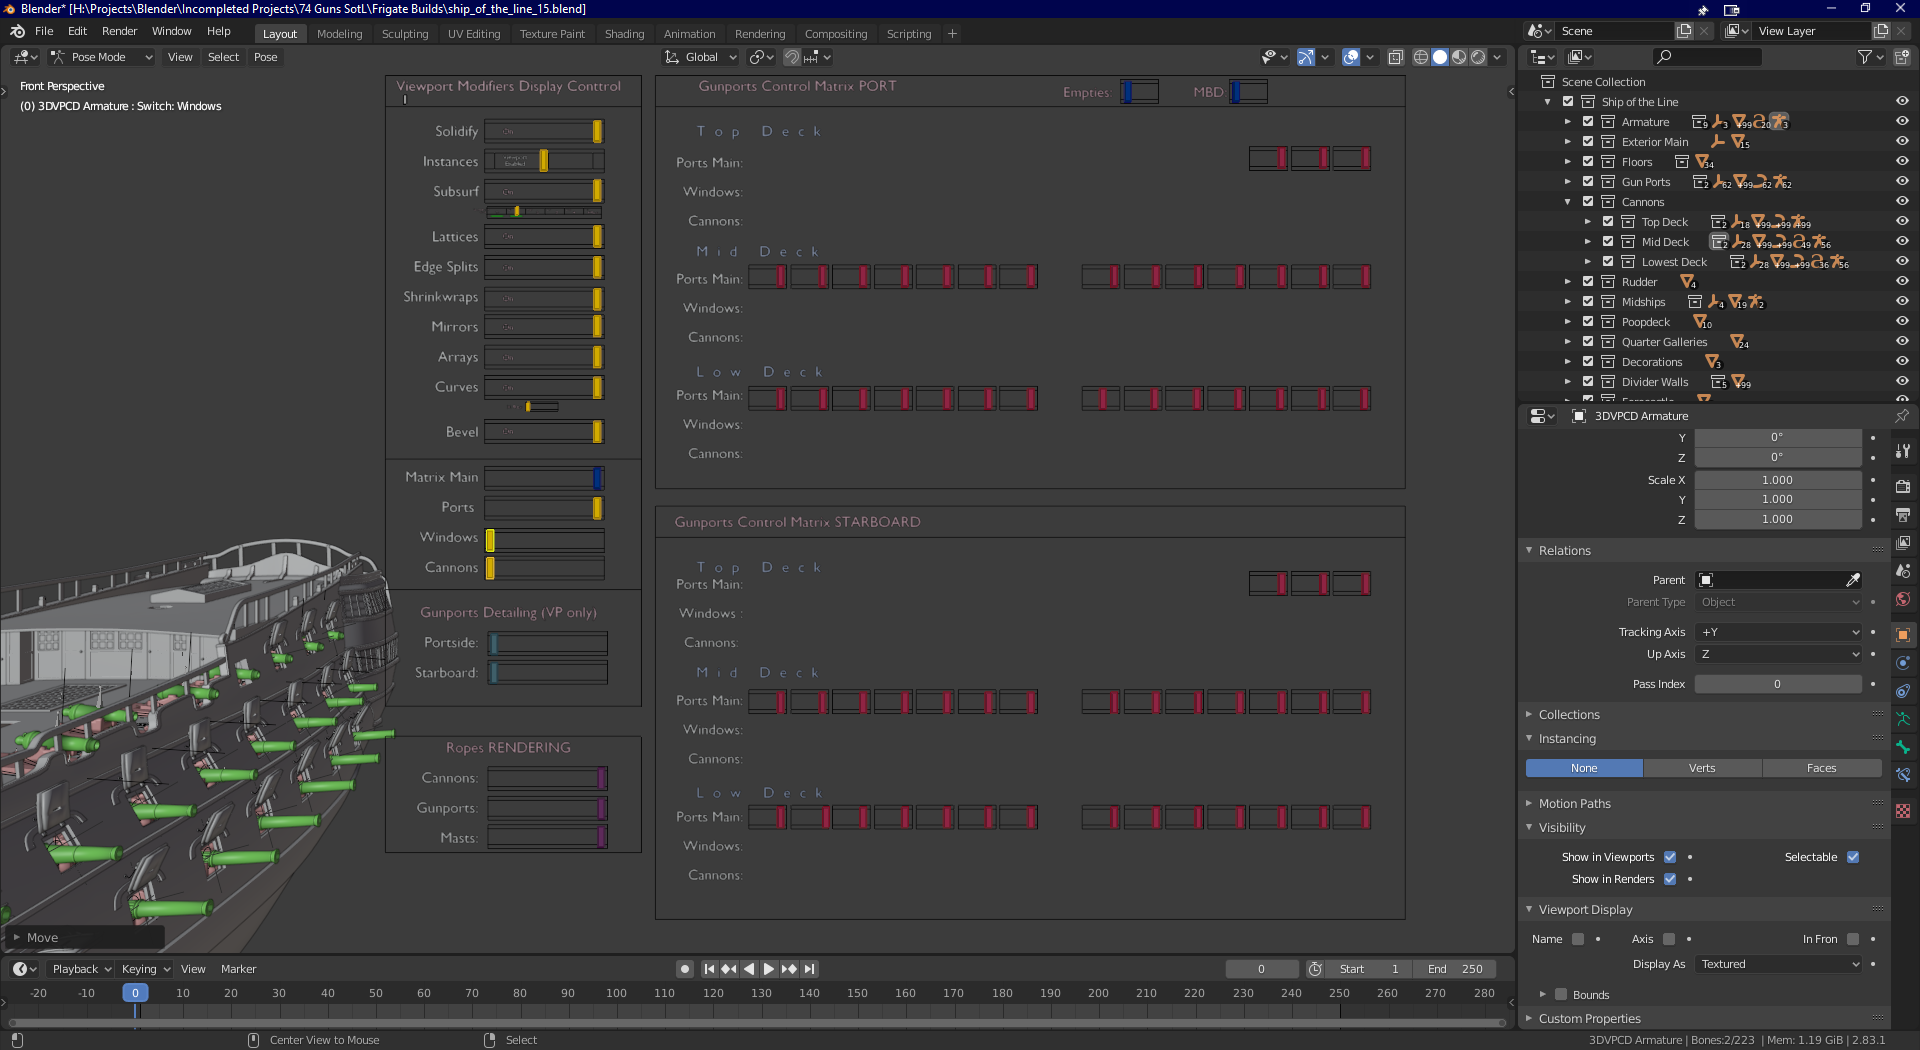
I don’t know if people are interested in seeing the rig part, but I’ve started on a ‘matrix’ which will allow an animator to control each gun-port individually, and (eventually) the cannons themselves - notaby whether they’re in a run-out or ‘loading’ status. It looks a little jarring but I’ve set it so you can enable and disable individual lines of switches (for example, if you want to see only the gun-port switches, you can disable the windows and cannons themselves).
If anyone wants to see more of this, I’ll add it to my list of things to update. I only mention it now cos that matrix took a lot of work to get right!
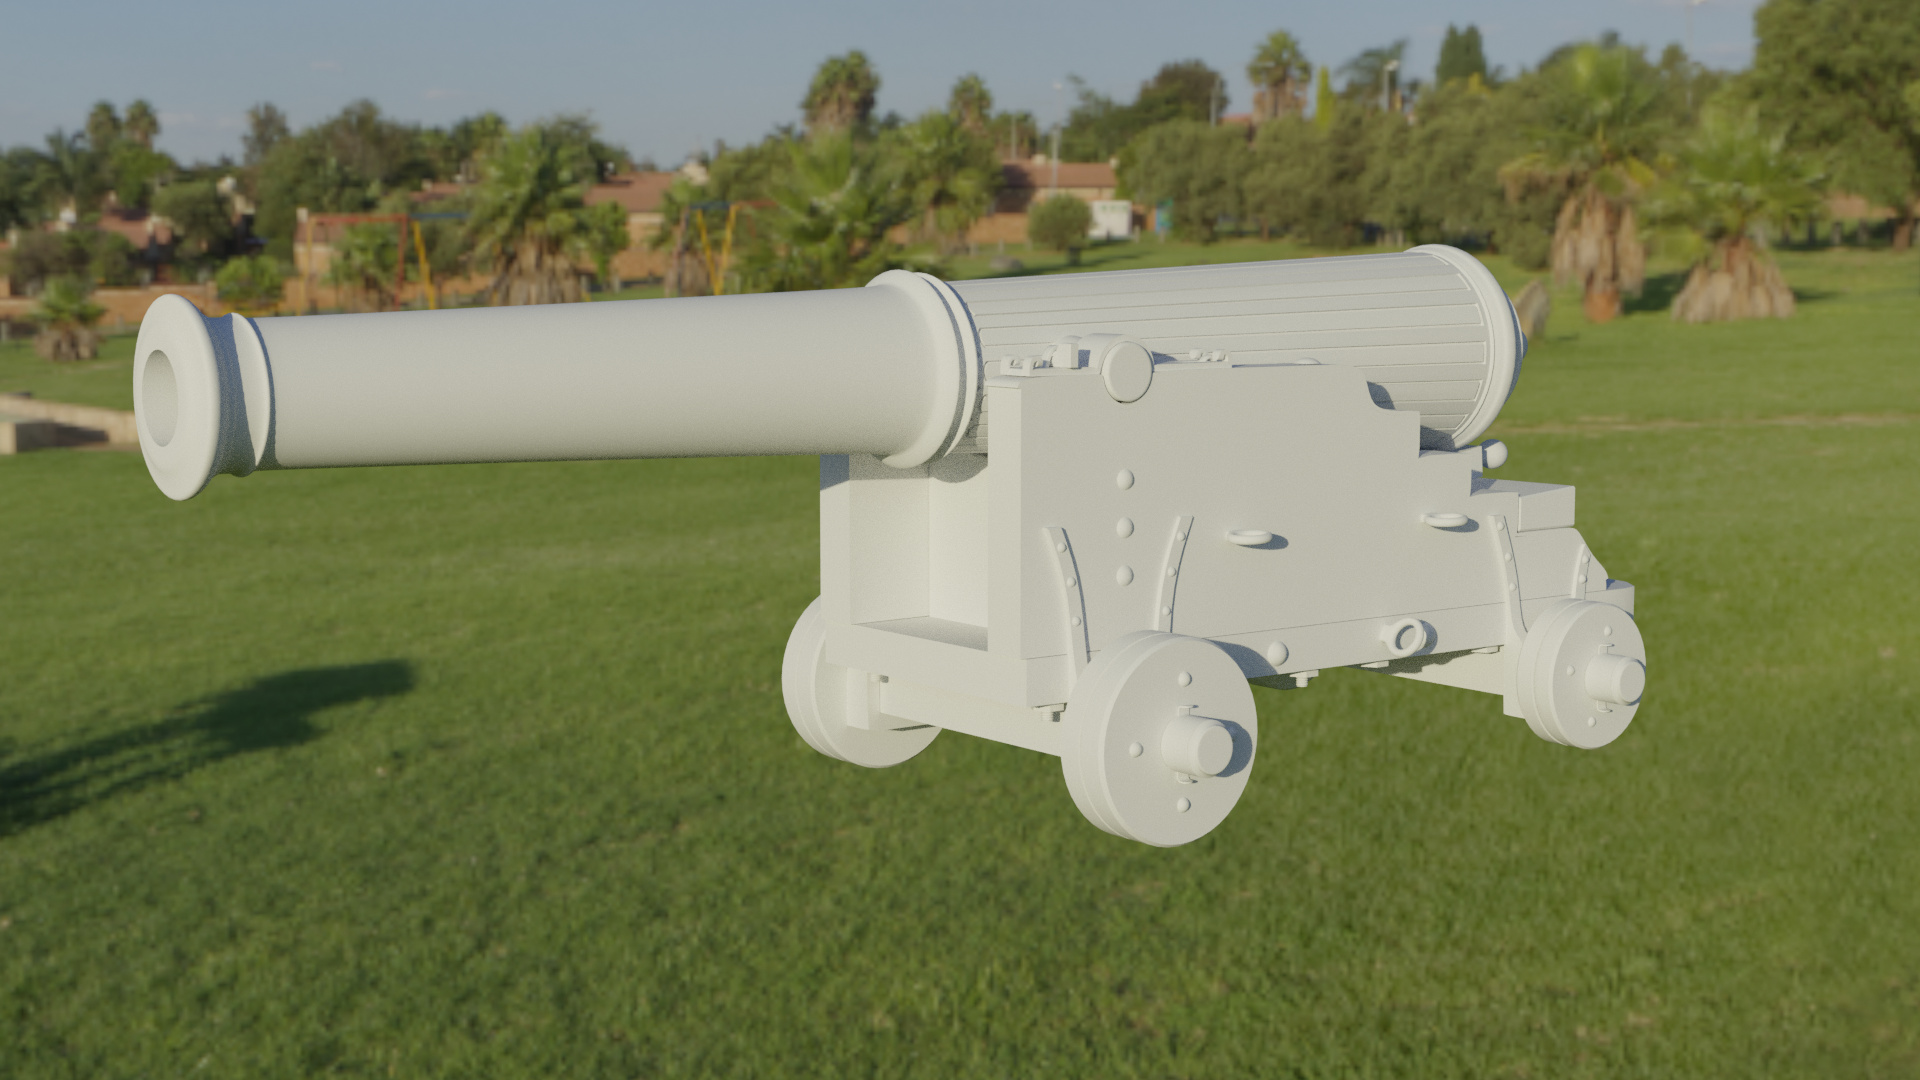
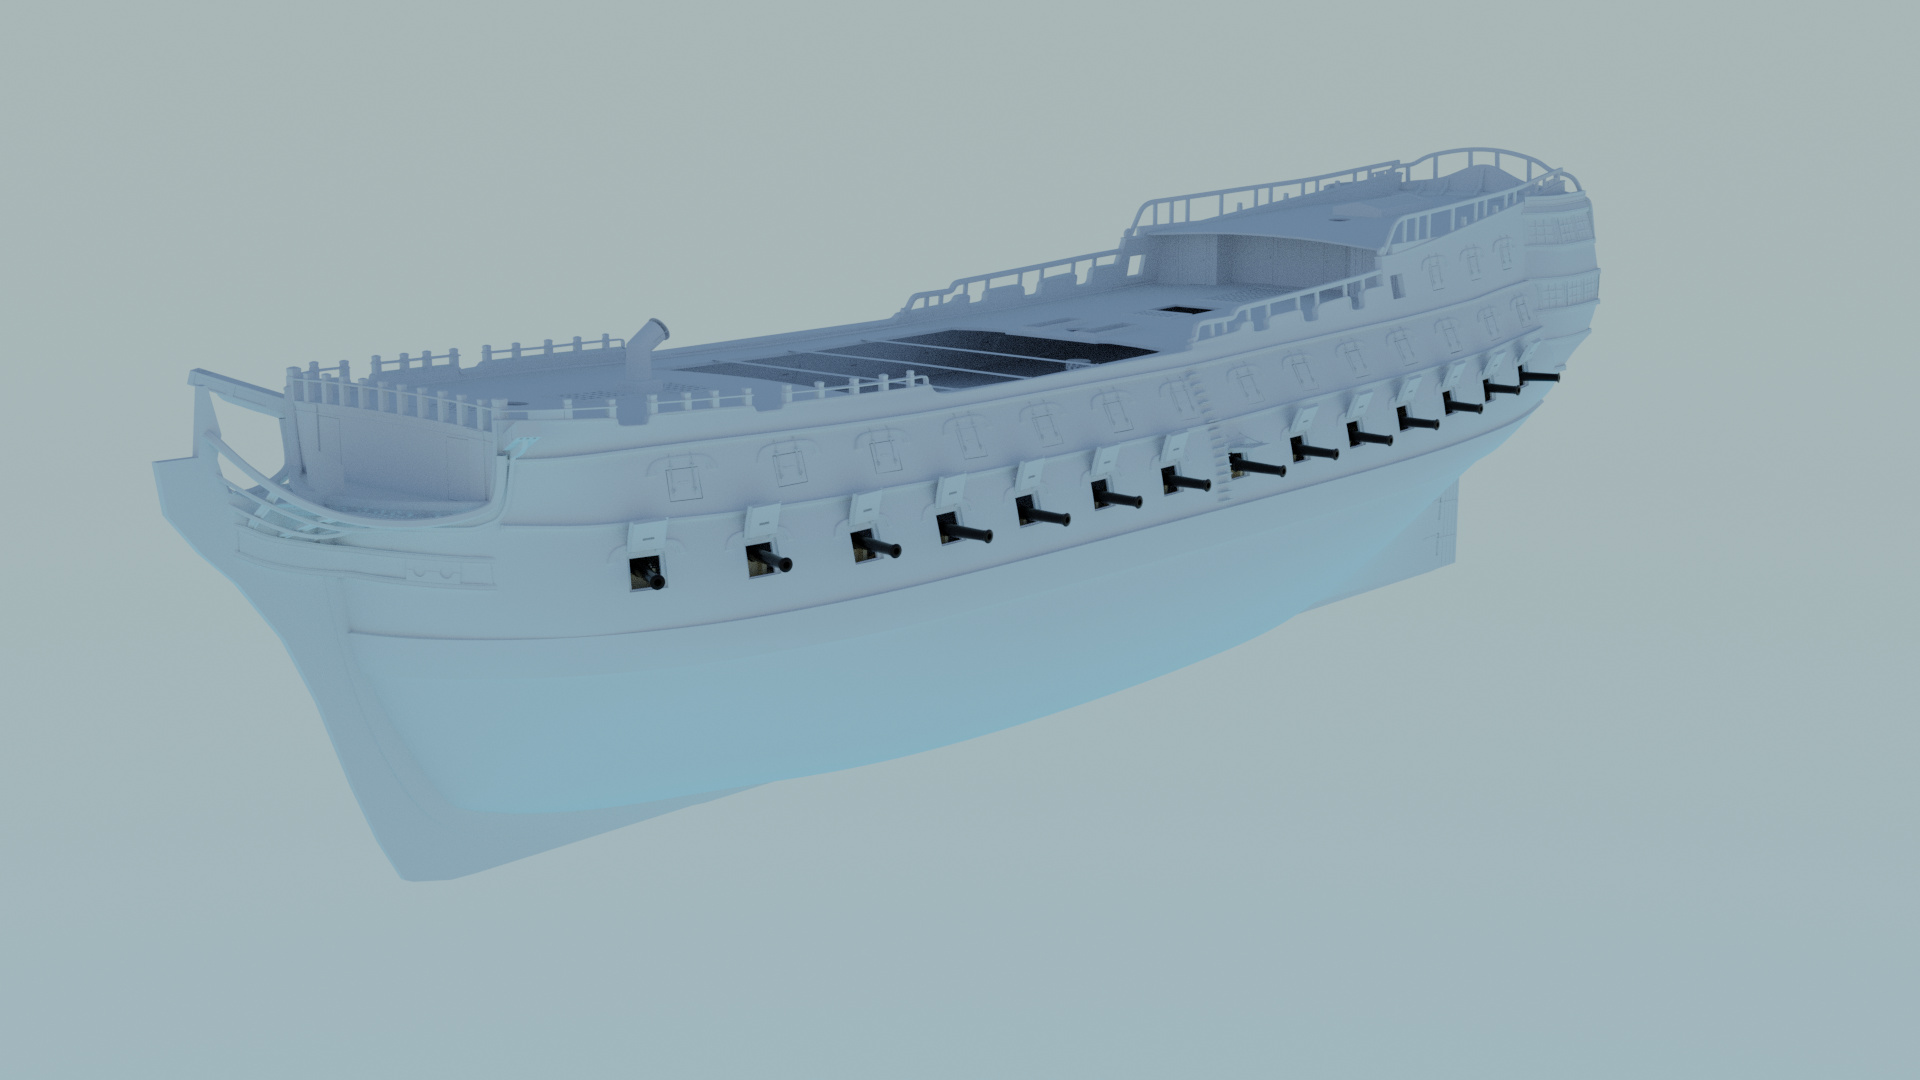
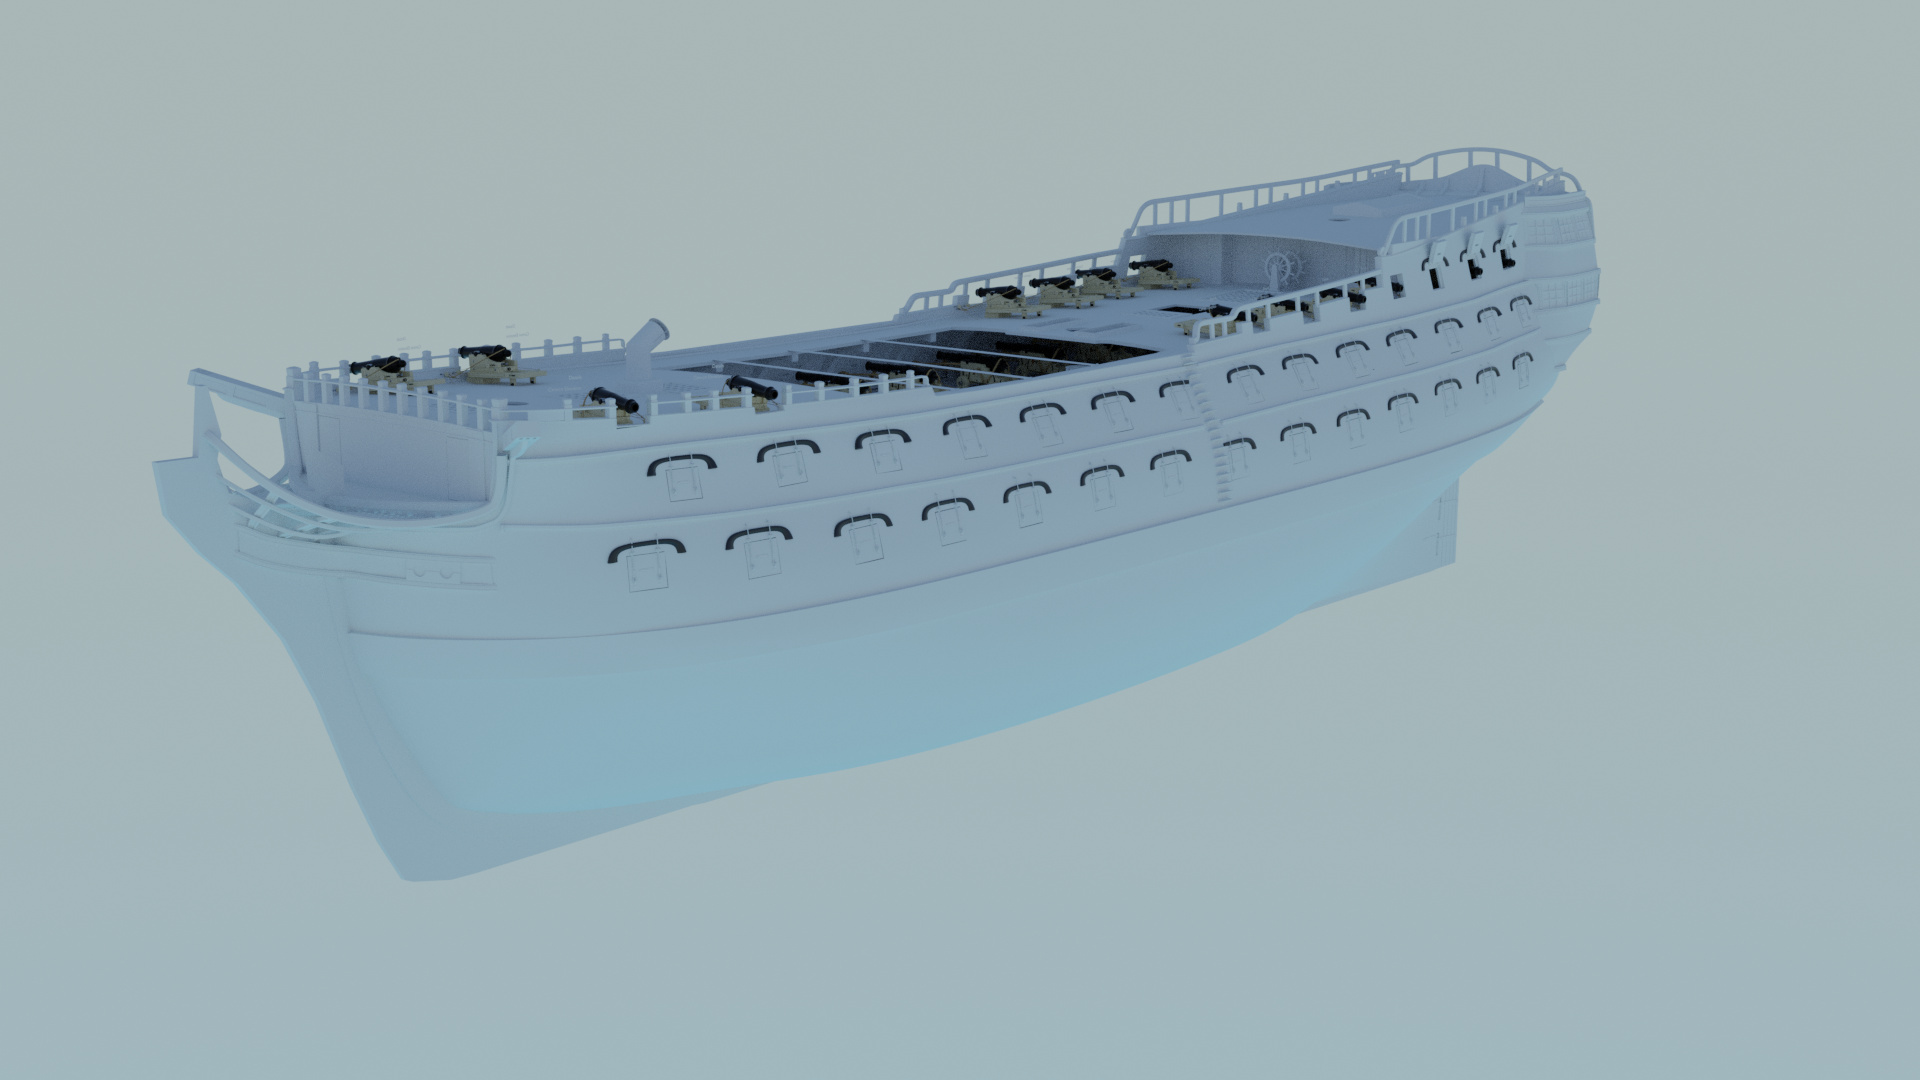
The beast!
I can’t wait till I color this thing in and fire her off!
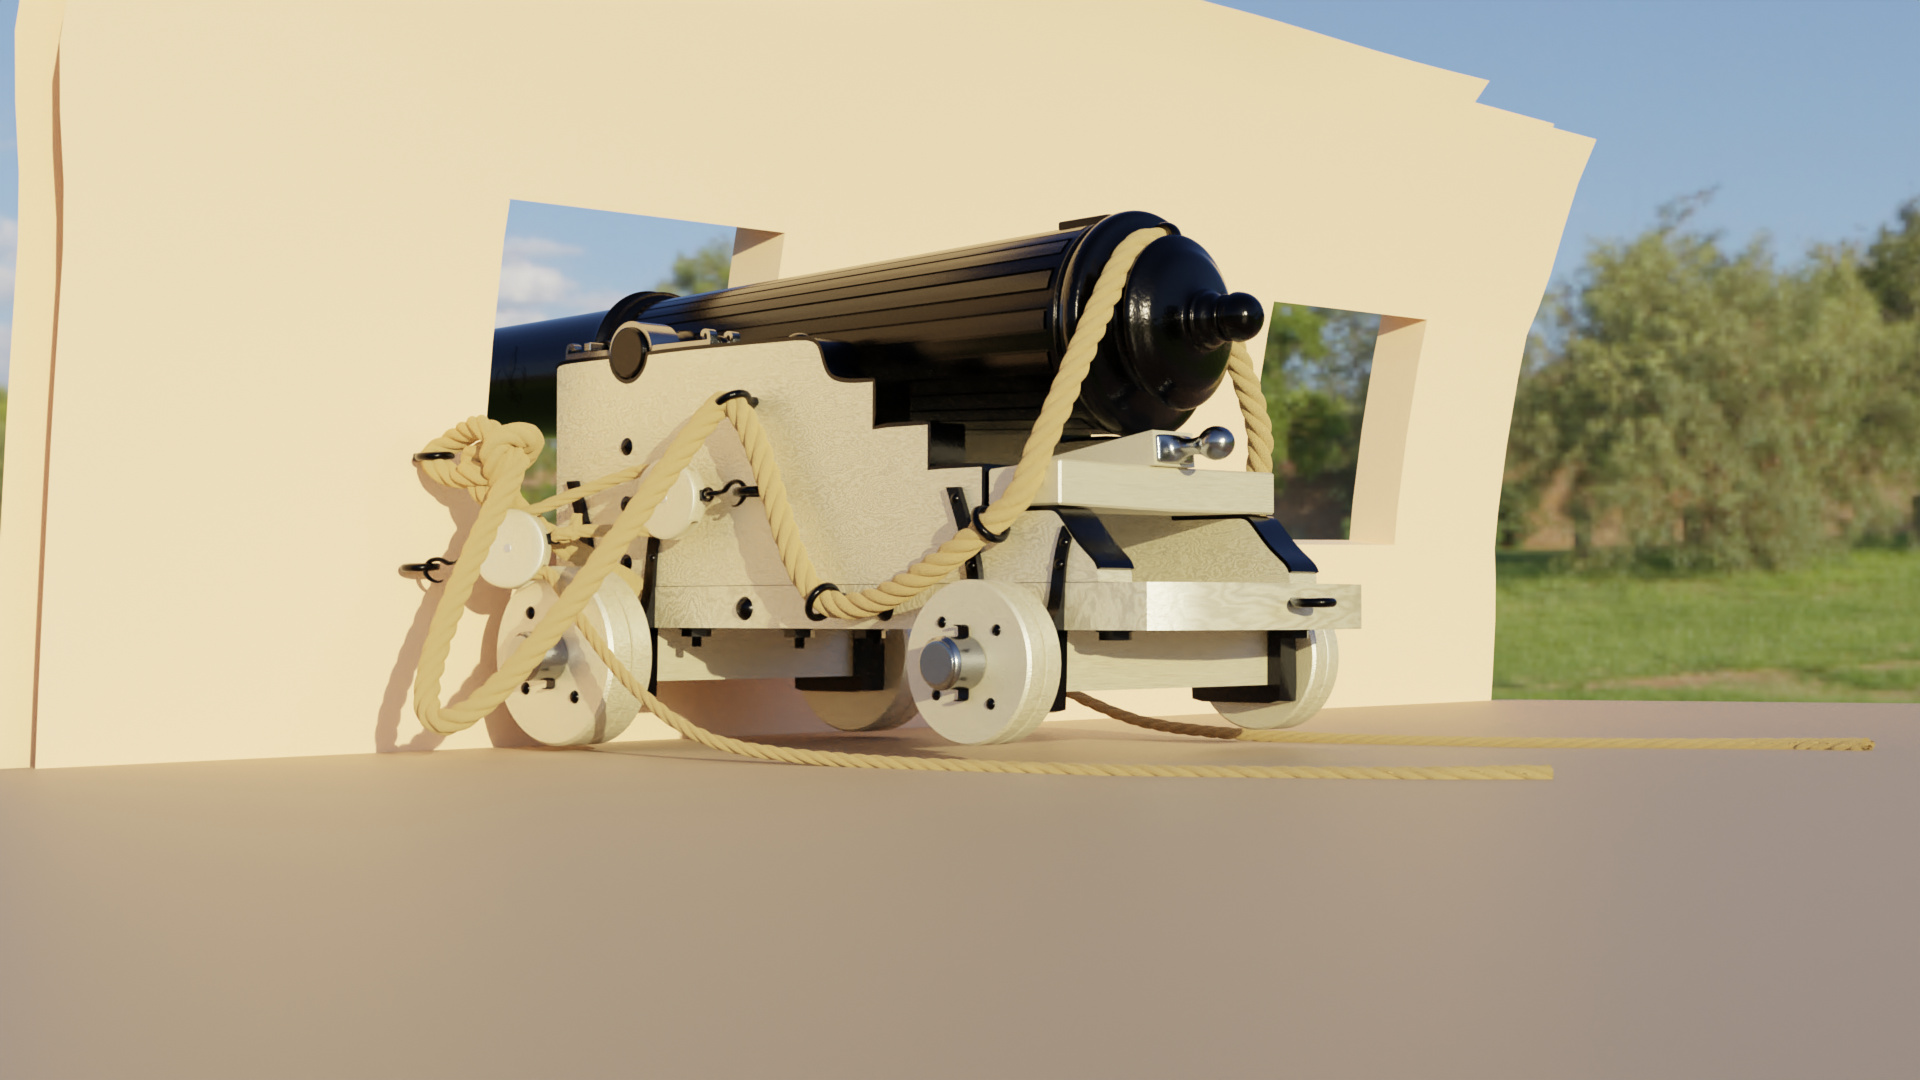
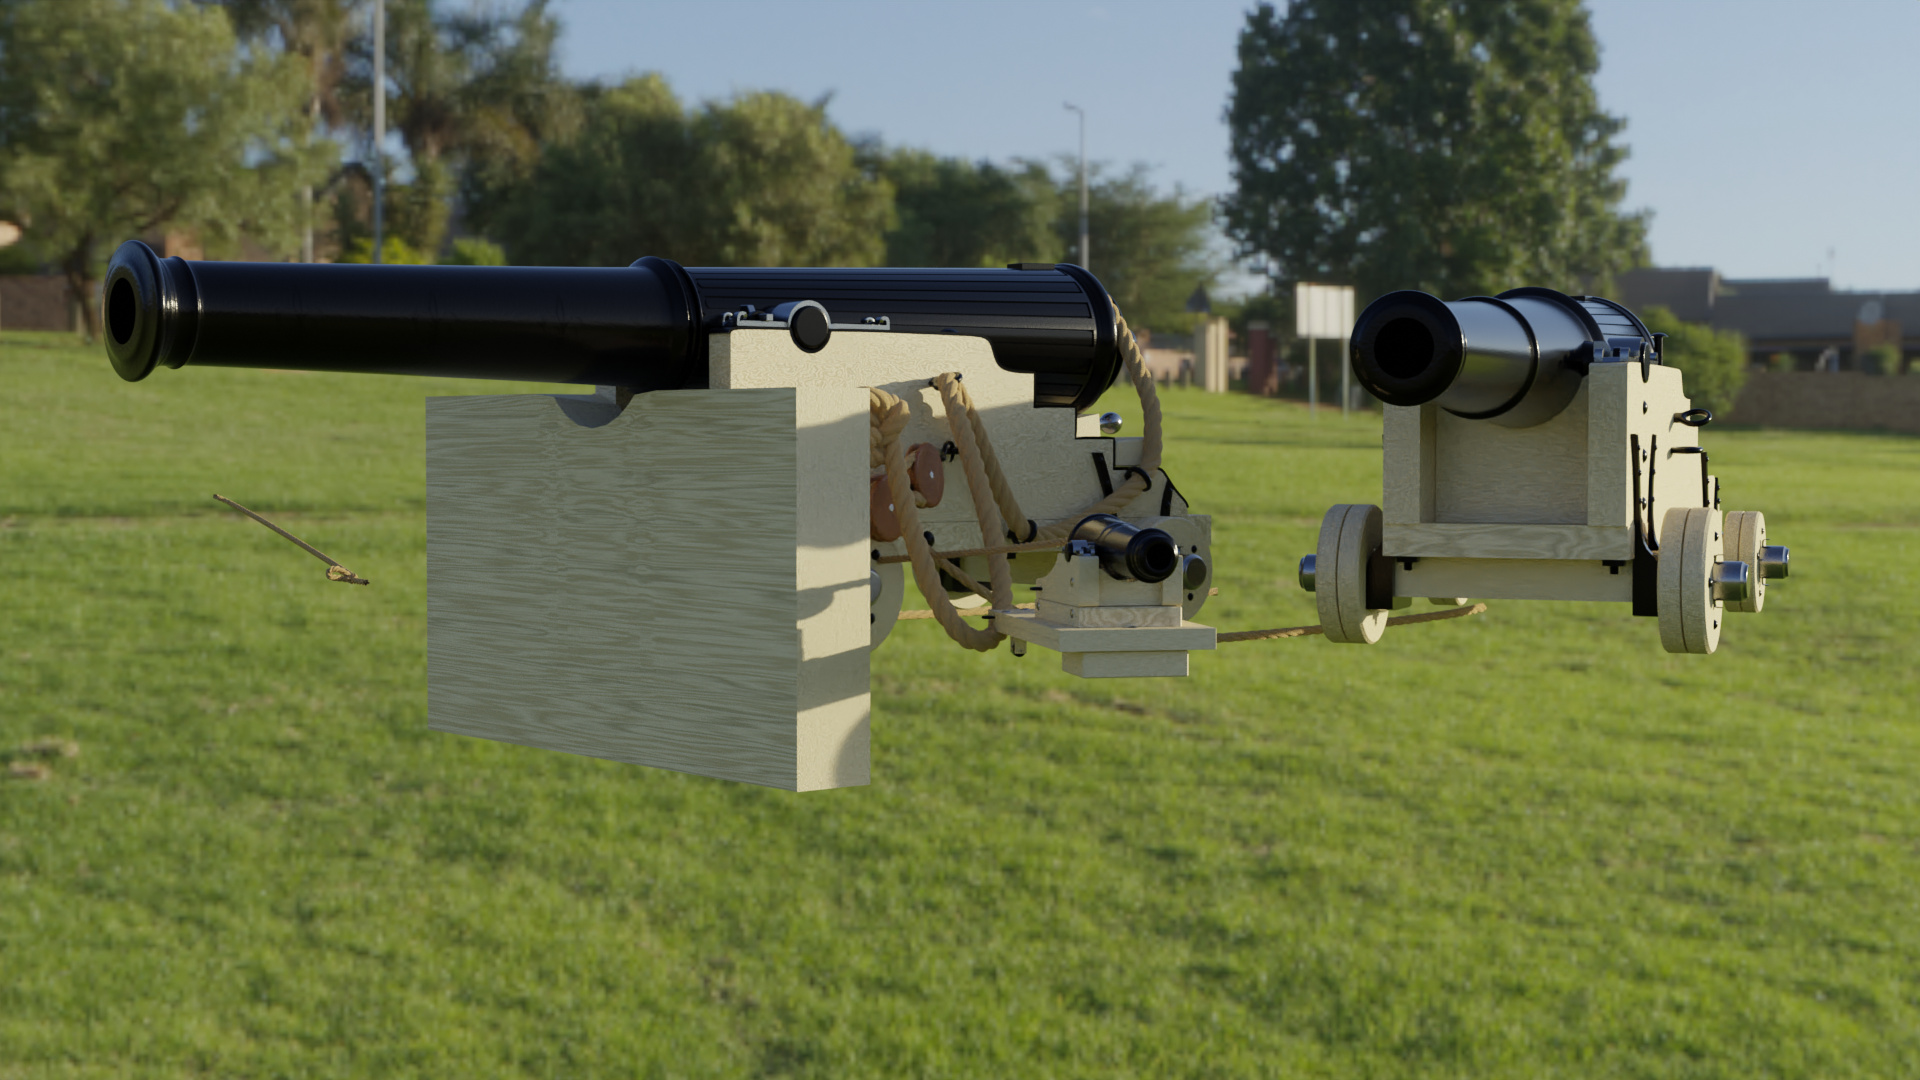
Want to model the tackle and ropes plus add a little more decoration on the front half of the barrel. If I add the wall hooks now, it’ll be easier to attach them to the wall on the ship.
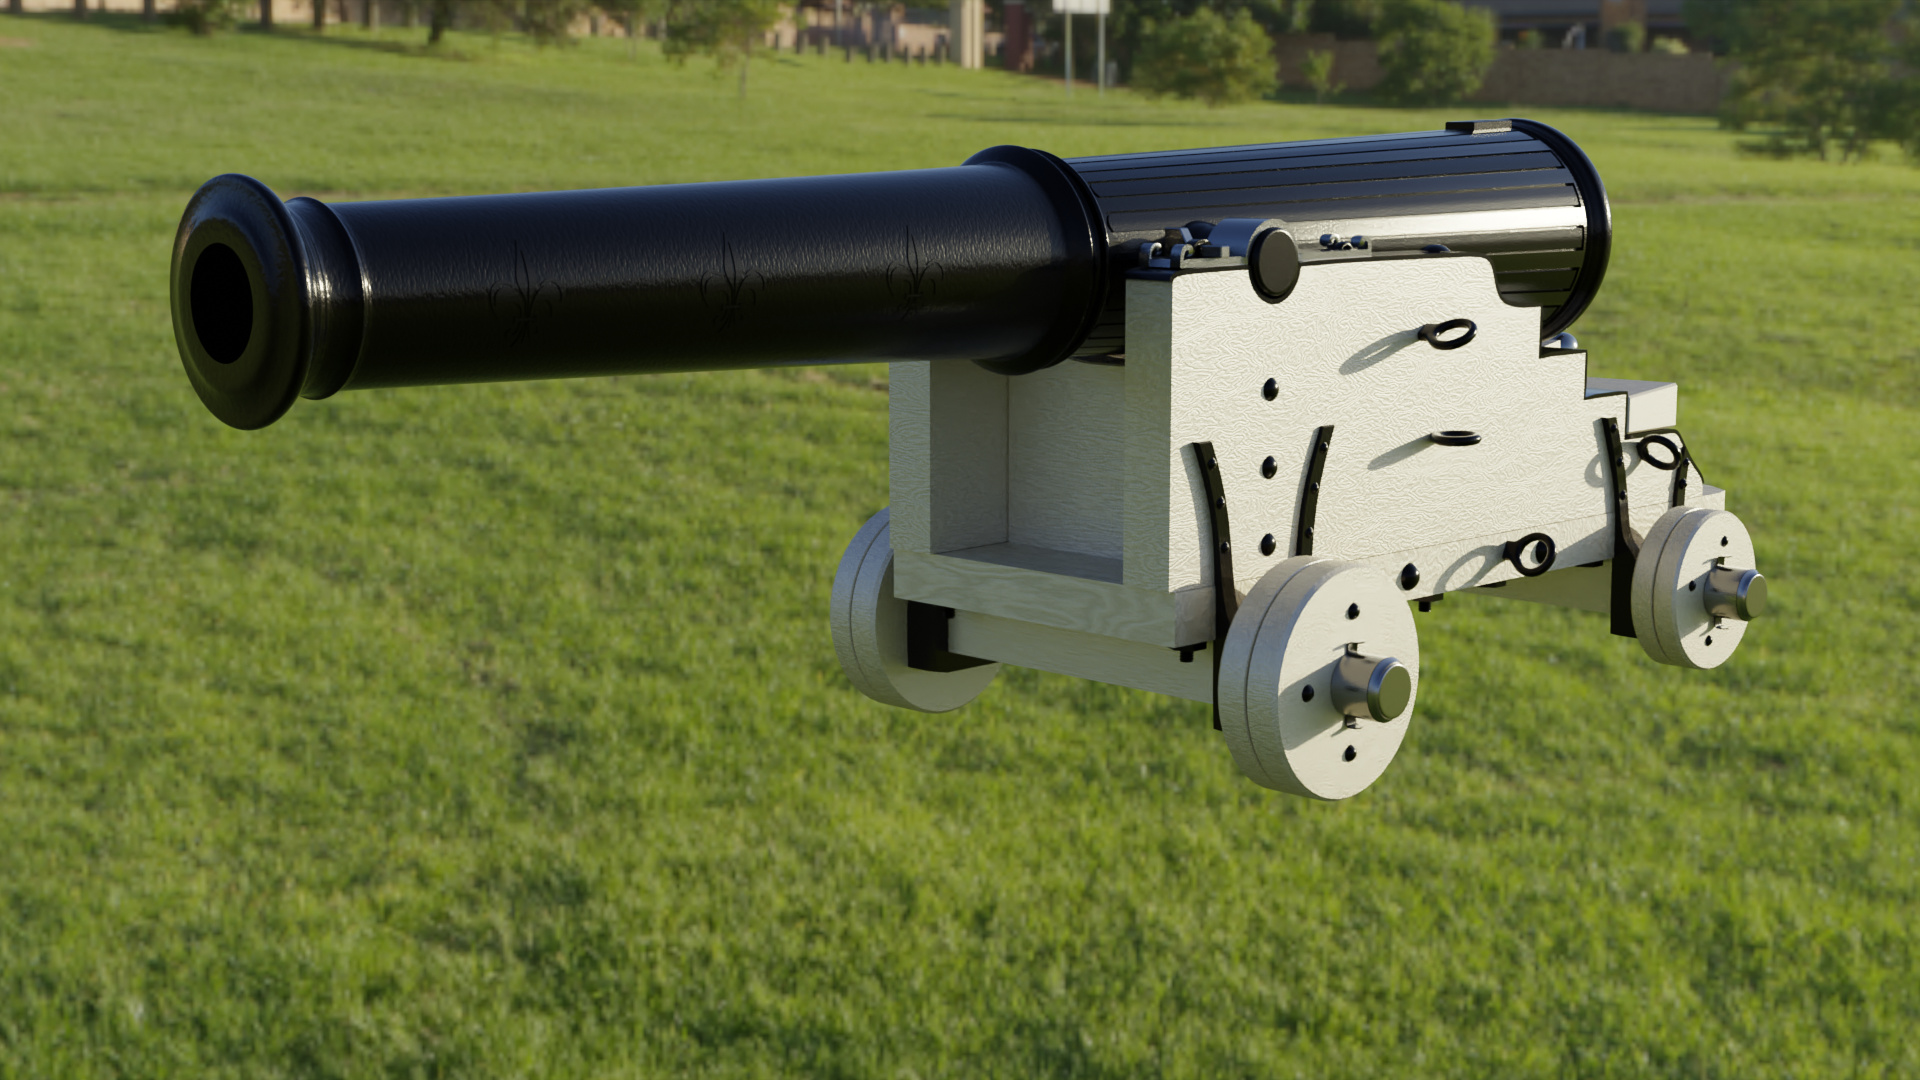
The beast has some color! I’m practically done now, I just need to do some finishing work on the rigging on the wheels (they’re always fun ![]() ) but for most intents and purposes, this cannon is now complete. The aim now is to downsize it a little for the middle deck, and then I’m debating between downsizing again or creating a dedicated carronade for the top deck. Can’t imagine it taking too long nevertheless.
) but for most intents and purposes, this cannon is now complete. The aim now is to downsize it a little for the middle deck, and then I’m debating between downsizing again or creating a dedicated carronade for the top deck. Can’t imagine it taking too long nevertheless.
The wall (and floor) in the above pictures are temporary. They’re cutouts from a section of the ship but they’re not intended to be used as a final render.
That tackle and the ropes should come in handy for the ship sails too!
A front shot sans the rigging and walls:
Okay, I have another project coming up so this might be the last update for a couple of weeks or so. I’m happy with my current progress! All cannons have been modelled and are ready to be sitted on-board, but my computer is starting to max out so I’m on the hunt for ways of finding ways to reduce RAM usage during rendering. The Blend file itself is over 70MB!
I do think them cannons look better up close and personal. They’ll probably feel better when I get some color on the ship itself (esp at ship-wide shots).
Now the cannons are out of the way practically, the plan is to now work on the stairways, bell, rear lanterns and maybe the anchor. I’ll want to model a little quarterboat (but these things had up to three onboard usually) so I’ll need to figure out how they were mounted on the ship. At that point I want to get on with trying to texture the ship (side walls, division walls and floors), and then work on the three masts. I also want to add some mini dividers that sit between the cannons, but that should be a five minute job - right now the space between the cannons look a little bare (noticable from the top-down view). Exact ordering for these tasks I’m not sure yet.
The three cannons side by side (the beast, the mamma cannon, and the baby):
If you have time, I would be interested in learning more about your control “matrix”. I’ve never done much with animation or rigging. It looks like it could be very useful for mechanical objects.
What do you mean by ‘rigging the modifiers’?
Essentially, I’ve set it so that I enable or disable the ‘viewport display’ of all object’s modifiers in the scene by one switch. So there’s a switch for all objects subsurfs, all objects bevels, all objects mirrors, etc. I do it mainly to prevent a sluggish workstation when building complex models like this one but it also comes in handy for wireframes.
If you want to see an example of it at work, I’ve done something similar on my bus model over at Blendswap, you can see it in action there. There’s also a demonstration for it on YouTube (timestamp: 22:38)
Either way, I hope this makes sense.
.
I’ll bear this in mind then when posting further updates; I’ll attempt to explain the rigging part as I go.
It makes perfect sense. Actually a great idea!
I like your bus, btw. I have one in the works but I got stuck with no good references for certain parts so I put it aside for now. I’ve started downloading your video to keep as a reference because it will probably be a big help and inspiration to continue. 7 hours is very long but that means it has a lot of information packed into it. I appreciate that! ![]()
to save space you could use group instancing
where you set some parts in other files
and upload as proxy in main file
What is this matrix thing ?
but on cycles 70 MB is not that much
i got Cycles file at 400 MB with 400 objects and around 2.5 millions verts
and it works fine but take time to render ~ 1 hour at low sample
but this might be a problem on EEVEE which might crash!
happy bl
Instancing is fantastic! The problem I’ve got though is I want to be able to animate the individual cannons in and out and I don’t think that’s possible with instances (or is it?) Each cannon has its own unique rig.
I might do a little more experimenting with instances and see if I can get something to work.
.
Okay, the matrix is simply a control panel for the gun-ports. There’s a switch for the port itself, a switch for the peeper windows, and theres be one for the cannons as well. I’ve put a video online here so you can see it in action:
Matrix Video
Each column controls its equivalent cannon.
When rendering, my RAM goes into overdrive though cos of the sheer number of vertices, mainly in the ropes. My computer is nearly a decade old (and even then the hardware isn’t exactly top-of-thel-line) so it’s struggling to keep up with what I’m throwing at it. I can’t wait till I can build a new PC!
For now I’m thinking of just disabling the ropes geometry and just using curves, looks a bit crap but at least I should be able to render out images.
my PC is about 5 years old and have only a very simple video card
but at level 4 for open cl i think
so up to now seems to work ok with Cycles
i’m also looking forward to get a new PC by end of this year if possible
you could find some rope with UV map instead should be lower verts!
i got some simple file for this with images
let me know if you want it - i can PM it
for the instances / proxy you should be able to move or rotate it
but cannot modif the data as such which is part of the original file
happy cl
Why not just texture the ropes?
it would be repeated anyway along the rope
i got one where it use a nice Un image of a rope
and use array on a curve
so it does repeat well along the rope
not that difficult to do i guess
happy cl
Nah, you’re both right. I might just wind up switching out the poly version and use a UV map to create a rope. I wanted to try and avoid image textures if I could and rely on procedural (I want to really start studying materials), but some things are just inevitable haha!
I feel like I should be able to instance the gun-ports, and then lock the bones of the rope to the instancing faces, but then that kind of defeats the point of using instances in the first place.
For the short-term I’m just gonna disable the cannons inside the ship when they’re not visible, seems to help matters!
I need a little more time before coming back to this project anyway, just working on a couple of other things first.
A minor update for this project:
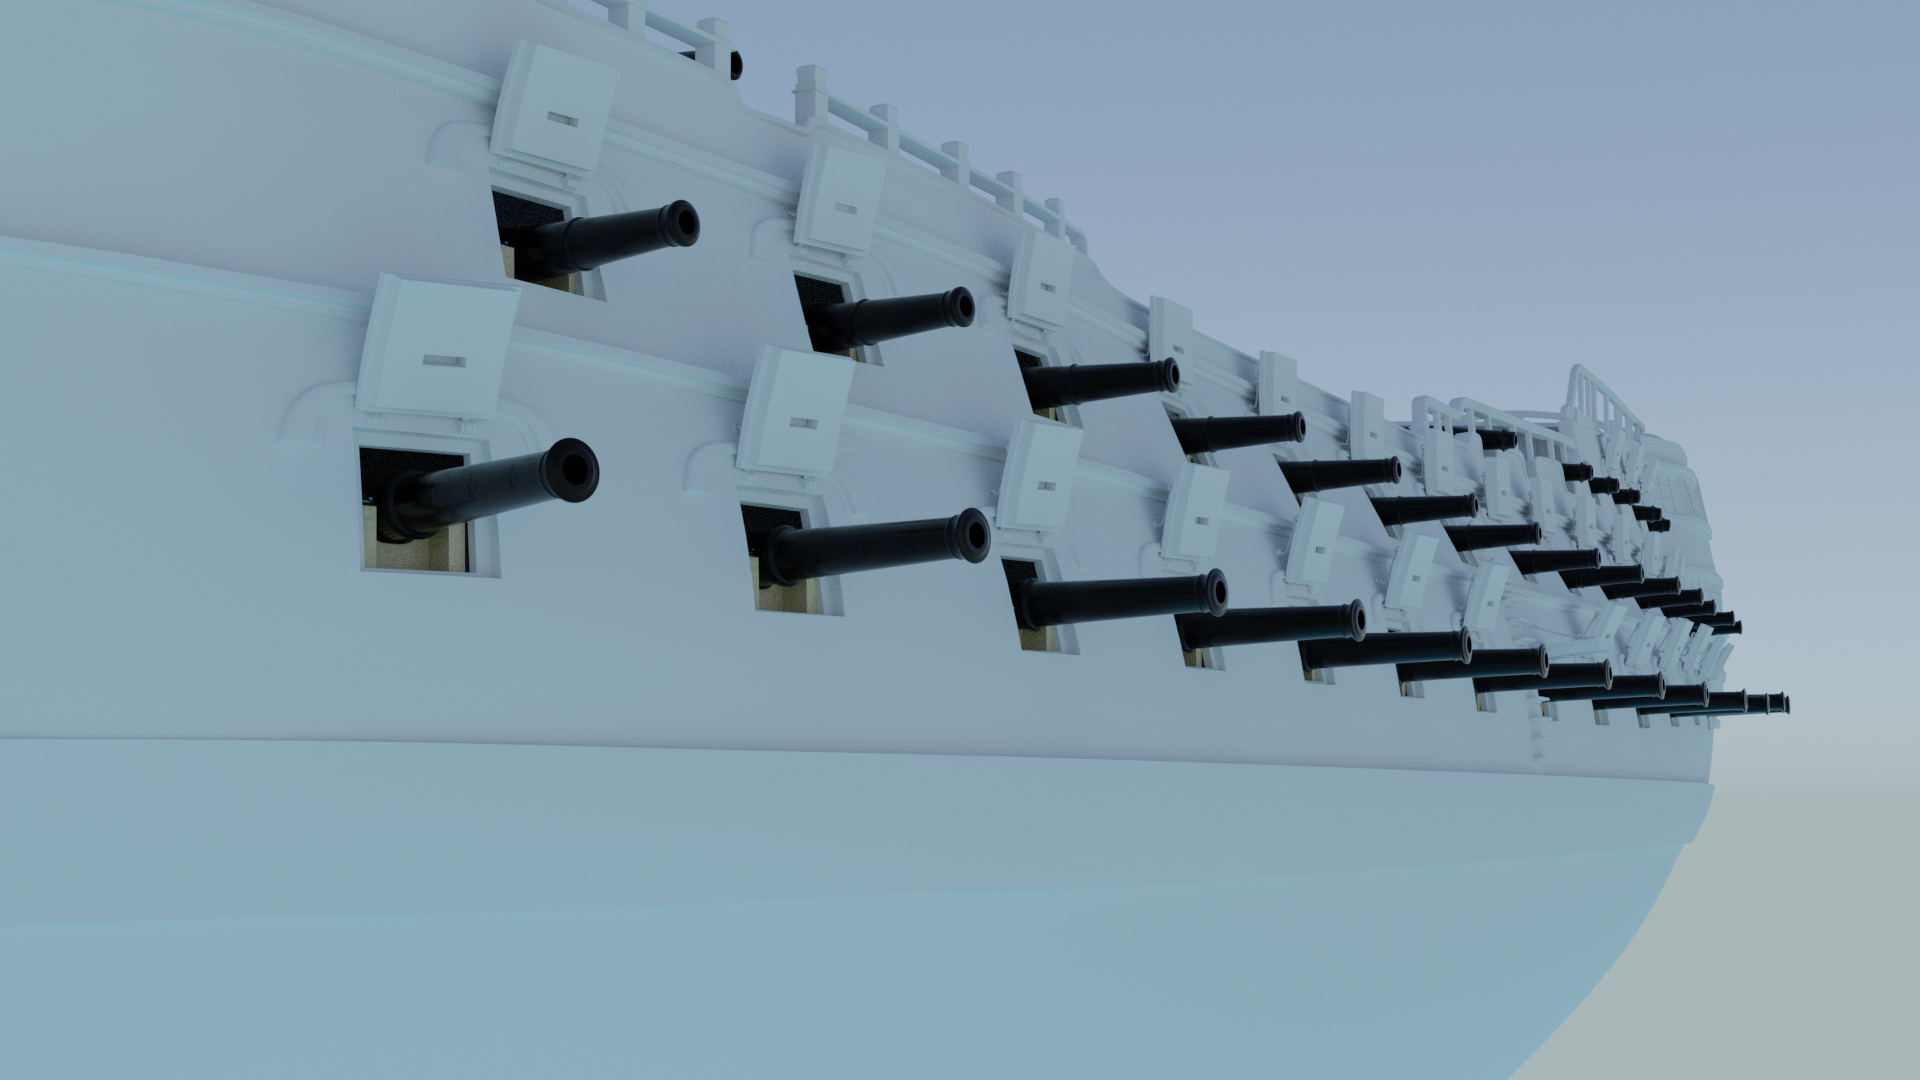
I’ve installed the cannons for the middle and top decks (though top deck cannons might require additional work.)
No major other developments at this time.
I’ve updated the matrix today so that each bone has a dedicated color. It’s a lot easier to see what switch does what and it’s not a great mass of white now.
Color scheme:
One of the things I want to do is start Python scripting so I can look into ways of turning these rigs into better UI (instead of relying on bones and objects.) For now it’s the best I’ve got. That said, I don’t think this matrix will expand that much more for the rest of this model - one exception maybe the sails when I get them on (I want to be able to control the swinging motion of the sails if possible, reposition them.)
The ‘matrix main’ switch hides and shows the entire matrix on the right hand side there. If it’s set to zero, the whole matrix hides. Example:
I hope this answers any questions people may have regarding the matrix / rigging of this vessel to date. I’m open to any more or specific ones.
A few updates:
I realised at some point that I had subsurfed the ropes to a level two for rendernig! ![]()
![]()
![]() That was a huge contributing factor to the max-out and even crashes! I’m still thinking about using the methods you guys have posted where I substitute it for a mesh (and have even created a rope ready for it) but for now it seems to work okay. What I have now works, but for any close up still shots I’ll add any subsurfs as and when.
That was a huge contributing factor to the max-out and even crashes! I’m still thinking about using the methods you guys have posted where I substitute it for a mesh (and have even created a rope ready for it) but for now it seems to work okay. What I have now works, but for any close up still shots I’ll add any subsurfs as and when.
I’ve had to sort out the curves of the ‘carronades’ on the top deck. Doing that I also added a gun elevation control (just for these, I don’t have the patience to re-install all the other guns on the lower decks - I’ve lost count of the amount of times I’ve done it now!) I’ve had to install elevation controls with the carronades as they were clipping the gun-ports at the back when run-out (you can even see one with the image below.) It breaks up the monotony a little as well anyway.
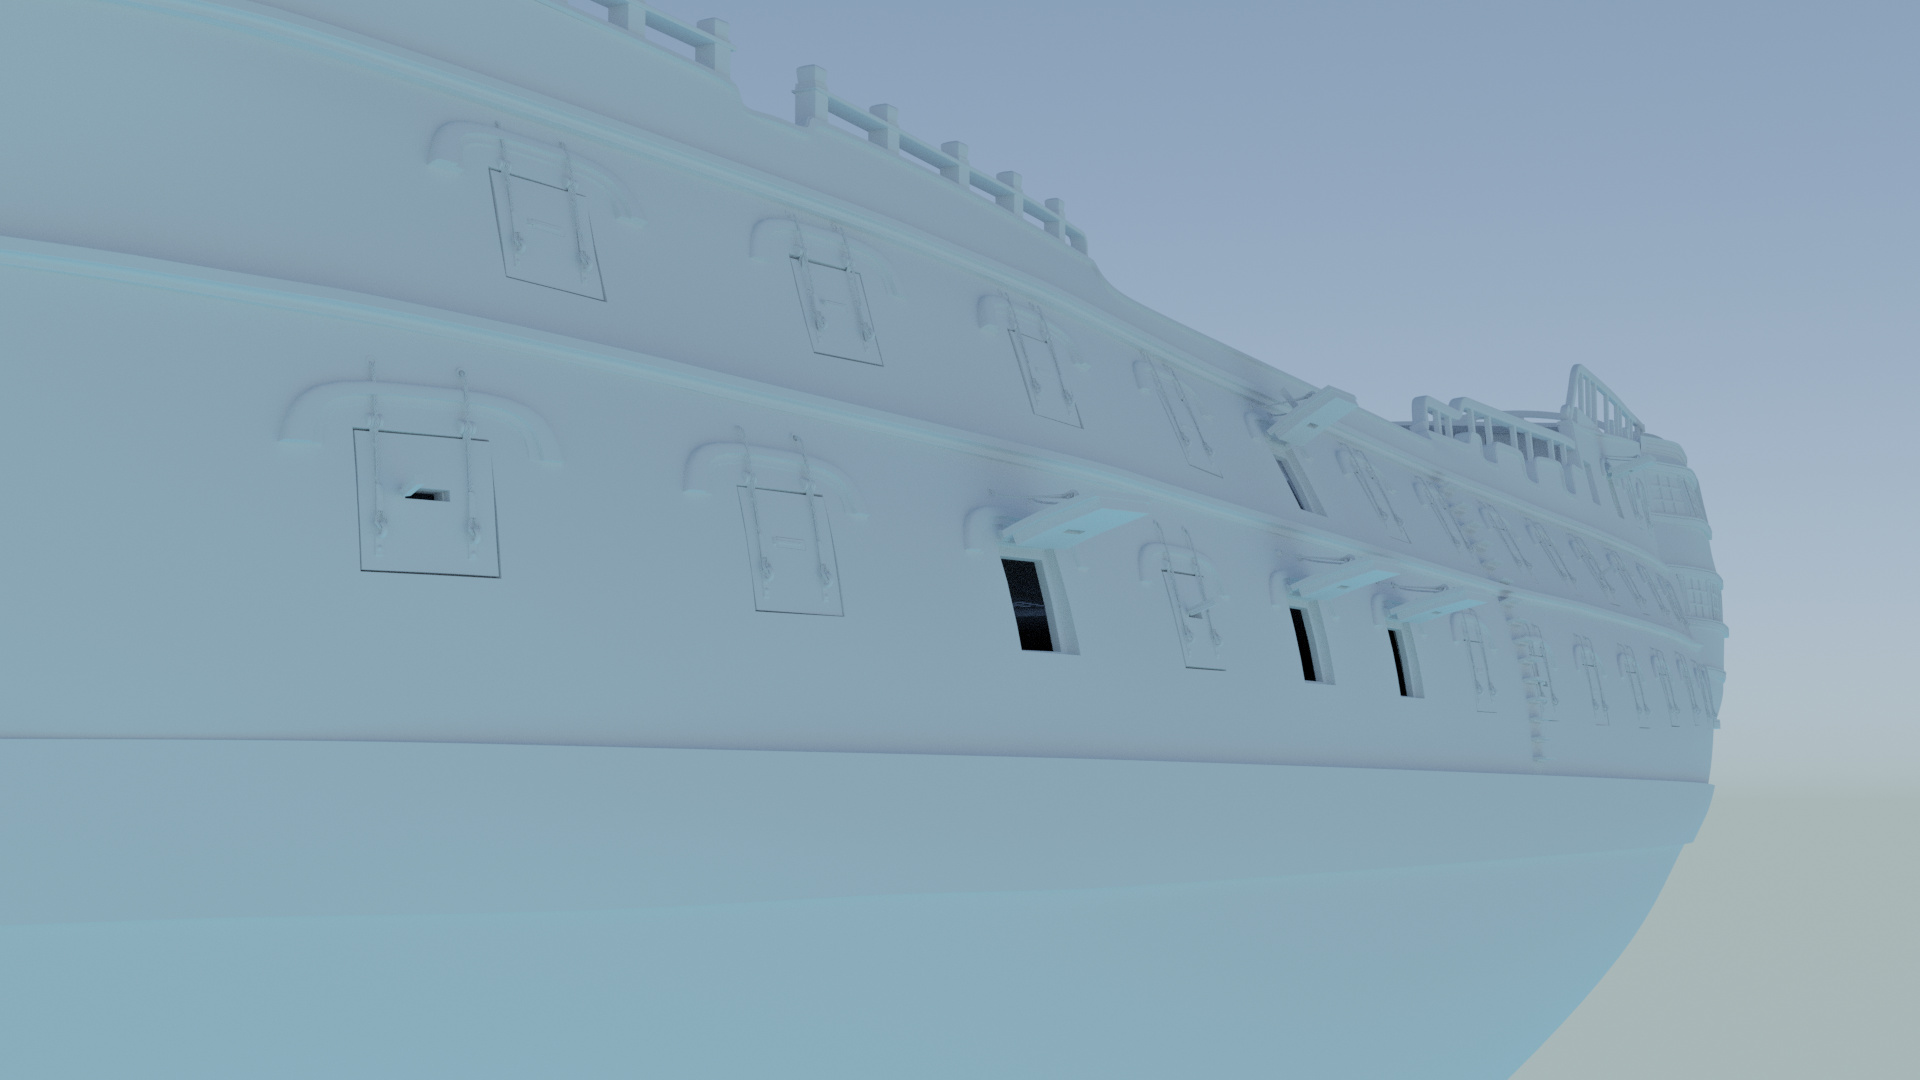
I’ve applied the shrinkwraps on the top part of the hull and straightened up the rims. I figure they now look a lot better.
I’ve (finally) installed a helm! The picture I’ve attached is fairly small, but if you want a close up, let me know and I’ll create them.
I’ve also installed arches between the gun-ports on the mid and lower decks. I’m deliberating roof-beams but I’m not planning on having the camera down there much so I’ll see.
My current to-do list (sans sails):
–Fencelines---------------------------------
Midships fenceline
Forecastle rear fenceline
Quarterdeck fenceline
Side fences
–Stairways----------------------------------
Poop-deck to quarterdeck
Quarterdeck to upper gun deck
(Maybe) upper gun deck to bottom deck
–Models-------------------------------------
Bell
Anchor
Rear lanterns
–Front--------------------------------------
Front pillars!
Figurehead
Once again I’ll be working on my other projects so progress with this ship will be fairly sporadic.
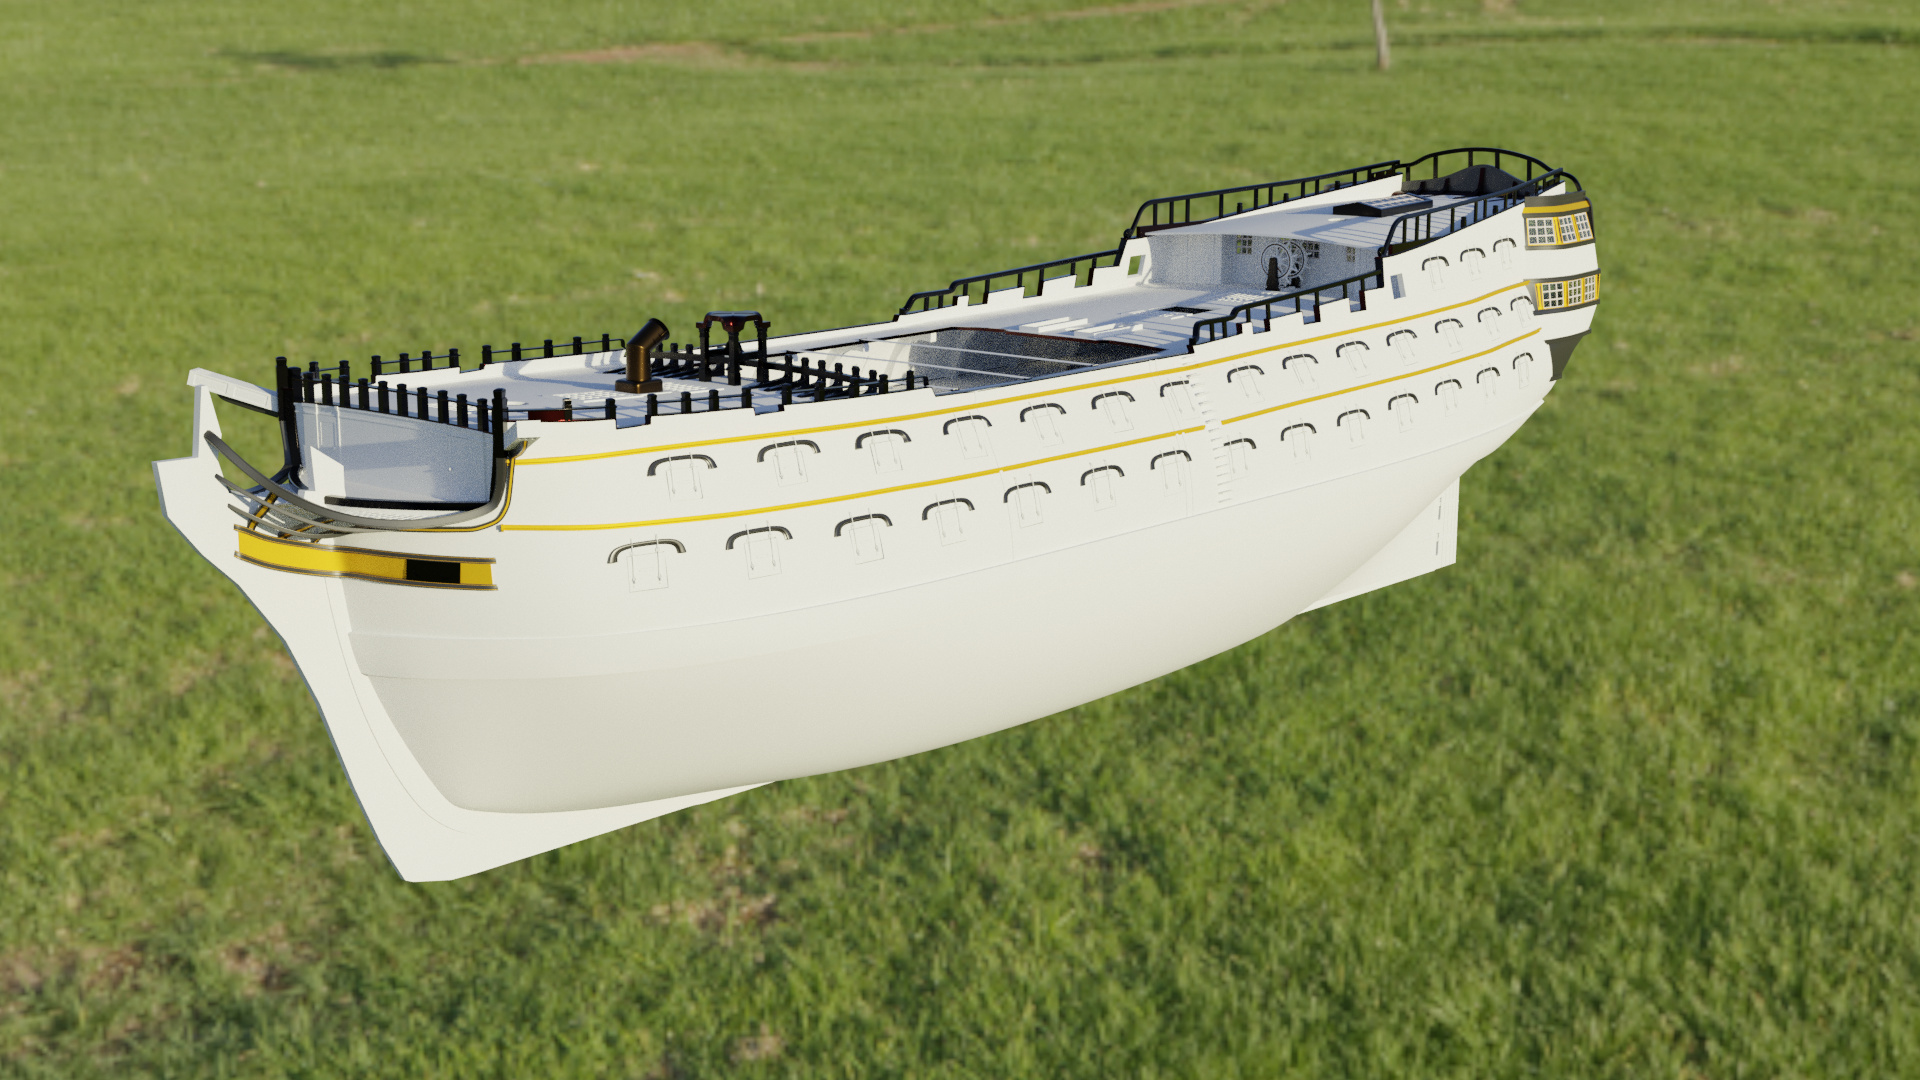
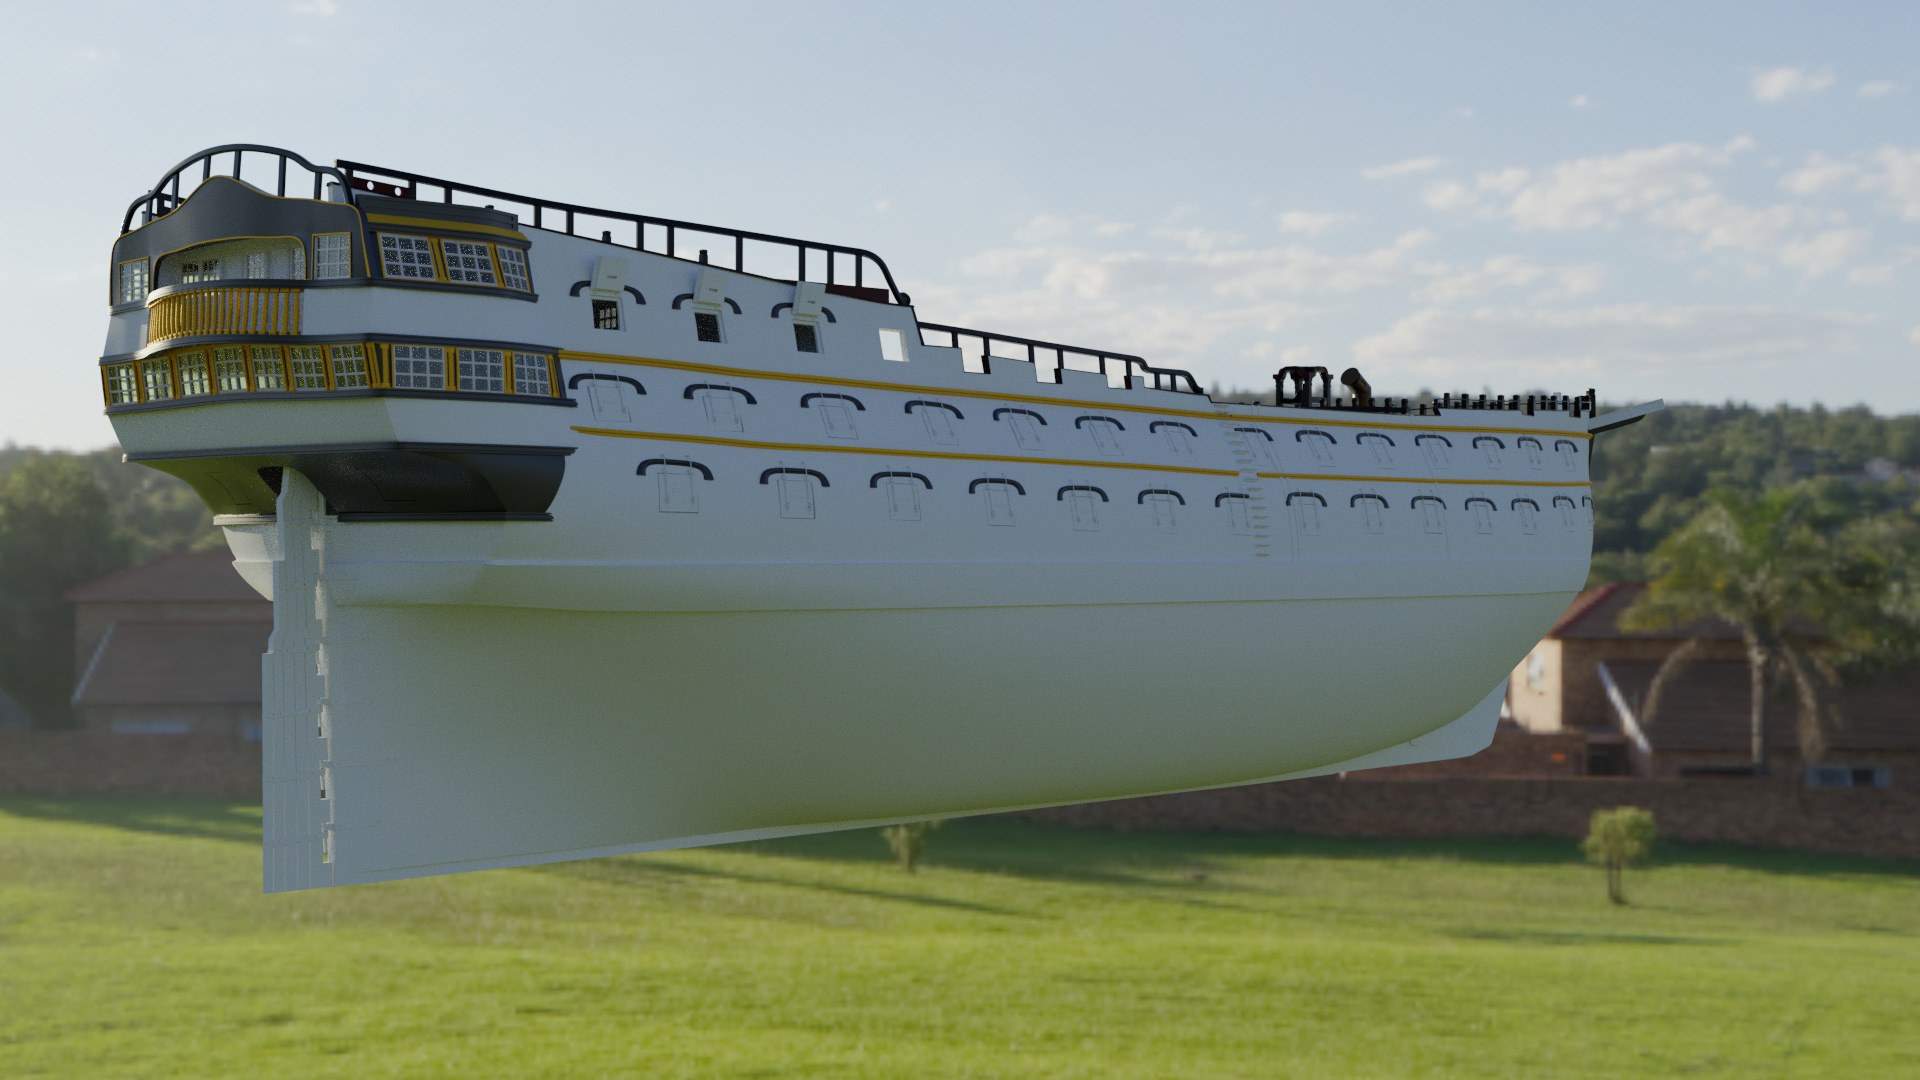
I haven’t completely finished modelling but I’ve started adding color to certain parts of the ship.
I’ve installed the ports for the stern-chasers as well.
I’m hoping to go with a black/white striped theme with gold ‘trims,’ I tend to find they’re my favorite color. I believe the yellow/black theme were a lot more common, especially during Napoleon’s era - but I find I’m not too keen on it. I might do one render, I’ll see.
The ‘dividier walls’ I’m hoping to be a nice dark-red maroon-like wooden color. The floors will likely be normal wood textures.
I’ve installed the bellfry (again at last!)
I need to finish off the fencelines, add the rear lanterns, possibly model the long-boats, and add the stairways. Once they’re done, it’s just the sails!
I think I’m about 90% way done with this now (maybe 70-80 if you include textures.) I feel like she’s starting to feel like a foreboding and legitimate ship and I look forward to seeing her in the ocean with a full rigging.
I kind of like the quarter galleries theming I have going on there, but it seems a bit too ‘glossy’ at minute. I’m gonna experiment with both materials and theming.