
Welcome!
There are multiple things that can be done to get close to this, some easy and some harder.
I should also add that this can be achieved in both Cycles or Eevee, there are pros and cons to each for a retro look. Cycles can do perfectly sharp shadows and accurate reflections (which were often featured in old renders). Eevee makes it much easier to imitate the shading of the era though.
In this case, I think Eevee would work best, as the shading in the example is very simple and there are no shadows (I am assuming you are in a recent Blender version and that your computer is compatible with Eevee). If you want an explanation for Cycles, just ask and I can give one too.
-
Set the color transform to standard in the color management settings. The fancy options we have now like Agx, Aces and Filmic didn’t exist.
-
Remove all diffuse bounces. In Eevee, it can be done by going to the raytracing settings, changing the method from “screen-trace” to “light probe” and unchecking “Fast GI Approximation” (this removes light bounces, but will allow reflections later on chosen objects).
-
By default, the sky background will cause ambient light of the same color as the background. This may or may not be something you want depending on the scene. This can be controlled in the world material by using separate background shaders to control the light and what’s visible to the camera.

-
There are no shadows in the example, so just disable them completely in the render settings. If you do want shadows however, you could instead set the shadow steps to 1: this stops soft shadows from being used and makes them as sharp as Eevee can support.
-
If you need mirror reflections, you can add reflection probes to do it, placing them carefully so they affect only the chosen mirror objects. The table in the example (and any wall mirror) would be done with a plane probe, just make sure to set the raytracing resolution to 1:1 and disable raytracing in the render settings for sharp results.
-
Complex reflective objects, like the robot, seem to be done using reflection textures instead of real accurate reflections. Basically, you could do those reflections by getting an image of a landscape or room and using it as if it was a reflection. Here is how to do it, it’s pretty simple and I think it’s how it’s done on the robot in the reference.
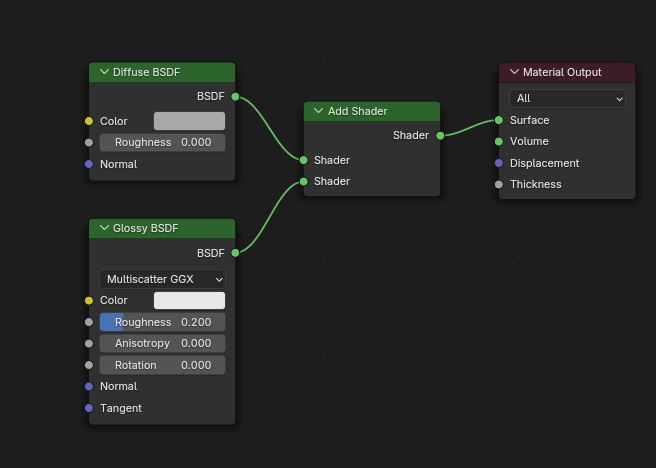
- For the average solid, non-reflective materials, don’t use the default Principled BSDF, it’s too modern and fancy. Instead, use a diffuse and a glossy BSDF and mix them with a mix shader node. Keep the roughness value of the diffuse at 0 at all times, they couldn’t do diffuse roughness back then.
To add to @etn249’s post…
You can use Matcap images in the world setting, lights, and also connect them to the object.
You can make your own matcap just by using a circle in the right resolution. 2k, 4k, etc., for the image format, and then add any colors and gradients you want so that they influence the color or reflections of your scene…
