Finding a good matcap is hard, thanks!
If anything, the vanilla ones might be the best for each task, but change is needed to refresh myself ![]()
Meanwhile I’m enjoying your sketches ![]()
1 Like
@stray Yep, good catch. You’re entirely right. Thanks for the reminder, it’s easy to miss details from top view since I don’t spend a lot of time looking at it from that perspective- or I didn’t, I will now ![]()
@sozap thanks for that detailed information! I use that method on landscapes but I hadn’t considered using it on things of smaller scale. That should be very useful ![]() when I have a spare moment I’ll go back and try the mouse again this way and get it more correct.
when I have a spare moment I’ll go back and try the mouse again this way and get it more correct.
@Minamookevlar yeah, I’ve used the default matcaps enough that they start to bore me. I also find their lack of color contrast a negative - this one has a gradient with browns, yellows, pinks, and reds, making each face a different color, not just a different value, and the only default matcap with that is the Normal one. Which is a very useful one, just not for this
3 Likes
Still a better love story than “500 days of summer”
1 Like
Day 22 - Behold, a head
Pictures
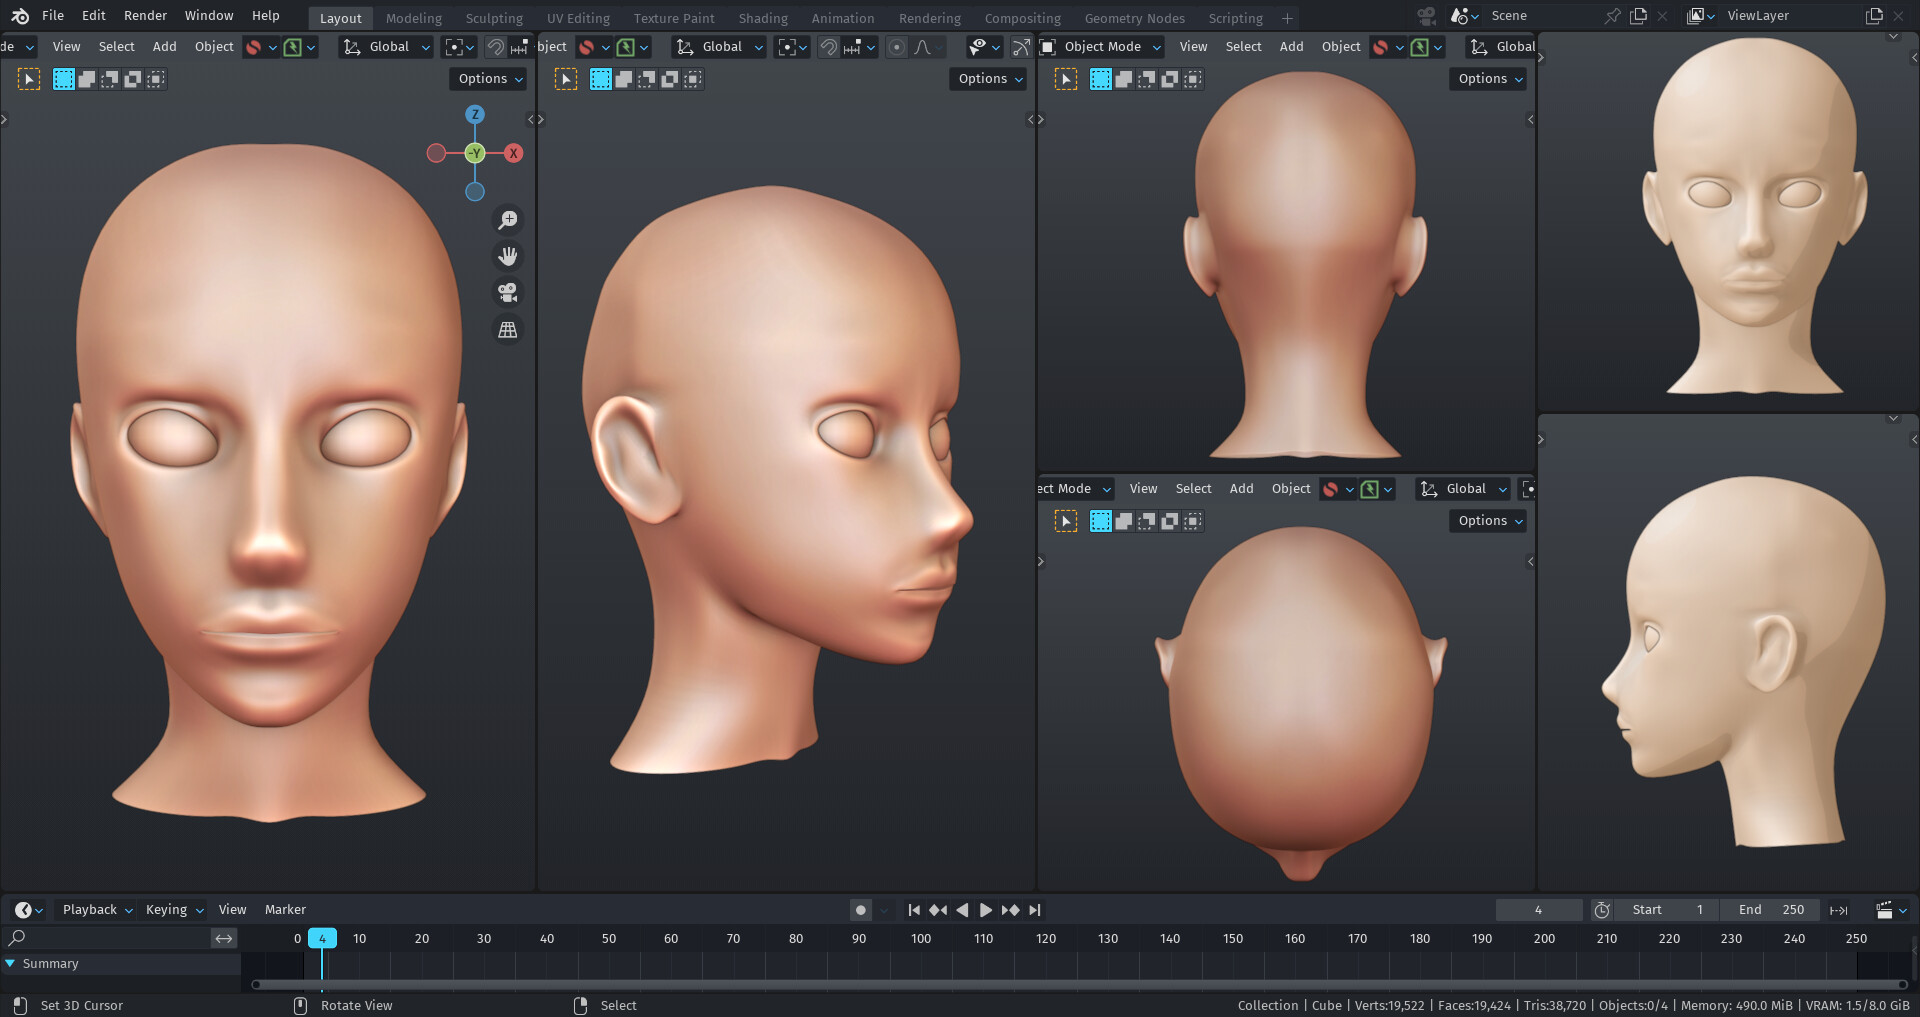
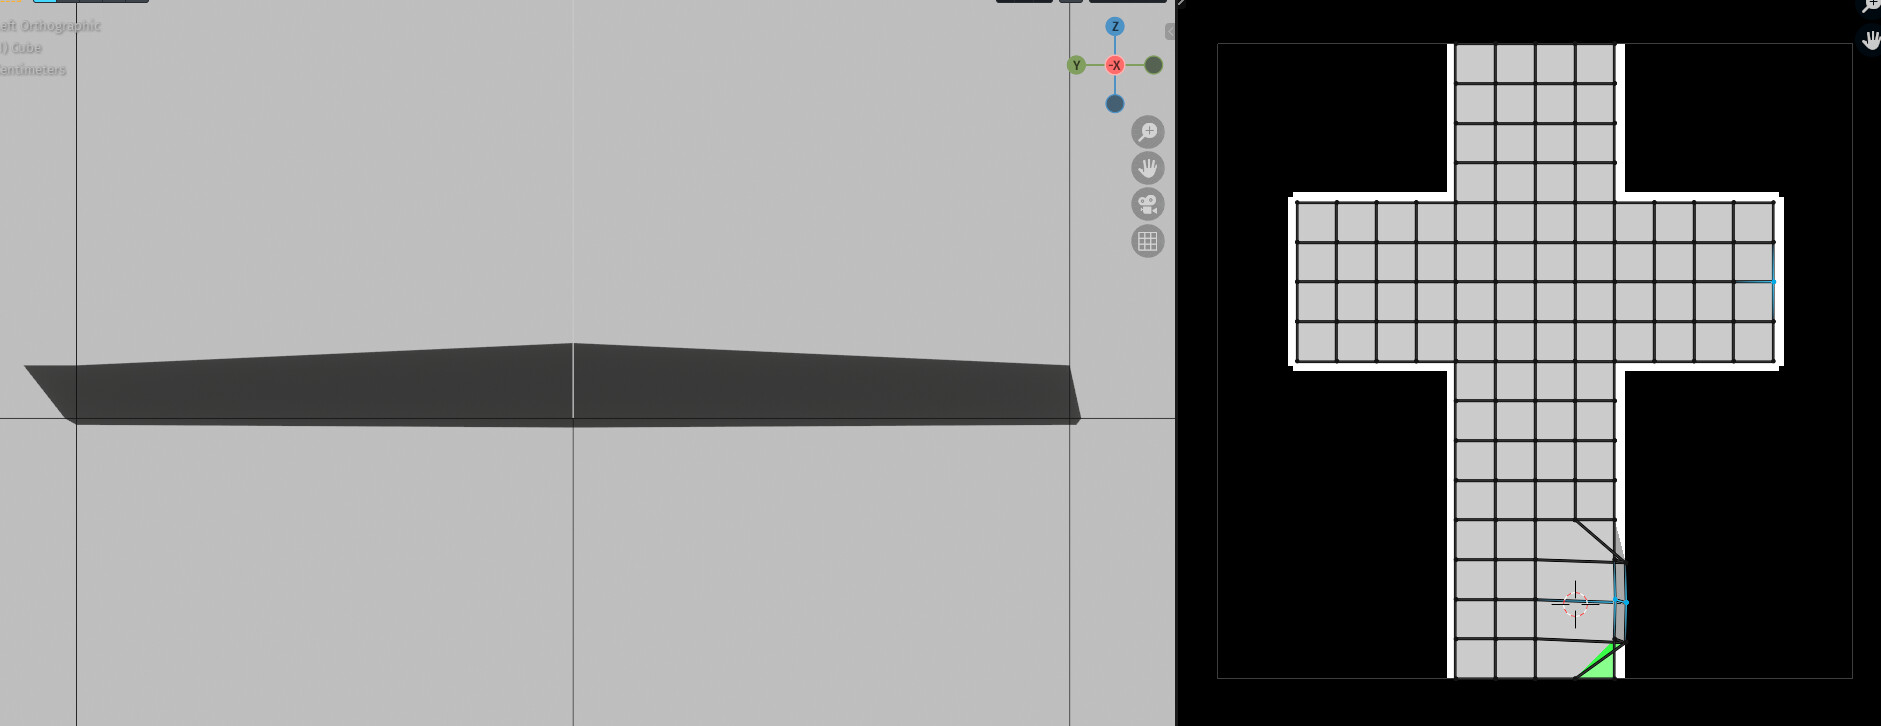
Perspective on the left (vertical), ortho on the right( square-ish). Thanks again @stray for the reminder to use top view
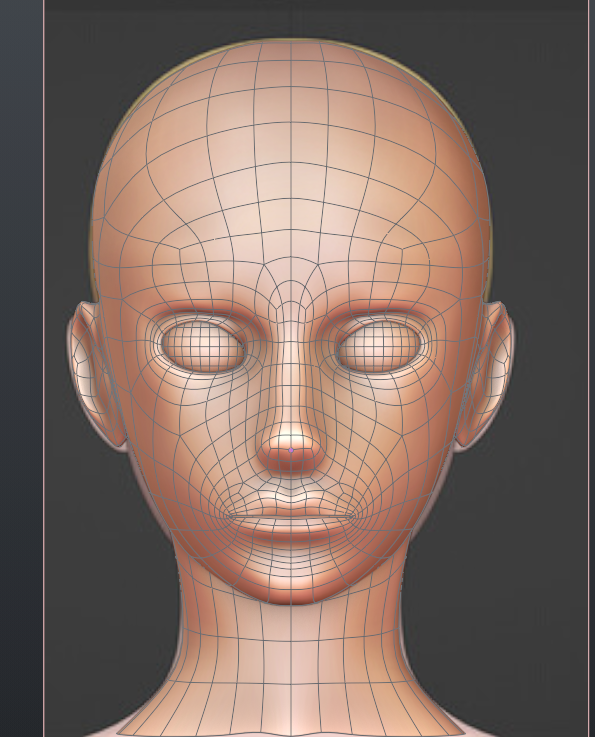
Wireframe in ortho side/front view:
It looks pretty good, but I feel like there's *something* slightly off with the proportions that I just can't put my finger on. If anyone has any suggestions, please share them :) Here's the current file: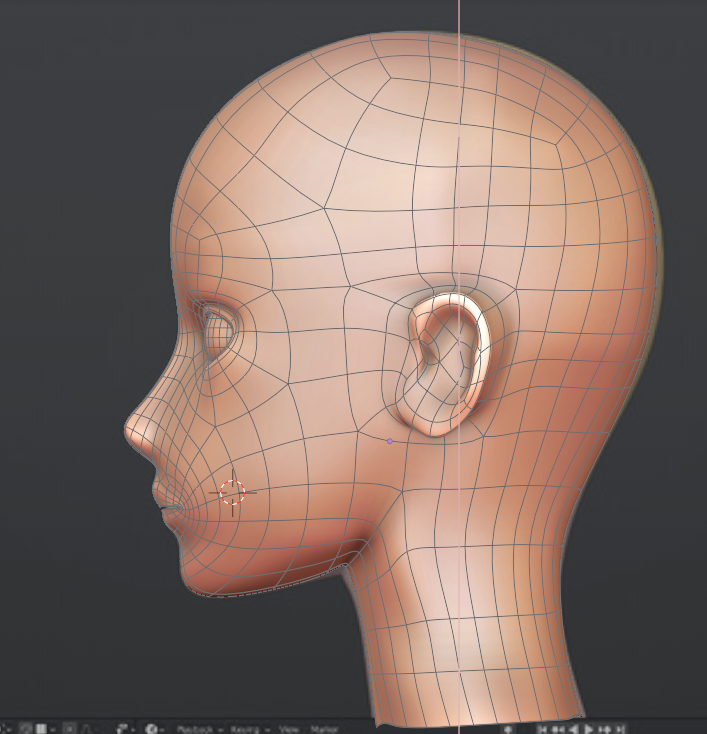
pmh_01.fbx (312.0 KB)
Ears? Animation?
Read more
The ears aren’t correctly detailed. I don’t intend them to be, as I have no use for realistic ears. The type of ears I’m interested in are almost entirely line art:

and these ears give me enough to go off for that.
This has excellent topology for animation - a combination of Dikko’s guidance (he never misses!) and my own experience. I haven’t done much deformation testing yet, but I don’t really need to- I know what good topology for animation is, even if I’m not always great at making it ![]()
New things I learned
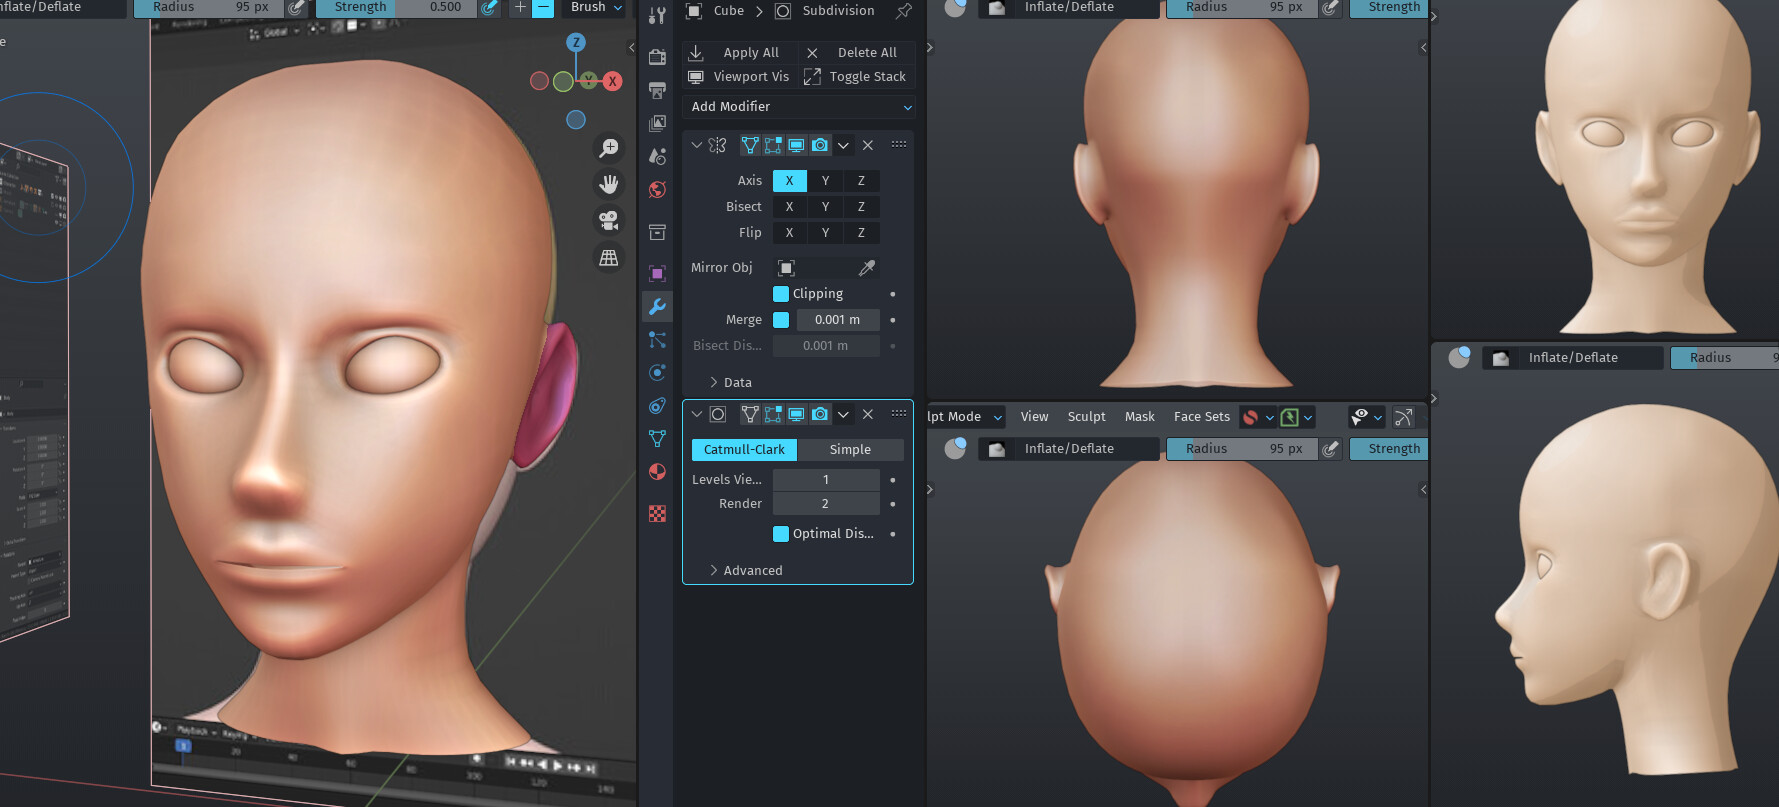
I tried out face sets for the first time in sculpting, to be able to freely manipulate the ears separate from the head. Face sets are awesome, I’ll for sure be using them again.
What’s next? (A body)
The neck is really a placeholder, the number of loops is all wrong. I’m torn between using a poly-modeled body I’ve made already or getting the practice I need and actually making the body (I typed “mody” several times before my brain could process the distinction between “model” and “body”)- heck, who am I kidding, I need the practice. Poly-modeling it is ![]() Making a body is surprisingly faster than making a head, so that should in theory only take two days.
Making a body is surprisingly faster than making a head, so that should in theory only take two days.
Personal progress
This is already my fastest poly modeled head ever- by a lot. I aim for 20% faster and 10% better each time I do this, and I broke the 20% faster by several days. 10% better? I personally think so ![]() My last poly-modeled head was this one: Barbara Gordon (Batgirl) 🦇 which had significantly worse topology and took me… the better part of a week and a half to do, IIRC.
My last poly-modeled head was this one: Barbara Gordon (Batgirl) 🦇 which had significantly worse topology and took me… the better part of a week and a half to do, IIRC.
Music
read more
Half Xenoblade Chronicles - I don’t listen to a specific game at a time, I just have a Xenoblade Chronicles soundtrack- and the other half, the same with Fire Emblem
Minor update: cheek tweak
cheek tweak?
Per my wife’s suggestions, I’ve tweaked the cheeks and upper lip a bit. She’s possibly even more familiar with the underlying structure of the face than me as a makeup artist, and I think she was right here. A head like this takes an absurd amount of tweaking. These changes are reflected in the most recent FBX, which I’ve updated, but not in the earlier screenshots.
9 Likes
That’s some awesome progress joseph !
It’s really cool to see you at work !
I think there are a ton of little details that you might want to tweak, but it’s quite subtle , in a face at some point it’s all about subtleties, and a slight change can bring a lot.
I see two options, you can use it against a bunch of real life photos and see were it deviates too much from reality, using the technique I talked earlier by looking at how distances or proportions relates to each others ( while keeping the stylisation obviously).
Or you can add a bit of textures, airs , eye browns, a slight make up, and that might bring into the light some areas you want to tweak. It’s all about changing the context a bit in order to refresh the eye because we tend to get used to the model at some point.
I could have tried a few things with a paint over, but I don’t have much time, beside I see really
only small stuff to test.
As you did with the cheeks, it’s better, hard to tell without flipping image from old to new, but all these little touch up accumulated can make a great difference !
Well done , there is a ton of progress !
4 Likes
I was hoping you would comment, your help last time was truly invaluable, but don’t worry, I won’t bother you like that this time around ![]()
I think I’ll do both, I’d like to get this generally correct anatomically before diving deep into stylization, so I think I’ll start with suggestion 1 and then once things look good compared to the real world, I can make it no longer look like the real world. Gotta learn the rules to break em ![]()
I’ll also add eyebrows and lashes soon- it’s really hard to see a face as a face without them, and I’ve learned that adding those details in makes it much easier to spot things that are wrong elsewhere.
Right now I think the best thing I can do is walk away and force myself to stop tweaking, not look at this again until tomorrow. I definitely have that tunnel vision you mention right now.
No worries, again, I know you’re busy right now ![]() I appreciate your comment and feedback, it’s very helpful!
I appreciate your comment and feedback, it’s very helpful!
1 Like
Yeah cool, indeed that seems a good reached milestone to make a break ! Or if you have more energy, spend it on another area so your eye can have some rest with the face.
This is how I’d like to work :

I try to work a character as a whole from the very beginning, I also do a render at each step so I can compare how the last change influence the results…
Being able to switch from one part to another is quite helpful , that allows to let some areas rest and
to work the character as a whole. Even if that generally not necessary, it allows to always have a complete result to show. When working professionally I can get feedback really early on the whole character. Instead of waiting to finish everything until I can show the whole because I started with the face, then head, body, hands…
I tend to work a lot like that since some years, at least for simple cartonny mesh that makes sense :
Hope that can give ideas !
7 Likes
Day 23, Part 1 - Innovation in Inner Lines
I want to add two preambles - first, I’m working on my head mesh from a texturing standpoint. This doesn’t mean I’m done tweaking the head mesh, far from it. This is purely a technical exercise I’ve done in a separate file. Since this worked extremely well- better than I’d hoped by quite a bit- I will be using it again later ![]()
Second- this post is going to be a bit long and dive deep into the nitty gritty of NPR work. If that doesn’t interest you, you may consider skipping this post/parts of this post (but realistically, you should probably stop reading this sketchbook altogether, as NPR work is what I do ![]() )
)
Without any more ado- I present “Boolean blending of UV coordinates for improved dynamic inner lines”, which necessitates some background information:
Inner lines?
Feel free to skip if you know what I mean by this
Making outlines in Blender or other 3D software is easy. Blender especially has tons of options, ranging from Freestyle to the vastly superior inverted hull method. I differentiate between outlines and inner lines very specifically - they are not the same, and they are not created with the same methods. Outlines define silhouettes, inner lines do everything else. I have a visual example here.
Making inner lines in Blender is extremely complicated. You’re generally forced to choose between lack of control (line art modifier), lack of performance and lack of control (Freestyle), or lack of quality/pixelization (hand painting). Hand painting is by far the best option (of mentioned), since it gives a far more authentic “hand-drawn” look than the others, which are obviously and rigidly 3D, but textures large enough to allow for fine lines are… very large.
Huh. That sucks. So… what’s the existing answer?
Feel free to skip if you already know
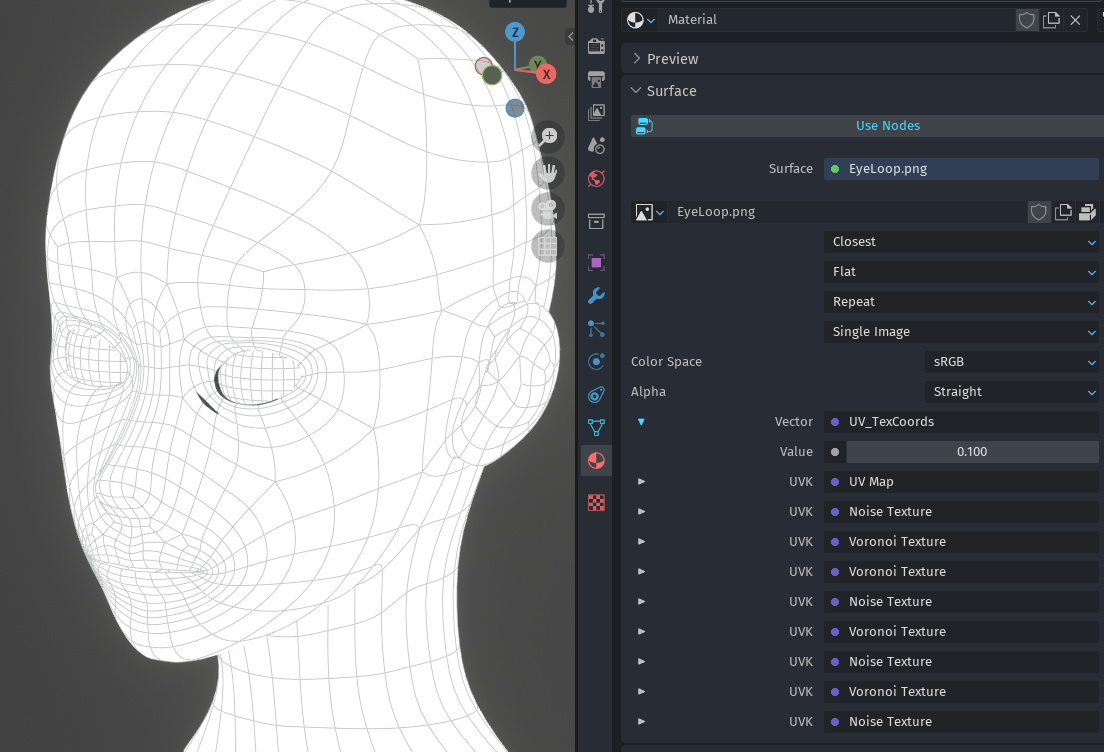
Popularized by the Guilty Gear games, but in actuality a much older and more widespread technique, the general answer is to use perfectly aligned UV maps in combination with a black and white ILM texture (inner line map) to generate lines that are actually vectors, not pixel based, and as a result, have infinite resolution at any size.
I recognize that sounds like a lot of gibberish, so let me show you:
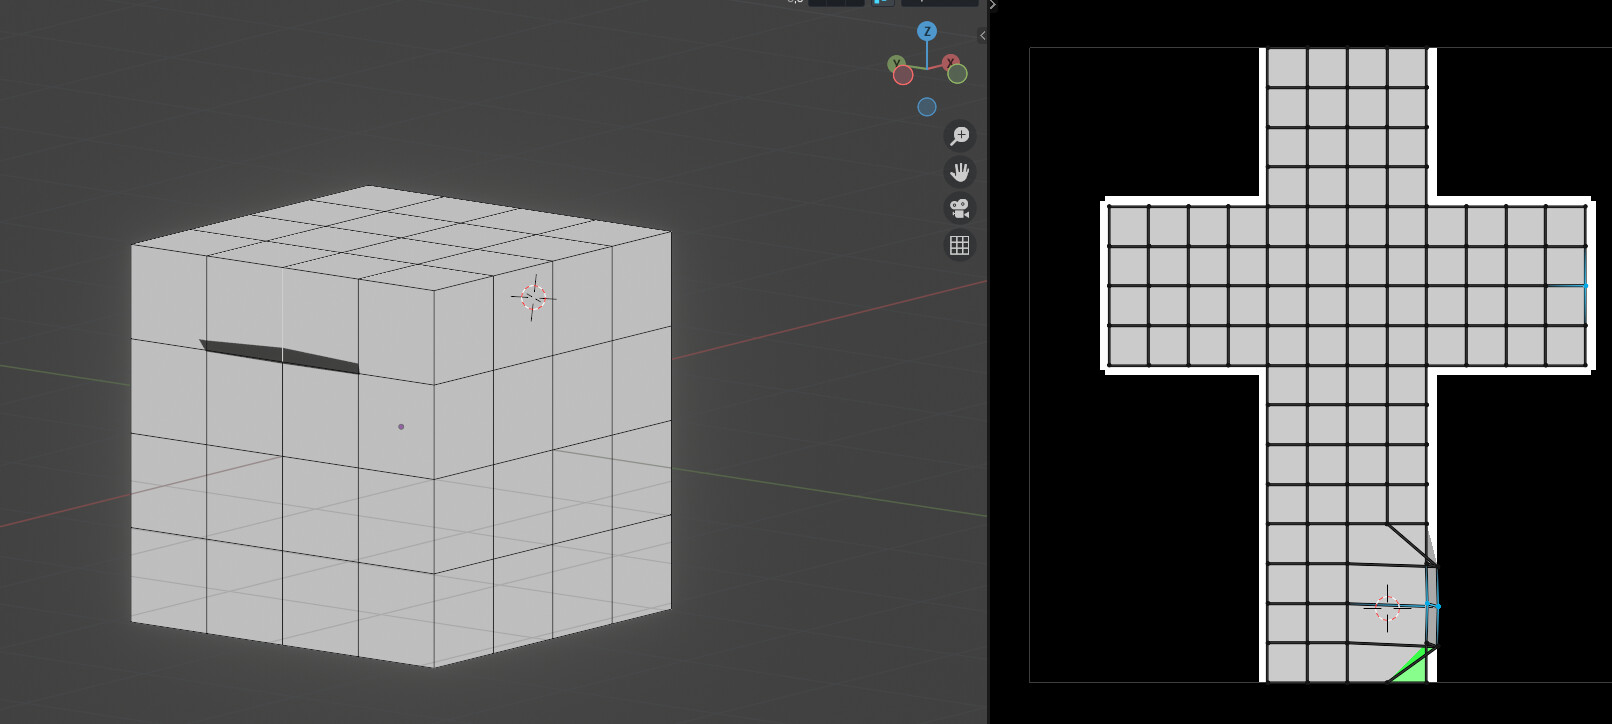
This is the simplest possible example- you can see how all the UV coordinates are straight, perfectly aligned on X and Y, except the one where I want an inner line. Notice that the inner line has no visible pixels- and it's worth mentioning, the image texture is only 128x128 pixels. Pretty cool!
This technique requires intensively dedicated and precise UV unwrapping, and you “paint” the lines by moving vertices in UV space.
Why “improved dynamic” inner lines?
Skip this if you just want to see what I've done so far today
Simply put, I’ve never seen this technique expanded beyond this point. The problem is that the inner lines remain the same, all the time- in real hand drawn animation, the inner lines change between shots, not to mention expressions.
Here’s a good example of what I mean:

Notice how the small wrinkles at the inner edges of the eyes are gone when the eyes are open. Subtle details like these are essential for animation, but the “how” of how to use them in combination with this vectorized line method is entirely unexplored.
Seriously, there’s nothing out there. Luckily for the world at large (or the 5ish people that read this sketchbook ![]() ), I’ve created a solution that I’ve been thinking about for a while, and finally today I implemented it.
), I’ve created a solution that I’ve been thinking about for a while, and finally today I implemented it.
How does this work?
- Break the face into zones- or islands- using UV seams.
- Create multiple UV maps for each zone- each UV map corresponding to an expression.
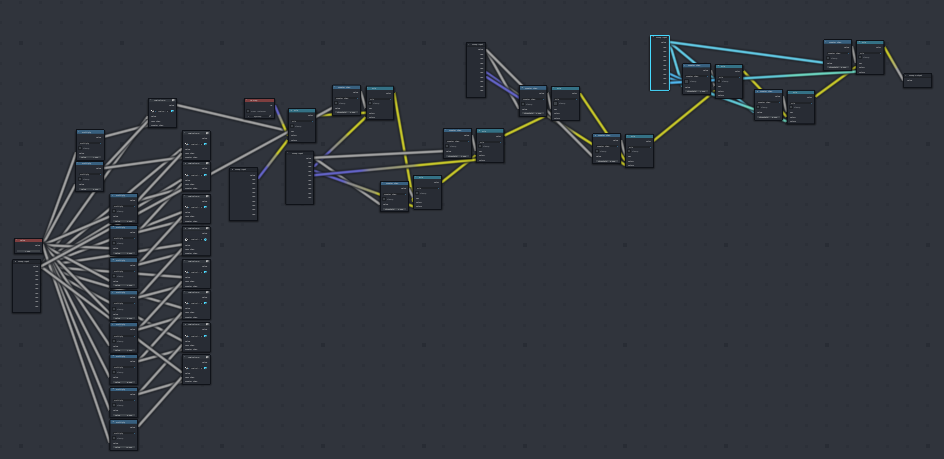
- Change the UV coordinates using the shader editor based on a single value per zone.
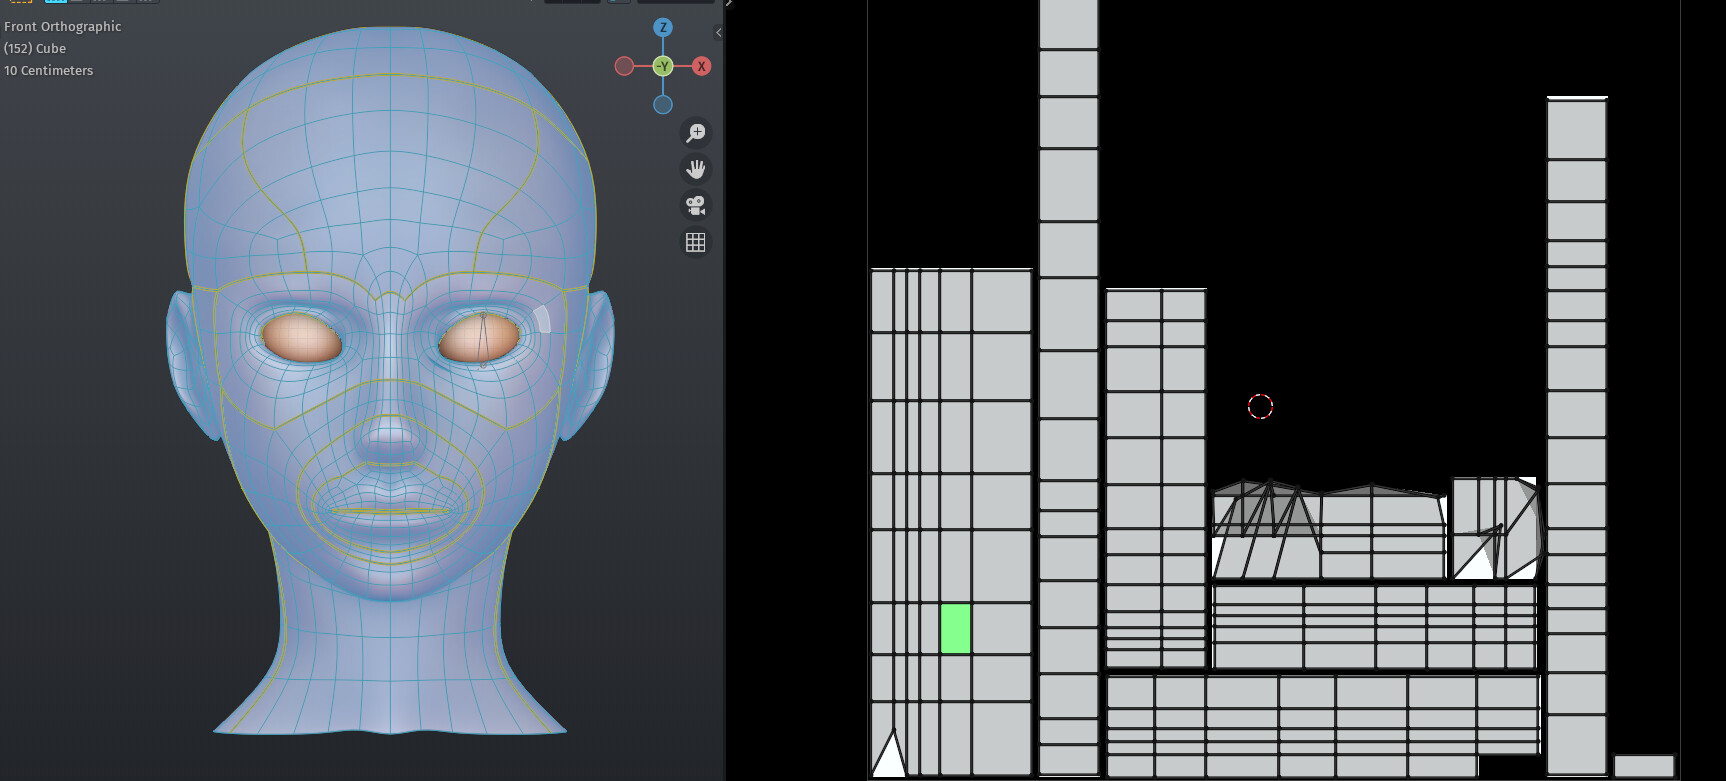
The great thing about this method is that it gives a huge level of flexibility with only a few maps per zone. For example, I put 15 zones on the head mesh I’m working on:

And my current shader node group - which is infinitely expandable- allows for 10 maps per zone, for a grand total of 3003 possible combinations, if I did the Combinations formula right. Yes, that does mean I have to manually create 150 UV maps, but it’s not as bad as it sounds- it’s really just tweaking a couple vertices on the existing base duplicated UV map, and it’s much less work than hand-painting inner lines every two frames, which is the solution I’ve seen people settle on.
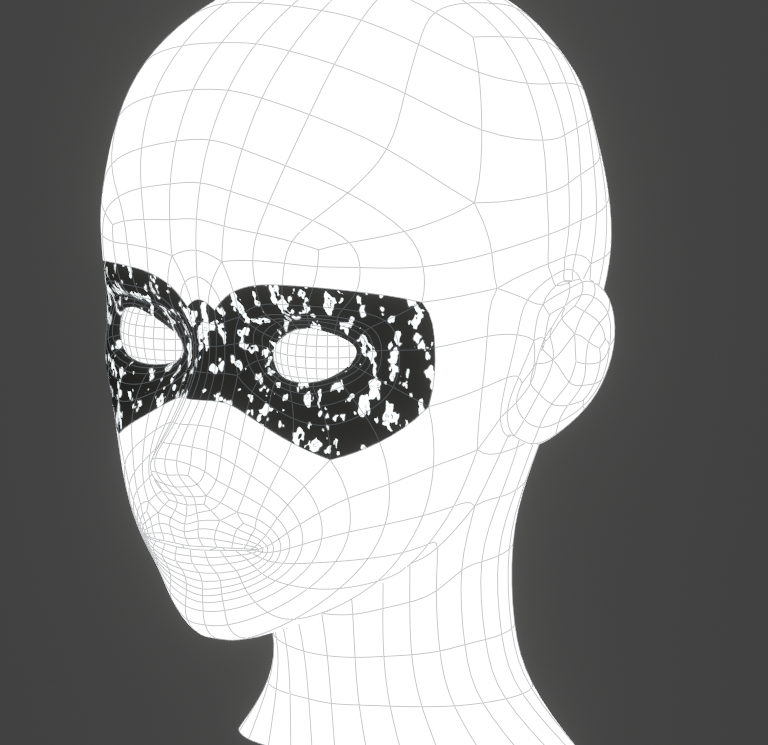
For time’s sake, I only have this set up on the EyeLoop zone, and I only made one map, using Voronoi and Noise textures to fill in the remaining slots. Check out how slick this is:
And again, it’s perfect vectorization at any size, even with armature deformation:


My image texture is once again 128x128. That means for the whole head, the total load for inner lines is 15 128x128 textures. This is 1.5% the memory cost of a single 4k texture, so it essentially takes no VRAM at all, which means you could have hundreds of characters in a scene and not even break a sweat.
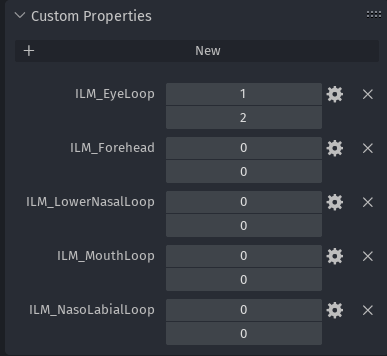
Once the maps are made, it takes exactly one click per zone to change them- specifically the left or right arrow on the Value:
Lastly, here are some misc shots showing the UV mapping for the EyeLoop zone, the shader setup, and values .2 and .3:
This method has no discernable performance impact. I can get real-time playback at 60 FPS, same as without (Eevee seems to be capped to 60 FPS, or maybe it’s a GPU setting somewhere, I get 60 FPS even setting my FPS to 240)
5 Likes
You scared me to death with this gif. I stared at it for about 10 seconds, not understanding how this static image was a relevant example, and then the eyes opened and made me jump ![]()
Nice job on the inner line shader by the way. ![]() It’s looking really good!
It’s looking really good!
4 Likes
BA is weird about GIFs - sometimes they auto-play, sometimes they don’t, I actually scared myself a couple times while reviewing this post ![]()
Maybe I should tag this in the Halloween gallery, that really is quite the jump scare ![]()
Thanks, I’ve thought about and researched this way more than is reasonable ![]() It’s the perfect option for someone like me that isn’t very good at painting, I’d much rather just move some vertices around
It’s the perfect option for someone like me that isn’t very good at painting, I’d much rather just move some vertices around ![]()
2 Likes
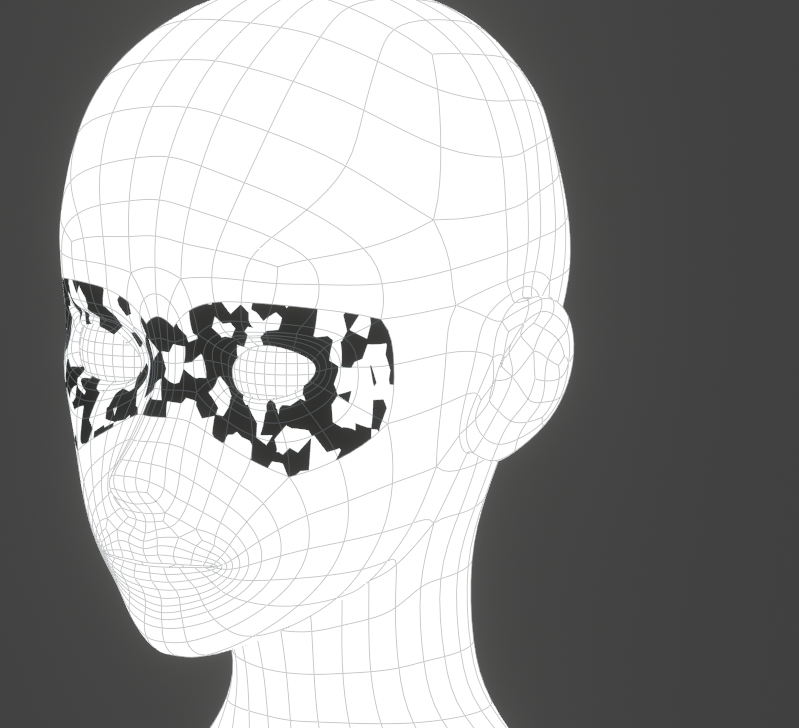
With a little more node spaghetti, you can very easily combine inner line maps per zone, allowing for hundreds of thousands of combinations:

Muting one of the two image textures:

I think this is the perfect level of customization- 15 zones, 10 options per zone, and 2 options per zone at a time. No performance impacts whatsoever. And even with two image textures per zone, that’s still only 30 128x128 textures, I could probably drop down to 64x64 to compensate. Trying that now ![]()
EDIT: It works at 64x64, but I have to manually repaint some pixels on the image texture since the resampling algorithm isn’t perfect. Going forward, I’ll pack my UVs to a 64x64 scale (UV Packmaster lets you specify pixel margin per resolution) initially, as it’s quite a hassle to try and change the resolution afterwards. This is good for disk space as well- saved as a BW image, each image is about 200-300 bytes total. All 15 images will take 4 KB, or so. For example, this is the LowerNasalLoop at 100%:

The only major downside I’ve found is that it kind of mucks up solid view- for some reason, the UV coordinates only work correctly in Material Preview or Rendered. Not really an issue, you just have to make sure you don’t have “Texture” selected in the viewport color overlay.
Also, before anyone asks “but if you have a different material on each part of the face- 15 in total- how in the world are you going to texture this??” I’ve thought about this as well, and my plan is to render an inner/outline pass and then a flat color pass (using one UV map and one material) and a shadow color pass (same thing), and composite them into the final image. If I didn’t mention, this is not a game-ready technique, it’s intended for animation specifically.
5 Likes
Wow, never even thought of shooting vertices in UVs into outer space (maybe I still don’t get it but I saw what you did, or is it dislocation to change angle) and with animation. (Can you? Oh yeah, now I see the animate dot, wow you can animate pretty much anything now!)
Thanks for sharing! Interesting good stuffs!
2 Likes
It’s a pretty weird technique, honestly speaking, I don’t think this was how UV maps were intended to be used ![]() But hey, it works better than anything else I’ve tried
But hey, it works better than anything else I’ve tried ![]()
I also recognize I have not explained it well. At some point in the future I’ll make a video tutorial
3 Likes
Thinking out of the box gone right ![]()
I should watch it thanks!
2 Likes
Cleaned things up quite a bit, changing values is much easier now. Considering tossing these props in a sidebar panel ![]()
I probably will at some point, I need to work on tweaking the face and getting it anatomically correct before I then proceed to break it completely with stylization ![]()
EDIT: And… just like that, I’ve encountered a quite serious difficulty that may actually render all of this pointless. Apparently, you can only add 8 UV maps per object ![]() I’m thinking then that I may need to have a duplicate copy of the head where each zone is a separate object, so I can at least have 8 maps per island. It’s not the 10 I was hoping for, but 8 isn’t horrible. It’s definitely not enough, though, so I might have to go back to the geonodes “moving UV vertices” after all
I’m thinking then that I may need to have a duplicate copy of the head where each zone is a separate object, so I can at least have 8 maps per island. It’s not the 10 I was hoping for, but 8 isn’t horrible. It’s definitely not enough, though, so I might have to go back to the geonodes “moving UV vertices” after all ![]()
Does anyone know of a way to change the UV map limit?
2 Likes
Can you use 2D vector attributes assigned to the face corner domain? They should be equivalent to UVMaps for most intents and purposes.
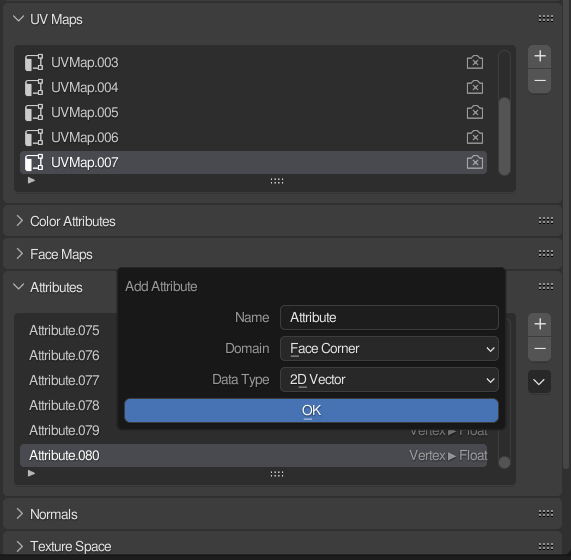
The catch is that you cannot manually edit them in the UV editor. You’ll have to use geometry nodes to manipulate them.
2 Likes
That’s another possible solution- I’m not in love with the “cannot manually edit them in the UV editor” part, so I’m going to try StrayBillie’s idea first. If that doesn’t work, I’ll do it your way, since the “split each island into its own object” still has the limitation of 8 maps per object, which simply is not enough (although worst comes to worst, it’ll have to be). One way or another, I’ll get past this, I’m just hoping to do so in a way that still lets me manually manipulate UV coordinates.
Or, I could always try and recompile the source code to give myself a higher limit, as this limit is frankly ridiculous. The info I found about it said “it takes a lot of memory” and “it can slow performance”, which I’m inclined to disagree with, as I currently have 120 UV maps in this scene with no performance loss and a whopping 225 MB of memory usage ![]()
1 Like
Wow, I learned a lot right there. Don’t have anything helpful to add, but that looks like a really clever solution for those usually handpainted inner lines.
1 Like
If I can get around this blasted limit, I think it will be really clever ![]() This is the only time I’ve ever been stopped dead in my tracks by a Blender limitation, and I’m not enjoying it at all. But thank you for your confidence
This is the only time I’ve ever been stopped dead in my tracks by a Blender limitation, and I’m not enjoying it at all. But thank you for your confidence ![]()
1 Like
Day 23 Part 2 - Nothing to show, just a short retrospective
I’m going to be honest, today really sucked. I’ve spent most of my evening trying various ways to get around this accursed 8 UV maps limit.
I couldn’t figure out how to get StrayBillie’s solution working on anything other than a cube.
The other various geonodes ideas are cool, but it’s so incredibly difficult to do anything artistic that way, especially when you have to do it one vertex at a time. It takes so much effort, so much time, and so many nodes that it’s just not worth it.
I tried a few different shader tricks to modify the UV coordinates- they’re great for something like a decal, where you just need a simple position from an Empty, they’re entirely worthless for something more complex like this.
I tried the UV Project and UV Warp modifiers. Neither does anything near what I need.
Lastly, I tried what I thought would be an ingenious workaround- exporting UV coordinates to text and re-importing them, so one UV Map can contain infinite numbers of UV Maps. I would just have to make the maps, export them as I go, and then delete them.
Unfortunately, while this shows promise, it has crippling accuracy issues that I have no idea how to solve. I’ve made a thread about it in #coding:python-support , but honestly speaking, I’m not super hopeful I’ll get a reply, let alone a solution. It’s a unique problem not easily answered, and a lot of things go unanswered in that subforum.
I’ve lost track of how many hours I’ve spent trying to fix this already, with no luck whatsoever. Normally I’d just throw the idea away and try something new, but this has so much potential. It works perfectly, it’s incredibly easy to use, I just need more UV maps ![]()
Why am I posting this? I’m hoping that it will help show that it’s not all unicorns and rainbows and cool ideas working in Blender- specifically, I’m hoping that showing my struggles today will help motivate some of you that struggle with impostor syndrome or not feeling good enough ![]()
It doesn’t get any worse than having a really cool idea that you’ve spent a lot of time thinking about, figuring it out, feeling the satisfaction of it working perfectly, and then being completely helpless in the face of an obstacle you have no idea how to overcome. But you know what I’m going to do tomorrow? I’m going to open up Blender, and I’m going to keep working, because there will be another win eventually. Hopefully, tomorrow ![]()
5 Likes