99* Days of Blender

Day 24 - Miracles happen every day

I just noticed that yesterday’s last post was the 200th- bit of a depressing note for a milestone like that, so here’s something far less depressing. @stray is a miracle worker, who has single-handedly solved all the difficulties I spent hours agonizing over yesterday. And it’s simpler than making multiple UV maps and far more scalable. And… it lets me get values between 0 and 1 for each ILM expression, which is another huge improvement. All in all, the moral of the story is- if you get stuck, find someone smarter than you and ask them for help :sweat_smile:

My time in Blender today was split between writing a Python solution to my problem- which actually worked decently well, but was more clunky and less easy to use- and then, after StrayBillie messaged me, configuring their system to work with my system. Today was quite technical, in other words, and I don’t really have anything to show for it, but rest assured that this is revolutionary. Some geonodes, some out-of-the-box thinking, and a whole lot of sweat, blood, and tears…

and we officially have the only scalable, flexible, vectorized, non-performance-impactful inner lines solution in Blender.

Am I going to do anything else today? Nope, my brain is officially fried from this whole mess :sweat_smile:

Music: Scriabin - piano etudes and preludes

8 Likes

That is super awesome!

Collaboration of smart people saves the day, yay!

3 Likes

Day 25^ - I’ve been working, I just have nothing to show

^Technically I was doing stuff in Blender yesterday but it was a bit of a disaster and I’m just going to forget about the whole thing :slight_smile:


I’ve been meticulously- much better than last time- unwrapping UV maps. That’s it, really, there’s not much to say about it, other than the process works incredibly well. The only major flaw in this inner line technique is that the ease of use is entirely dependent on your UV mapping, meaning if it’s not easy to use, you have no one to blame but yourself. To that end, I’ve been optimizing my UV maps for ease of use, where I can move an edge in a logical direction and the inner line moves in the same direction. Currently, ease of use is very easy indeed. Ease of setup- not so much.

This may all seem abstract, and I recognize I haven’t explained it well, so here’s one more screenshot that should help quite a bit:


Places where the UV map is in the white are white, same as always, but here you can see how just moving some edges into the black is all you need to add “eyeliner” :smiley: And that eyeliner isn’t static- I can easily keyframe how much or little of it there is, which allows for the variation between camera angles that is essential for this.

The eyes, nasolabial crease, and mouth have by far the most complicated UV unwrapping- the more islands, the easier it is to add more lines. Areas that don’t need many lines can get away with not many islands. Ultimately, this is highly technical work that requires a lot of strategy and planning. I would not recommend trying it just for fun. I enjoy it but I’m weird :laughing:

Yeah, I really don’t have anything else to say :man_shrugging: I’ve launched a 2D curriculum for myself, you can check that out in my other sketchbook: 2D Learning and Practice - #13 by joseph

Music:

Baba is You soundtrack. It’s nice background music in the weirdest, funkiest, way possible. It’s also an excellent puzzle game that I cannot recommend highly enough

6 Likes

Nice stuff, I think I get it now! Thanks for explaining :+1:
That process looks hard to get right, but then again I don’t touch on UVs so yeah. Again, very cool technique, sliding faces into the black is like some traditional cloth dyeing. :point_left: Hey, in that sense, now it makes sense why you said you’re “painting”. Cool stuffs! :sunglasses:
Hey… Wait a minute I should’ve paid more attention to the video on Day24! :person_facepalming:
Now I caught up, great work. :person_gesturing_ok:

1 Like

Day 26 - Refining my base NPR shader, and yes, you guessed it, more UV work

First, I apologize to all my regular readers, I have things I need to respond to from most of you. I’ve been quite busy today and I’m a bit overwhelmed with my plate at the moment, so it might be tomorrow when you get a response :slight_smile: One quick note-

I hadn’t thought about this, but your comment intrigued me, so I did some research on traditional cloth dyeing, and you’re entirely right. It’s a fascinating convergence of an ancient traditional technique and a brand-new digital technique, and I’m quite delighted to discover that people have been approaching this problem in similar ways for thousands of years. So thanks for sharing that!

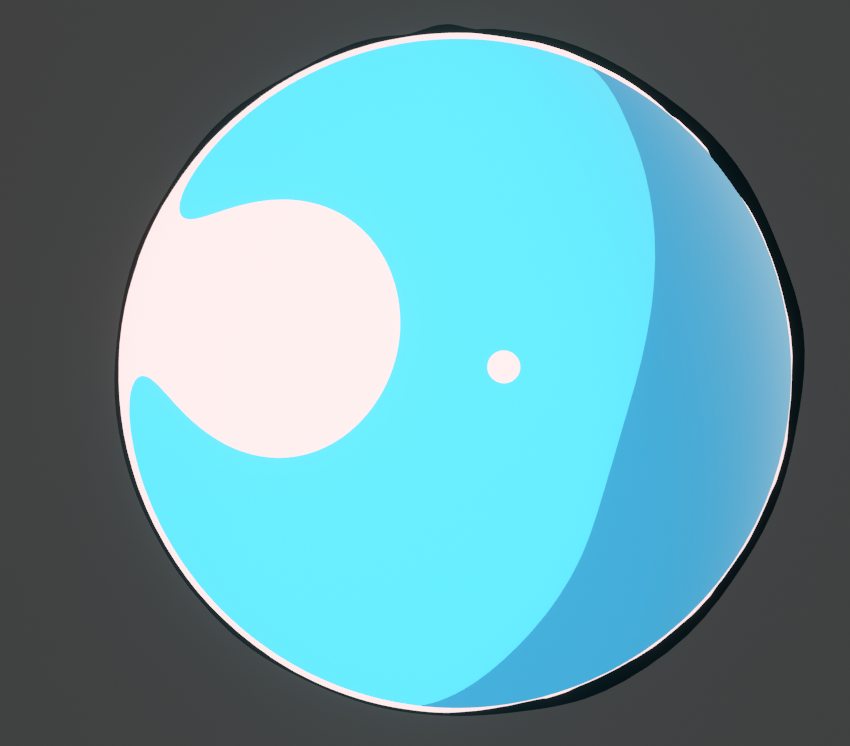
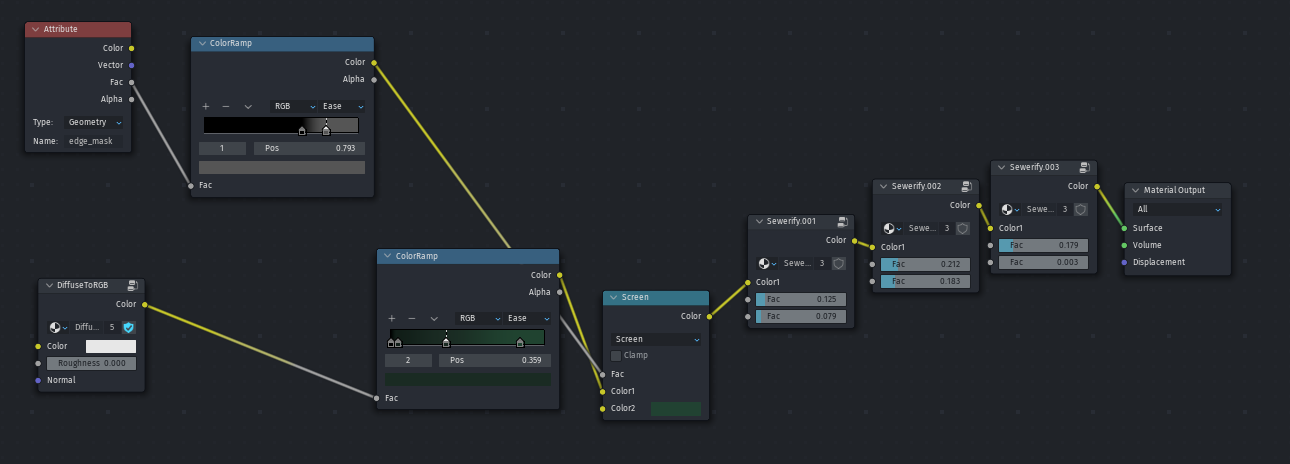
@piranha4D reminded me yesterday, indirectly, that my standard NPR shader needed some love, attention, and bug-fixing. So, bug fix, love, and attend I did, and the result is excellent:


If it looks mechanical, it’s because the spheres are constantly spinning, and this rotation would be stepped or done by hand in an actual animation context. The spheres are UV spheres that I randomized the vertices of and then smoothed the vertices, to get some cheap surface variation.
The great thing about this shader is that it is fully customizable, with a ton of different parameters:

All of the spheres are using this shader, just with different parameters.
And this shader has a ton of different outputs, which is essential - it allows for hand-tweaking things where needed, frame by frame, with hand painting. This isn’t often needed, but it’s nice to have the option:

More UV work? Really?

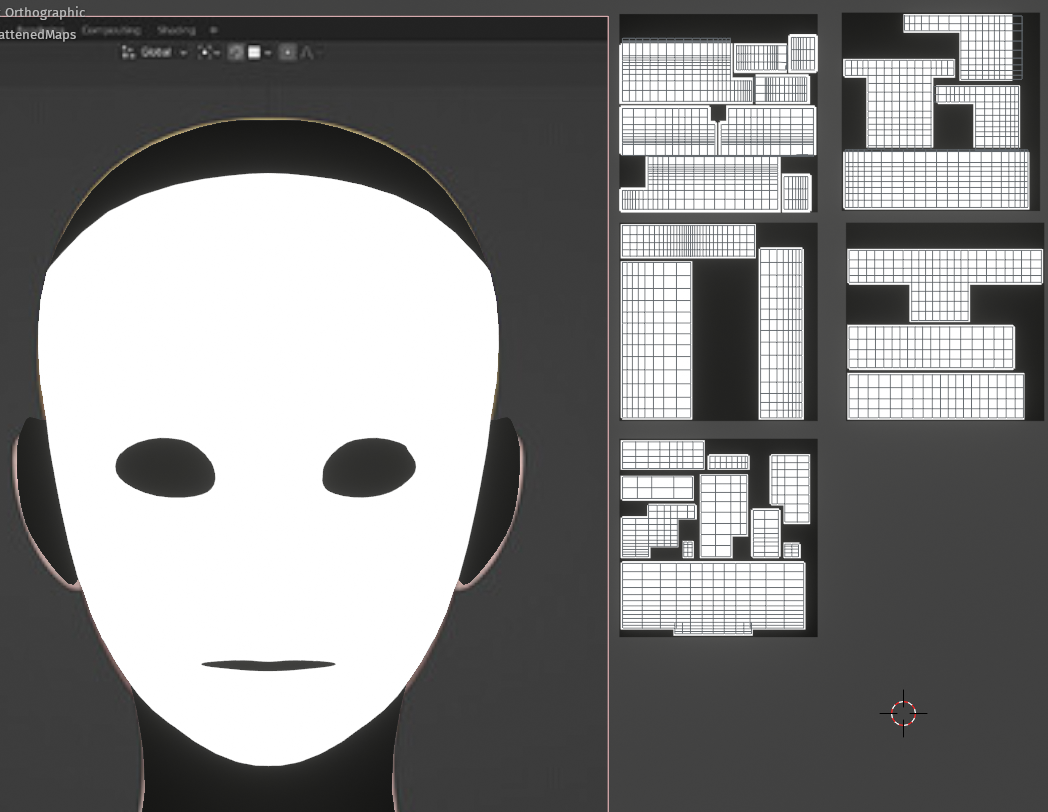
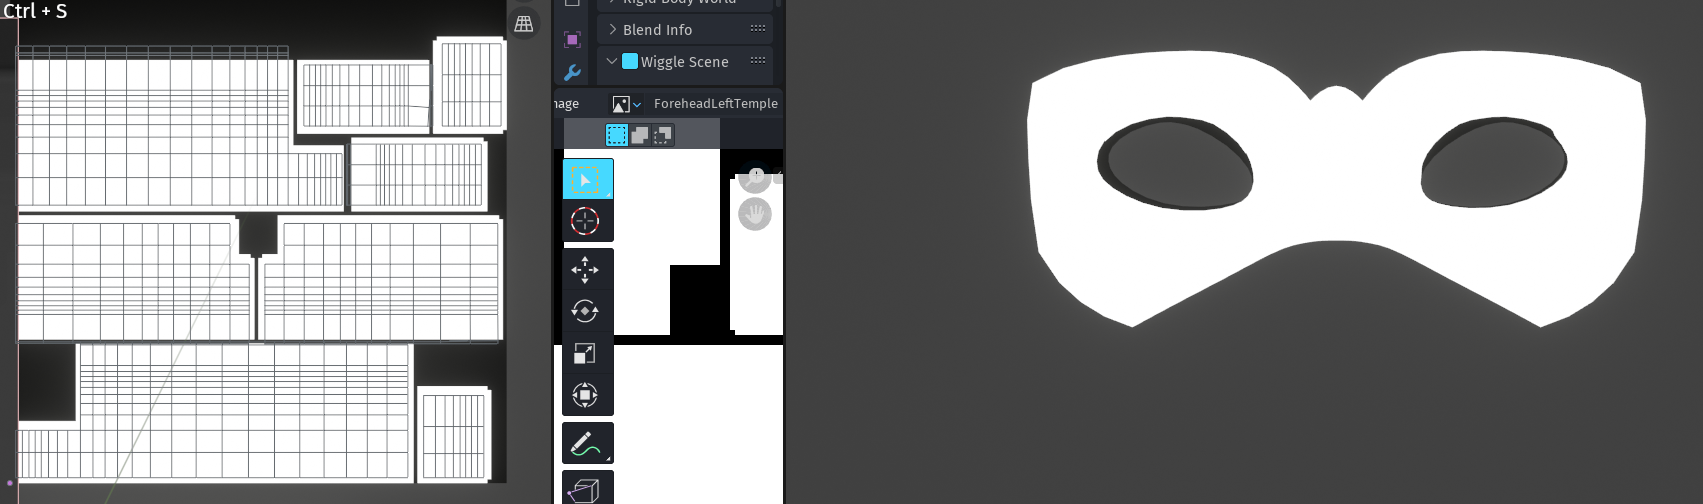
Yep! Someone’s gotta do it, and that someone just so happens to be me :grin: In this case, I realized I was doing something colossally stupid by maintaining the separation of the objects- rigging a head broken into components like this is essentially impossible, definitely not worth the effort, and so I combined all the UV maps into one single map- or truth be told, I ended up re-doing the mapping entirely for I think the fifth time now. If I had planned this better, I would have only had to do it once, but now I have a streamlined process for next time!

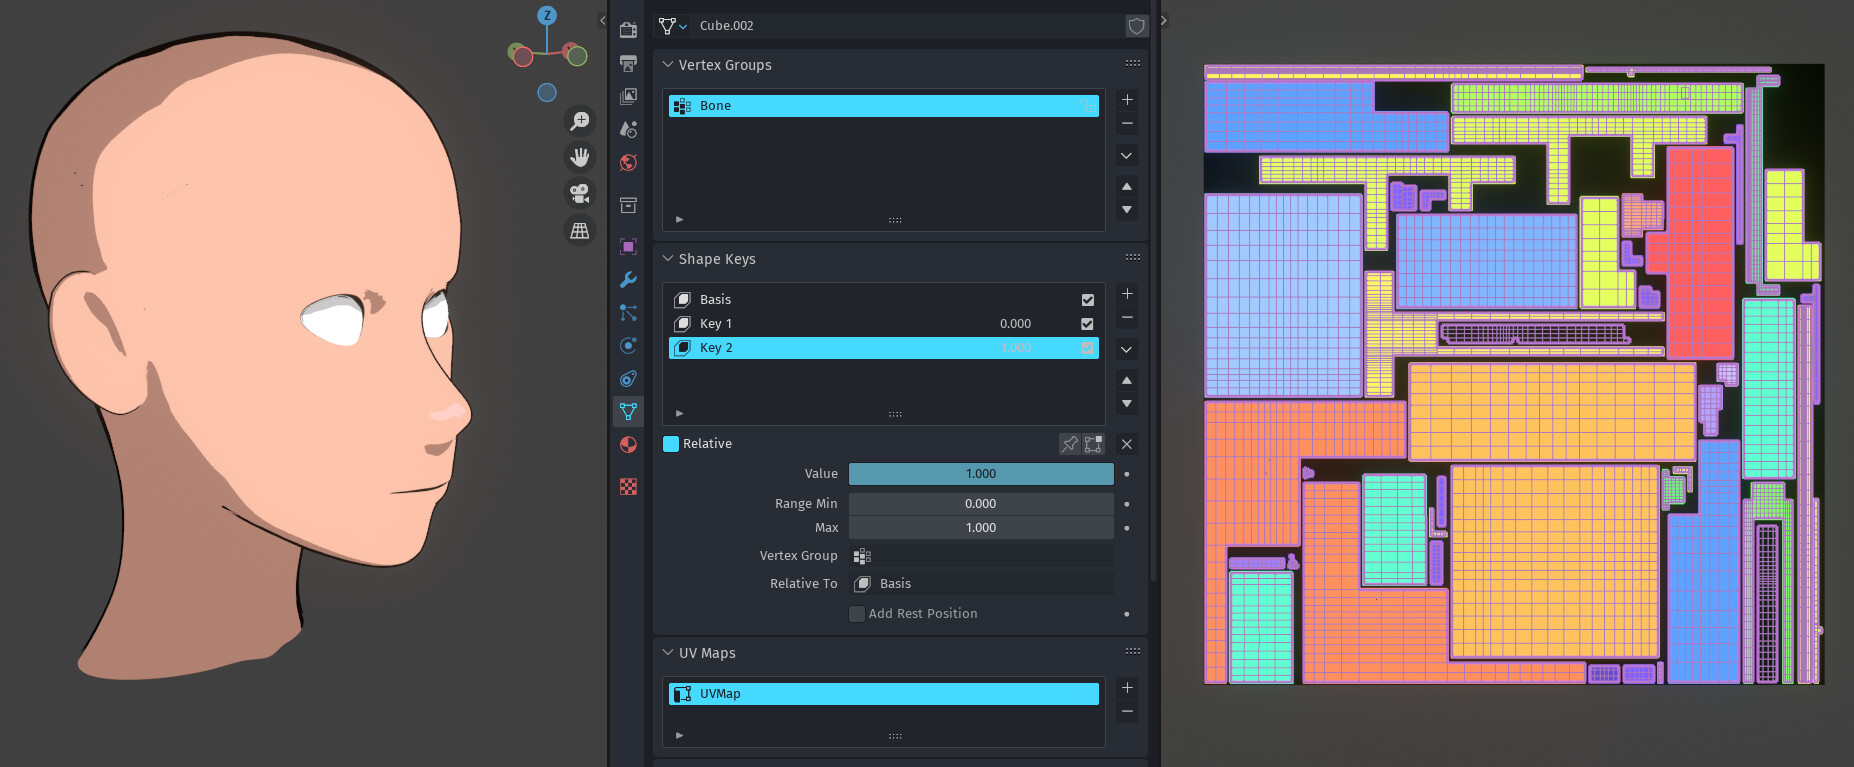
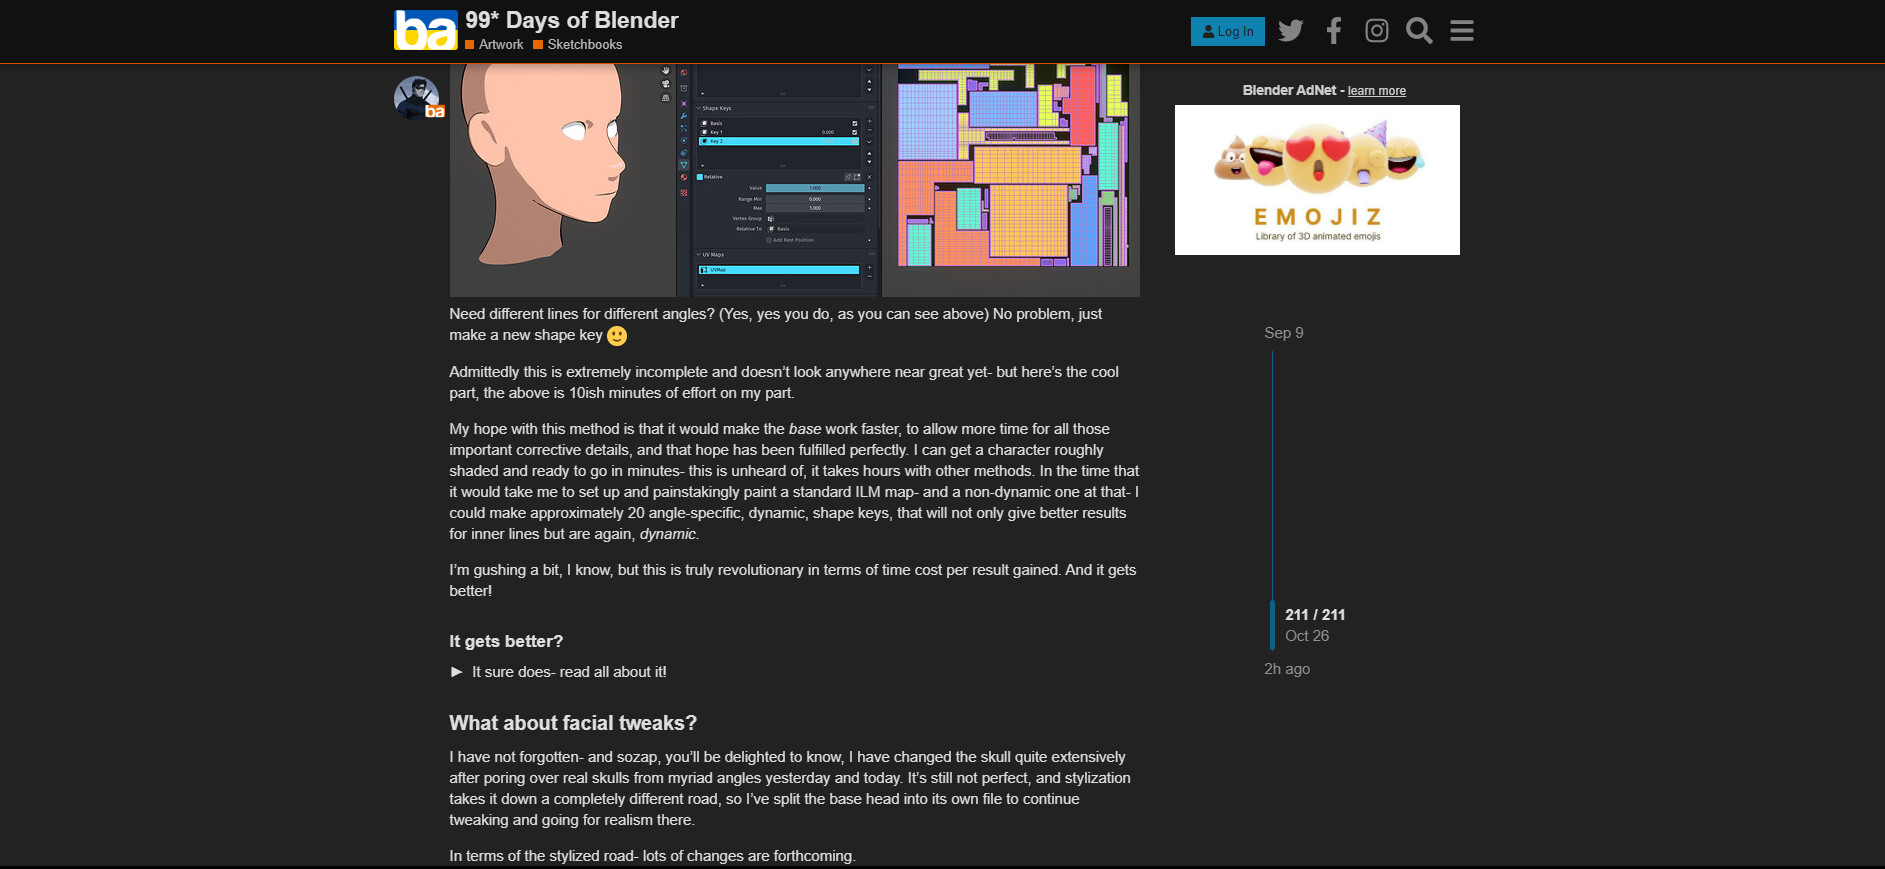
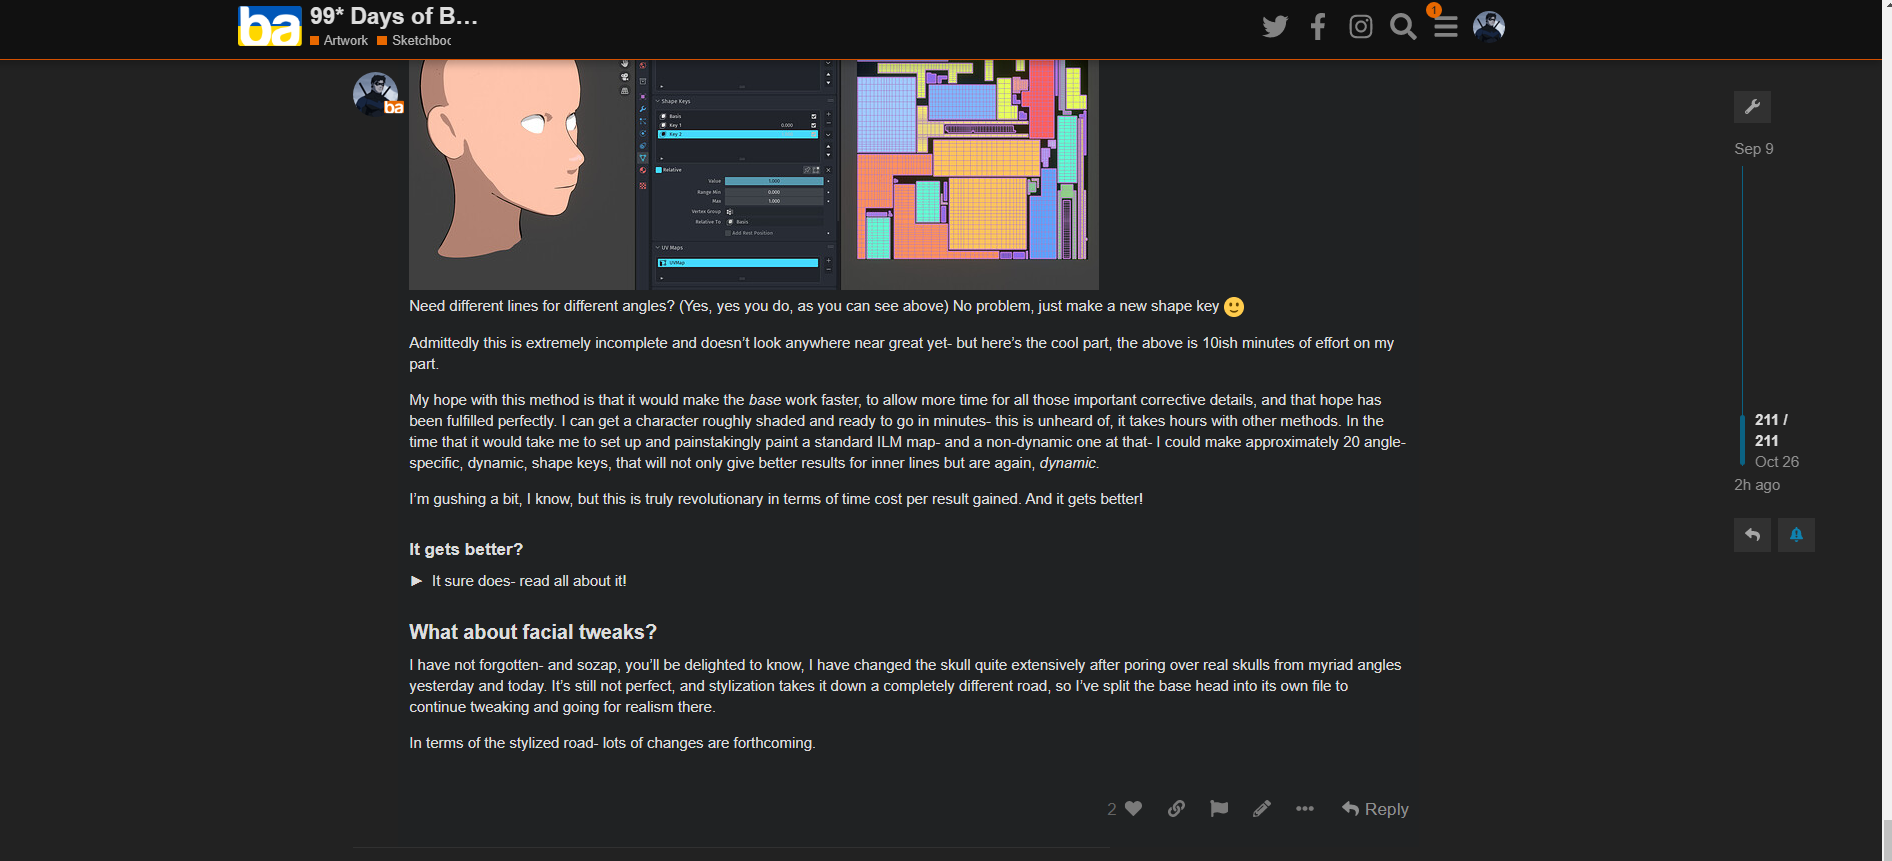
Here’s the megamap, with colored zones I adjust the opacity of with a custom property:

The colored zones are for reference only, I just want a black and white mask ultimately, but it’s nice to be able to quickly see which edge goes where.
The whole megamap is 512x512 pixels, I could have gone smaller, but I need a fair bit of white space (technically, black space) to work with. It’s still not bad, and the body should fit in 512x512, or maybe 1024x1024 (hands have a lot of inner lines that really muck up UV mapping, other than that it’s really just shoulder blades, collarbones, hip bones, stomach, breasts, knees, elbows, and 1 or 2 lines for each limb to convey muscle- which sounds like a lot more than it is)

The last few days have been… really lame? Boring and technical and repetitive?

Yes, they have, haven’t they? :sweat_smile: Big shout out to the regular readers for having the courtesy to read all this nonsense, or at least skim it :wink:

Truth be told, NPR work in Blender is a lot of work done properly, and the easiest thing in the world to do wrong. That is to say, if you want it to look good, you’re going to need to devote dozens if not hundreds of hours to the study and practice of deeply esoteric theory, complex math, long-forgotten techniques, and extinct websites you can only access through the WaybackMachine. If you don’t care if it looks bad, you can whip up an NPR shader in 10 seconds, which is where I think a lot of the snobbery and scorn in the Blender community towards NPR work comes from. I get it, a lot of it does look childish and amateurish, but that’s just the consequence of not putting in the time to get it right :person_shrugging:

Music:

Celeste - it’s been raining and storming all day, and something about Celeste just feels right for stormy weather. Also the Braid soundtrack - same deal, it’s just rain music. Celeste is one of the greatest video games ever made, I’d highly recommend it. I haven’t played Braid but it has a beautiful soundtrack

5 Likes

NPR is fascinating (though beyond my comprehension) and I’m taking notes for future studies. Keep that “boring and technical” stuff coming :wink:

3 Likes

Good to hear :slight_smile: It occurred to me I should probably actually share this shader - once upon a time I had plans to commercialize it, but I simply can’t be faffed to scrounge for extra income these days, I’m too old and perfectly comfortable at my job :wink: I’ll send it to you if you want it, I’m going to hold off on sharing it publically until I have some simple documentation for it, since the parameters are a bit overwhelming if you don’t know what they do. Depending on how my evening goes (still got 2D work to do) I’ll do that tonight and share it tomorrow, but again, you can have slightly early access if you want :sweat_smile:

3 Likes

Oh no - but thank you for the offer - there’s just no way I can wrap my head around something complex like that at this time (I’m pretty much asleep by the time I get to my PC) :sweat_smile: For now I’m content with bits of info you’re dropping. There’ll be a lot of re-reading to do later :slight_smile:

1 Like

Guess again. (:kicks your goblin brain in the head:)

3 Likes

Day 27 - This is kind of cheating… but here’s my shader

Ok, I know, I need to be actually making things in Blender, but honestly, this is going to have to count for today. I had to spend most of my free (that is to say, non-work) time this morning babysitting a Thread That Shall Not Be Named, and then writing up this documentation took quite a fair bit of time. Regardless, here is my Ultimate Cel-Shading Shader, free for anyone to use (attribution not required but appreciated). Trust me when I say this is the single best cel-shader for Blender out there. You will not find better, I’ve been looking for years :sweat_smile:

Check it out, give it a whirl- the documentation has a short GIF for each parameter, as well as written instructions, and it would be a shame if I went to all that work for no reason :wink:

Music:

I didn’t personally have music on for a lot of the day, but my wife did in her office so I was just eavesdropping on hers. She was listening to Midnights, the new Taylor Swift album, and it’s quite nice. I’m no swiftie but I’ve enjoyed it. When I did have music on it was my regularly scheduled Fire Emblem soundtracks :slight_smile:

8 Likes

Day 28, Part 1? - Hours turned into minutes

Behold, the result of combining my cel-shader with my (powered by @stray :wink: ) inner line method:


Need different lines for different angles? (Yes, yes you do, as you can see above) No problem, just make a new shape key :slight_smile:

Admittedly this is extremely incomplete and doesn’t look anywhere near great yet- but here’s the cool part, the above is 10ish minutes of effort on my part.

My hope with this method is that it would make the base work faster, to allow more time for all those important corrective details, and that hope has been fulfilled perfectly. I can get a character roughly shaded and ready to go in minutes- this is unheard of, it takes hours with other methods. In the time that it would take me to set up and painstakingly paint a standard ILM map- and a non-dynamic one at that- I could make approximately 20 angle-specific, dynamic, shape keys, that will not only give better results for inner lines but are again, dynamic.

I’m gushing a bit, I know, but this is truly revolutionary in terms of time cost per result gained. And it gets better!

It gets better?

It sure does- read all about it!

There’s still more to do that isn’t particularly fast traditionally- but with shapekey driven UV maps, shadow correction goes from a gigantic nightmare involving manually positioning dozens of empties for normal edit modifiers (seriously, that’s what it usually takes) to a simple swipe of a shape key. How, you say? Simple- the ShadowMask parameter in my shader. Plug a black-and-white texture into that and distort the UVs as needed with shape keys.


I’m testing that theory right now and I can confirm it’s a speedup of huge magnitude. What used to take hours now takes minutes. At this point, I’m predicting a speedup of at least 10 times - what would normally take 10 hours can be done in about 45 minutes this way, and I’m slowing myself down quite a bit just getting familiar with the UV map. Once I have that memorized, I think I could see speed gains of 20 times.


Once that’s all settled, the only major thing remaining is camera angle relative shapekeys and camera distance relative shapekeys (CAR and CDR for short), which unfortunately this process will not speed up at all, but those are usually pretty simple, and I’ll take a 2000% (… I think that’s right) speed gain that covers 90% of the process without complaint.

What about facial tweaks?

I have not forgotten- and sozap, you’ll be delighted to know, I have changed the skull quite extensively after poring over real skulls from myriad angles yesterday and today. It’s still not perfect, and stylization takes it down a completely different road, so I’ve split the base head into its own file to continue tweaking and going for realism there.

In terms of the stylized road- lots of changes are forthcoming.

5 Likes

Also- this is a bit off-topic- I’ve just now realized that my longer posts are probably really annoying to read on vanilla BlenderArtists. My own BlenderArtists is much wider and easier to read:


To that end, here’s my Stylish extension for BlenderArtists. It makes using the site a much more pleasant experience :slight_smile: It’s based around @Felix_Kutt 's , but with quite a few changes.

.topics, .suggested-topics-title, .suggested-topics-message{max-width:80%!important;min-width:80%!important;width:80%!important;margin-left:10%!important;}
.d-header-icons{margin-left:-24vw!important;position:absolute;left:-100px;}
.contents > .title{margin-left:10vw;}
.nav-link-container{right:500px!important;}
.reason{margin-left:16vw!important;}
.topics > .featured > .thumbnail {
        max-height: 100%;
        max-width: 100%;
        height: 100% !important;
        width: auto !important;
    }
    .tlp-featured-topics.has-topics .topics {
        overflow-x: auto;
        width: 100%;
    }
    .tlp-featured-topic.featured {
        max-width: 16.33%;
        margin: 0 auto 0 auto;
    }
    .tlp-featured-topics.has-topics > div.topics :first-child {
        margin-left: 0 !important;
    }
    .wrap {
        max-width: 94% !important;
    }
    .timeline-container {
        top: 28em;
        margin-left: 80% !important;
        float: right !important;
    }
    .timeline-container > .topic-timeline {
        top: 8% !important;
        margin-left: 0 !important;
        width: 100% !important;
    }
    .topic-body {
        width: 80% !important;
    }
.topic-area{margin-left:16vw!important;}
.topic-footer-main-buttons{margin-left:16vw!important;}
    #friends > #btxt {
        display: initial;
    }

.create-topic{position:absolute;left:90vw;}

.topic-list, .navigation-container, .footer-message, .suggested-topics-title, .title-wrapper {width:80%!important;}
.title-wrapper{margin-left:16vw!important;}
.extra-info .title-wrapper{margin-left:0vw!important;}
.suggested-topics{margin-left:7.2vw!important;}

You can use this with Stylish:

or xStyle:

Or probably others as well.

3 Likes

That’s really awesome!

[Better visual BA experience]
Works great in Stylus (less private-data-collecting fork of Stylish)! Thanks!

1 Like

So cool! Love seeing the methods you come up with, feels like I’m watching a devlog of some sort. Very interesting!
Thanks for the bar expanding, will try it out!

1 Like

Yeah, sorry to say I haven’t updated it in quite a while, but happy to see someone got some use out of it. :slight_smile:

1 Like

Day 29 - Back in the perspective saddle

Short preamble- I’ve been advised kindly by several of you to scale back my ambitions and make scenes that are smaller and more manageable. Well, thought I, what could be smaller and more manageable than a sewer?

I didn’t just randomly have sewers on the brain- recently I converted Young Justice Season 2 Episode 1 into 13,722 still frames (every other frame, of course, because as you well know, animation is done on twos.)

Which, by the way, was a pain and a half- I paid for this DVD, I should be able to rip it apart into single frames should I so desire, and I do so desire, but apparently that’s frowned upon in the world of DVD protection :thinking:

Anyway, frames 0675-02899 have a battle in a sewer, which works out perfectly, because I have a ton of reference shots of this sewer from over 10 angles. Behold, my reference board:


There are more shots, I just don’t have room for them on this board.

This is definitely smaller, and it seems more manageable. Other than the fact that I kept making really stupid modeling mistakes, which wasted a lot of my time- this took over an hour, which is frankly ridiculous. I could have got away with a lot more if I’d been willing to have bad topology, but it physically pains me to do non-quad work.

Anyway- once again- here’s my progress:

If your immediate reaction is- wow, that’s really dark! - well, it is a sewer :wink: Once I’m done texturing it will look a lot better.
And so far, it looks pretty good from any angle, which isn’t much of an accomplishment, I suppose, since this is just a tunnel, but I’m proud of it :slight_smile:

This kind of scene work is actually more useful to me than what I’ve been doing anyway- my only need for scene work is as backgrounds as animation, so what could be a better way to learn those skills than by practicing recreating backgrounds from animation?

Lastly- it being late- I will not be able to do any 2D work today. I know, I’m slacking big time, I’ll make up for tomorrow by doing extra cubes :wink: I also just got one of the really nice body-kun figurines in the mail, so there will soon be horrifyingly amateurish figure studies over there as well.

3 Likes

My immediate reaction is “oh, that looks really good!”

Stop berating yourself (even though it serves to hammer home the point why me doing that as well is a waste of energy, so, thanks, i guess?). Making fewer mistakes is what practice is for. It takes a lot of practice for our brain and hands to really get used to doing something. And digital work is forgiving of mistakes, so practice comes relatively cheap, which I love. I sometimes get paralyzed and do nothing for a while because I hate making the first cut into a nice new piece of actual wood, because that’s where a mistake can ruin everything – I’ve been there and done that, and man, does it suck.

I know you know all that. I need to keep hearing it though, so I figure it won’t hurt you either.

And now I want one of those body-kun figures. Especially if it comes with a sword and a laptop, all the mod cons, what’s not to like? What’s not to like is that I am a long way from humanoid character modeling. BUT IT’S ON SALE! :sigh:

3 Likes

You’re entirely right, and my frustrations are mainly that I feel like I should be able to do these basic things faster. Especially tonight, it’s been a while since I’ve done an arch with buttresses and I keep screwing up my face orientations. But… as you say, that’s how we learn and improve :grin: I’ll try to keep my musings positive, I’m quite mean to myself internally but I’m constantly working on not doing that.

As far as the figures go- here’s my review, he feels better made and sturdier than any other drawing mannequin I’ve encountered. The joints are all metal and most of them are double articulated, which is awesome. If anything, they’re possibly too stiff, which is a good thing, because they’ll loosen over time. It does come with all the accessories and a bunch of different hands, very helpful, and I think the woman comes with swappable breasts. Which is silly, since all of the options are double D or higher, and you can’t just make breasts bigger without affecting the rest of the body unless you’re talking about implants, but I digress.

The only negatives are- the price, obviously, the instructions are entirely Japanese and not terribly helpful even when translated, and the stand is a bit of a pain to put together. Those joints all needed tightened for me, and they’re tiny little screws.

3 Likes

Day 30 - Sewer complete!


This is a big win for me. I took a scene, recreated it as a blockout, textured it, and it looks really good from several different angles. I’m also quite happy with my textures - I’ve been trying to use @sozap 's layering method more mindfully, to the point where I have three “Sewerify” layers per object (the water is entirely unique):


Each of those layers is the same node setup with different scales, and stacking them allows for a lot of depth of detail.
Turning these off makes a big difference:

Lastly, I’ve done a ton of compositing to get the look I wanted. I used the Enrich add-on, not for the presets (I hate presets), but for the very convenient layer-based compositing system:

This is what it looks like without the compositing:

The final look isn’t perfect, but it’s pretty darn close, and it’s not bad for a first try. I’m really happy with how this turned out, I could quite feasibly use these renders as backgrounds for animation (although again, the look isn’t perfect, and a pass through a Painterly filter might not be a bad idea). The contrast on the walls needs to be higher- which would require some manual painting to enhance the existing procedural edge wear- and the lens distortion might have been a mistake. Or rather, I think the lens distortion is right on the wide-angle shot but should be lessened on the others. That’s definitely new knowledge to me :slight_smile:

Music

A bit of an eclectic mix - Death Cab for Cutie, Walk the Moon, The 1975, Clairo, Bad Suns, MisterWives, Foster the People, just a nice chill vibes playlist

6 Likes

I recently discovered darktable for post processing, and I’d recommend you check it out too. It’s free, open source, fast, and easy to learn if you’re already familiar with basic post-processing skills. It has a powerful non-destructive workflow with a module stack, similar to the addon you mentioned.

2 Likes