I promised realism, and… ok, it’s close enough to realism I’m working on this cave scene from this tutorial:
Although I’m making a lot of my own changes. This tutorial seems a bit beginner focused and is really missing a lot of simple tricks that would make it much easier. It’s a great tutorial and I’ve definitely learned some things from it, it’s just nice to be able to supplement it with my own knowledge.
This isn’t done, by the way, tomorrow I’m going to add a lot more vegetation and some volumetric. This is just all I’m able to do today.
Pre-compositing it looks like this- I’ve been able to teach myself a lot about compositing with this project. I’ve also learned a lot about lighting, sculpting, and texturing. Lastly, I used geometry nodes for the first time ever to roughen the edges near the water and add some erosion lines where the water used to be:
I’m really happy with how this has turned out. I do of course see quite a lot that could be better, but I’m trying to focus on the positive since my dislike of my own work is quite a hindrance in my life. I’ve made quite a few changes since yesterday.
Overall, I’d say this has a distinctly “Wii/Gamecube era pre-rendered background” flair to it, which isn’t what I was going for exactly, but I’m not mad about it. Drop a simple pixelation filter on this and you’d be looking at a Final Fantasy background, which I’ll try later if I have time
As a kid, I had this PC “game” that came on like 10 or 20 CDs, that mixed a fun point-and-click first-person adventure on a long-lost island (I think you were trying to escape?) with teaching you algebra and calculus. I did not care for the algebra, but I liked the game. Looking at this work has brought it back to my mind for probably the first time in 10 or more years. This 3D scene would fit right in. I don’t remember the name, or I’d show you all what I mean- if anyone knows what I’m talking about, please share it with me
Also, here’s a Walk Navigation walkthrough (without compositing or volumetric, the render of course looks much better):
In contrast to Day 6’s imaginative, fantasy, cave, today needed to be about realism. I don’t have much time today sadly. I was planning on doing more with the scene, but it ended up taking far longer just to model this than I was expecting because the knife tool doesn’t work in Blender 3.3 Ok, it works, but it no longer cuts the way it should in x-ray mode? I’m absolutely baffled by this regression, it’s horrible and I hate it. Cutting the angled ends here took easily three times longer than it needed to because of this.
Anyway, this is the antenna for my WiFi card. It has some interesting material properties I’ve tried to replicate. It also has a tendency to pick up fingerprints, which I’ve also replicated with an alpha texture:
The WiFi symbol is only visible from certain angles and with the right lighting, which I think is super cool. It was fun to figure out to do this correctly in Blender.
Not much else to say, this is a pretty boring piece of hardware overall.
Ok, technically, I’d already started sculpting this head a couple of weeks ago. It was probably halfway finished before today, but I made a good bit of progress on it today. Now, informationally, realism is definitely a goal here- I’m not planning on sculpting further detail, instead, I’ll be retopologizing this. I have no use for sculpting a perfect human head with pores/wrinkles etc, it just doesn’t have any bearing on my plans, my goal instead is anatomical correctness.
So… before I retopo, I need to do a sanity check. What is wrong with this head? Don’t hold back and don’t be shy, it’s a lot easier to fix things now rather than later.
I personally find it challenging to get the anatomy right at this stage, especially without eyebrows. Something about eyebrows just makes a face so much more like a face, you know?
And yes, before anyone asks, I’ve been using reference for this. A lot of reference
The pictures are a mixture of 100mm and 120mm focal length. I don’t remember which are which, sorry. I can tell you for sure these pictures are 90mm:
Nice product-viz! Although it might be boring to you, even if this is some Angle-based ultra/hyper cool slick design plastic (made in china), it really is a nice asset for your asset collection. I like it! Place it in a scene with good lighting, and boom.
I’m not even an amateur when it comes to anatomy of any kind (so don’t take it too seriously), but I do feel like the chin base (jaw bone joint) part kind of looks too narrow. The front, there seems to be faces with that narrow-ness, and at first, that felt off to me, but as I looked at the side view, I kinda got why. I think the vertical line in front of the ear should be a little more straight, to put it differently. Again, can’t be a teacher myself, just that my fresh eyes would say so. Pls correct if wrong!
Overall, I would need to spend a ton of time to get to that level, so nice work!!
Hmm… I think I know what you mean, and I think you’re right. The lower cheeks and the lower jaw need more volume. I’ll see if I can implement it
Thanks for weighing in! Anyone else who wants to, please do, it would help me out very much
:urk: – why can’t you need help with something nicely blocky and low poly?
Disclaimers first so you know how much (little) to weigh my opinion on such matters:
I have not studied human anatomy. I haven’t ever analyzed human facial features. I don’t really pay much attention to them IRL (it’d be rude to stare).
I am aware that there’s a huge variety among humans, so right now I am arguing with myself about whether what I notice here matters. It probably doesn’t.
But you asked twice. Alright. I concur with the jaw issue. I also feel there is something slightly off about the nose, that it comes in a bit too much at its narrowest point before it flares out again towards the nostrils. In profile it also feels a bit too concave; it seems more stylized than realistic.
And the eyes seem really large, but maybe they just look that way without eyelids; I have no real life reference for that. Missing eyebrows don’t bother me, but missing eyelids are creepy.
Sorry I can’t be any real help. This is way beyond what I could do myself, that’s for sure.
I’ve never done much with low poly but maybe I’ll try it out, just for you
Yeah, I could see that. Good catch! I’ll add more volume there as well.
Hmm… yeah, more volume there I think would be good. The overall vibe I’m getting here is more volume all around
Believe or not- this is how big your eyes are without eyelids. I know, that’s super weird. Tomorrow I’ll add eyelids and eyebrows and you’ll say “ohhh now that looks like a person!” Hopefully
To be fair, there’s a chance some stylization might have crept in. After Retopo, I’ll be stylizing more anyway. I just figure it’s good to start with realism, get that right, and then stylize. I usually jump too early into stylization
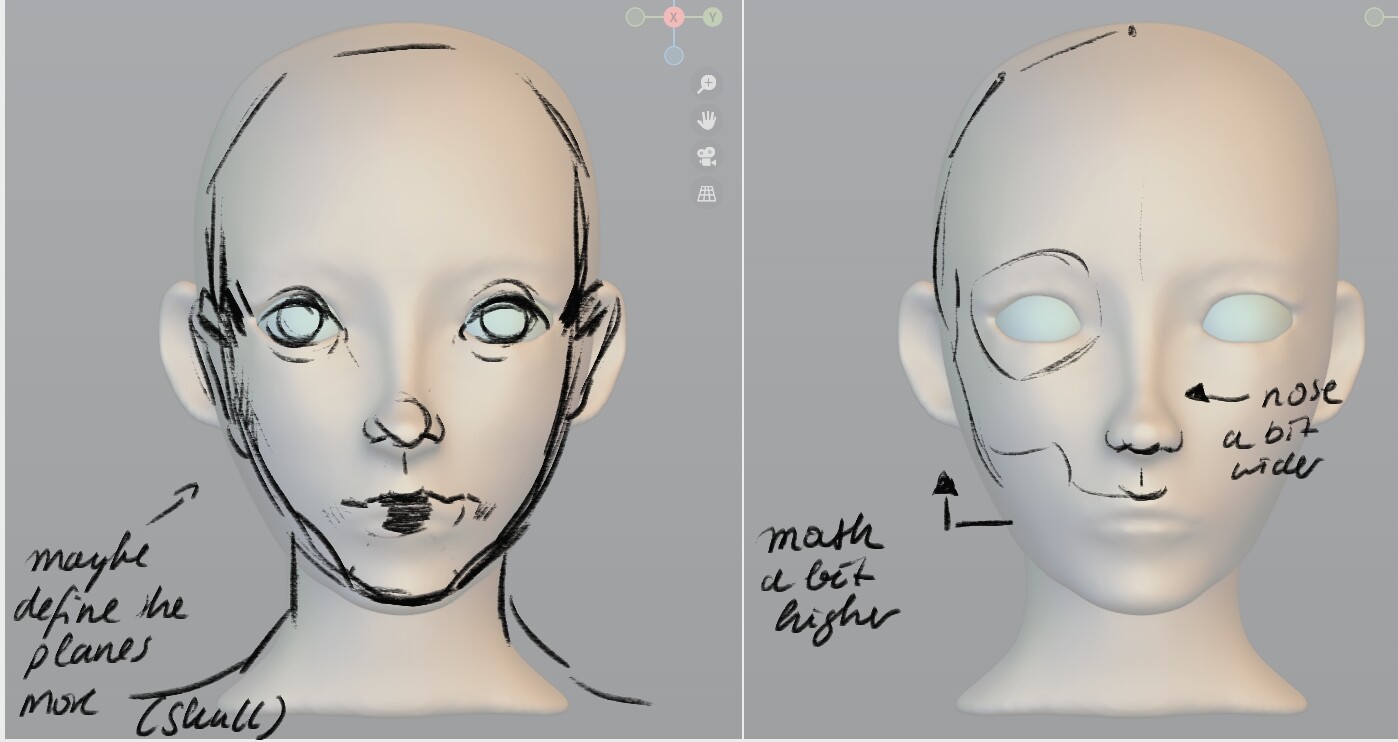
push the planar changes of the faces in as lowpoly as possible, I find that staying with a very low polycount (8k for example) and sculpting until there is no form anymore to adjust really helps from the beginning. Right now the face is very smooth and round and I think it would benefit a lot from the Grab brush and really digging into the general forms, the bones, before going into “muscular” forms
the mouth is quite low, I’d move it a bit up
the nose is a tad thin, I’d adjust the width and push the nose a bit up, too
neck is quite tiny
Excited to where you take this sculpt. It’s definitely a great start
Interesting… everyone else said more volume on the lower half of the face, you say less your draw over does look really good, I’ll for sure be trying it out. Do you have any tips for getting those flat planes without having weird indentations? I’ve tried to do some flattening with the grab brush but it ended up deforming a lot more than I could control.
Thanks for your feedback, you’re totally right about the neck and mouth. How is it that I can’t see these things until someone else points them out?
I think the reason is: When you add more volume to the lower half, the mouth isn’t as far down anymore as before. You could go either way, depending on the structure of the face.
I’d just lower the polycount to something like 5k and start pushing the edges around, not bothering to flatten anything