Hey pingking23, was wondering if this wonderful exporter will get an update for use with Blender 2.80.
Many Thanks.
1 Like
Hey @pingking23,
updated the script for Blender 2.8x:
- Naming conventions
- Class registration
- PEP (lowercase variable names)
- Context references
-
Object.selectproperty replaced with get/set functions
Remaining issue is that the exported comp file is not formatted properly. Not on my side, I guess they changed the file specifications in newer versions of fusion or there was a bug before. In best case, just one curly brace is missing somewhere, not sure right now.
What do you think? Could we port this to github, gitlab or something to get track of the changes?
Cheers,
Christian
Hey p2or Thanks so much for all your efforts, greatly appreciated! I’ll post over at https://www.steakunderwater.com/wesuckless/viewforum.php?f=16
and see if any Fusion users can help out with testing.
Kind Regards,
Tim.
hi,
blender and fusion arent on very much on my free time anymore.
i didnt care about the exporter since fusion got its own 3d tracker. didnt know anybody was still using this.
i did a quick first look at the new exporter and for my test it didnt export the things between line 413 and 478 of the script
hope i can find out more
I’m also interested in having the 3d data from Blender to Fusion.
Right now I’m using alembic and it works fine. Just curious, what would be the advantage of a dedicated exporter?
The advantage is/was that the exporter could (2.79) send tracking data to the tracker nodes in Fusion. It was also the best way to get the camera animation accurately which the FBX exporter still fails to do. But exporting via alembic fixes that issue.
2 Likes
I recently started using blenders camera tracking. I find it even better than PF track.
I have a problem of when I import the alembic into fusion the aperture size is usually off. And I have to manually adjust to get things to line up in fusion.
Is there a way around this?
Fbx import into fusion seems to mess up camera alignment
Hi!
Just tried installing it and I get this weird issue, maybe someone else has it. Blender finds the .zip addon and installs it with no problem, it shows up in my addon tab in preferences. But it dosen’t show up in my export tab… It’s just not there. Do anybody know if you have to check something else before using it?
What I’ve tried is : Installing and re-installing it, installed it - then restart the program (and one go where I restarted the computer as well)
I’m on blender 3.4 and maybe it dosen’t work there? Do anybody know anything about that?
I’m on an imac as well so mac OS system, could that maybe be the problem?
Hi guys,
is there still life in this addon?
I’m currently fighting with getting a camera from Blender to Fusion Studio (18.6.4 latest version).
Usually I export the Blender scene to Alembic, import it to Fusion, unlock the Camera3D node and set the “Resolution Gate Fit” in Fusion from “Height” to “Width” and get a proper match.
But this time I have to also import the “Shift X” and “Shift Y” from Blender to Fusion (called “Film Shift X” and “Film Shift Y” over there.)
No luck so far. Not with Alembic, not with FBX. Fusion can’t even read its own exported FBX files back in correctly. So I had the hope that this addon here could help, because it directly outputs “.comp” files readable by Fusion.
Sadly Fusion refuses to recognize the comp-files I export as a comp and doesn’t load it (which has been reported before), plus reading through the exported .comp file in a text editor, the keyframes of “Camera3D1LensShiftX” and “Camera3D1LensShiftY” aren’t exported as well.
In the meantime, it would already help if I could export e.g. a simple .dfmo 2D motion path file from Blender to Fusion to get the 2D position of e.g. an empty to attach a lens flare to.
It’s a shame I can’t code a single line of Python…
Preface: This will be a long post but in the end you’ll get a Python script that can export the screen position of Empties in Blender to .dfmo files for Fusion. ![]()
OK, I thought before I keep begging for a solution that would be easy to solve by someone who can code, I gave ChatGPT a try and talked to him/her/it to help me find a solution. I can’t code at all BTW.
The result is (positively) shocking and finally led to a solution that did the job and gave me a solid solution for the next time I need it. So I thought I’d share it here. Beware, as I said before, I’m not a coder, so if you are and see what I post here, please comment. But at least for me it worked and I’m fascinated and frightened at the same time… mostly fascinated, though ![]()
My task was to add lens flares to an existing 3D animation that was animated in Blender.
I use Fusion for comp and some awesome free lens flares available for it. My usual workflow is to export an Alembic containing the geometry and cameras from Blender and then use the positions of helper objects to add “Locator3D” objects in Fusion and then output 2D screen space locations as sources for the lens flares.
Worked every time, thanks to Alembic export from Blender / import in Fusion.
This time 3 different target resolutions / aspect ratios were asked, 2 of them needed an animated lens shift (film back). Blender exported the 3 cameras to Alembic without a hitch.
But this time with animated film backs Fusion did ignore the animation on these. (Later I noticed that while Blender exports it to Alembic and USD, it also can’t import them back.)
To make it short: I had no way to export reliable 2D positions for the lens flares.
A “flaky” solution would be to match the film shift by hand, but as soon as it’s animated it’s tedious and error prone.
Another solution would be to add something like a small white object in Blender where the lens flare should have its origin and render the rest of the geometry in black / matte and render that as a separate View Layer.
Tedious as well plus it doesn’t support off-screen positions.
If only I could export the 2D positions straight from Blender to a file that Fusion can understand. For example the “.dfmo” file type that is a simple ASCII file per tracker that contains something like this:
DFMO
0.000000 0.000000 1.000000
0.000000 0.011719 1.500000
-0.000000 0.023437 2.000000
0.000000 0.035156 2.500000
0.000000 0.046875 3.000000
0.000000 0.058594 3.500000
0.000000 0.070312 4.000000
0.000000 0.082031 4.500000
0.000000 0.093750 5.000000
0.000000 0.105469 5.500000
0.000000 0.117188 6.000000
0.000000 0.128906 6.500000
0.000000 0.140625 7.000000
0.000000 0.152344 7.500000
Super simple! Each line contains the x- and y-position in screen space, normalized to 0.0 - 1.0 value range, the last column contains the frame number as a float. The value range can also be smaller than 0.0 and larger than 1.0 in case the object is off screen. Additionally the positions are saved at full and half frames (that’s why there are frame numbers like 1.500000 etc.)
After some talking to ChatGPT I finally got this Python script:
import bpy
import bpy_extras
import os

# Function to convert 3D coordinates to normalized 2D screen coordinates
def world_to_normalized_screen(scene, obj):
    co_2d = bpy_extras.object_utils.world_to_camera_view(scene, bpy.context.scene.camera, obj.location)
    render_width, render_height = scene.render.resolution_x, scene.render.resolution_y
    normalized_x = co_2d.x
    normalized_y = co_2d.y * (render_height / render_width)  # Adjust Y-coordinate for aspect ratio
    return (normalized_x, normalized_y)

# Get the current scene
scene = bpy.context.scene

# Check if there is an active camera in the scene
if scene.camera is not None:
    # Filter selected empties
    selected_empties = [obj for obj in bpy.context.selected_objects if obj.type == 'EMPTY']

    # Check if there are selected empties
    if selected_empties:
        # Get the directory where the blend file is located
        blend_file_directory = bpy.path.abspath("//")

        # Iterate over selected empties
        for empty in selected_empties:
            # Create a file for each empty named after the empty's name with .dfmo extension
            file_path = os.path.join(blend_file_directory, f"{empty.name}_coordinates.dfmo")

            # Iterate over the frames in the render range with increments of 0.5
            with open(file_path, 'w') as file:
                # Write the first line
                file.write("DFMO\n")

                for frame in range(int(scene.frame_start * 2), int((scene.frame_end + 1) * 2)):
                    # Set the current frame with increments of 0.5
                    frame_value = frame / 2
                    scene.frame_set(int(frame_value), subframe=frame_value % 1)

                    # Get normalized 2D coordinates
                    normalized_coordinates = world_to_normalized_screen(scene, empty)

                    # Write coordinates to the file with 6 decimal places
                    file.write(f"{normalized_coordinates[0]:.6f} {normalized_coordinates[1]:.6f} {frame_value:.6f}\n")
    else:
        print("No selected empties.")
else:
    print("No active camera in the scene.")
Not even the comments were added by me, it’s all from the AI. And it works like a charm:
Just load the script in Blender’s script editor, select one or more Empties that you want to export and press the play button on top to run the script. In the end you’ll get a single .dfmo file per Empty next to the .blend file that is open. The files are named after the corresponding Empty.
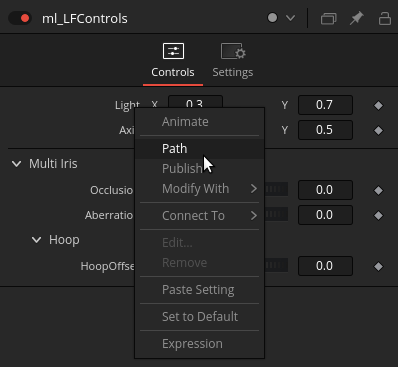
Now in Fusion make sure your project resolution is set correctly. Then you go to the 3D screen position input of the value you want to animate, right-click and select “Path” to add a path animation:
Then right click in the viewport and import the motion path file (.dfmo) from my script to this Polypath:

Done!
Now your 2D animation path is 1:1 the same as in Blender’s viewport.