It can be baked, if you use a retopo, with 16 vert circles for the center hub/pipe and the two outer wheels/plugs, then 15, 5 sided nuts, you should be somehwere around 400 verts, or something like that, if you have the geometry close enough to the original then the bolts will bake just fine, that little bumpy part :spin: I mean.
Not going to look great from sharp angles but for the most part it will look about the same.
ok but if i reduce let say the middle shaft to 8 verts smooth is it going to give something good
or too rough!
i’ll try to make a test later this week
but not certain what to expect here!
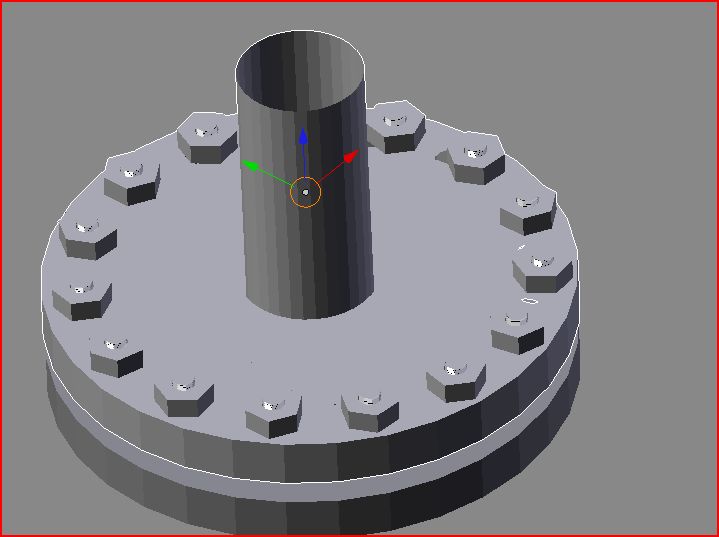
this shape is a small one i have other with may be 100 nuts or bolts head
so not certain if this is the best way to go or use the sculpt texture method with some alpha or normal map for a bolt or nuts!
Its not the shafts that are the problem you shouldn’t even break 400 verts with 32 sided shafts, its the nuts that are the problem (thats what she said?)
for shaft , go with 16 vertices and for base with 24.
Hex bolts are good enough. try to decrease the count.
Mark Sharp all the edges of base, bolts and set smooth shade.
Unwrap All, adjust your uv’s. bake AO and utilize it to texture your mesh, most of the details can be achieved via texturing. no need to add little bump over bolts, just fake it.
your mesh will remain under 300 faces with lot of details. (using existing 16 x 8 face bolts)
It depends what you are trying to achieve. if the mesh is not much visible, then better go with low res model , delete bolts all together, use less vertices for base and shaft, fake everything in textures (normal map, bump etc). You only need the details, if the mesh is viewable from up close.
i know that fake won’t allow close shots
it’s the problem with bump / normal moa
mind you with bake it’s alot more defined then older bump maps!
and i have some model with 100’s of rivets and bolts
so fro the geenral scene i won’t be able to sue even medium res moedel
only way to get something will be to fake it
with bump/ bake normal map or using texture painting or sculpt texturing painting !
but have not experience a lot with bake normal and sculpt texture painting!
i’ll try to make a tst today with the baking and see if it works well or not !
first test will be with these rivets
not certain if i can fake the bolts here!
I was just pointing out how you could do your first pic in less polygons. (also you dont seem to have set smooth applied for some reason)
you cant really make a very square wheel look round with normal maps if thats what youre trying to do, you can only make slight differences, this would require a high to low poly bake.
use the extra polys where you need them, on edges. save the normal mapping for the stuff on flat surfaces.
also bevel everything on the thing youre making the normal map from, it will make better normal maps, which is what i did on the bolt.
Baking a normal map from the high poly to the lower poly version of a model can often do the trick
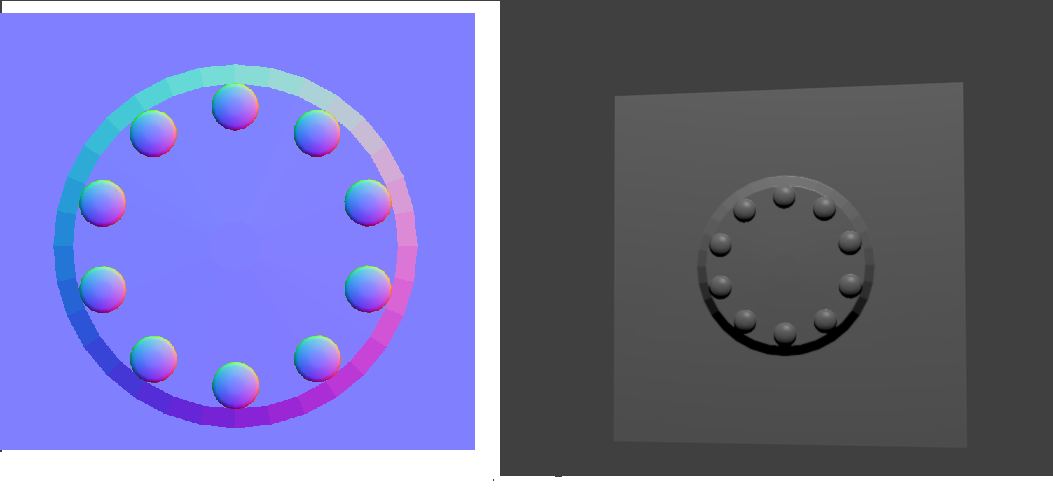
By example this render of 2 bolts :
The actual models are these :
As you can see, the bolt to the left has much more faces than the bolt to the right.
What i did was simply having both model at the same location, had the low poly bolt unwrapped, selected the high poly, then the low poly, and finally used the Blender bake normal function with the “Selected to Active” button enabled to obtain a normal map of the high poly projected on the low poly.
i mean is it required to add seams to do it to get a nice unwrap or just a plain unwrap will do
ok for bolts i have right now i don’t think i want to see the filets
but can this trick be used for the wire done with curves as shown in post 15 for instance ?
and what about using this new feature in 2.6 the sculpt texture painting
i do have a lib of all kind of bolts’ head
only problen i have is it possible to apply this to a rounded face
like in the case of 100’s of rivets on cylinder in post 9 ?
U need to add seams to unwrap. Better put them where , they are not easily visible. any yes the model shown in your 2nd last post can be faked. Just as @sanctuary mentioned in his post.
You can place rivets from your library over your baked normal map in Gimp/PS easily.
There are lot of details, which you can easily achieve with textures only.
Also, your model uses lots of extra vertices (remove edges from the square part, just keep the corners). Just keep the shape, and remove every extra edge,face.
Check out this link http://vimeo.com/28535685 a very good tutorial by Porter Nielsen for Alpha Map creation in Blender.
What ever you do (sculpting or adding details ) u need to unwrap the low poly model to actually put it in work. currently ur model is 3000 poly, by sculpting, you’ll easily push it up to around 100,000 poly, now multiply it with 10 to 12 pieces and other geometry in your scene. A lot of work for your PC. so , you need a low poly object . Adding seams is not a very bid problem, try it.