seanser, callmeishmael, bacon_chaney >> Thank you for your feedback.
tyrant monkey >> He’s not only a great bodyguard but also a kickass chef. 
mofx >> Can’t wait for the update!
I’ve played some with the rig. I have to say that this is the fastest responding rig for a character of this quality!
Also, I’ve seen your maya rigging reel and those rigs rock too. However I am happy to say that you didn’t fell into the trap of trying to convert your maya experience into Blender. You’ve played all Blender strong points right. Great job!
ps: how long did it took to transfer from maya to Blender? Just being curious, because it took me about three days of tinkering with maya to be able to animate with it and to feel pretty comfortable with the app when I needed to use it.
To be honest I thought it would be a lot slower than normal considering the face rig consists of around 150 bones, deformers and controllers counted, if not more. I wanted to try to make a system that worked like muscles, Blender’s stretch to constraints are very useful for this purpose. This way I didn’t have to use any Blendshapes.
However I think the performance boost comes from the mesh being very low poly, we’re talking game engine level. The detail in the face and hands are normal maps. The body, head, hands and shoes are 5500 polys. The eyes, teeth, buttons and similar are another 5000 polys (a lot wasted polys).
I think another performance boost comes from just basic vertex weights. I don’t use a mesh cage to deform the mesh. To be honest I learned that it was pretty much the way you’re supposed to work in Blender when I was done with Biff. :o
Would you mind pointing out the things I used in Maya which you thought I should not use in Blender? I feel I used most tricks from Maya in Blender, except how twist bones are done as Blender’s B-bones are powerful enough to do that by default. When I work with rigs I only think of “How would I like to manipulate the character? In what way can you do as much as possible with as little as possible? etc”, then I work with what I have. ![]()
That’s a tough question because I started to feel at home in Blender just as I was finishing up Biff. There’s a lot of things I’m having a hard time getting accustomed to in Blender, a lot of the features are hard to learn by trial and error and you have to reference a lot of things through wikis, manuals and tutorials to understand some basic things. (like pressing R twice to get a different rotation mode, not obvious! :p) Even though I used a lot of tutorials when I started learning Maya I feel I didn’t have as much frustration in the beginning, it was rather lack of experience that held me back. All in all, frustration aside, Blender feels pretty good when you’re past that first huge wall.
I checked through my WIP files and counted hours over how many days I worked on the whole character (sculpt of head not included). Spread over 1½ month I worked 21 days with a total of 130h spent. That includes modelling, retopo, rig and animation. Animation itself was 7h. That is 130h/21d, around 6 hours per day. I know I spent two whole days fighting problems with the rig because I didn’t understand why Blender gave me double transforms, so without that problem and some other showstopppers I would probably be done at 100h total. (I had to redo the face rig almost from scratch and the mesh was tweaked a lot of times) I see that as a pretty long time considering I could have a character fully rigged, animated and running in-engine in a week at my last job. (that’s 40-50h for rig and full animation set) :o You could say my transition period from Maya to Blender was a month total.
Looking at the bright side I now know how to avoid most of the total showstoppers on the rigging front. Sure, I haven’t worked with simulation and hair yet but that’s another topic. ![]()
Nothing to add but a big “WHOAAAA!!!”. Impressive rig, man. I’ll try to play with it ASAP. Thanks for sharing!
Hi Denny!
Really good job u’ve done. Is it for any project or only demonstrations of ur skills?
I like the face texture, kind a fake sss and rendering time, but to make it even faster to render u can do motion blur in nodes.
I’m working now on fat football player rigg, here’s link to some pictures http://www.blender.pl/index.php?option=com_smf&Itemid=2&topic=9004.0
Can u give me some advise or any tutorials how to add character properties to ur rigg?
Cheerz.
I want to see whatever you come up with. ![]()
I did it as a hobby project to learn Blender, then instead of having it lie around on my harddrive for nothing I wanted to share him. ![]()
I’m quite not past the intermediate level with Blender so I haven’t had any experience with nodes just yet. I could look into it. Thanks for the tip!
I quite don’t follow, what do you mean by character properties on my rig? He looks kickass by the way!
Just to clarify. Is it that you want to add more to Biff or is it that you want to add similar properties to your own scene/rig?
Thanks for the model&rig! One question though… what’s the name of the band that you used as a soundtrack for your presentation! It sounds really cool!
to any rig
Ratatat - Loud Pipes, it’s visible in the corner of the video when the music starts. :yes:
If you open up Biff.blend, the default scene, you’ll see the License text on the left. Go down to the bottom of the text area and change License.txt to Biff.py. That’s the script for adding the rig settings in the properties panel.
To add a similar script to any scene, open the Text Editor, add a new file, save as a .py file. Then tick the Register option to the right of Run Script button. This means the script will run whenever the file is opened.
You can copy the script and change the things to suit your needs. The things you need to change is;
- bl_label = “Character Properties” to what you want the panel to be called
- return (ob.name == “Biff” and mode == “POSE”) ob.name must be the name of your armature. Otherwise the panel won’t appear in POSE mode. This row makes sure the properties only appears when you’re animating the character, no point in having them there when working on other things.
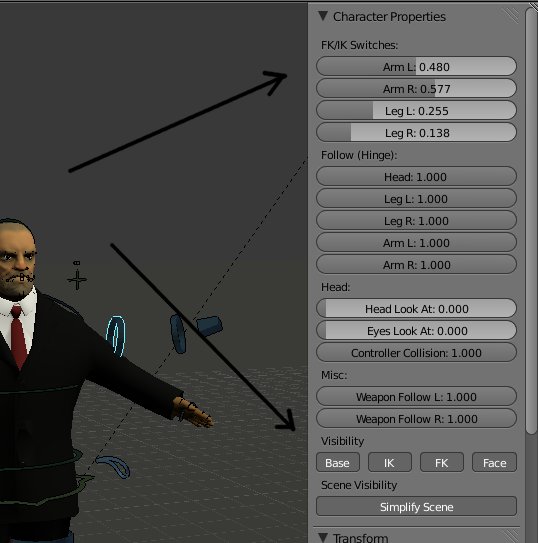
- col.prop(pose_bones[“RootController”], ‘[“ArmIK.L”]’, text=“Arm L”, slider=True) These similar looking lines are for connecting the sliders/buttons to actual values on your rig. RootController is the object and ArmIK.L is the Custom Property value of the object. Arm L is the visible text on the slider.
If you select the RootController, Pose Mode, then go to the Bone panel. You’ll see Custom Properties which I’ve added (ArmFKFollow.L, ArmIK.L, EyesAim etc). These values are used to drive the values on my constraints.
- To drive a constraint, right click the constraint value and Add Driver
- Then open up the Graph Editor and change F-Curve Editor to Drivers.
- Press N to get the properties panel in the graph editor.
- When a driver is selected in the list, press Add Variable in the properties panel, give it a name (not necessary but is cleaner).
- In Prop add your armature.
- To get the Path, go to the RootController and then right click the value, for example ArmIK.L, and Copy Data Path.
- Now Ctrl+V to paste the value into Path in the Driver properties panel.
- Last but not least change Type from Scripted Expression to Averaged or Sum Values. You have to do this last or the connection won’t update.
- Redo the above steps for all the constraints you want to drive with the same property. For example in my rig I drive 4-5 constraints with the same property for the IK switches.
- You should now be able to drive the constraints with your Custom Property from RootController.
- These are just examples and you can of course mix drivers and custom properties however you want.
To get an overview of what happens the flowchart controls like this;
UI Panel Slider -> RootController (CustomProperty) -> Constraint1, 2, 3
I recommend using a property on an object like the example to drive constraints and not try to use the UI directly. It’s cleaner, you have more control and you’re not dependent on a script for the rig to function.
[QUOTE=Would you mind pointing out the things I used in Maya which you thought I should not use in Blender? I feel I used most tricks from Maya in Blender, except how twist bones are done as Blender’s B-bones are powerful enough to do that by default.[/QUOTE]
For one thing, you’ve used strech-to constraint (no such thing in maya, except with some programming)
Second, bones for facial setup - I have never seen that in maya (and I have analyzed number of rigs (even made some myself) and I thought that it was impossible… or very hard, at least)
Anyway, great work, I just love the intricacy of your facial rig (I have used something similar in Einsteindwarf - see my sig for the link… uh, I think that I have newer version on blendswap - but on a much smaller and less precise way)
How did you do boneweights - auto bone weights or weight painting?
Hahah, oh he is biff alright  Thank you for sharing this amazing rig with us.
Awesome job on the character. You should make a tutorial on making those rigs, could earn you a few bucks 
True, I would prefer to say it’s worse though, when you can actually make a node-based setup, rather than saying there’s no such thing. :eyebrowlift:
Actually more common than you think. A lot of game rigs use bones instead of blend shapes as GPU skinning is quite new, using blend shapes is generally calculated on the CPU in games. If you checked my demoreel on my site, all rigs was made in Maya for UE3 and were all bone based rigs, no blend shapes involved. Player character has a full setup for the face.
Looks like an interesting character, saw on your blog that you haven’t had time to get the short done because of life. Would have been nice to see him moving.
All auto except tweaks on the sleeve. That’s why I have so many bones in the face because to be frank Blender’s weight paint is a nightmare. ![]()
I think you’re the first to catch the whole Biff part, but then that’s quite a Swedish expression. ![]() I don’t know if I want to bother making any tutorials, doubt I’d earn enough bucks for it to be worth the time.
I don’t know if I want to bother making any tutorials, doubt I’d earn enough bucks for it to be worth the time.
Hello Denny,
first of all… wow man this is the most easiest and most powerfull rig I’ve ever played with!!
I have to say I really love it! Especially the flexibility with his face!
I have never solved the issue to create a proper facerig!! I was always working with shapes, but this method is very unflexible.
This is crazy how detailed the facerig is, and how many bones you have used!! :eek:
I am working on a lowpoly Charakter myself right now, I started to create a rig, and this will be a great reference to learn! Thank your very much!!!
Just out of curiosity…
Why have you switched to blender? Was is worth for you compared to maya?
It would be great to hear a few thoughts of you on that topic, as an experienced maya user.
Wish you good luck with your study you’ve recently started!
thanks Denny that script and few video i’ve watched should help on that custom properties,
cheerz men
That is awesome!
I’m gonna start playing with him, starting today! Amazing job!
It’s nice that you find it easy to use.
Holy ****, she’s awesome! Can’t wait to see her finished. ![]()
Earlier I used Maya with a license I had from the studio, I don’t work at the studio anymore which means I either need to get a student license or pay up a leg or my soul to do freelance. Blender is a perfect choice as it has similar amount of functionality and it’s free. The community is more friendly, if I for example would like to invite a friend to get started with the software or help me out on a project I only need him/her to download the software and nothing else.
My opinion is also that it’s not the tool that makes an artist, even if it’s preferred to have efficient tools to avoid frustration, it’s usually enough if you can accomplish what you want even if it takes a longer time. Blender has some fast features like auto-UV-unwrap and heatbased autoweights for armatures, on the other hand modelling and weight painting lacks enough punch in some areas so they become really inefficient. However it’s enough to get things done. If you become experienced enough with Blender and its scripting interface you have complete access to reshape Blender to match your production. What’s the point to pay $$$ for a software that’s not that remarkably better? How much freelance/work do you have to make to earn that back? Not to forget how much will you accomplish before you have to pay for the next update? Even if Blender is completely missing a feature or is slowing you down, what stops you from using another free software to back that up? Wings3d, Sculptris, Gimp, you name it. That’s where Blender wins in my opinion.
obis_81 >> I hope you get things up and running.
Matt Elder >> Thanks. ![]()
agentmilo >> Show me whatever you come up with! ![]()
Hey Denny, great work! Really exciting to see a good rig come out of Blender. And I look forward to your (hopefully) continued participation in the Blender community.
I’ve only ever done serious character rigging in Blender, so I would be very interested to hear your comparative impressions of Blender vs Maya in terms of rigging.
I don’t use a mesh cage to deform the mesh. To be honest I learned that it was pretty much the way you’re supposed to work in Blender when I was done with Biff.
Having done a lot of rigging with mesh deform (I assume that’s what you’re referring to?) I actually try to avoid that now. It has a lot of drawbacks, so IMO it’s best not to use it unless it’s necessary (or for simple quick-n-dirty cases). I stick to armature deform + corrective shapes these days. YMMV of course.
Sure, I haven’t worked with simulation and hair yet but that’s another topic.
Sim is only useful for very simple situations at the moment, unfortunately. Using simulation in Sintel was a huge pain, and lost us a lot of time. I recommend avoiding it when possible. (Hopefully Project Mango will address some of these issues.)
When I work with rigs I only think of “How would I like to manipulate the character? In what way can you do as much as possible with as little as possible? etc”
Yes! Exactly! I love you. ![]()