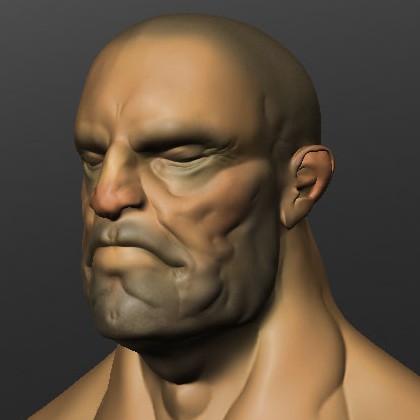
Biff - Updated for 2.59

It’s nice to hear that from one of the developers from the open movie projects. :cool: I have a lot more things I want to do in Blender so I’ll be around, I just don’t know when I’ll make any new updates.

Sure!

  • The first thing that comes to mind is the constraints. Rotational/transform/hierarchy constraints are more reliable in Maya than in Blender I’m afraid, they tend to just work in Maya while in Blender I have to scratch my head several times to get them to play well because hierarchies and transforms behave very different.

  • On the bright side constraints are a lot friendlier to work with and less destructive as Blender has them in a completely separate mode (Pose Mode) and each object has them in a modifier list. In Maya you don’t have these modes so any changes to a skeleton is pretty much permanent. Constraints also clutter your outliner and transforms in Maya so you have to work with a lot of null groups in your setups.

  • The separate Edit/Pose modes for armatures is like heaven. To be able to work with bones and constraints in such a non-destructive way was a real surprise. I was really confused at first when I didn’t understand that constraints was added in pose mode but now when I understand the fundamentals it’s a huge relief.

  • I was a bit skeptic first at how the joints/armature is not only deformers but also the controls, I’m used to having a separate mesh or nurbs/curve shape for controllers in Maya, however with the Pose Mode and the Bone Shapes I really like it.

  • Yet again with Pose Mode. It’s nice to see that all animation is completely separate from the armature, with actions and stuff, so it’s easy to revert back to the default bind pose if you need to edit the rig.

  • Mirror Editing is friggin’ awesome, 'nuff said.

  • Copy/Mirror Pose, same thing.

  • All in all Blender has a more reliable/non-destructive rigging system. However I want more reliable / easier to use transform constraints.

  • I also want to mention scripting in Blender. So far it’s not that easy to get started with compared to Maya. However, the way the UI works; it’s really awesome how easy it seems to incorporate your own UI elements based on context. This wasn’t easy at all in Maya. You could make your own little windows with buttons on them and stuff but if you wanted to do something more advanced it was pretty much a dead case unless you wanted to program source code and compile a plugin…

Do you have any tips regarding weight painting? I find it to be a nightmare, either having to jump back and forth between joints to, even out the weights, or use the scary normalize buttons. In Maya the weights are evened out between joints automatically when you paint and it’s something I’d love Blender to have, or maybe I just haven’t found how to do it properly. :confused: I’ve also found the brush to be hard to use, in Maya the brush tries to stay on the surface you’re painting on so you don’t accidentally paint on something nearby or behind, that’s close to impossible in Blender. I found myself rotating the camera to insane angles just to get rid of any unintended surfaces for the current brush stroke. Assigning vertex groups by selection works for hard surfaces or less precise areas but when you want to paint an organic area you can pretty much forget it. Right now I’m trying to stick with adding joints so autoweights does the job but I still have to go in there sooner or later to use the tool. You could say that the time I save by using the heat based auto weights is the time I have to spend on the weight paint when I have to do the final tweaks…

I don’t plan to use simulation for any too important things, maybe a flag or simple cloth.

Great minds think alike? :cool:

I wish I had your knowledge, I am downloading this because I want to learn about how you went about modelling this guy, expect Private Messages frmo me in the future with my noob questions evil grin

This was my modelling workflow.

I first sculpted him in Sculptris. This was during the summer.

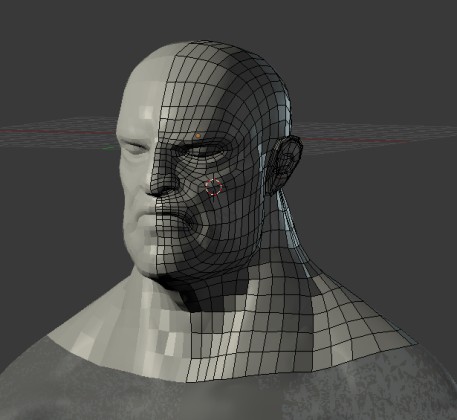
Then about a month ago I decided to learn Blender and decided to make a full character of him. So I made a retopology of him. The UV map was made with autounwrap in Blender. I rendered out a normal map and occlusion map through xNormal using the high res sculpt to the lowpoly mesh. I also converted the painted colors from the sculpt to the new UV map.

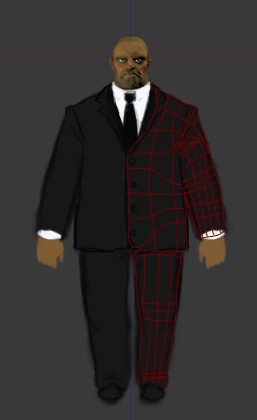
Then I made a very simple concept of his body and proportions and drew an estimate wireframe of how I would model him. The wireframe was of course far from final so it changed.

When the body was done I tweaked the proportions and sculpted a simple set of hands in Sculptris, then ran them through retopology. Normal map was done in xNormal. Eyes and inner mouth was all done in Blender.

That about covers it.

That’s very nice, from those screens it doesn’t look like the model is as many polys as it originally looked in the video, which is great because it looks fantastic and lower end computers can handle it!

That’s the wonders of Normal Maps! Blazingly fast for the detail you get, only downside is the UV-seams you have to fix. :slight_smile:

Interesting. Could you be more specific? I’ve not run into reliability problems with Blender’s constraints myself, and it would be nice to know how to improve them. :slight_smile: (Also note that one of the cool things in Blender is the ease of writing your own custom constraints in Python. Although I’ve not checked if that’s been restored in 2.5 from 2.49.)

My impression is that one of the nice things in Maya is the node system (although I also get the impression that Houdini’s node system is more robust/flexible).

The separate Edit/Pose modes for armatures is like heaven. To be able to work with bones and constraints in such a non-destructive way was a real surprise. I was really confused at first when I didn’t understand that constraints was added in pose mode but now when I understand the fundamentals it’s a huge relief.

Yeah, I rather like this. However, I also find it frustrating that bones aren’t objects (for a variety of reasons). I’ve had some discussions with Bassam (an awesome Blender rigger) about this, and he agrees. It would be nice to find a way to preserve the benefits of this system without its drawbacks.

Mirror Editing is friggin’ awesome, 'nuff said.

Maya doesn’t have mirror editing? Eek. I rely on that so much.

I also want to mention scripting in Blender. So far it’s not that easy to get started with compared to Maya. However, the way the UI works; it’s really awesome how easy it seems to incorporate your own UI elements based on context. This wasn’t easy at all in Maya. You could make your own little windows with buttons on them and stuff but if you wanted to do something more advanced it was pretty much a dead case unless you wanted to program source code and compile a plugin…

Yeah. I’ve done a fair amount of mel scripting in Maya (as well as animating in it). I also talked with a guy from Valve who has used Maya’s Python API quite a bit, and who has started messing around with Blender 2.5. Our impressions are pretty much the same: Blender 2.5’s scripting API is a whole lot better than Maya’s, but of course Maya’s scripting is easier to dive into because of the echoing feature and good documentation. 2.5 sort of has an echo feature, but it’s not as direct and doesn’t help you learn the data api at all.

2.5 is also missing some hooks that 2.49 used to have. I assume those (or some variation on them) will be restored at some point, which will allow for some pretty cool scripting possibilities.

All-in-all, as a coder I’m happy to sacrifice Maya’s shallower learning curve in this respect if it means having a cleaner and more robust API. Scripting complex systems isn’t an unmaintainable mess in Blender 2.5, whereas that often tends to be the case in Maya in my experience. It does make things less nice for normal users just trying to quickly automate something, though, which is a shame.

Do you have any tips regarding weight painting? I find it to be a nightmare, either having to jump back and forth between joints to, even out the weights, or use the scary normalize buttons. In Maya the weights are evened out between joints automatically when you paint and it’s something I’d love Blender to have, or maybe I just haven’t found how to do it properly. :confused: I’ve also found the brush to be hard to use, in Maya the brush tries to stay on the surface you’re painting on so you don’t accidentally paint on something nearby or behind, that’s close to impossible in Blender. I found myself rotating the camera to insane angles just to get rid of any unintended surfaces for the current brush stroke. Assigning vertex groups by selection works for hard surfaces or less precise areas but when you want to paint an organic area you can pretty much forget it. Right now I’m trying to stick with adding joints so autoweights does the job but I still have to go in there sooner or later to use the tool. You could say that the time I save by using the heat based auto weights is the time I have to spend on the weight paint when I have to do the final tweaks…

Weight-painting in Blender is indeed quite lack-luster. I learned a lot from Angela on Project Durian, though, and at this point I generally don’t use weight painting much at all anymore. I go the more tedious vertex-by-vertex manual weighting route. It’s a huge pain, but it gets really nice results. There are also some tricks that make it less tedious than it sounds at first (though it is still definitely tedious regardless).

Incidentally, there should be a check-box in the t-panel called “Auto Normalize” that keeps all the weights normalized while painting, which I think is the behavior you’re looking for?

All-in-all, there are a lot of things that could be improved in Blender’s weighting tools. I’m considering writing up a proposal. I think there are things that can be improved even beyond what I’ve seen in other software (Maya, XSI, etc.). The things you mention, however, are certainly an important starting point.

Thanks for the run-down! :slight_smile:

(EDIT)
And whoops, forgot to mention: auto-weighting is a fantastic feature for quick tests and background characters. I totally ignore it for hero characters, though. I’ve even abandoned it as a “starting point” these days. I just start from scratch. It tends to get in the way more than it helps if I plan to do manual weighting.

Great minds think alike? :cool:

Ha ha. At least when it comes to principles. :wink:
I’m sure we would have disagreements about the ideal ways to rig various things. But I suspect that just comes from different preferences as animators. :slight_smile:

For example, if you have a hierarchy of objects in Maya (grouped) and add a parent constraint (childof) inside of that hierarchy, the object will blend between the parent and it’s hierarchy relation without any issues at all.

However in Blender if you have an armature with a similar hierarchy, where you disconnect two bones (so you can translate them but still a child). If you are to make a childof constraint here you get double transforms because the constrained object gets some kind of double parent relationship. Simply put, in Maya the constraint inside a hierarchy overrides the position while in Blender it’s more of an additive calculation.

I mentioned this on the bug tracker and was told it would work if the bones weren’t part of the hierarchy. However the same behavior appeared when I made the relations exclusively with constraints.

With the current behavior I have to rely on Copy Location / Rotation constraints, the only problem with them is that the transforms are based on the center of the constrained object and not the pivot of the parent. So I can’t get a parent like relation. I bet there are some way to get the behavior I’m looking for but it’s way harder to do than in Maya. :spin:

Yes, the node system is really nice but it’s a hassle to work with sometimes, with that I mean slow to do the connections by hand. I would say that Maya is a middle ground between Max and Houdini. You have great control on data flow level and some great ready to use tools, but neither are as great as Max and Houdini. But you have both which in some way is really great!

I’m split on this one, somehow I find it nice with armature object, but I also understand the strengths of bones being objects.

Actually it has, somewhat… When you create a skeleton, you make one side, then you have a Mirror Joints function in one of the menus where you can choose naming conventions and orientations of the mirrored side. However this acts like an applied modifier so it’s a one time action. So if you are to edit one side afterwards, you need to redo the mirror joints functions. Blenders mirror edit is more of a live feature while in Maya it’s a manual apply feature.

Maybe what Blender needs is some kind of pseudoscript for macros? A lot of times you want to make a macro to speed up repetitive process’. If you want to make a macro in Blender you need to import and define a bunch of things to even get started, in Maya you only need the echoed line to repeat.

I think that’s pretty much what I’m looking for, however I don’t know how Blender works enough to be certain that Normalize is the equal to what Maya does by default.

You’re welcome. :slight_smile:

As it is now I agree, however if the painting tools got that last oomph I think it would be a great starting point.

Apart from the principles I think that, like you say, it’s all about taste. The rig is after all the interface for the animator, as long as the animator is happy I’m happy.


Something I’ve been thinking of that could make weight painting better could be a copy skinweights feature similar to Maya. A version of that could be to use the current mesh deform modifier to copy the influence of the deformer as vertex groups of the mesh underneath. Think of it as an Apply button but Apply as Vertexgroups.

In Maya I usually have a mesh that’s a lot simpler than the final one for weight painting, then I use Copy Skin Weights onto the detailed mesh and it’s really fast and reliable. I think something similar would be possible with Blender, maybe use the baking features (normal maps) to copy vertex values rather than render a normal onto UV coordinates. Too bad I’m not good enough with Python to attempt this myself yet. :spin:

Watched the video and your rig seems awesome !! Thanks for sharing your character, I’m gonna play a bit with it and try to learn from your work.

Props to you, DennyLindberg; for your amazing skills, for showing me that the limits of Blender’s abilities are nothing I should concern myself with at this point, and for giving away such quality work in a world where people try to get money for the lint between their toes…

:yes:

Can I give him a Jolly Roger hat and a pineapple lapel pin?

Serialsiner >> Have fun. :cool:

As long as you show us how he looks like with a Jolly Roger hat and pineapple lapel pin. :wink: J/K

See, I’ve kind of “bonded” with v2.49b and I’m scared if I upgrade to a “test” version I’ll have to learn all new stuff, and I’m just now getting down these basics. And DennyLindberg’s own Biff is too beauceau for v2.49…

after that, it’s on!

wow, nice pretty nice. Congratulations

Hey thanks for your detailed information!!

Sorry for being offtopic! Here is the first attempt of the facerig! Most of the knowledge based on your biff model! Once again, thanks again for this great resource!
I am really excited, that it worked so well!! Here and there not perfect, but I have totally improved my skill in facerigging :slight_smile:

I’ve decided to release her also under the gpl licence. Once I get finished!
Thankyou!

That’s friggin’ awesome ndee, you took my setup and made it 110%. :smiley:

I love how you made the sticky lips thing, the slider to keep it shut, and the lips collision. I also like how your setup is a bit cleaner. How did you go with the sticky lips, is it a limit distance constraint between the upper/lower controllers?

It’s nice to see that someone found Biff useful for study. :slight_smile:

Can’t wait to test the rig and maybe animate her!

Thanks Denny,
you made it easy for me. If had to learn this alone, I wouldn’t be that far for years… :slight_smile:
But still, I need to learn alot more to become as good as you are now.

About the stickieness…
The Upper Lips Controler have a limit distance constraint to the jaw controller bone. With Clamp Region set to outside. So if the jaw bone gets up, they get pushed sotfly away.
The Mouth seal works similar. There I do have limit distance constraint to each lower lip controller. Set to inside. And the constraint is driven by the slider in the custom character menu. But still I am not that satisfied with the result. The lips do not match perfectly. Maybe I will come up with something better.

Didn’t really think of using the jaw controller as the distance pivot. Great choice. :slight_smile:

Alright. I have been pulling apart the face on this guy this evening and rebuilding it on a different model as I go. The only secret that blender wont give up is what is driving the influence on the Limit Distance constraints on each of the MouthControllers ?

The graph editor tells me that it may be the FaceCollision driver. If it is could you shed some light on whats going on in that dialogue?

EDIT: lol, it’s now that I slide the Controller Collision slider and see that it drives the influence. Thanks for the rig, Denny. I’m learning a lot!

Cool model. I’m a newbie here and I’m peeking into how to use blender and the models. I’m playing with handles and stuff without really understanding it. I hope to build a movie with master doing tai chi. I know all 108 moves in Tai chi and would like to get my animation going. Does any one know of a model that looks like a tai chi master such as Yang Chengfu. (google images of this guy and peek at the size of this guy. Biff reminds me to look for this type of model [I can’t post links yet])

It would be most interesting to try the curves in the animations to study different paths of movement. I might even be able to demonstrate the meaning of Qi during tai chi movements. For now I’ll need to figure out the controls of the figure. I don’t want to dig out my old Poser. Too limited.

Can anybody point me to pdf (or savable print documents) documents on how to control and move madels such as Biff? I’m using blender 2.5

Another thing to look after! Can’t wait