For the past couple of weeks I have been searching for some kind of documentation or video tutorial on how driven shape keys are handled in Blender 2.5 but have found few resources.
Even in earlier versions of Blender I never fully understood shape key drivers, but now in 2.5 I am totally lost.
Can anybody who understands this topic post a quick tutorial?
Thanks!
Here is how to setup a bone driven shapekey in r27156:
First make sure you have a mesh with shapekeys, and an armature with the driver bone in the scene.
Right click on the numeric value next to the shapekey name and select ‘add driver’
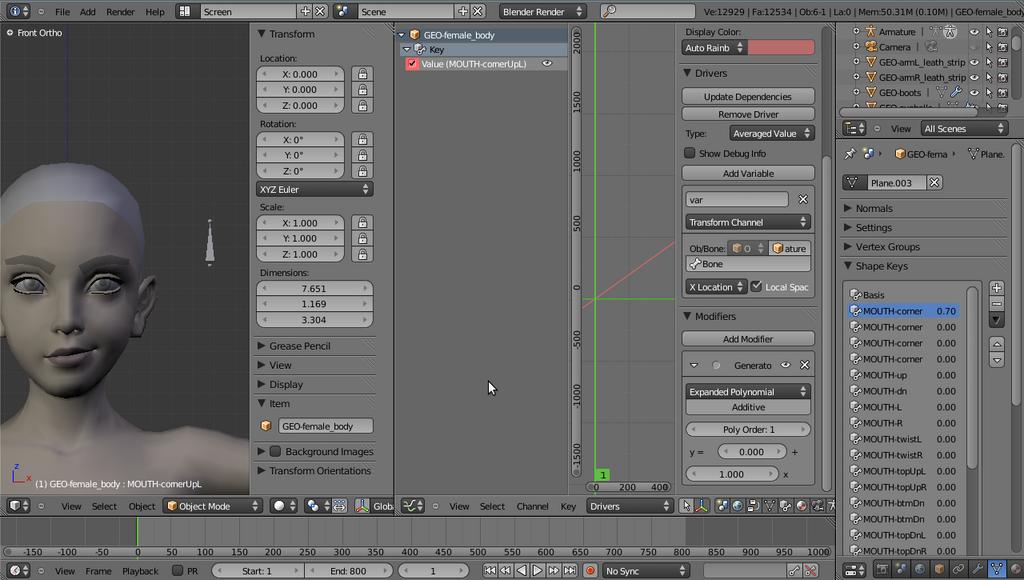
Open the graph editor and change from ‘f-curve’ to the ‘driver’ window from the rollout at the bottom.
Select the channel you are driving to make it active.
Press ‘N’ to bring up the driver properties display.
Change the driver type from ‘scripted expression’ to ‘averaged value’
Click ‘add variable’ to create an input settings field.
Change ‘single property’ to ‘transform channel’
Choose the armature and bone name (the object type is correct by default), choose the driving channel, and since it is a bone you will want to enable ‘local space’ as well.
You can then insert your own keys, or adjust the default ‘generator’ animation modifier to change the rate of the driver.
Once the driver is created you can copy it to other shapes by right clicking on the value again (where the driver was added), choose copy driver, then right click on the new value and paste the driver.
That is it in a nutshell. I am working on some 2.5 rigging videos and plan to cover this in more depth. Understand that alpha 1 made big changes to the driver system from previous versions, so there won’t be many tutorials for 2.5 available at this time - the program is changing too much! I’ve been following the updates on this blog, which have been invaluable in keeping up with all the changes.
Thank you!
I was able to follow most of those steps, but not all.
In Step 7 when I click “Add Variable” I get the a message saying “Error: Invalid target channel(s)” but then in Step 9 when I change the Object to “Cube” it goes away. Did I do something wrong?
Also, in Step 9 I was able to choose an Object name, but I didn’t see any field to select a Bone name. So this is where I am stuck.
In Step 7 when I click “Add Variable” I get the a message saying “Error: Invalid target channel(s)” but then in Step 9 when I change the Object to “Cube” it goes away. Did I do something wrong?
Nope It does that because when you create the variable it is already hooked up, but of course - it is blank. So it whines at you! That is why the message went away when you added the proper names into the fields, because it was no longer connected to a blank variable.
Also, in Step 9 I was able to choose an Object name, but I didn’t see any field to select a Bone name. So this is where I am stuck.
The object you selected should be your armature. Once the armature is selected as the object, the bone field should appear. Make sure that you also did step 8 first
Thank you. That answers those questions - I got through all the steps, but… when I move the bone, the mesh still doesn’t deform. What have I possibly missed?
Also, I can’t seem to Tab into the vertex editing mode for the driver curve. It seems like I should be able to hit “Tab” and then edit the vertices of the curve.
I have a small problem, linking the key driver to shape a bone child
I move my son bene and everything works fine, but if I move the bone father his move the bone child and the shape key is activated, and that’s not right should only be activated when the child bone is moved relative to the father and not when the parent moves the child.
forgive my poor English, I’m in Ecuador and my English is not good
There are no vertices Animation now has a new feature called ‘animation modifiers’ which generate curves based on an algorithm. The curve you see in your display by default is being created by the ‘generator’ modifier which you can find under the driver setup at the bottom of the properties window in the graph editor. You can adjust it by adjusting the values of the generator, or if you don’t want a straight line you can remove it and insert your own keys.
Absolutely anything haha I don’t know offhand, I’ve not used the new system enough to be familiar with it inside and out yet… if you post a blend I’ll take a look and see what I can figure out.
@mxcreativo
I just tried this and got the same result. I agree, it should not be behaving that way, I will file a bug report.
Actually, even more bizarre: if you rotate the child bone when translate X is the driver channel, the driver will somehow be evaluated. I don’t understand what is going on…
I’ve attached the file I used for the bug report so you can have a look at the problem. If you rotate the child bone, the driver evaluates. If you translate/rotate the parent, the driver also evaluates. This is definitely not intended behaviour.
In the 3D view set your manipulator from ‘global’ to ‘normal’, then enable the transform manipulator. That will make the manipulator match the bone axes. The X axis is the red one, and moving along X activates the shapekey. Since the driver is setup to use translate X of the bone, I would say it is working
*also make sure that you are moving the bone in pose mode, not the armature in object mode.
I did not read all answers, but I got marvelous help from this video:
Trying to extract the ‘know how’ from it:
Just make some shapekeys …(using “object data” icon , properties view, basis and one more at least)
Than click above for a new layout: Animation and change ‘Dope sheet’ to “Shapekey Editor”
There you see your keys, and change the slider at different Frames.
And it will work
OK, first, this is about drivers in general, not just shape keys. I took the plunge and downloaded 2.5 alpha 2 today. One of the first things I wanted to do was check out a character from 2.49b. As expected, the drivers didn’t work, so I set out to learn how to fix them. Think I’ve got it all figured out but for one thing: how to set up my own keyframes in the graph editor’s drivers mode.
Yes, I played with the generator modifier to create a curve for me, and know how to alter the curve as needed to fit my needs. Yes, I played with the limit modifier, to set limits on the generated curve to fit my needs. No problems at all, except if I want to add a curve myself and set keyframes.
I’ve attached a .blend file with a simple fk arm rig in the middle of the 3d view. Above the fk arm is an ik arm rig. I have copy rotation constraints on the fk arm which I want to control with the single bone at the bottom of the 3d view. At the moment, only the rightmost bone (a hand bone) has the constraint controlled by the switch bone. It all works just fine, except as I said, I cannot create my own curve in the graph editor. I assumed turning off the generator modifier would allow me to insert my own keyframes/ curves.
So what am I missing?? I’ve watched videos from mfoxdogg’s website and Tob’s youtube channel and yes, they are different versions of blender. I’ve also read alot of posts here on the subject as well. I’ve overcome all the differences from the versions they used and 2.52. I’m lost…What am I missing?? Does 2.52 not have the ability to create your own curves??:rolleyes:
I was very excited to find a ‘Distance’ driver variable, as if it’s what I think it is it’ll make building facial rigs much easier, but can’t seem to get it to work. Is it broken, or am I just not understanding it?
I’m assuming it’s supposed to drive a value by the proximity of bone A to bone B, but however I set it up the value moves when I translate bone A in any direction, even away from bone B. I wouldn’t expect it’d need a curve, but with or without one, keyed or generated, it behaves the same.
@revolt_randy
To insert your own curve just remove the generator and then ctrl+LMB to add a cv. You can position the cv’s accurately with shift+s>>current frame / cursor value, which will snap the point to the cursor position horizontally and vertically. You can set the cursor accurately at the top of the graph properties window. There may be a better workflow, but I’m not yet familiar enough with 2.5 to know
@bunny
I fiddled with the distance driver and got it to work. It measures the distance between 2 objects or bones and uses the change to drive a 3rd object or bone. The curve determines the rate of the driver, as expected.
I’ve attached an example of the driver on bones and objects. The distance between the bones/objects on the right of the scene is the variable. I’ve added my own curve to the objects to increase the speed of the monkey head, to show that it can be other than 1:1.
Where the heck is ctrl+lmb combo found at??? I spent 2 hrs today trying to figure that one out. Watched videos, checked what there is of online docs, checking menus, searching posts on here, etc… I literally ran out of places to look for the info…
In my search, I learned alot about the drivers graph editor, like the position cursor options, the limit and generator modifiers, and just the general workflow of the graph editor… But where does one go to learn more???