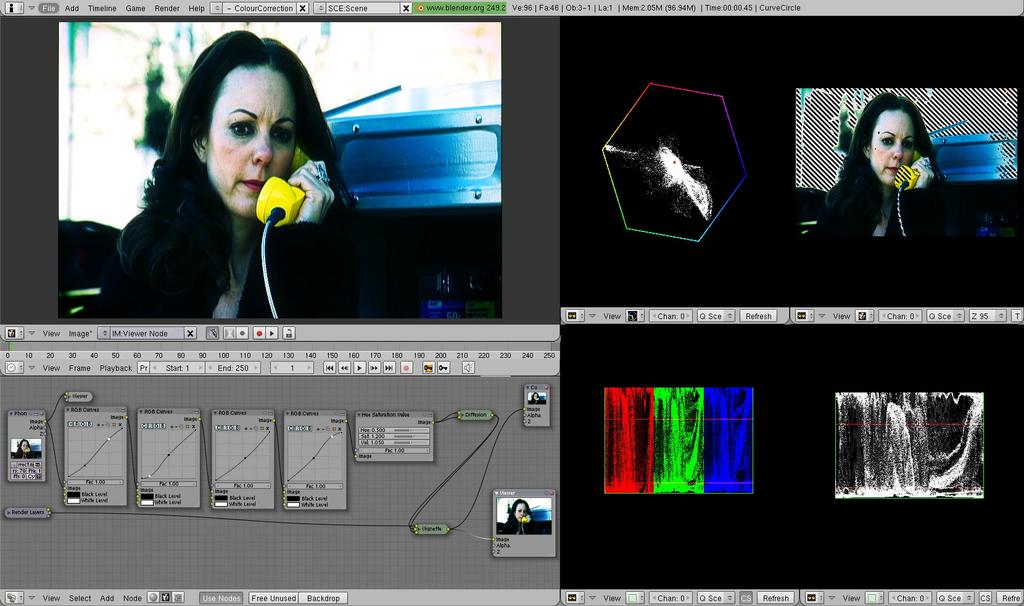
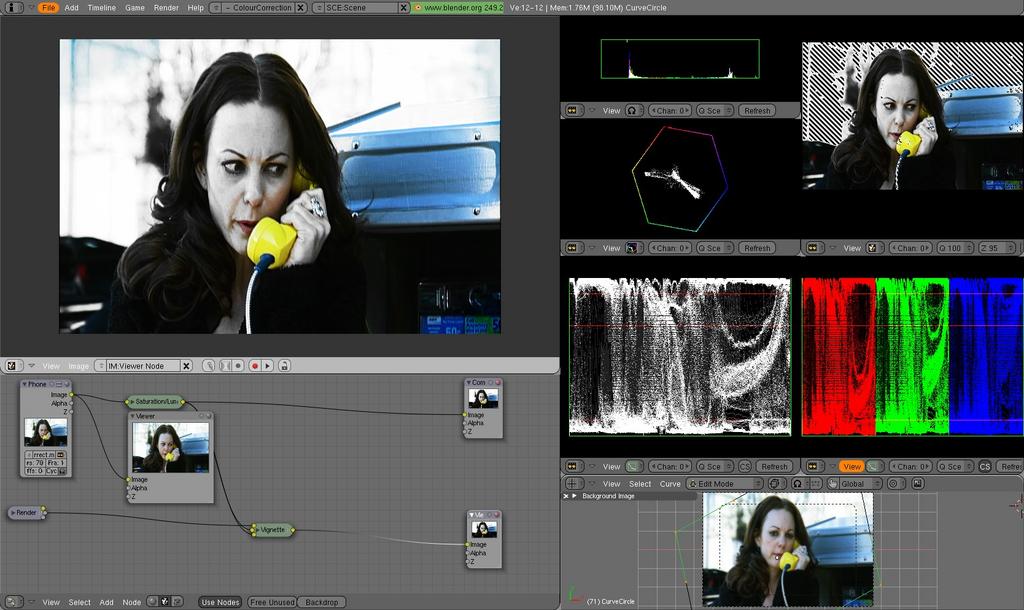
Blender Colour Correction Tips.

So I have been using blender for colour correction instead of Apple Color or Colorista, and blender utilises colour correction so efficiently.

The Vector scope, Luma waveform monitor and RGB parade scopes are in blender…as well as the Histogram (- which I don’t use).

I use curves to adjust the black and white points, which are each end of the curve. The red, green and blue curves to adjust the colours. I separate the HSV and add a curve to the Saturation or Hue to further adjust. I increase contrast in only the luminance channel by attaching a curve to the V section of the HSV node separation. I adjust clips in the node editor, add a scene to the VSE and click on ‘Do Composite’ and ‘Do Sequence’.

If I want to specify a particular area in the composite I either do vignettes in the 3d view with Beziers, or I pull a difference/luma or chroma key on a colour of selection. Run the matte through a set alpha, attach the main image to the set alpha, attach an alpha convert (key to premul) after it and after that alpha over it onto the original image.

Primary and Secondary colour corrections to the most advanced levels are so easy in blender. If you don’t have the money to purchase Apple Color or Colorista, just use blender it can do everything that’s worth anything. If you read any advanced colour correction book you can easily easily translate it all.

Though Apple Color, Colorista, Da Vinci and very excellent programs and their workflow is brilliant. Save your workspace in blender in the way best suited to your workflow and your workflow may just be very efficient.

Thoughts??

Great that you’ve got a way of working sorted.

I’m doing much the same as yourself and a lot is achievable but I’d have to say I disagree, I find blender no where as efficient or powerful than any commercial CC app you list. But that isn’t really surprising. Blender’s focus isn’t video editing and colour correction, understandably.

Even basic stuff like have lift gamma gain swatches on screen together with some near realtime feedback would be nice, swapping between the three committing each time before taking affect is just one tiny example of how blender is no where near Colorista, MB Looks or Apple Colour.

To prove the point check this tutorial out, excellent.

Start at 09:00 for comparison with Colorista, DaVinci et al. and push pull technique. A pain with blender.
12:06 why all three, l,g,g on screen together.
13:00 for power windows/vignettes, pain in blender. :slight_smile:
21:00 for speedy look from l,g,g not fanny around opening and closing l,g,g swatches and committing before moving between like in blender.

Say you want to make your shadows bluer but keep skin tones as natural as possible, try doing that little push and pull exercise using blenders l,g,g colour swatches, jumping back and forth between the three, committing a value before you can see the results. Don’t you find that slow compared to Colorista, MB Looks or Color, sure you can do it with blender but I find it painfully inefficient in comparison to MB Looks for example.

2.5 is even worse, with that stupid jk, colour wheel that doesn’t include a colour swatch to see what colour you’re creating or a sampler with realtime colour value window, or ability to zero/reset a colour in one hit. Try using that in the VSE as it stands in 2.5, hopefully realtime feedback will come like else where in 2.5, geez it’s hard enough keeping it on screen, keeps wanting to disappear.

The other thing is when you want to do stacked/layered multiple corrections/looks to a source clip using the idea of a adjustment layers. Every damn strip effect requires “2 or more strips must be selected”, so you can’t just add a correction layer you either have to create a duplicate of your strip + it’s edits, what happens if you tweak your original strip again, reduplicate, reapply effect? or use a neutral colour strip, with multiply and add correction to that to affect the original source clip. It starts getting messy and convoluted.

The totally dysfunctional combination of nodes and VSE refusal to talk to each other efficiently is another. It would be great to just apply any number of node groups to any number of VSE strips. Or ability to feed the VSE into the nodes.

I find adding as a scene for each one of the mattes for CC’ing or whatever is so damn slow, the alternative is having to precompose everything and add it onto VSE after as an image sequence or such and do the blend / masking there, hardly efficient. :frowning:

But all that aside I really enjoy using blenders VSE and nodes for video editing and it sound like you do too. The more the better, I hope 2.5 will see further improvements for us all in that area, so far it seems very quiet on what is proposed, far more important parts to get working first I guess. :slight_smile:

btw with a name like sirius black you must be a HP fan. With regard to CC for looks HP is fantastic, absolutely love the colour looks in those movies.

I’m doing much the same as yourself and a lot is achievable but I’d have to say I disagree, I find blender no where as efficient or powerful than any commercial CC app you list.

True I also believe that it may not necessarily be as efficient or powerful as those programs, but I also believe that workflow/power/efficiency is a subjective process. For example… For me to use bezier’s, I merely have to click a few times with my workspace saved as it is, and in the context of colour correction I create masks just easy as the greatest programs. So vignettes and masking are easy for me. The speed of creating a power window in blender for me is not much slower (although it is slower - by a few seconds I guess) than the process of doing one in Color.

Even basic stuff like have lift gamma gain swatches on screen together with some near realtime feedback would be nice

True. I would very much like it if we didn’t have to click on ‘Refresh’ every time we had to see the changes made to the Vectorscope and Luma Waveform monitors.

Start at 09:00 for comparison with Colorista, DaVinci et al. and push pull technique. A pain with blender.

Not for me at all. Read ‘The Art and Technique of Digital Color Correction’. It is written by a professional colourist that throughout the book sits with other colourists that work on many blockbuster and independent films as well as TV shows, and throughout the book him and other colourists demonstrate the power of using curves instead of the Lift,Gamma,Gain sliders. They use curves for Saturation and Hue adjustment. They are in Color’s Primary In Room. They are in Avid Symphony Curves Tools. They are in Avid Xpress Pro Curve Tools. They are in Color Finesse’s Curves Tab. And it is all very easy to set up in blender.
The push pull technique is so simple in blender, I always start with 4 RGB curves for colour correction. Just as these colourists in the book do. The first I adjust the black and white points. The rest I can play with the colours etc, in their different areas - shadows, mids, highlights. In that book the guys pull the Red and Green curves down to create a dark blue in the shadows, and for the red in the highlights they push the Red up towards the highlights, for the gamma you can push it wherever. You can dial down the saturation easily. And preview immediately in the UV/Image editor. …Though the ‘Refresh’ button has to be pressed to see the graph changes… grrr…

for power windows/vignettes, pain in blender.

As I mentioned earlier. I don’t find it painful to do so in blender. Though I guess it is a little slower. Than some of the programs. Though I don’t find Magic Bullet Looks/Colorista to exceed blender in this regard necessarily…for example in the clip, the guy himself states that Colorista can only do a square and an oval, though he says anything else is never used anyway, I disagree: (an excerpt from my book)

"One of the most adamant users of these custom shapes for sec-
ondary color correction is veteran Chicago colorist Pete Jannotta: “I
always prefer to draw (custom shapes) because even in da Vinci I don’t
use a fixed circle ever anymore. What I like to do is draw the shape
and then move it around so I can see how the light is working. I
don’t care what the shape is, but if it’s an oval, then it’s fixed and I
can’t control it.”

Many, many, many of the colorists go on to say that they use custom shapes, because they are sick of using the typical same shapes. In fact, from what I remember less of the colourists out of the bunch that are doing corrections in the book actually use the square and oval.

And on another point the guy in the video speaks of the fact that Magic Bullet Looks cannot animate vignettes! That is not necessarily better in any way, I figure if blender can fill the hole that both of these have without being used together, then blender is not necessarily falling behind in the vignette area and if it is then it is not falling behind very far.

I’ve seen that video before and I love it. Everything in that video I’ve done in blender quite quickly… once again I’ve changed my workspace to fit it! Though blender isn’t at their level in terms of appears or user friendliness, or default speed. If one does not have the money to purchase Color or Da Vinci, I think they can rest comfortably in the fact that blender can handle those tasks well… also if they do end up going to work somewhere as a colourist, it does not take alot to get used to another film colouring system…it’s very easy to bounce between different programs and pick them up immediately.

I guess just want more blender colourists to emerge I guess. It’s not like Maya or 3ds Max, where the industry needs you to be able to adjust quickly to their programs for professional work. The underlying principles in colour correction are far more easily transferable between programs.

I adore Harry Potter! The books, the look of the film I just die over!

hmm, 2.5 must be better. Couldn’t you map “refresh” to a keystroke? That would improve your efficiency out of sight :wink:

i find grading with just curves to be a pain really, you loose to much fine control. And shouldn’t power windows have animatable shapes? I mean stuffing around with hooks and RVKs is silly.

At least you can have favourite node groups appended and screen layouts you like, Has anyone got a killer CC .blend setup?

Ok, i must have misundertood your original post.:slight_smile:

For example… For me to use bezier’s, I merely have to click a few times with my workspace saved as it is, and in the context of colour correction I create masks just easy as the greatest programs. So vignettes and masking are easy for me. The speed of creating a power window in blender for me is not much slower (although it is slower - by a few seconds I guess) than the process of doing one in Color.

I have to keep reminding myself that you are talking about Colour Correction / Grading only, as a seperate process to the whole NLE thing. Everything you are talking about is in nodes and working on whole video, not a live edit, is the terminology an ‘Offline’? not in the VSE. Or do you have some secret dynamic link capability with FCP :-)?

Goes back to the idea of being able to apply any number of node groups to any number of VSE strips.

For small quick projects I’d assume that for speed and efficiency the ability to CC a live edit is the most practical way to go or is it a no no, should I be doing an intermediate non CC’d master in .png’s or lossless codec and re import to CC seperately, then final master, then encode?

Obviously for big movies and such the CC goes to a seperate department or studio, a DI? and an intermediate format is used. I guess emulating that process would relief some pain. :slight_smile:

I do it all in the same process, import, edit, CC and find it a pain in blender, but enjoyable. :slight_smile:

But definetely going to try the import of a master and CC as a wholely seperate process as you yourself are doing but don’t know how I’m going to see the scopes/histogram for feedback other than using a scene on the VSE. :slight_smile:

btw did you sort out your intermediate video format from your other post?

True. I would very much like it if we didn’t have to click on ‘Refresh’ every time we had to see the changes made to the Vectorscope and Luma Waveform monitors.

Is this to see an update of a node scene on the VSE? I don’t have to hit Refresh when working in the VSE? EDIT Read further down and see you mean the UV Image window. :slight_smile:

Not for me at all. Read ‘The Art and Technique of Digital Color Correction’. It is written by a professional colourist that throughout the book sits with other colourists that work on many blockbuster and independent films as well as TV shows, and throughout the book him and other colourists demonstrate the power of using curves instead of the Lift,Gamma,Gain sliders. They use curves for Saturation and Hue adjustment. They are in Color’s Primary In Room. They are in Avid Symphony Curves Tools. They are in Avid Xpress Pro Curve Tools. They are in Color Finesse’s Curves Tab. And it is all very easy to set up in blender.

Yes I own a copy of Steve Hullfish & Jamie Fowlers book and read it many times, aaapting the tutorials to blender including use of curves, but there are no scopes, histogram or zebra nodes to check on progress. So if the node scene is on the VSE to do that then I would have to reafirm my comment of the disfunctional connection between the two. But this goes back to my comment about offline. I do most in the VSE and see that as the weak area, nodes is ok for offline, but a pain for live edit. Perhaps CC is not a live edit process?

The push pull technique is so simple in blender, I always start with 4 RGB curves for colour correction. Just as these colourists in the book do. The first I adjust the black and white points. The rest I can play with the colours etc, in their different areas - shadows, mids, highlights. In that book the guys pull the Red and Green curves down to create a dark blue in the shadows, and for the red in the highlights they push the Red up towards the highlights, for the gamma you can push it wherever. You can dial down the saturation easily. And preview immediately in the UV/Image editor. …Though the ‘Refresh’ button has to be pressed to see the graph changes… grrr…

How do you keep a check on you the frame you’re working on without zebras, RGB Parade and Luma scope and histogram. Is it all by eye? Perhaps I’m over using them and need better trained eyes. :slight_smile:

As I mentioned earlier. I don’t find it painful to do so in blender. Though I guess it is a little slower. Than some of the programs. Though I don’t find Magic Bullet Looks/Colorista to exceed blender in this regard necessarily…for example in the clip, the guy himself states that Colorista can only do a square and an oval, though he says anything else is never used anyway, I disagree: (an excerpt from my book)

"One of the most adamant users of these custom shapes for sec-
ondary color correction is veteran Chicago colorist Pete Jannotta: “I
always prefer to draw (custom shapes) because even in da Vinci I don’t
use a fixed circle ever anymore. What I like to do is draw the shape
and then move it around so I can see how the light is working. I
don’t care what the shape is, but if it’s an oval, then it’s fixed and I
can’t control it.”

Many, many, many of the colorists go on to say that they use custom shapes, because they are sick of using the typical same shapes. In fact, from what I remember less of the colourists out of the bunch that are doing corrections in the book actually use the square and oval.

Stu (The Spirit) also did the RebelCC stuff for After Effects which is the tool he uses most and in his book Rebel DV he uses beziers for so called power windows, so I guess he was in selling MB/Colorista mode. :slight_smile:

And on another point the guy in the video speaks of the fact that Magic Bullet Looks cannot animate vignettes! That is not necessarily better in any way, I figure if blender can fill the hole that both of these have without being used together, then blender is not necessarily falling behind in the vignette area and if it is then it is not falling behind very far.

Yes a limitation, he does show that Colorista can do it. It’s swings and roundabouts as they say. :slight_smile:

I’ve seen that video before and I love it. Everything in that video I’ve done in blender quite quickly… once again I’ve changed my workspace to fit it! Though blender isn’t at their level in terms of appears or user friendliness, or default speed. If one does not have the money to purchase Color or Da Vinci, I think they can rest comfortably in the fact that blender can handle those tasks well… also if they do end up going to work somewhere as a colourist, it does not take alot to get used to another film colouring system…it’s very easy to bounce between different programs and pick them up immediately.

Then we agree. :slight_smile:

I guess just want more blender colourists to emerge I guess. It’s not like Maya or 3ds Max, where the industry needs you to be able to adjust quickly to their programs for professional work. The underlying principles in colour correction are far more easily transferable between programs.

Perhaps it would be useful to get some tutorials and .blends together to show blenders abilities in this area.

I adore Harry Potter! The books, the look of the film I just die over!

Do you have any techniques for things like faking shallow depth of field, diffusion etc. I know a lot of that is best in camera but it can be hard work with consumer/prosumer level video without getting into lens adaptors :slight_smile:

Getting some of the NLE / CC stuff together in tutorials and .blends could be useful and productive. MA Wilson mentioned his bin technique as well transferred from FCP, stuff like that.

Also there was a guy named Xat who was working on some CC stuff but waiting for 2.5 to settle down a bit, that could take some time. :slight_smile: he did an excellent greenscreen set of nodes.

I thought they were hard coded nodes not Node Groups, and that they probably wouldnt get into a branch? But yeah I have kicked around some presets so that I can do the basics, but I feel like I’m re-inventing the wheel all the time. When I find a cool workaround I have to go back and re-organise everything.

I think i have to start a thread about it, but 2.5 is lame at the moment and I dont see the point of spending time on 2.49.

Had a deadline, so I amost missed all the fun!
A few thoughts

@ Sirius Black
I don’t have any experience with FCP, Shake, AE or any similar app. I’ve only used Premier once as I was helping a colleague who had to teach an inset course on video editing for educators. I must say that I was not impressed at all from what I saw (don’t recall the version though -could have been an old one). Blender could easily top that and offer much more.
As far as I can tell, Blender can be used to accomplish pretty much everything these professional apps can offer. IMO what Blender lacks is a set of special tools or presets for specific occations which seem to be abundant in these other apps. These tools do make one’s life easier, there’s not doubt about that. But the tools are there, when it comes to compositing at least. One needs to develop an undestanding of how things work and what’s what before one can be productive. This is a turn off for beginers but it reminds me of a long discussion we had back at grad school regarding statistics: some argued that using e.g. SPSS for DOS required an understanding of statistics while the windoze versions eliminated this barrier altogether: one could carry out any statistical analysis without having any damn understanding of the underling statistics. Needless to say that I sided with the former view. Now, when it comes to professionals who want to be productive (whatever that might mean), I can understand that Blender might not be very a appealing option but hey I can live with that.

@yellow
man, I only have two words to describe the video:

wow!

I really enjoyed it, don’t know who the guy is but that was awesome. Can I achieve those effects in Blender? I’m not very sure I can given my current level of skill and understanding. However, I have managed to do pretty weird stuff in the past (though some purely by accident while I was playing around exploring things), so in principle I would say, yes I can do that. Do I think it’s gonna be a matter of a few clicks like the guy demonstrated? Hell no! :slight_smile:
But the guy appears to be an sfx guru, with a long history in the field and a very good understanding of both the theory and the tools. I reckon that someone with a good understanding of both the theory and Blender should be able to match that --or am I too optimistic?
As a side note, one poster in /. a couple of months ago said that sometimes an open source app feels like a 800 horse car with 1 wheel! It offers some 650 horse power more than proprietary apps but the lack of attention to certain minute but crucial details spoils it. Sometimes I do have the feeling that some more attention to detail would result in an almost infinite productivity. But this is the open source world, remember? We should be thankful for what we get. After all Blender is free and doesn’t cost a few hundred $ per seat.

Finally, what would be really great is some presets for compositing. I know there is no solution which would fit all problems and situations but it would be great for people like myself who are drawn to Bledner primarily for video editing & compositing. In fact a few weeks ago someone did post a blend file with some presets. The problem is that without some sort of minimal documentation this is not going to work for beginers or even intermediate users. For the time being, Roger’s book is the best available source and a good starting point.

just my 0.2 cents
Ilias

Yeah I think we should definately get together our best methods for colour correction etc.

I have to keep reminding myself that you are talking about Colour Correction / Grading only, as a seperate process to the whole NLE thing.

Totally. I wouldn’t dream of performing a live edit and colour correcting, first and foremost because I’m not an editor. :)… also because it would flow as effectively I imagine, unless blender was handling colour correction like a professional studio, whereas the colourist does their job and the editor etc does theirs.

but there are no scopes, histogram or zebra nodes to check on progres

How do you keep a check on you the frame you’re working on without zebras, RGB Parade and Luma scope and histogram. Is it all by eye?

Huh? I use all those scopes in blender. From scratch… you place a scene on the VSE strip, then head into the nodes, check the DoSeq and DoComp, split your screen however you want and start comping/colour correcting with the nodes and use the graphs. But you have to press refresh to see changes on the graphs. I’m not sure what you mean man? As I use all those graphs in blender.

Do you have any techniques for things like faking shallow depth of field, diffusion etc.

Do you mean in post to a non-3d image?

btw did you sort out your intermediate video format from your other post?

Yes. I did handle it efficiently. Thank you so much for all the help. I found this website that gave me the knowledge going on from what you had talked about, - http://generalspecialist.com/2007/02/video-codec-advice.asp - so it is now all sorted.

I’ve posted a couple images of my screen layouts as Jpeg attachments to this post. Hopefully they show up.. my internet is is being annoying.
:slight_smile:

Attachments


he he was it a video?

@yellow
man, I only have two words to describe the video:

wow!

I really enjoyed it, don’t know who the guy is but that was awesome.

Stu Maschwitz, ex ILM Compositor, Creator of the The Orphange, DV Rebels Guide book, Compositor on The Spirit movie, www.Prolost.com blog. Battled with Adobe to get a linear workflow into After Effects etc etc.

Can I achieve those effects in Blender?..
Sirius is,

Finally, what would be really great is some presets for compositing. I know there is no solution which would fit all problems and situations but it would be great for people like myself who are drawn to Bledner primarily for video editing & compositing. In fact a few weeks ago someone did post a blend file with some presets. The problem is that without some sort of minimal documentation this is not going to work for beginers or even intermediate users. For the time being, Roger’s book is the best available source and a good starting point.

just my 0.2 cents
Ilias
Ron Brinkmans Compositing book and Steve Hullfish / jamie Fowlers book also, if you intend doing any video then Stu’s book ‘The DV Rebels Guide’ is a great source too.

Sure I’m aware how to do it :-), It was going back to my comment that I thought it inefficient and a bit of a pain having to add the nodes onto the VSE as a scene each time and the slowness of the nodes processing and the manual refrsh to see the results in the scopes.

But perhaps it is far less an issue if you are working with a finished offline/master and just CC’ing, going to give it a try on a master and I’ll shut up on the subject. :slight_smile:

I’ve posted a couple images of my screen layouts as Jpeg attachments to this post. Hopefully they show up… my internet is is being annoying.
:slight_smile:
Cheers. :slight_smile:

Do you have any techniques for things like faking shallow depth of field, diffusion etc. I know a lot of that is best in camera but it can be hard work with consumer/prosumer level video without getting into lens adaptors :slight_smile:

Ah, I know what you mean. Yes I do if you’re wondering. For camera diffusion (the simulation of photons passing through the camera and going astray) you can either simply apply a good but light blur to the footage, sometimes passable but also not realistic as 100% of the photons don’t all pass through the camera creating that diffusion, only some do, and also too much of the detail of an image could be lost in a blur.
If applying to a CG object to simulate camera diffusion, one could render at 80% of the size and scale it up, then that is also a passable method.

The best method could be…
Blurring the image, Difference (add>color>mix>difference) the blurred from the original, Clamp to zero if in float, Add the original back to the image.

This way only some blur gets through simulating camera diffusion and photons passing through the lens.


For simulating Shallow DOF…
Add a linear/quad or whatever gradient you want. (Add>input>texture)
Use it as a mask, you could invert it with the rgb curves and/or invert node and attach a time node, clamp it however you want, then punch through your blurred image. Probably using a good quality blur, as opposed to a ‘flat’ one


Have you or anyone used any of these methods before?

Don’t the Comp nodes kill interlace? Who wants to render 1/2 resolution output?

I wish!
It was a paper for an upcoming conference. Boring stuff compared to the discussion here.

Stu Maschwitz, ex ILM Compositor, Creator of the The Orphange, DV Rebels Guide book, Compositor on The Spirit movie, www.Prolost.com blog. Battled with Adobe to get a linear workflow into After Effects etc etc.

looks like he’s a big shot really. Glad to learn about his blog. The analysis of how different movies share common color features was pretty cool! The explanation why was even more mind blowing.

Sirius is,

it’s good to know. Actually, I have followed Sirius’s proposed node setup and the result closely resembles the look Stu was talking about. It took me about 10 minutes.

Ron Brinkmans Compositing book and Steve Hullfish / jamie Fowlers book also, if you intend doing any video then Stu’s book ‘The DV Rebels Guide’ is a great source too.

Ron’s book is an all time classic of mine. I read it a couple of years ago and it’s a truly great resource. Thanx for suggesting the other books I will check them out.

Is it not possible to add the interlaced video in the VSE, and then import the scence into the compositor? Would it solve the problem?

Is it not possible to add the interlaced video in the VSE, and then import the scence into the compositor? Would it solve the problem?

Yeah that’s what I do man.

I would definitely like to see a technical chapter on color-grading added to the Wiki manual.

And, for what it’s worth, I really am not of the opinion that what is discussed in (or linked-to by…) “the Blender Wiki” necessarily must be strictly limited to “Use Blender Only.” Because, quite frankly, many of us don’t, and in the end, it’s the technique that needs to be discussed … to be taught.

I am very interested in this thread (and in others like it), because it definitely is true that the first important stages of color-management necessarily take place during the initial rendering processes. The better and the more uniform the source-materials are, the easier it is to grade it.

And, let us not forget, the various pieces that we are combining were generated over a period of days or weeks or months. That is always “what makes CG so very different.” In live-action, it takes exactly one minute to shoot exactly one minute of raw footage. Not so, in our world. We build scenes not only out of individually rendered objects, but we pile “pass upon pass” on top of them. If those aren’t graded properly when they are first produced, it will never look right and must be re-done. (ZZzzzz…) And yet, for tweaking the finished footage, we might not use Blender. Or, we might.

It is, frankly, a distraction if we insist that the only tools and techniques that we might “be allowed to talk about” are … Blender. Let’s teach the subject to each other and our peers. Let’s discuss our techniques and our tools as we actually use them in the trade. Whatever our personal tool-box might contain… “What matters most, maybe, is not the tools, but rather what you do with them.” We don’t need to defend (or to glorify) any tool. The objectives and the essential issues are the same throughout. Let’s talk about that.

Now, if you’ll pardon me, I’ve got to go back and carefully re-re-read this thread. :slight_smile:

I dont want to glorify anything at all. Sure one could use any tool, but the point here, I thought, was to push along Blender. After all it is the most available tool to hand for all this work. Anyway there is a another part of the forum for sundry other software.

I just don’t see the point in discussing applications that i can’t access, other than as reference to improvements or workflows.

But I will second the suggestion of a colour grading chapter for the wiki, it’s just unfortunate that there are currently small impediments to ease of use (scene wrangling etc.).

I realize this is an old thread, but if anyone’s paying I wanted to let you know that this has been an especially insightful discussion for me.

My first feature film is in production this fall (www.darklingsmovie.com) and since it is an especially stylistic fantasy film made on a budget, I was trying to decide what would be the best software to use. I liked the idea of getting the Magic Bullet Suite (Looks, Colorista, and then some), but even the $799 USD that it costs is a bit precious to the production. If I need it, it’s worth it, but I’ve been a big fan of what people have been able to achieve with Blender, and I’ve been looking for a chance to try it out for myself, and just hadn’t really gotten around to it yet. When I was trying to think of alternatives to Magic Bullet, it occurred to me that maybe Blender would have the capabilities (even if it also has some of the drawbacks you mentioned) to do some full-on color grading. I was actually having a hard time finding many people who use it regularly or taking its color grading capabilities seriously.

I’m glad to find someone who has, and I’ll be glad to take your notes (especially @Sirius Black’s - thank you!) into account when I begin testing my footage with it. If I need Colorista/Looks, I’ll get them, but it’s nice to know that there is possibly a worthy alternative that is perhaps slightly more tedious and/or time-consuming, but can yield comparable results.

Anyway, just wanted to give my input and some evidence (myself) that @Sirius Black is right when he talks about the value of being able to handle your color in a program like this over having to pay quite a bit more for people on a lower budget.

Thanks again!

Hi, most contributors to the thread are still around. There have been some interesting color grading discussions lately -esp regarding the look and feel of sintel (cf the news and discussions forum). May I also point out Francois Tarlier cg post?
http://www.francois-tarlier.com/blog/index.php/2010/03/color-grading-with-blender-2-5/