
Luke’s Blender Build 4.1.0 for Windows (gumroad.com)
Luke’s Blender Build 4.0.2 for Linux (gumroad.com)
Luke’s Blender Build 4.0.2 for Apple Silicon (gumroad.com)
Luke’s Blender Build 4.0.2 for Intel Mac (dropbox.com)
4.1 Source Code
4.0 Source Code
3.6 Source Code
3.5 Source Code
I’ve made a custom build for Blender. It’s free, and I’d like to hear what you think of it. The idea is to keep things the way they are, while giving you more options for:
Box, Circle, and Lasso Select
X-Ray
Drag Direction
Facedots
Selection Radius
Mouse Cursor
Header Highlights
Header Buttons
Camera Zoom
Frame Selected
Repeat Last
Some of these features are close enough that I’ll be submitting them for inclusion to Blender.
Design Doc for discussing potential selection additions.
Drag Select Edges and Faces
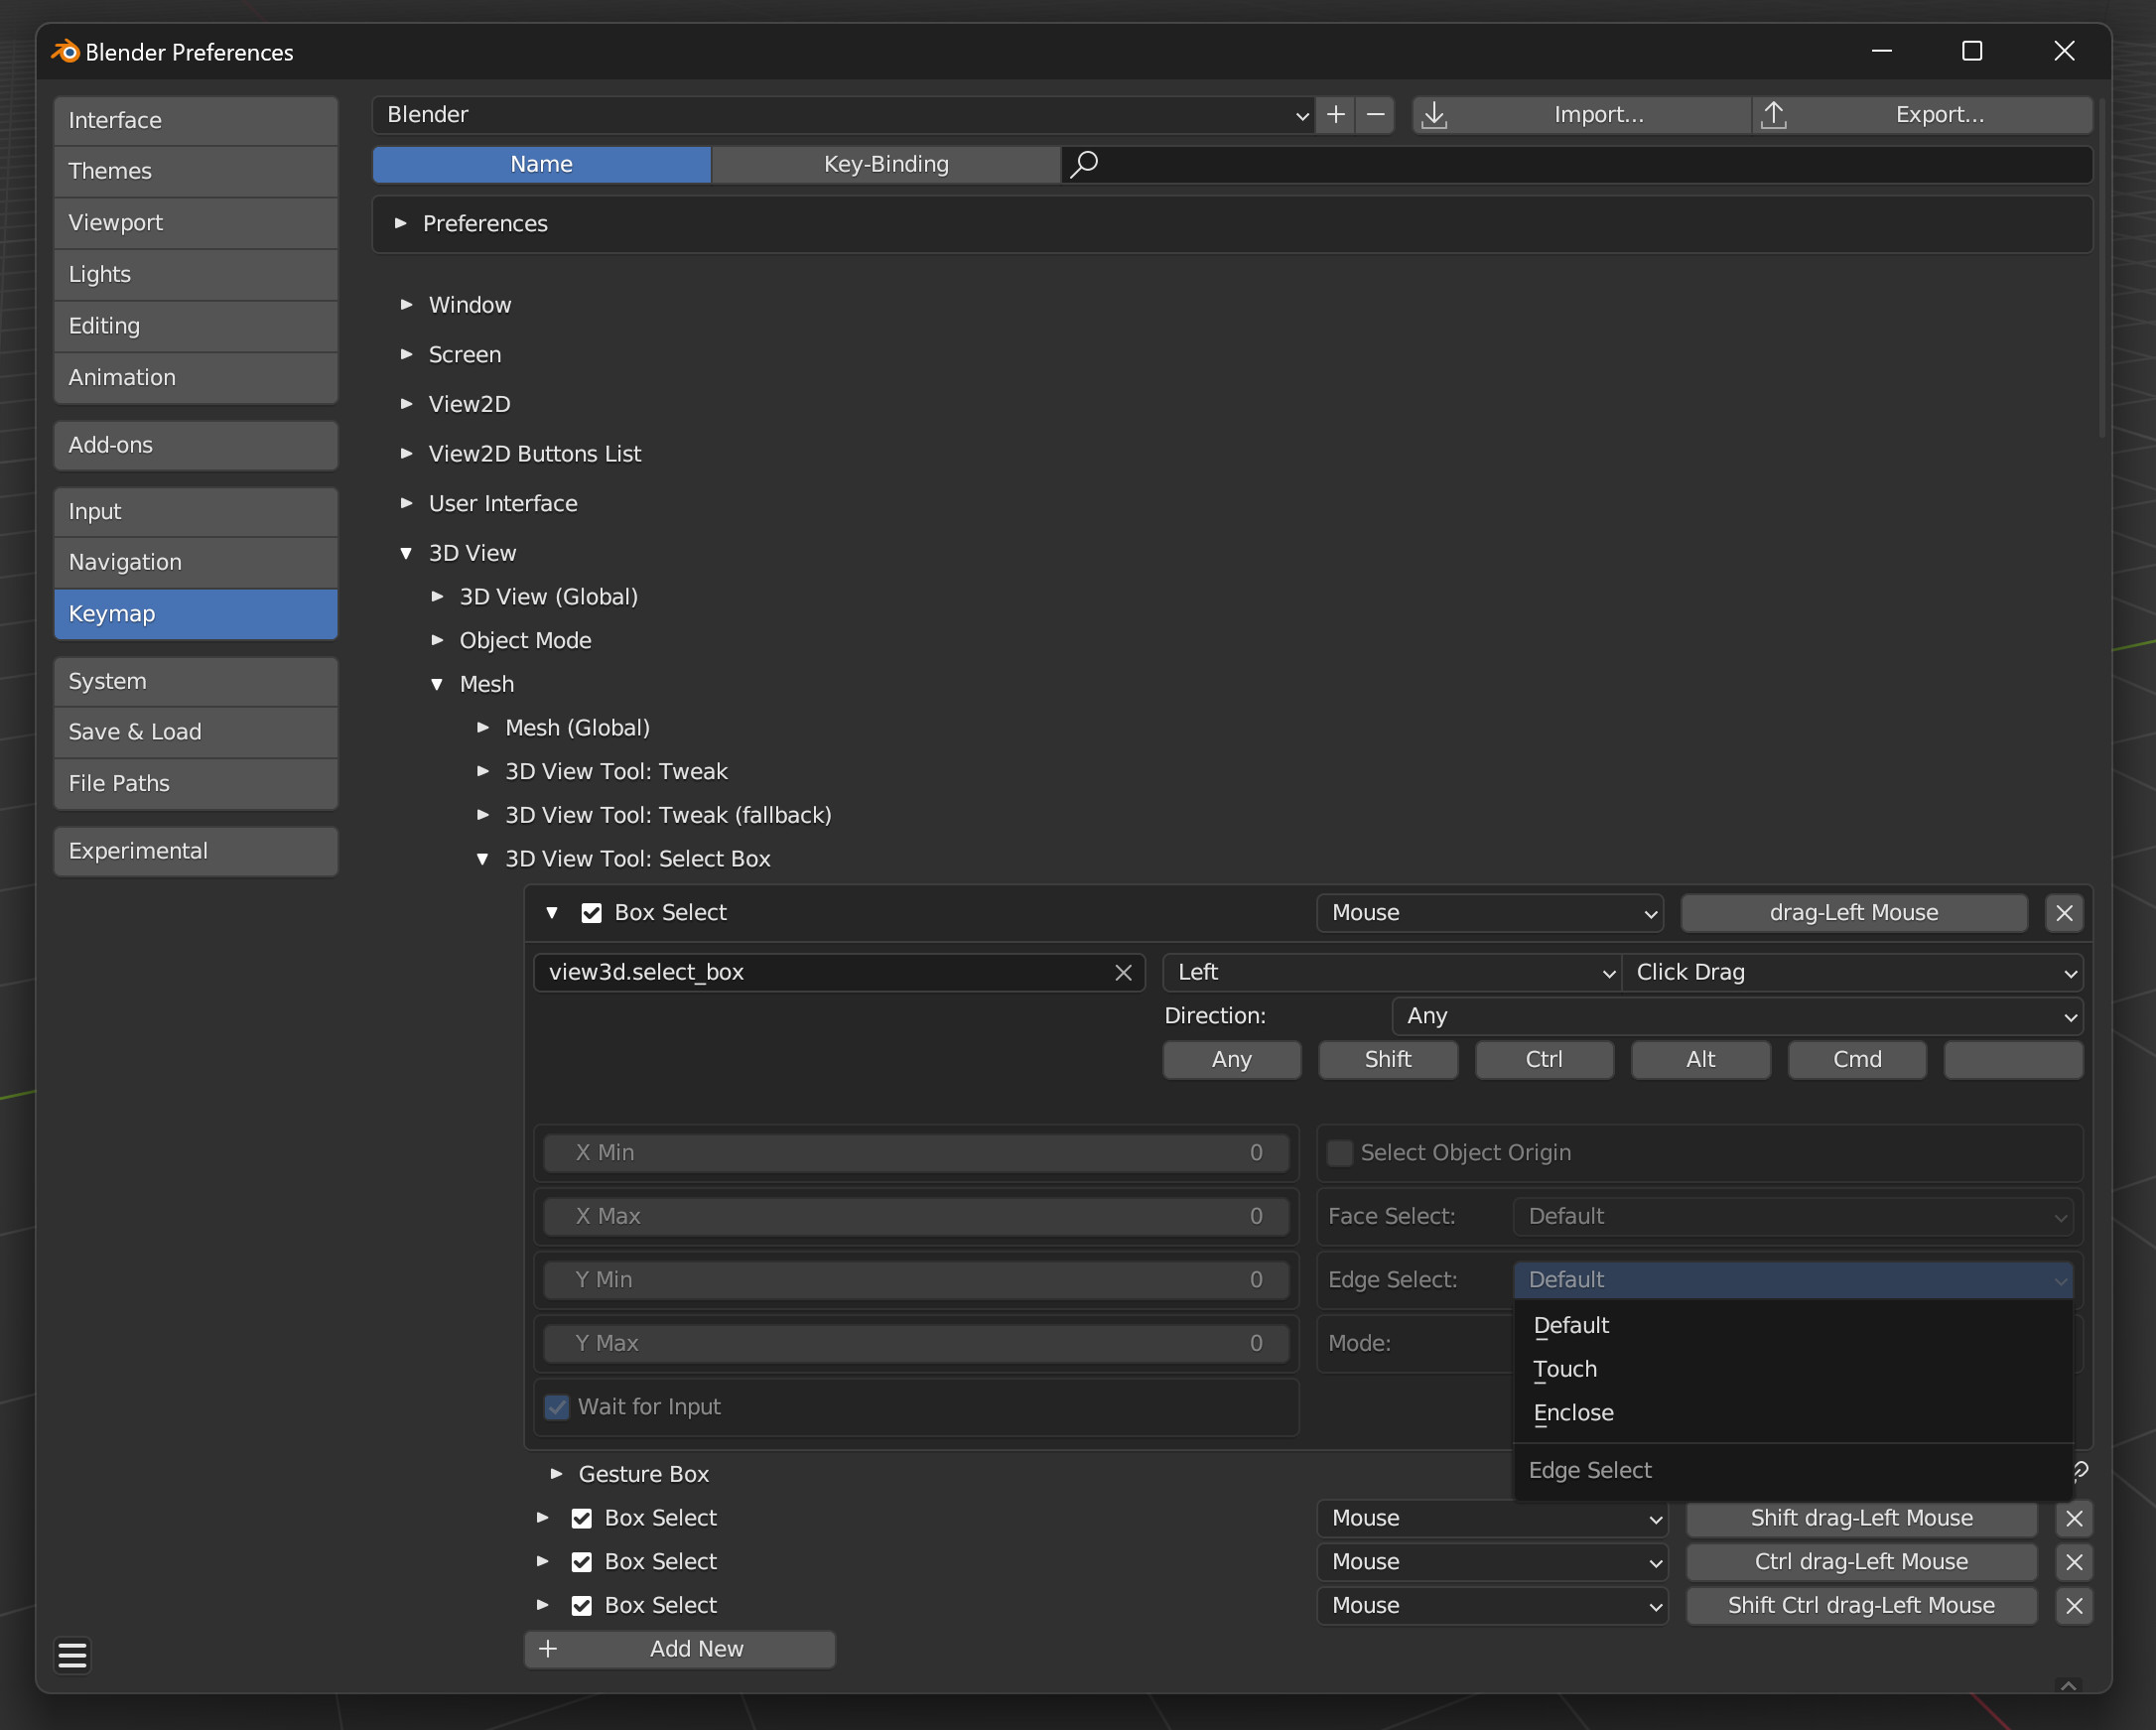
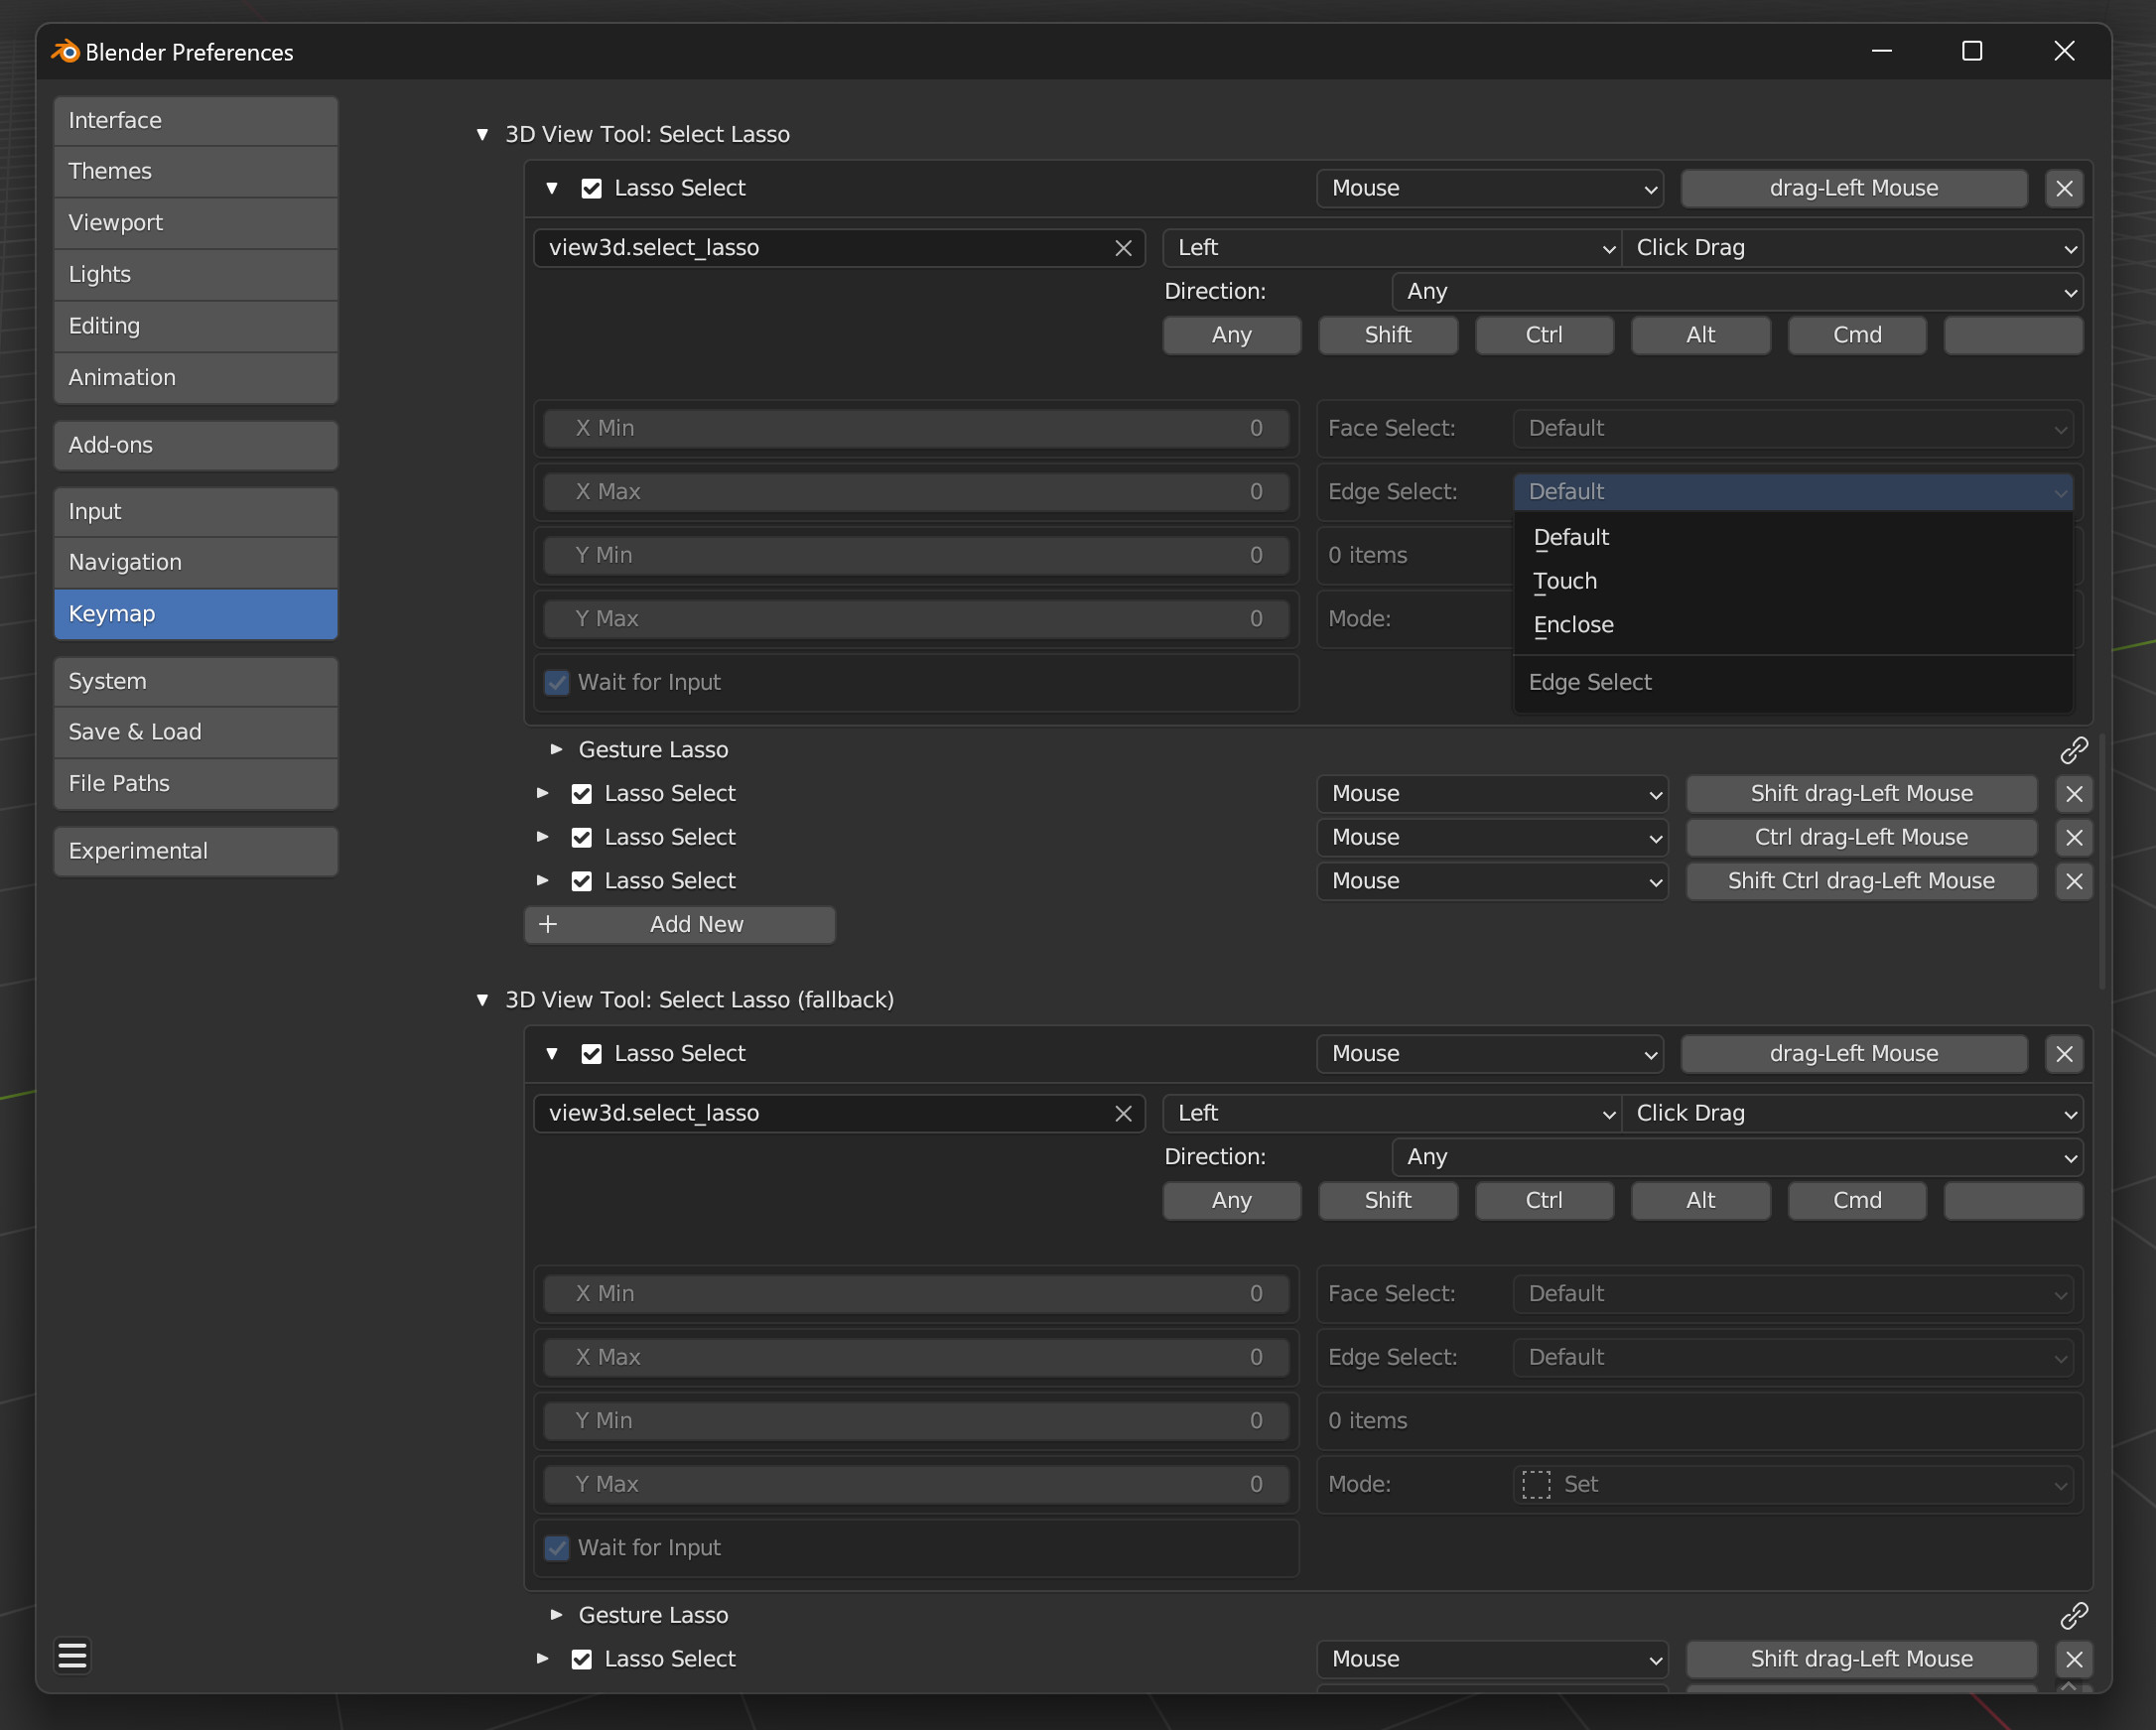
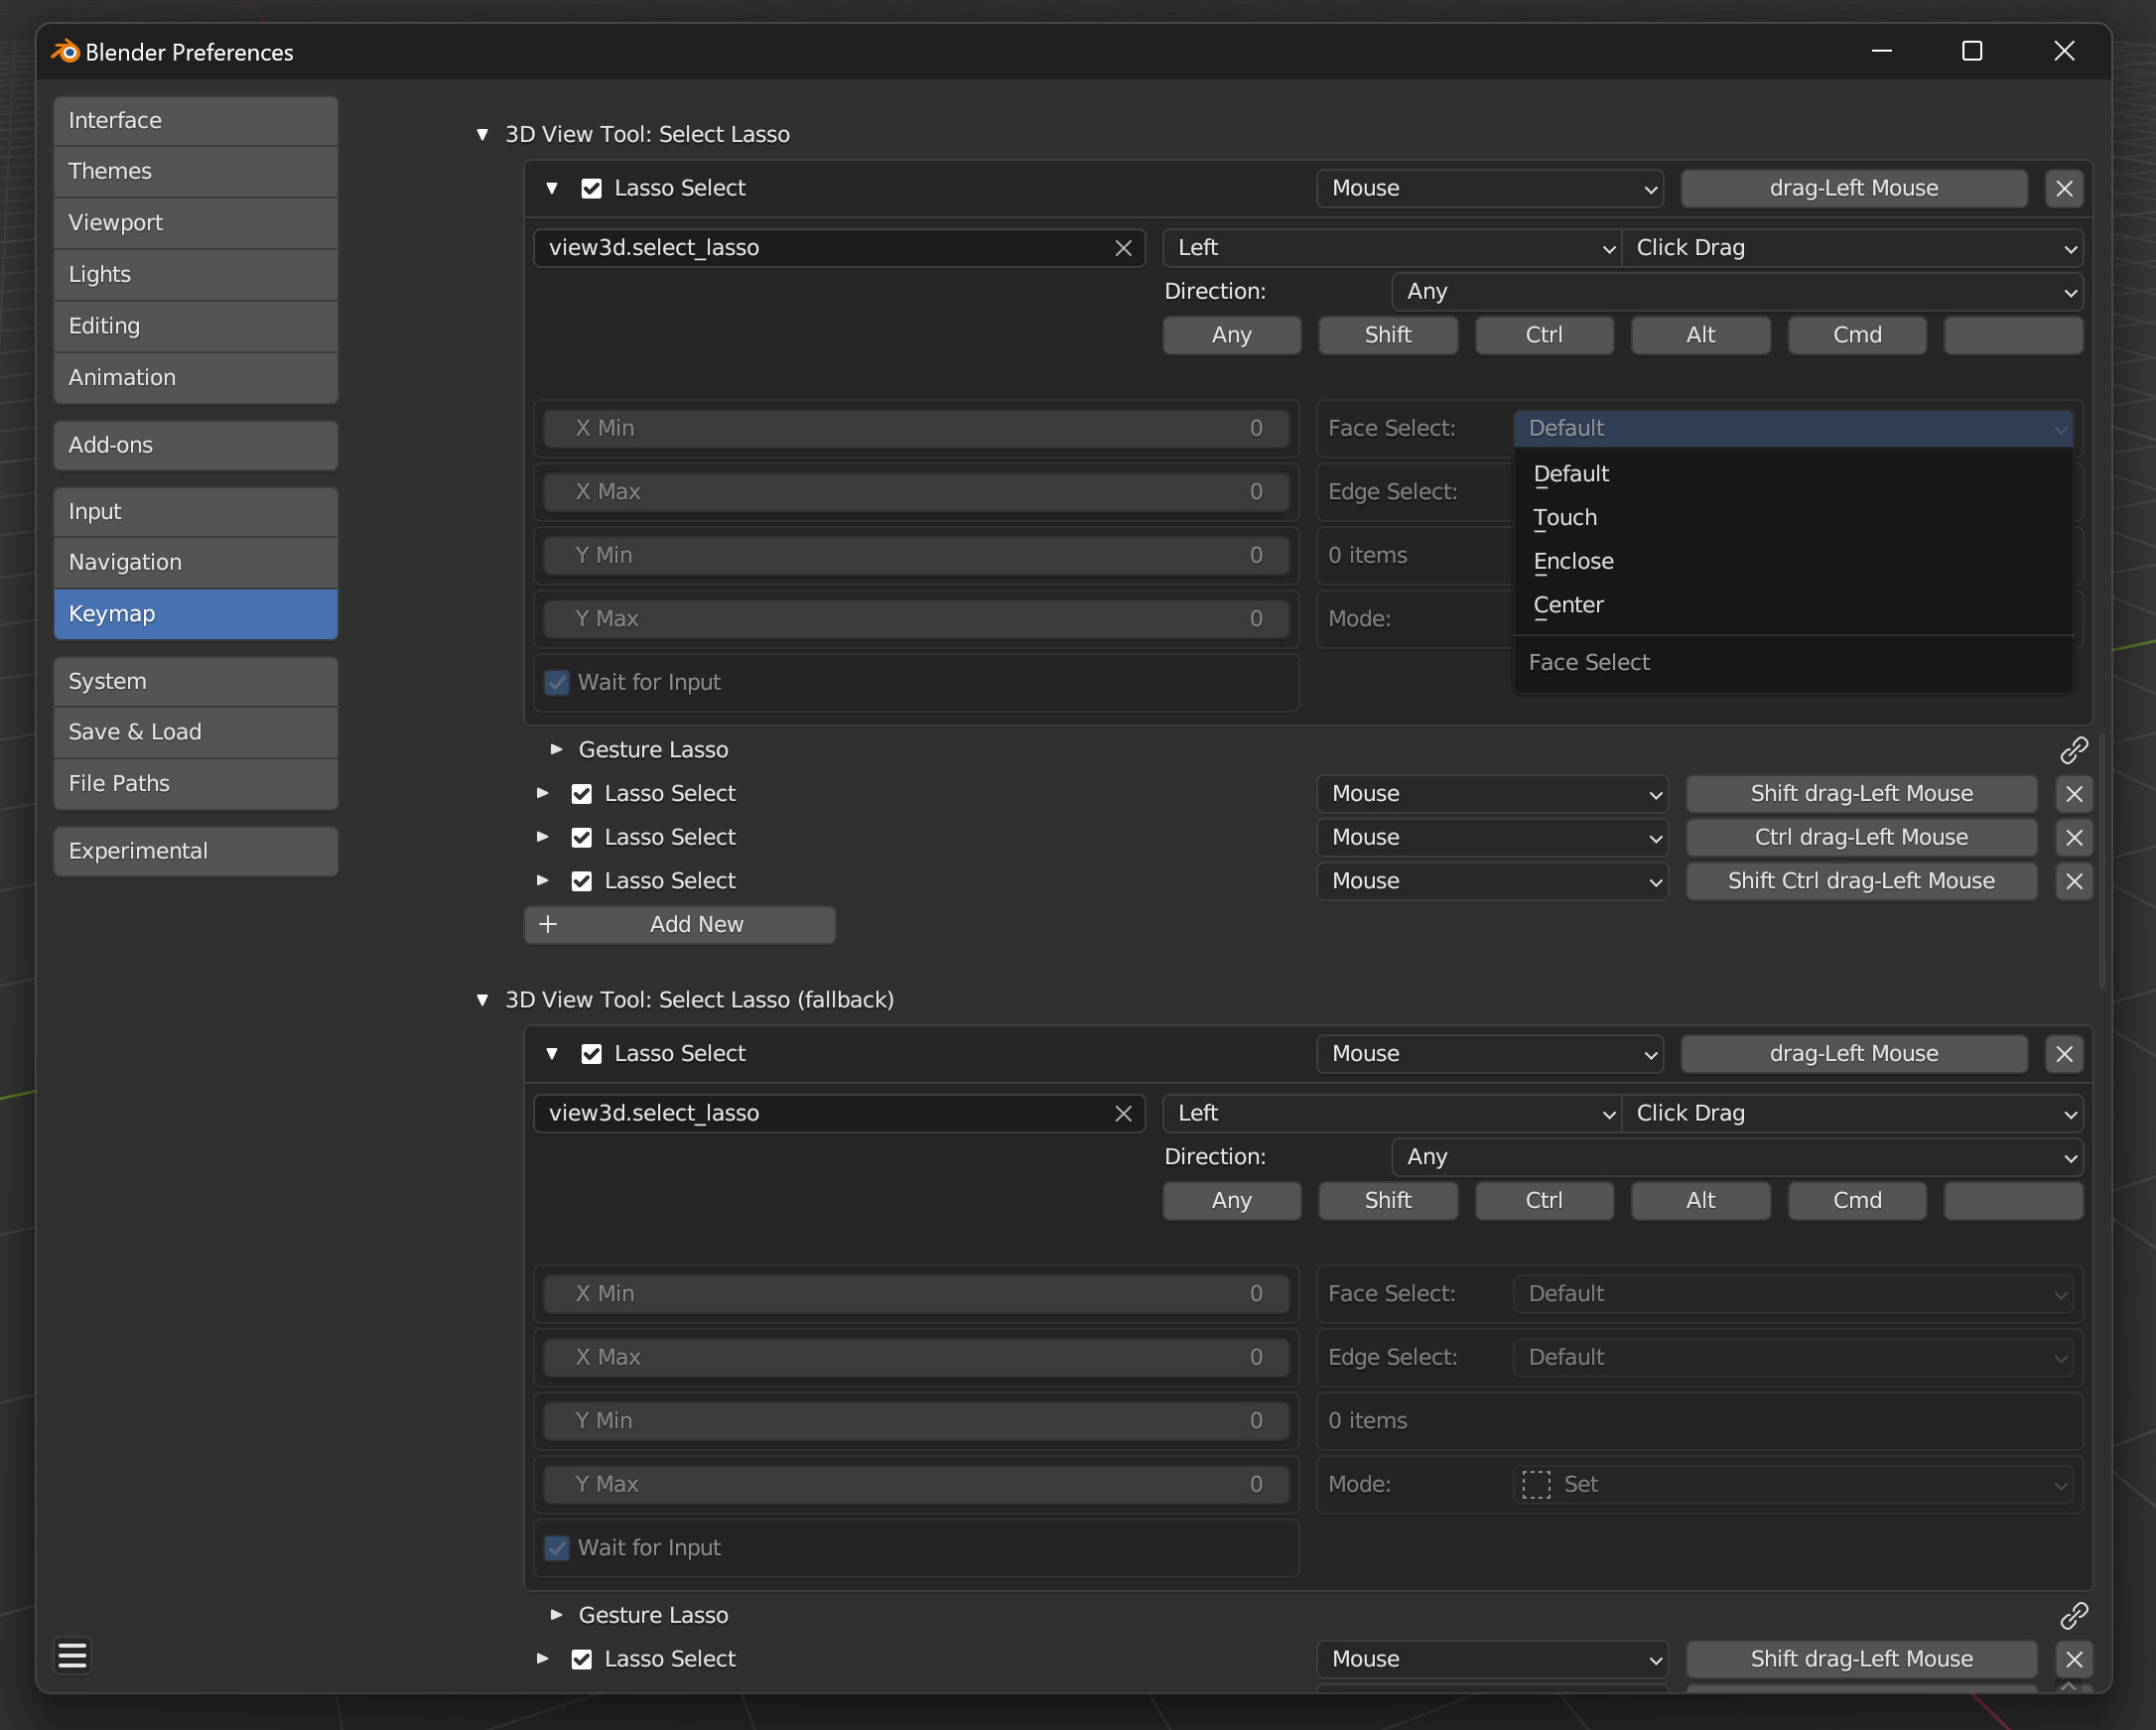
Preferences->Keymap->3d View->Mesh->(Box / Circle / Lasso) Select
There’s a dropdown for Edge Select with up to 3 options:
-
Default will do what Blender does, and Circle doesn’t have this option since it does Touch by default
-
Touch will select anything the selection area touches
-
Enclose will select edges that have both ends inside the selection area
Edge options for Box, Circle, and Lasso

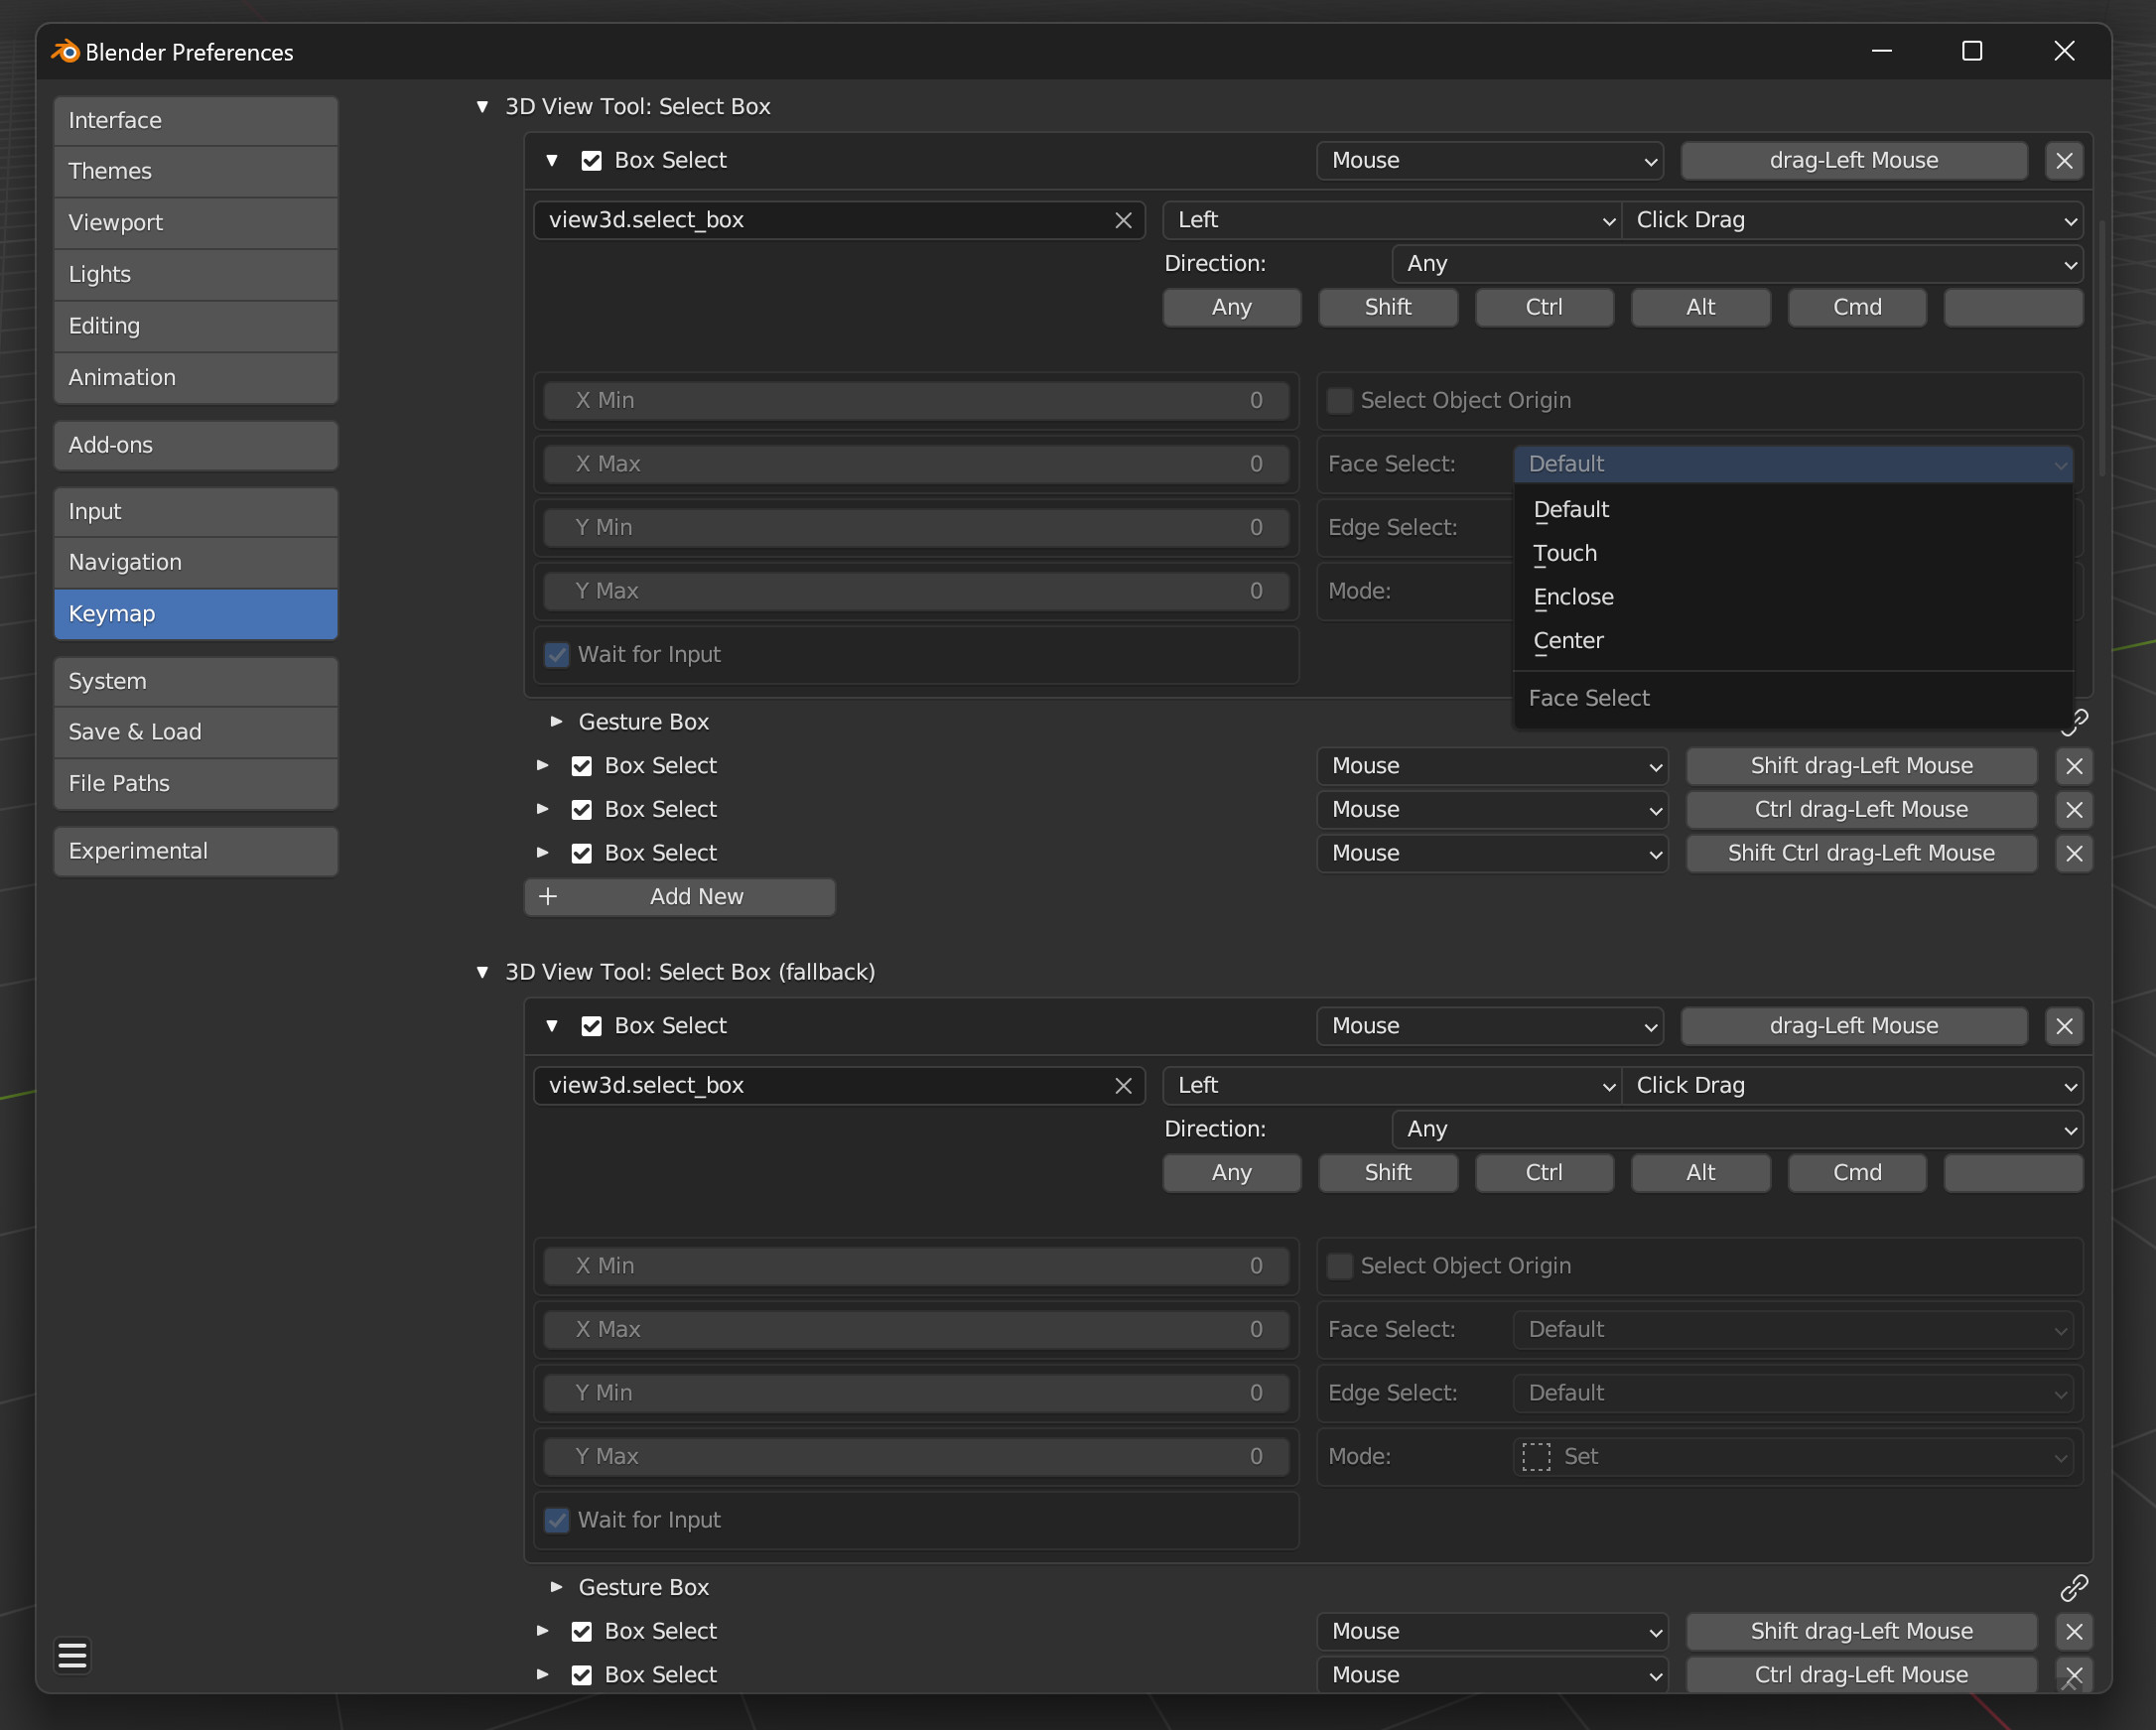
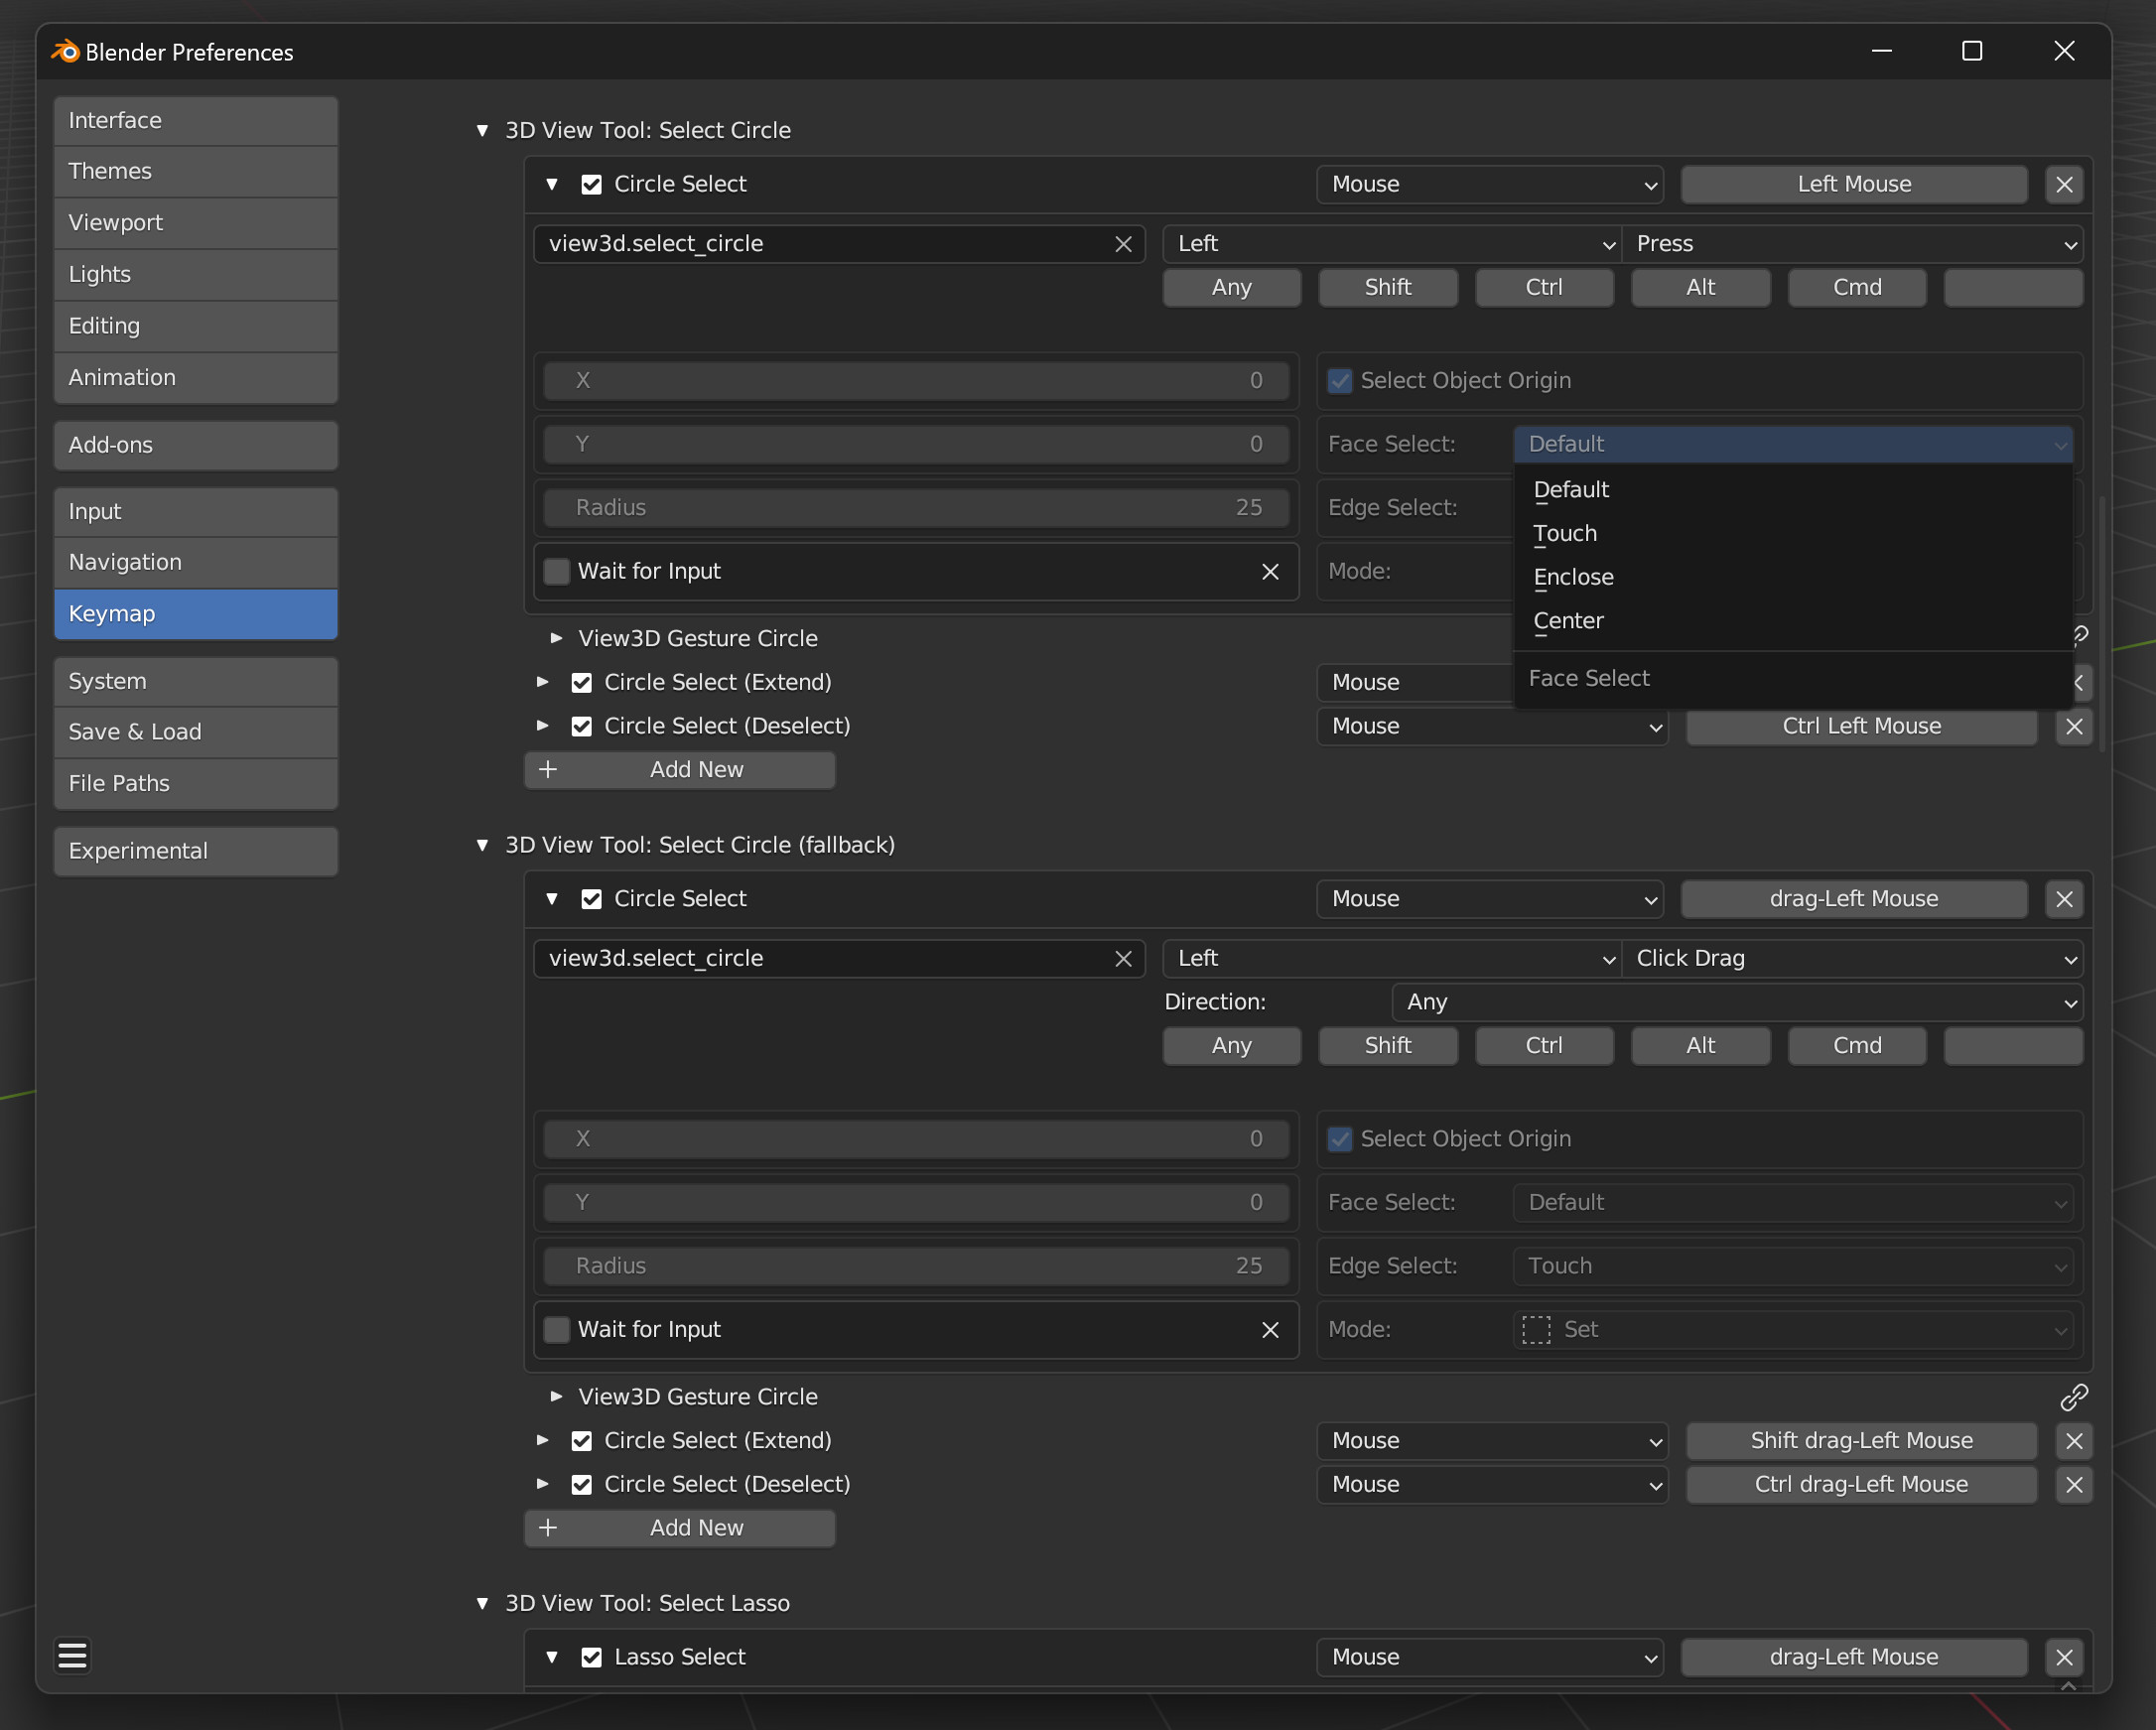
All these tools have 4 options for selecting Faces:
-
Default does what Blender does
-
Touch will select anything the selection area touches
-
Enclose will select a face if all their verts are inside
-
Center will select a face if you touch their center
Face options for Box, Circle, and Lasso
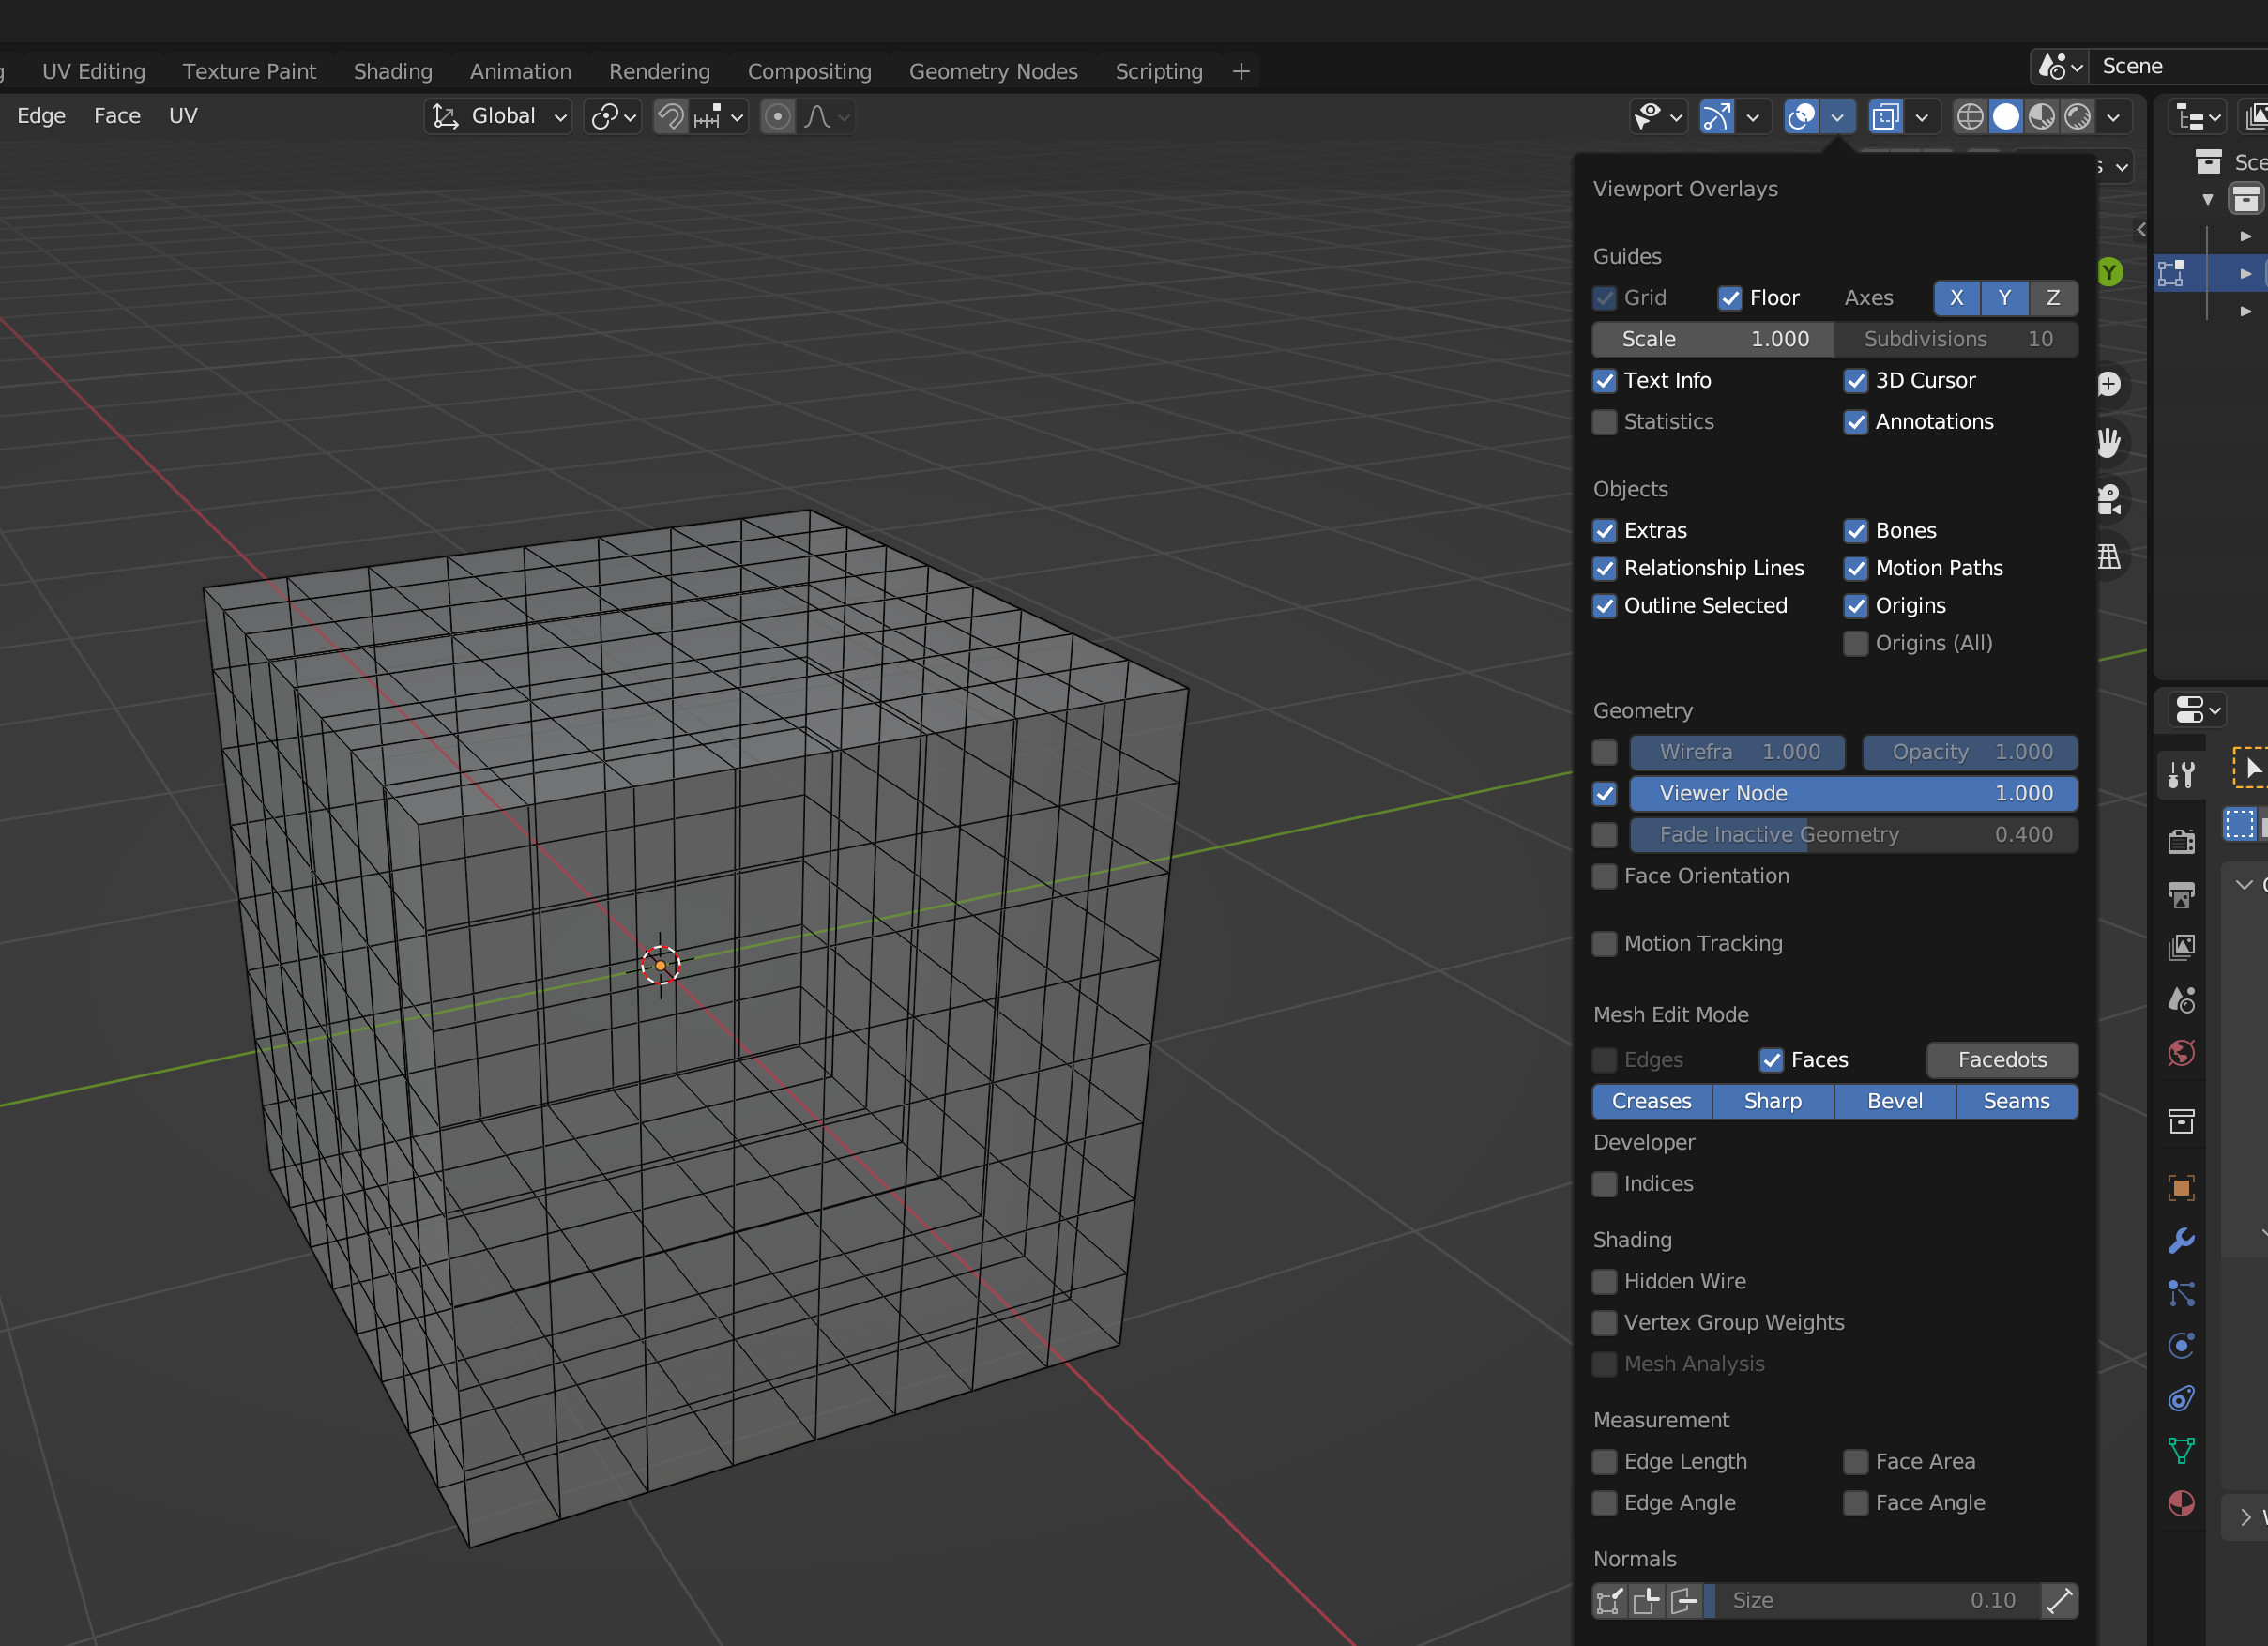
Facedots
Blender doesn’t let you hide Facedots in X-Ray shading, but with my build you can. Found in the Overlay Popover is an operator that toggles Facedots for either solid or X-Ray
Facedots on and off in X-Ray

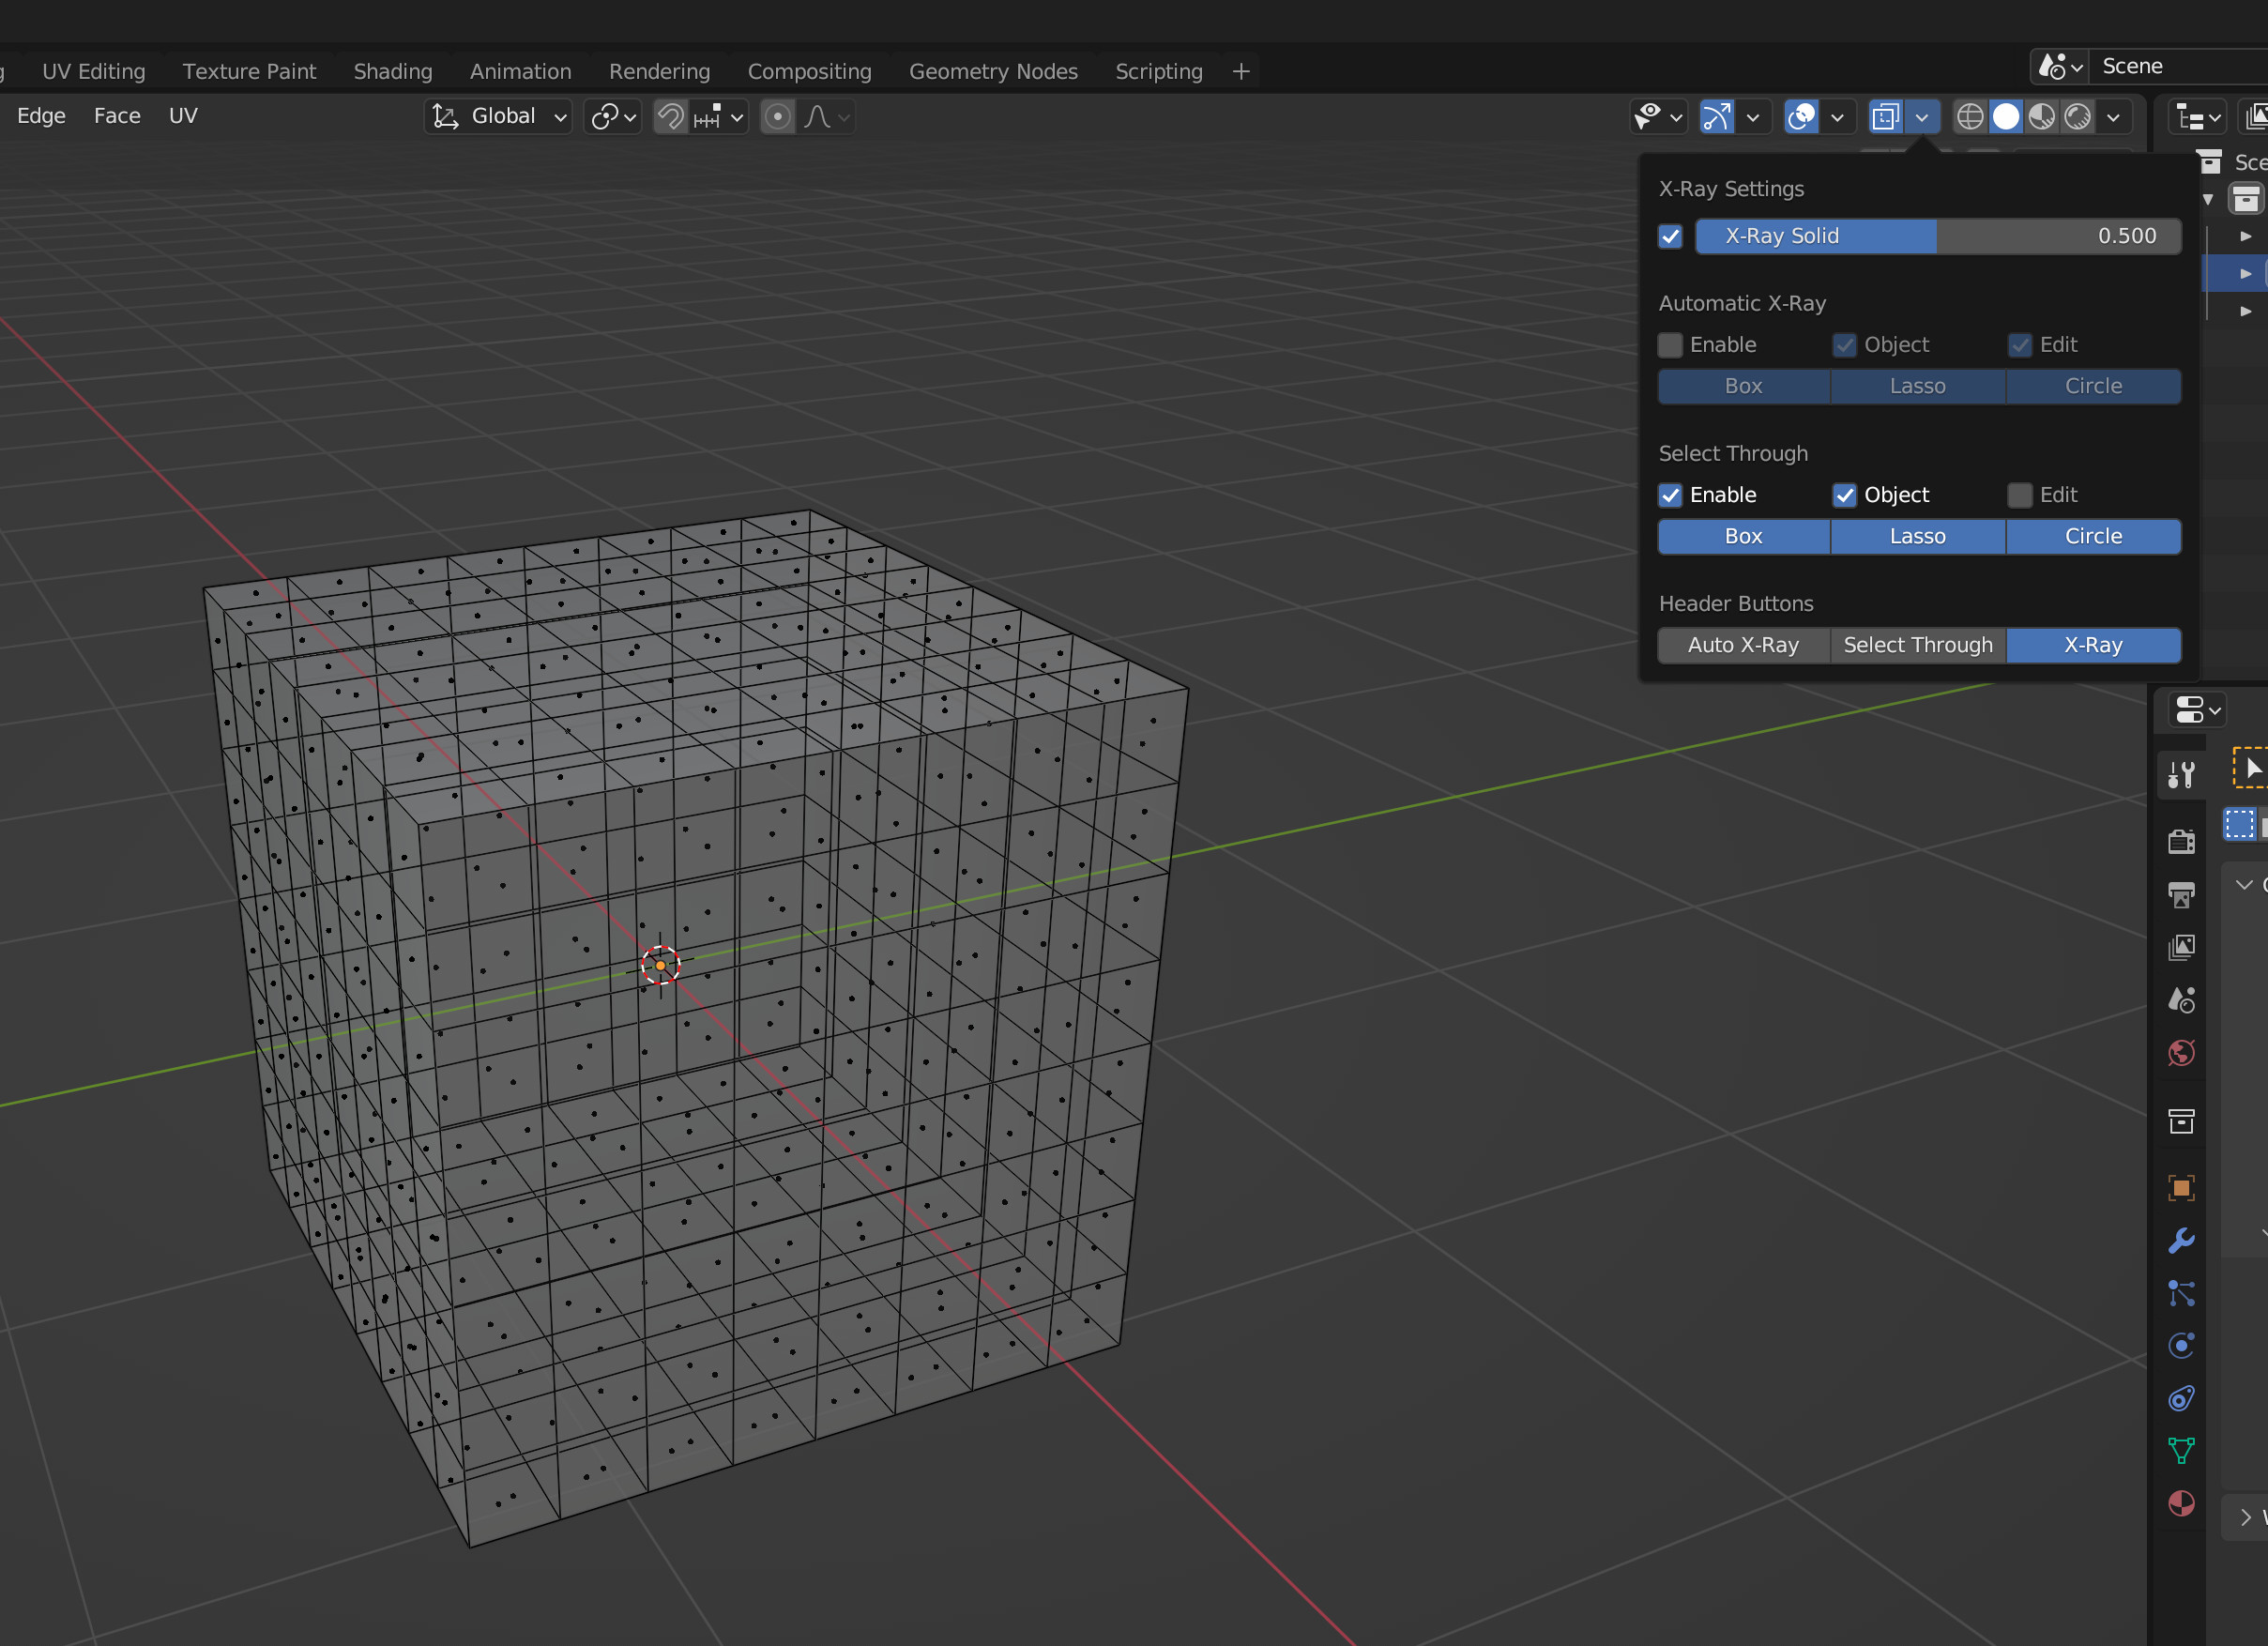
X-Ray
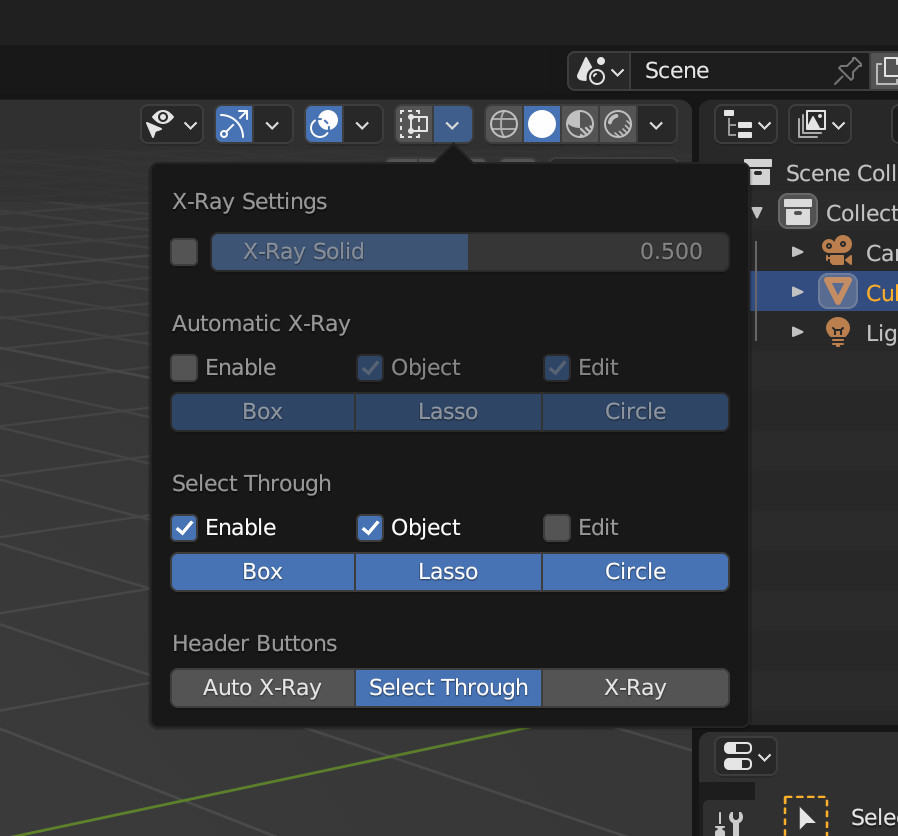
Blender doesn’t select unseen mesh. You select what you can see. If you want to select something on the other side of your mesh, you’d either turn on X-Ray or move the camera until it’s visible. With objects you always select through, and can’t turn it off. Not anymore. In the Header you’ll find a popover next to the X-Ray button. I moved the X-Ray settings here from the Shading Popover. They have new names so it’s more clear that wireframe and solid have separate X-Ray properties.
X-Ray on and off in solid and wireframe
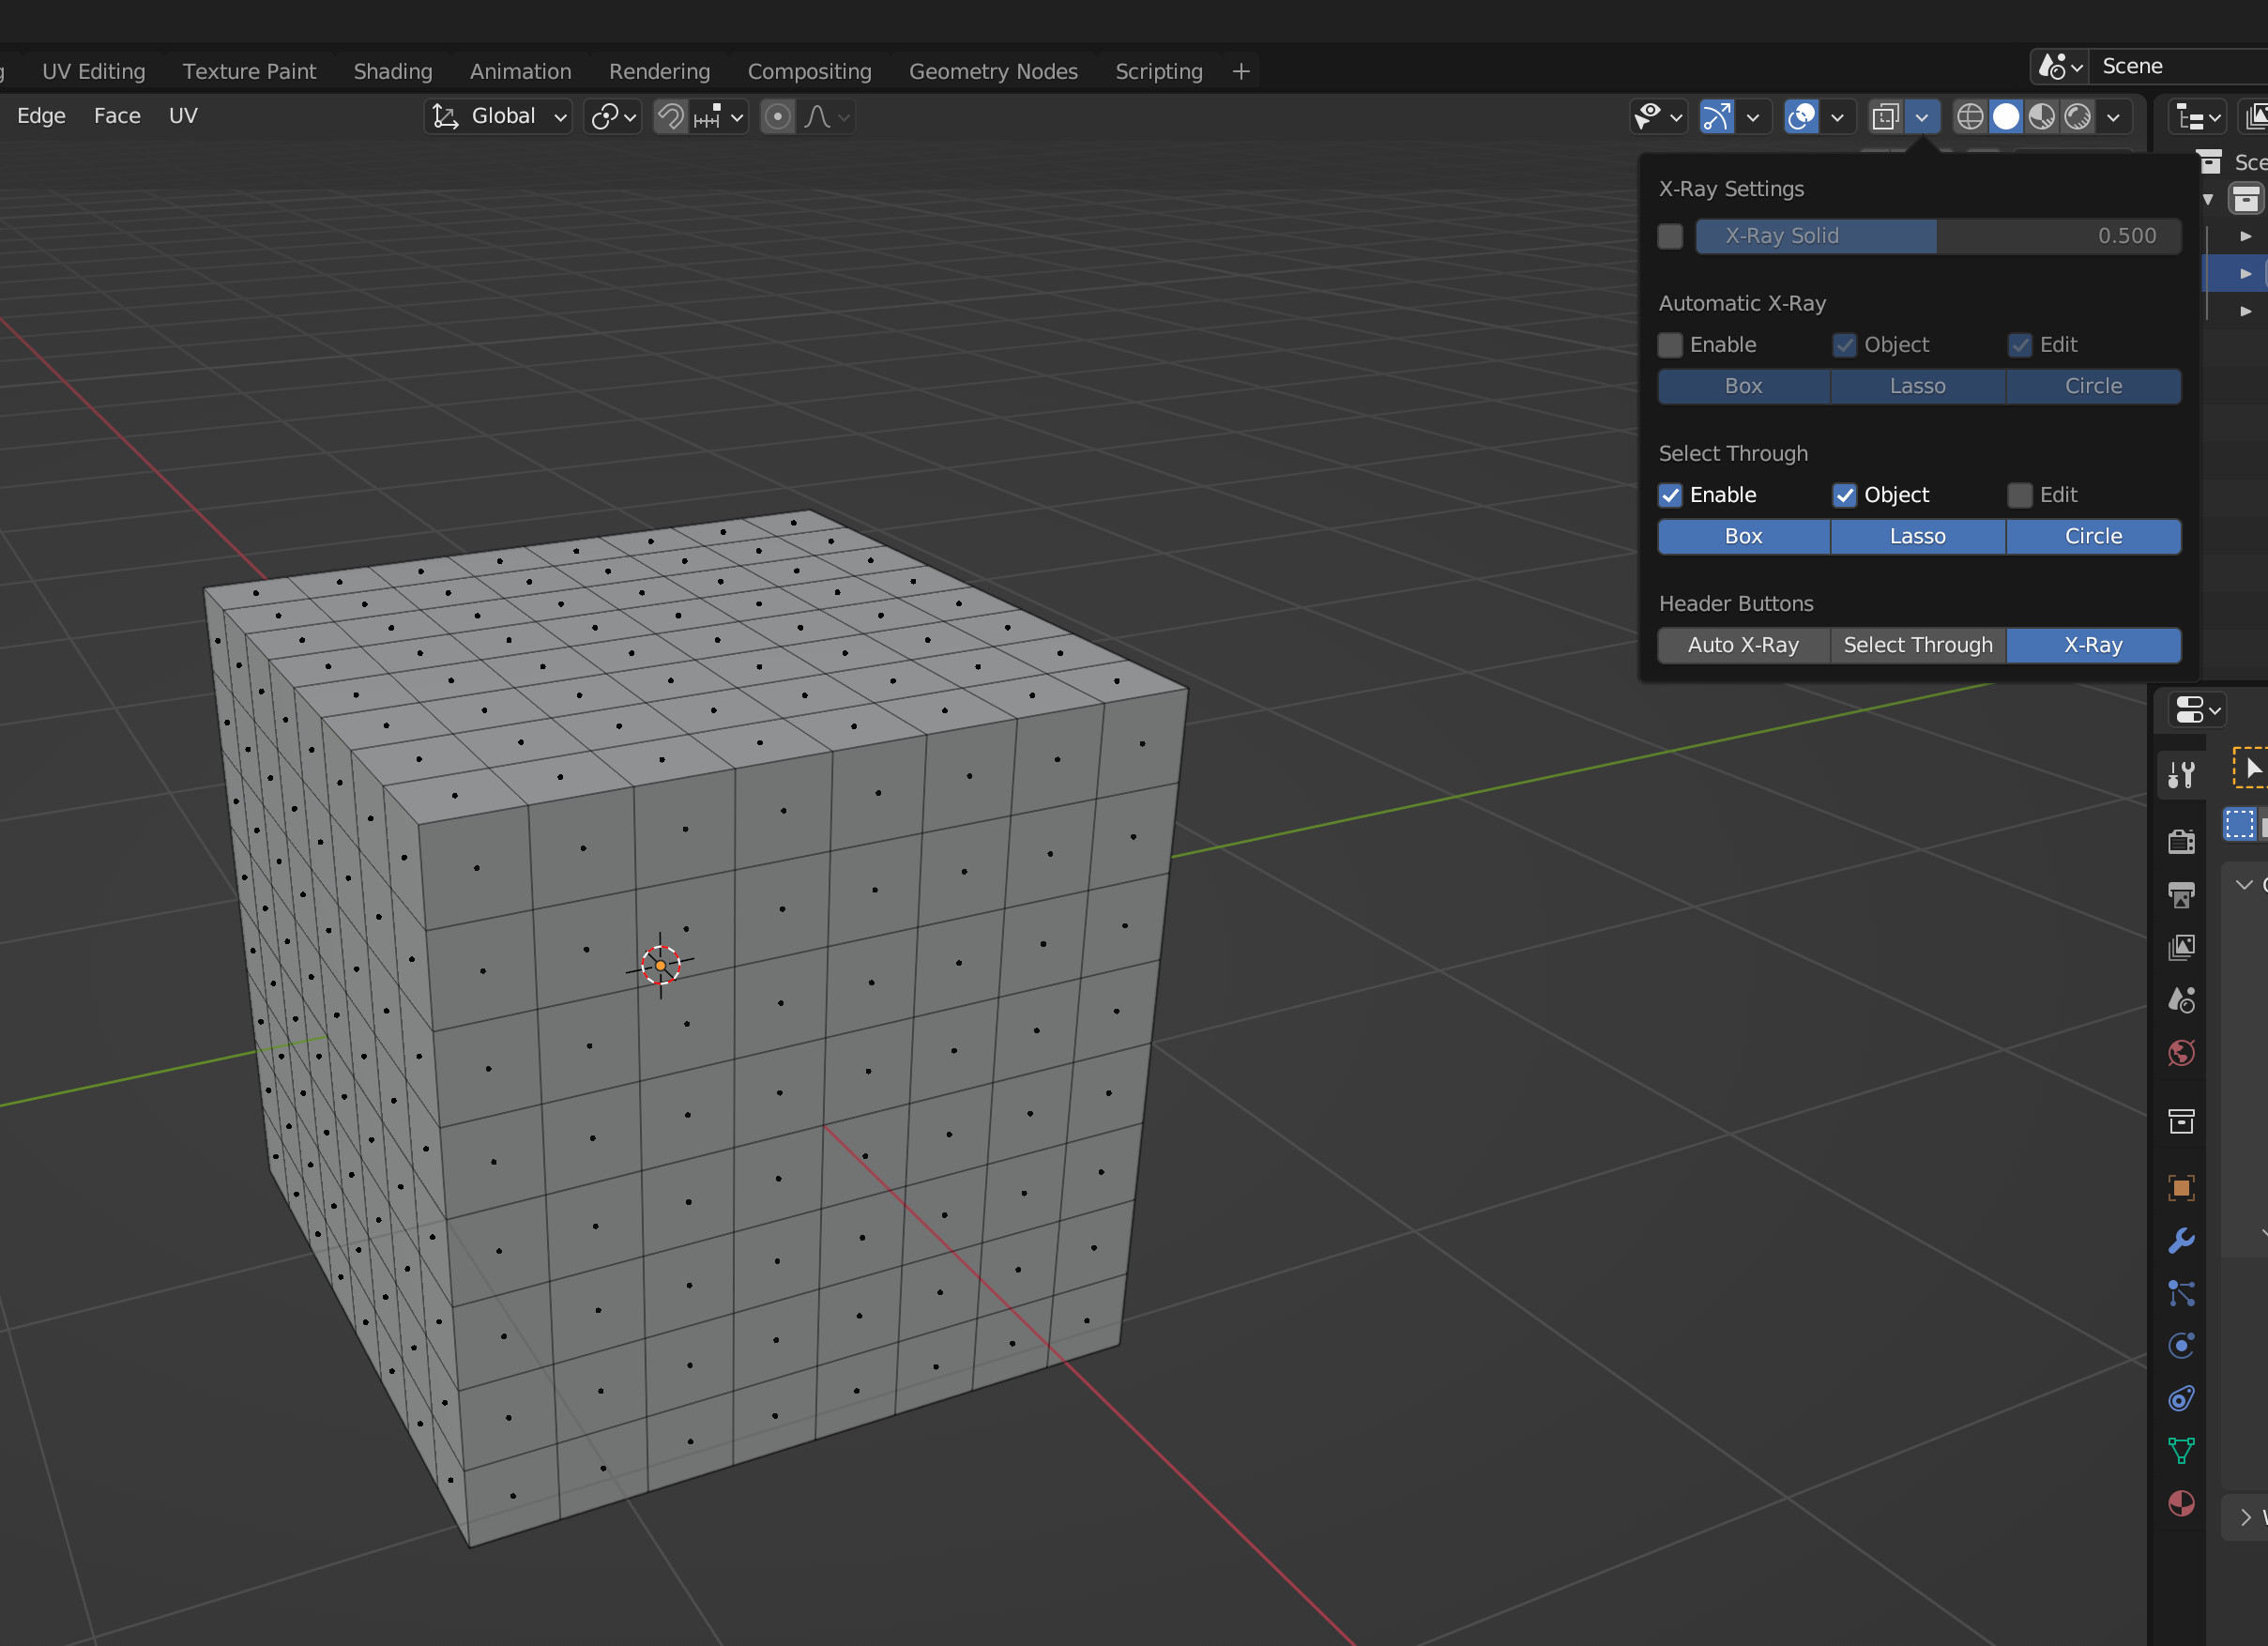
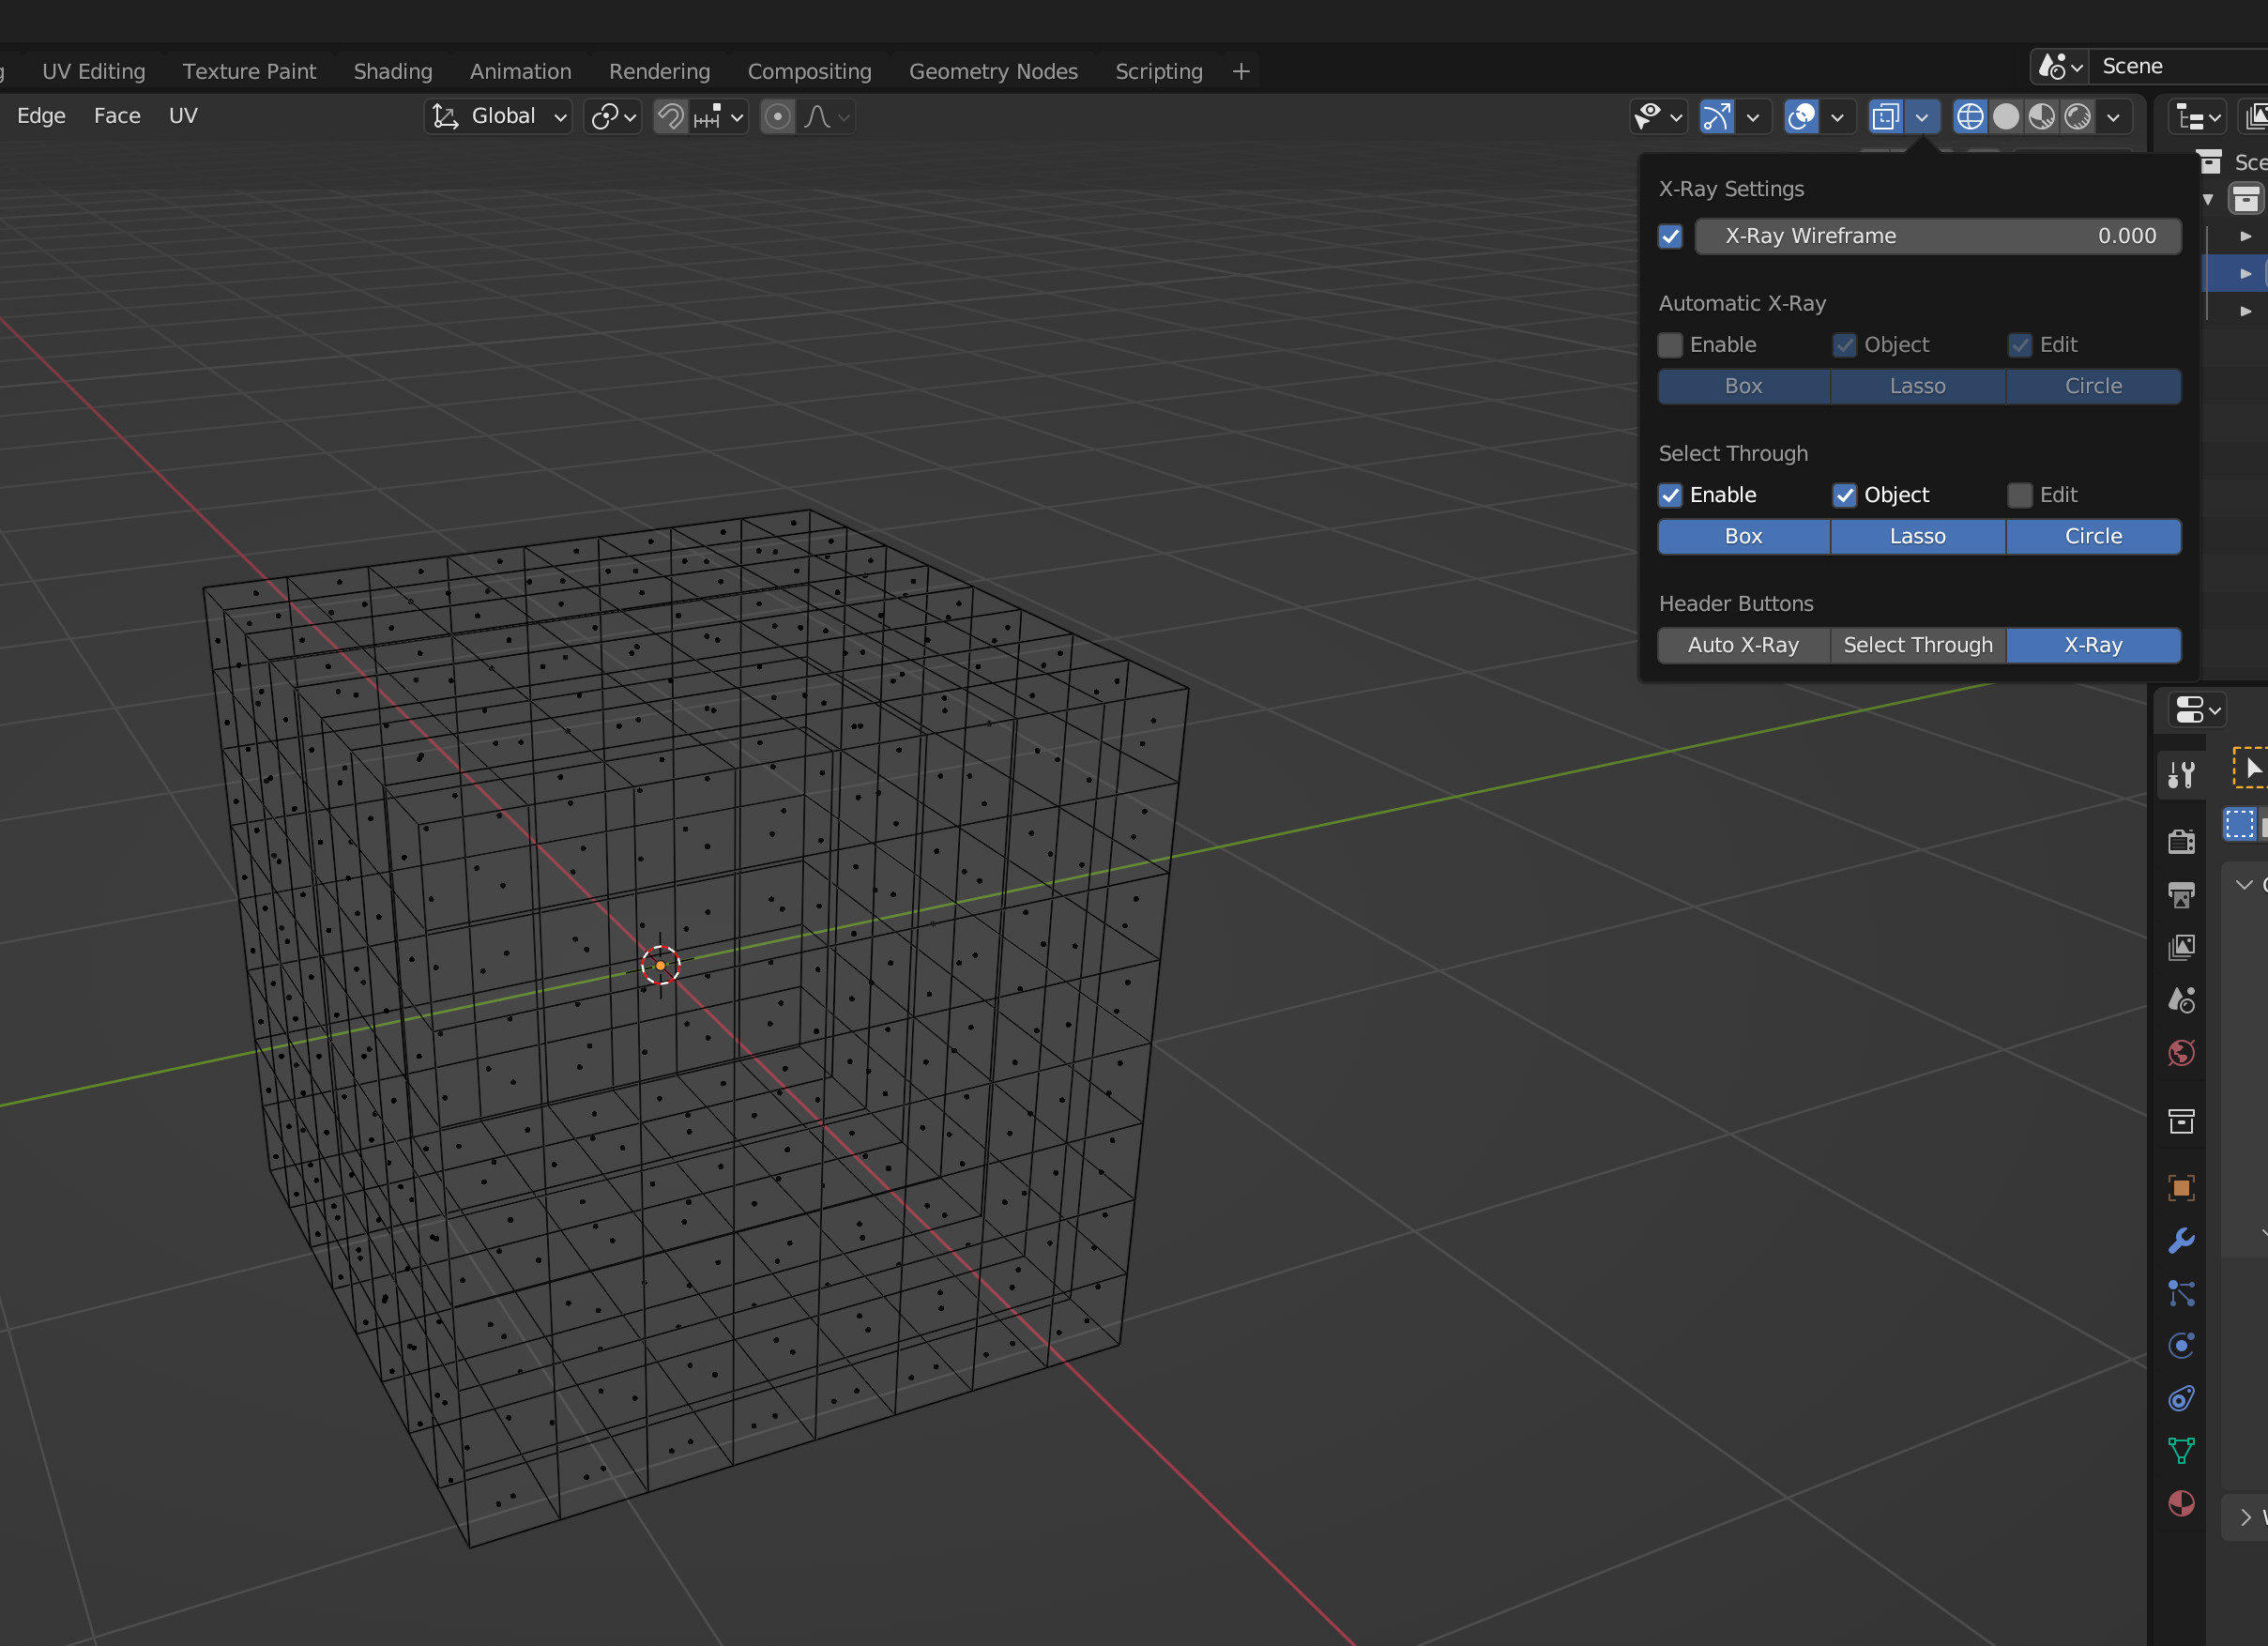

If you want to select unseen mesh without X-Ray, try Select Through. You can decide which tools and modes will use it. If you don’t want to change how X-Ray affects selection, try Automatic X-Ray. When you start to drag select with Box, Circle, or Lasso it will turn X-Ray on, and when you’re done it will turn it off. The settings work the same as Select Through.
I included some operators. You can show any combination of them in the Header. If you have everything necessary for the tool and mode you’re in, the button will be lit up. It’s modular, so there are many ways to setup your shortcuts. The icons for auto X-Ray and Select Through were made by Alexey Adamitsky.
X-Ray, Select Through, and Automatic X-Ray buttons in the header


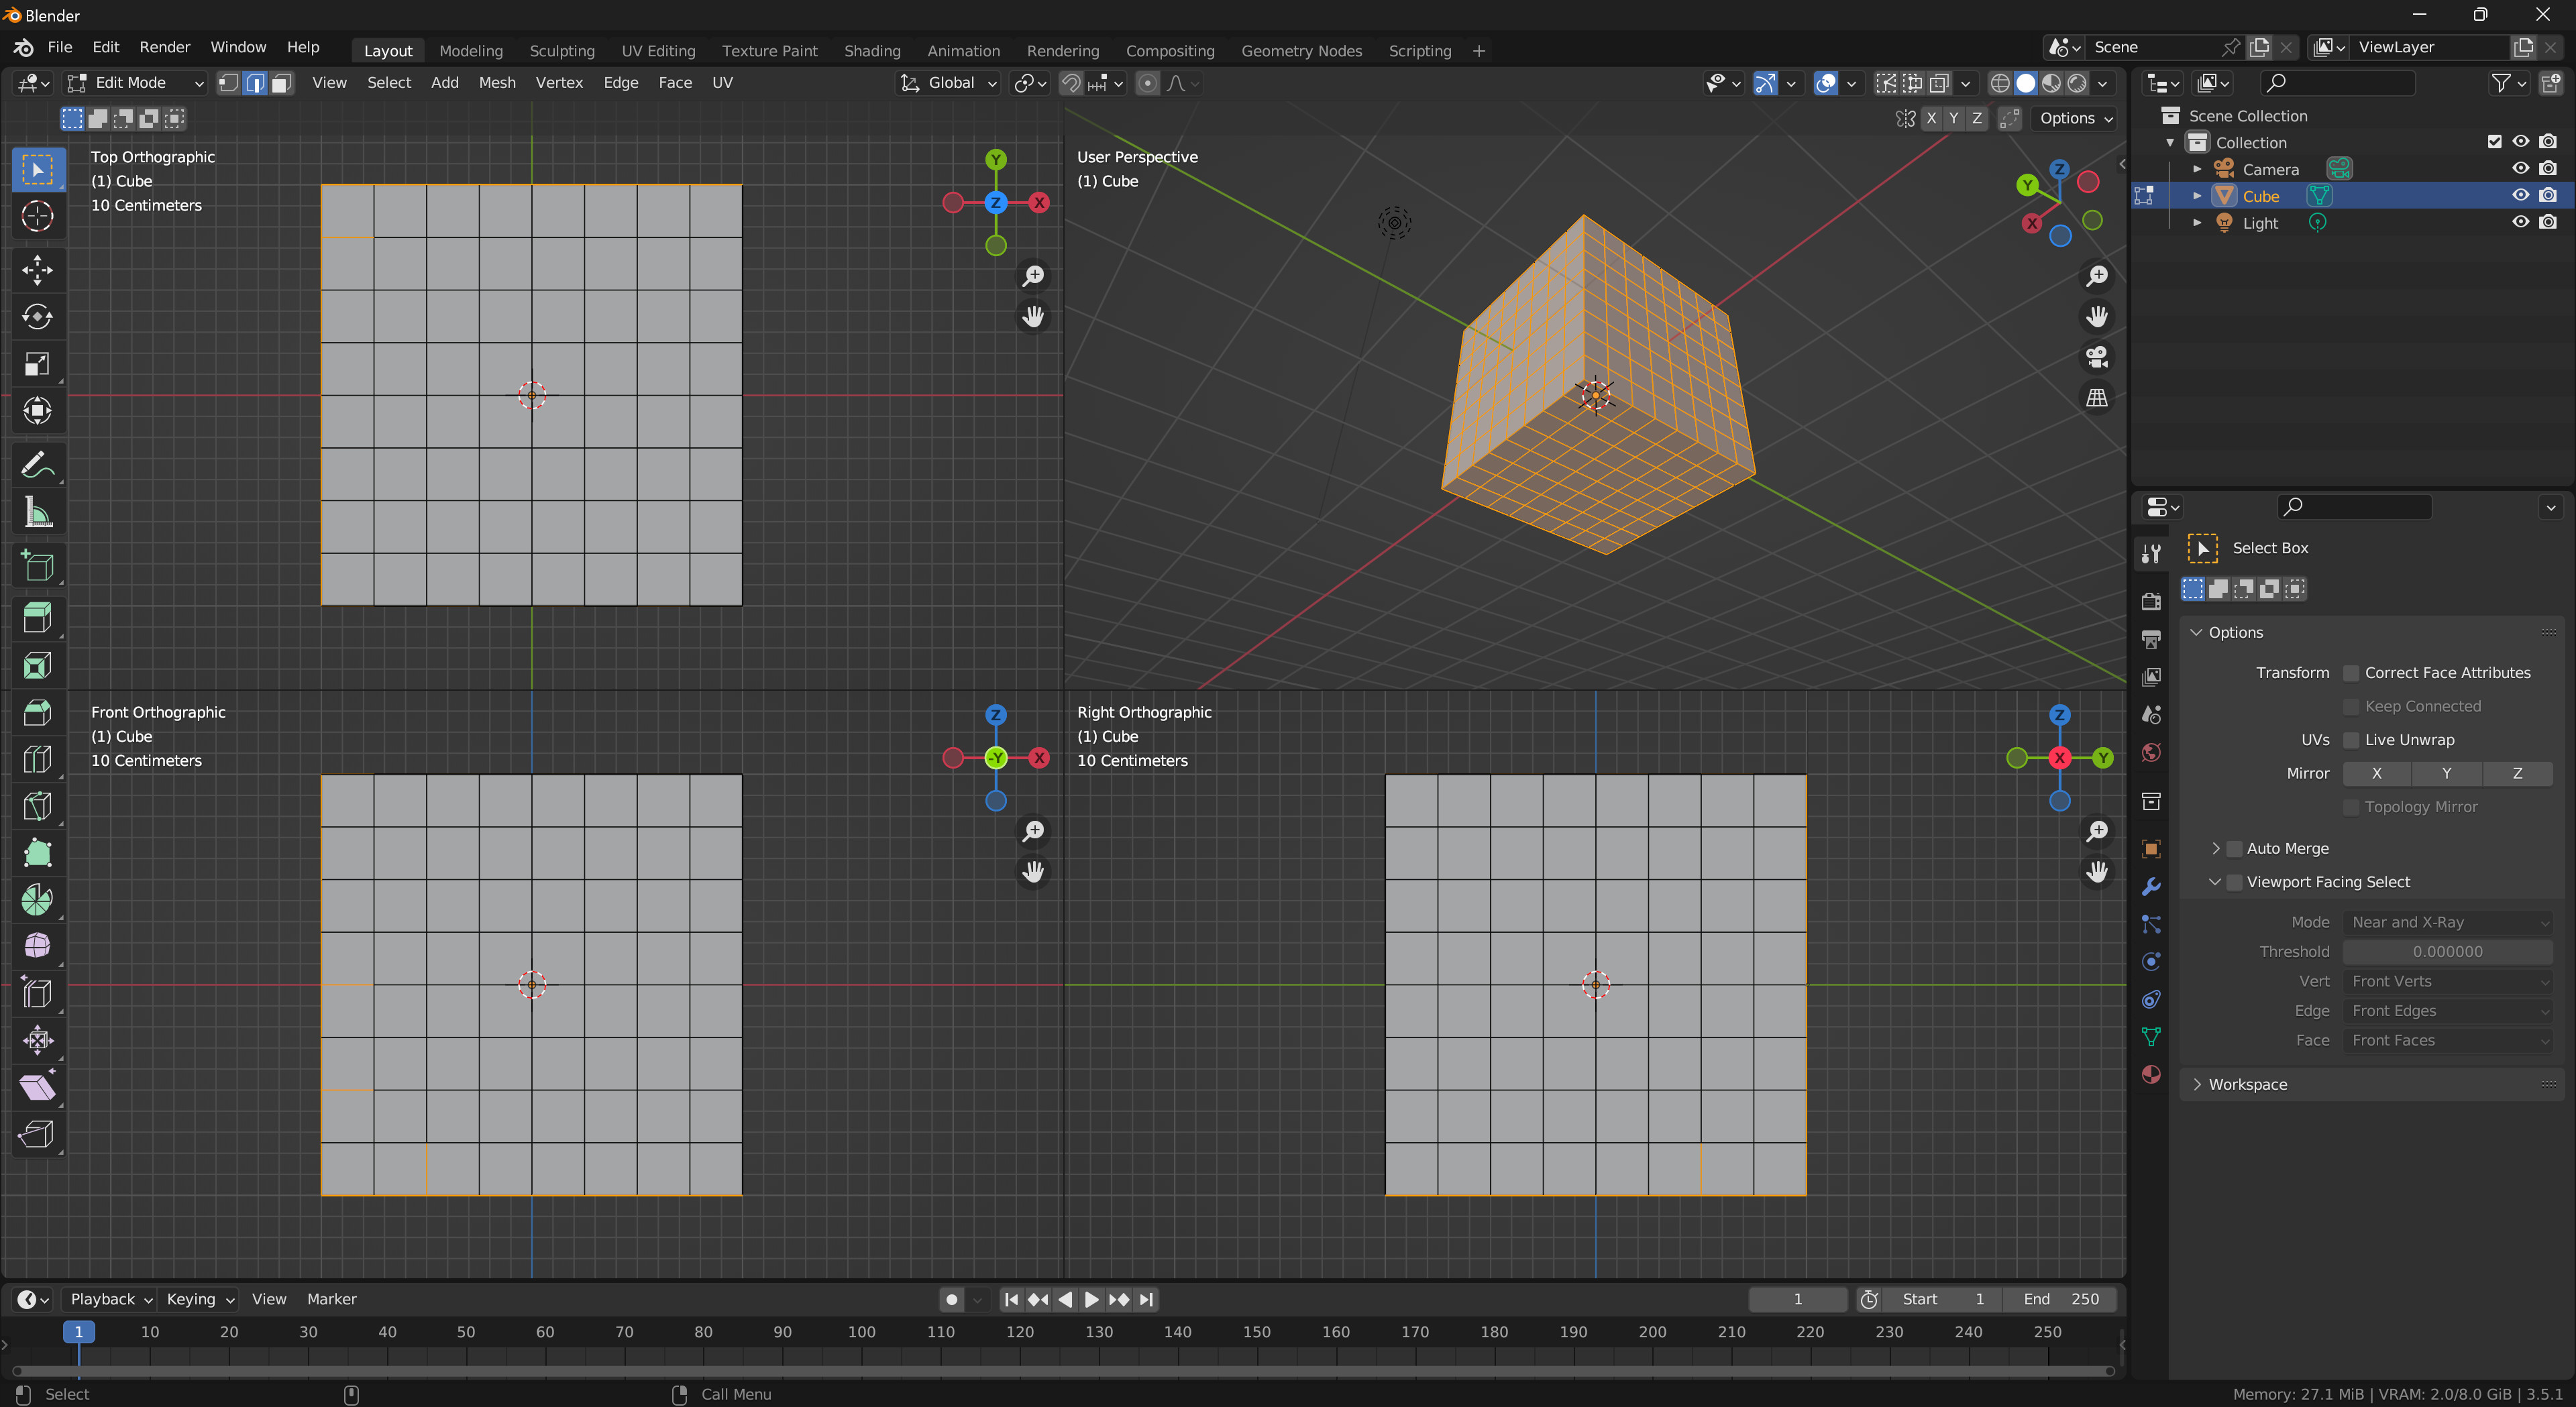
Viewport Facing Select
Blender does select unseen Mesh, and not in a good way like Select Through. If you can see some verts of an edge or face, they’re potentially selectable regardless of their visibility. If it isn’t truly random which unseen edges and faces this applies to, it may as well be. The 3 drag selection tools select the same wrong things, but if you move or rotate the viewport, this will usually mean that different unseen edges and faces are now selectable.
You can use Viewport-Facing Select to deal with this. It’s in Toolsettings, at the bottom of Options. It works in near select, X-Ray, or both. When you drag select, it compares mesh normals to the viewport. If they aren’t facing each other within the threshold, they won’t be selected. Greater or equal to 0 means the mesh normal is pointed in the direction you have it set to. The higher you set the threshold, the more your mesh needs to be facing in that direction. A value of 1 should mean the viewport and mesh are aligned, but was only working from the front perspective (numpad 1) and from nowhere else regardless of ortho. Max threshold is 0.999999, it is functionally the same as having it at 1 except it works from any angle. Negative values can select unseen mesh.
I use the All Verts setting. It’s saves performance without compromise, because Blender doesn’t select unseen verts. They’re dimensionless, and since there’s only one position for them to be drawn in, they shouldn’t be in the selection bitmap unless they’re visible.
Front Verts will select verts based on their normals,. If you try this, you’ll probably notice how some of the verts at the edge of your mesh are excluded. Verts of Front Face will fix that, it selects verts if they’re part of a face with a viewport facing normal. There’s also rear facing counterparts to these, they do the opposite where they’ll select stuff pointed away from you. Not sure if they’re useful but it’s easy to include.
The settings for edges work the same as verts. Using edge normals will exclude things you probably want to select, and Edges of Front Face will correct that. Same goes for face settings, except Front Faces are what you want for accurate selection. Faces of Front Vert will select faces that have at least one vert with a viewport facing normal. This means it can select unseen faces, which is what I’m trying to avoid, but maybe it’s useful for something.
Sometimes you can see a face even though it has a rear-facing normal, and VFS won’t select it. Usually this is because you’re dealing with two triangles that have no business sharing the same quad, but that’s going to happen from time to time, and you’ll need a way to select them. Besides turning this feature off temporarily, triangulating or otherwise fixing your mesh, single-clicking, or rotating your camera, you can drop your threshold into the negative. How negative you go depends on what you’re willing to live with, and it gets worse the lower you go. I keep it at zero, because at least you have a chance of noticing things you didn’t select. Hard to keep track of random selections that you can’t see. It’s not perfect, but it’s predicable, and should work with most geometry.
VFS off and on when selecting edges and faces (undesired faces can be seen in ortho)


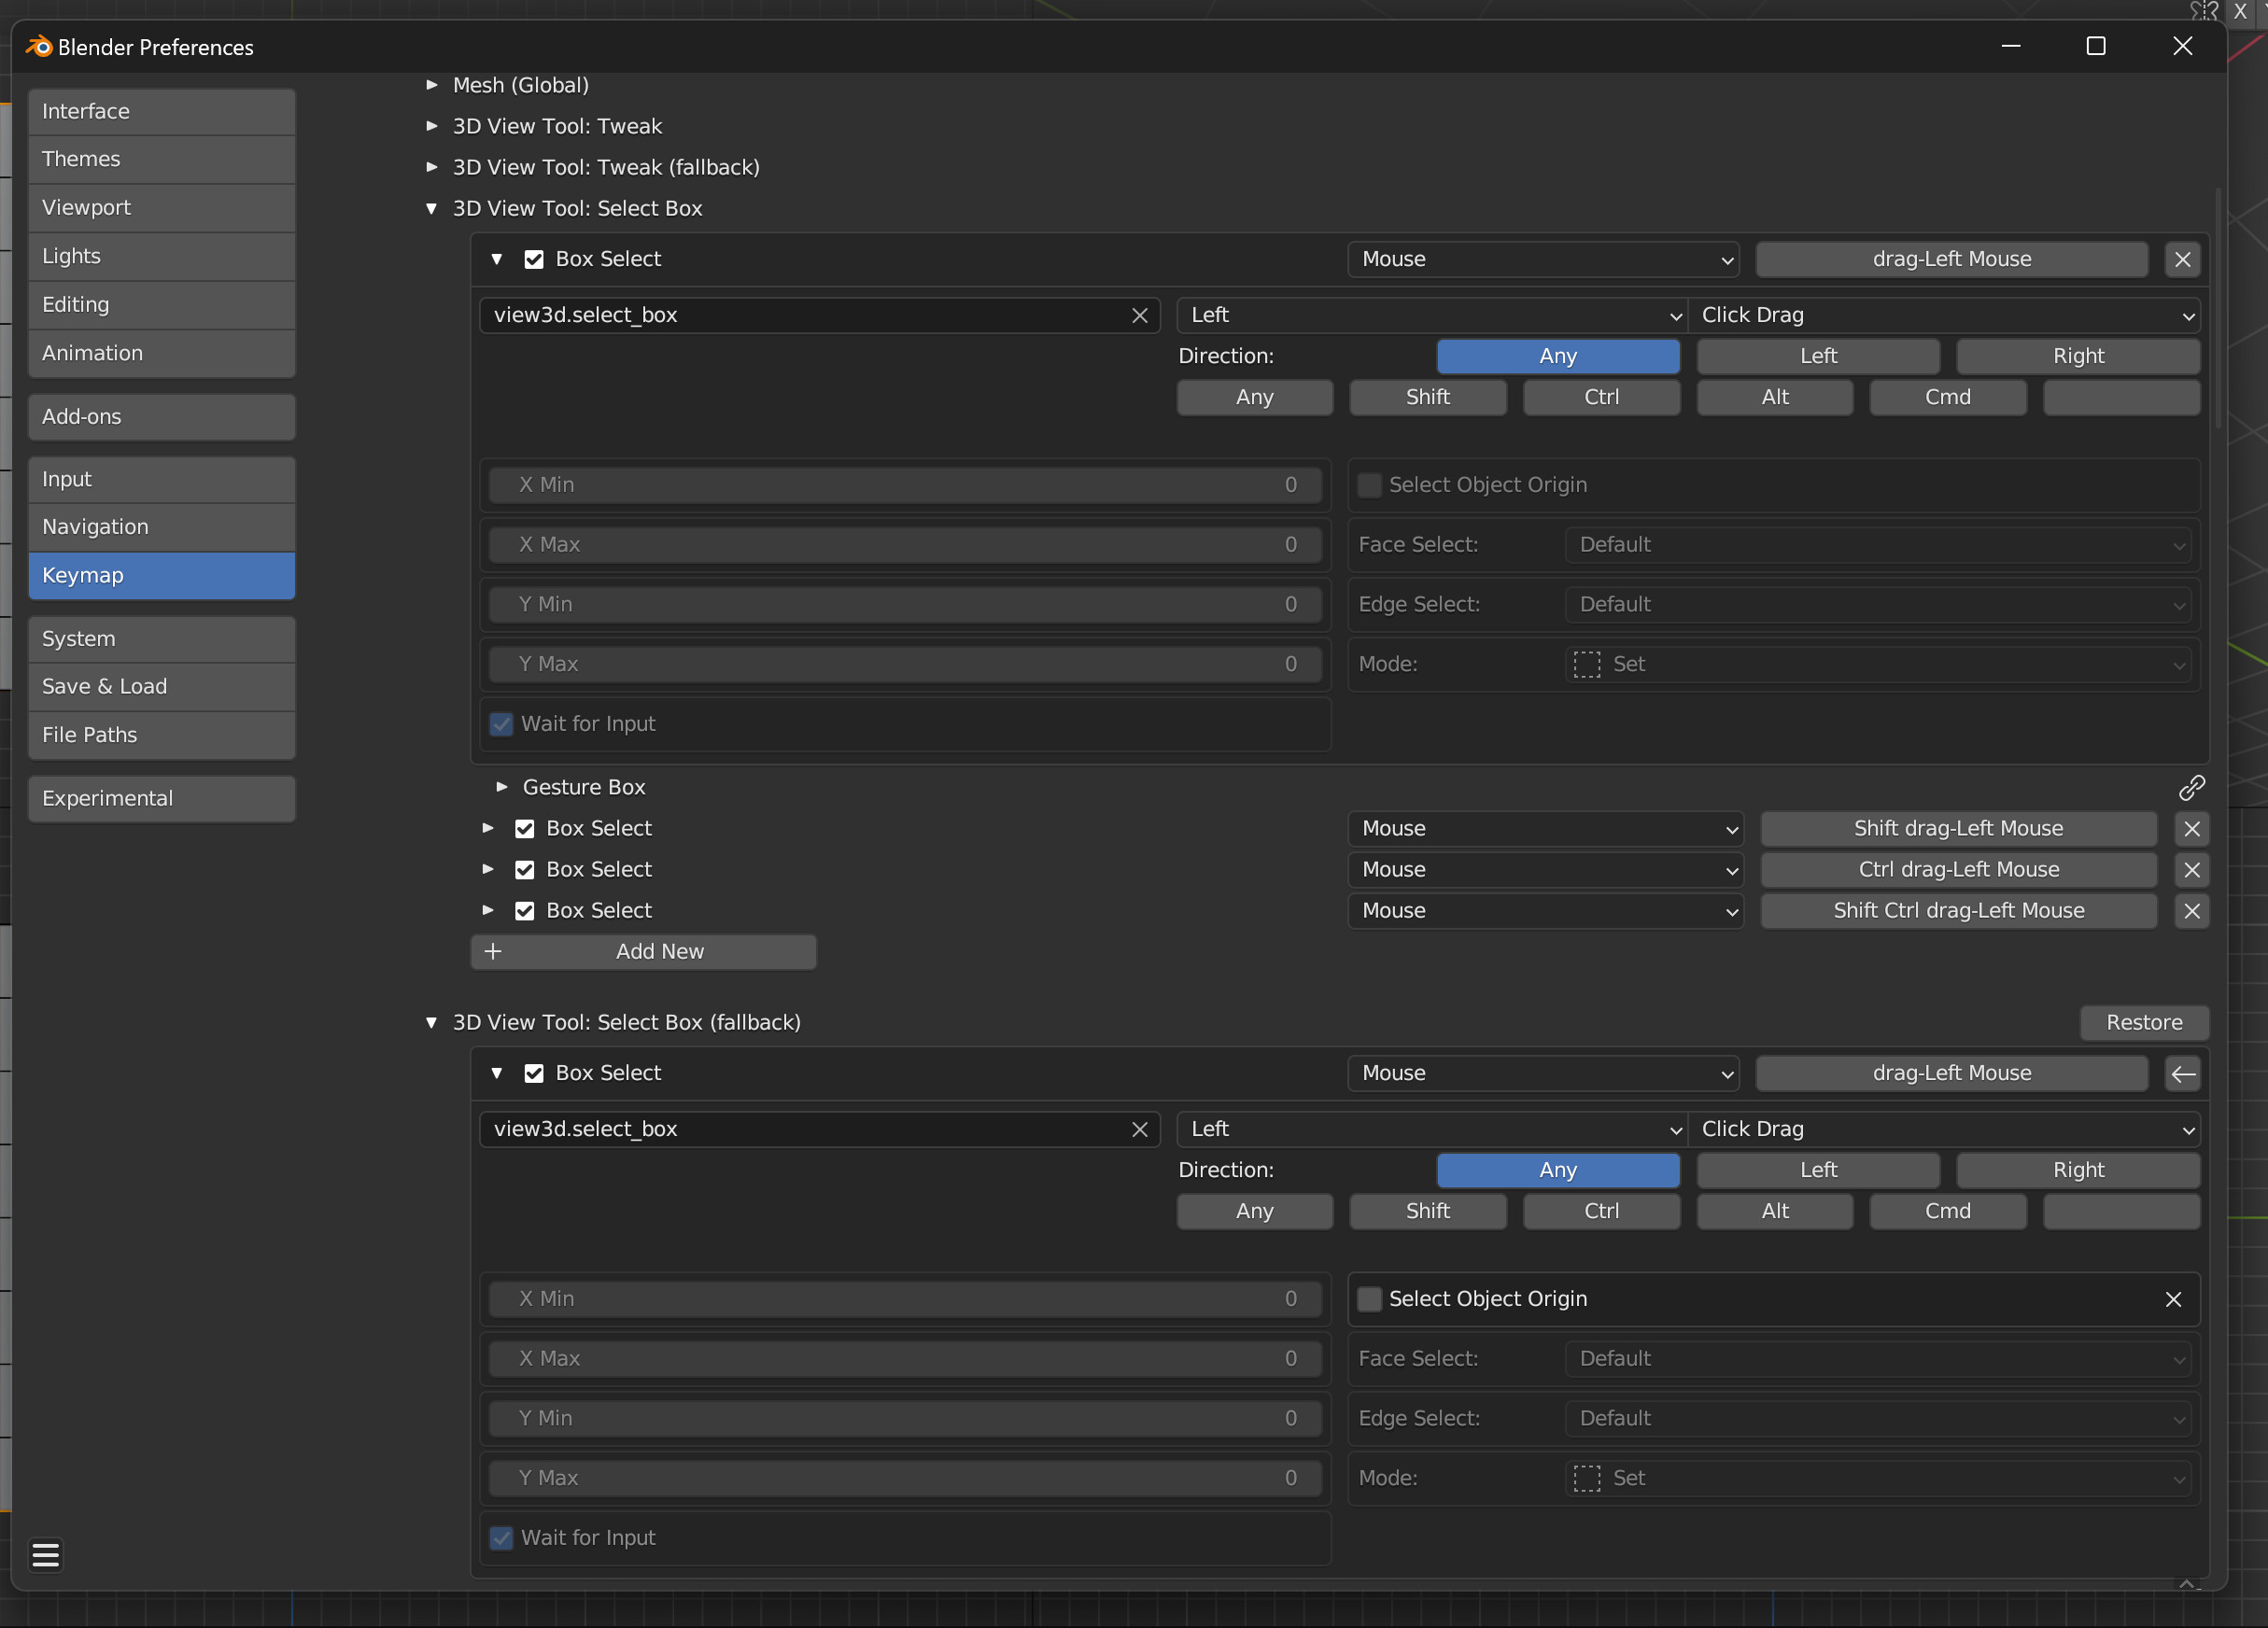
Object Origin
This feature is incomplete, but functional. Circle is forced to select objects by their origin, while Box cannot do this. There’s a checkbox called Select Object Origin in the Keymap. It’s a little off, an object’s origin can be still be selected when it is behind something else if some other part of that object is inside the selection area. Also, the selection area for Circle is larger than it appears when origin is off. One more thing: I couldn’t get Lasso working right, so I left it out. If you need more options for object select, there’s an addon called X-Ray Selection Tools that should work pretty good. Automatic X-Ray is inspired by a feature from that addon, it was added to my build at the request of Hologram.
Object origin in the keymap for Box and Circle

Mesh Select Issues
Intersect doesn’t work with Touch or Enclose face in X-Ray and Select Through. It will do a Center select instead. I figured it’s better to do something close to what you’d expect rather than nothing.
Enclose face works in near select, but it’s hard to use if you can’t see all the verts of a face. If you have a visible face, but some of it’s verts that would otherwise be on screen are behind something else, the selection bitmap thinks they don’t exist. This means that it also thinks that part of these faces are outside the selection area, even though they aren’t, and they get excluded from selection. One thing you could try is avoiding the selection bitmap entirely. Turn on Select Through, and set Viewport Facing Select to work in X-Ray, Verts of Front Face, Edges of Front Face, and Front Faces. Threshold at zero is best in my opinion. Now you get a decent result, but you have to deal with the baggage that comes with Select Through and VFS. You don’t always get everything you can see, at least when you have some weird faces that have triangles pointing in very different directions. Also, you’re going to select like X-Ray so if you have something that is facing the viewport, but don’t have line of sight, you’re going to select it without actually seeing it.
Drag Direction
Blender let’s you assign a direction to click-drag in the Keymap. There are 8 of them, which is nice, but it’s confusing and inaccurate if all you need are 2.
Preferences->Input, at the top of Mouse. Keymap Drag Direction has 3 options. Eight, which is what Blender does, Left Right, and Up Down. The tradeoff for mine is that they’re exclusive. If you use Left Right, the only Keymap items Blender will match with are Any, Left, and Right. Unless something has been manually set to a direction, there shouldn’t be anything besides View Axis, the ones where you hold ALT and Middlemouse while dragging in the direction that corresponds to the view you want.
With Blender’s way, try to set Box select to Extend when dragging left aka West, and Subtract when dragging right aka East. If you don’t initiate the mouse drag within 45 degrees of left or right, you get a Tweak Event instead of what you expected. There’s a way to make this work better. You set Extend to Any, and Subtract to East, Northeast, and Southeast. The Keymap item set to Any needs to be after the other 3 or they’ll be undetectable. Not intuitive, didn’t figure out this was possible until after making this feature.
With my way there’s 3 operators that will set your direction. If your Keymap is undetectable, it will warn you about it. Nothing bad will happen, it’s just telling you that this Keymap item won’t do anything because Blender can’t see it anymore.
Drag detection has some perpindicular bias. In short: whatever is perpindicular to the direction you have things set for, move in that direction before the expected one and there’s decent chance you don’t get what you wanted. The Left Right and Up Down options are very unlikely to experience this issue, and you can work around this by increasing your drag threshold in Userprefs. In detail: if you’re using Left Right, and you drag up or down far enough before moving to the right, you’re going to get the Left Keymap item instead of the Right Keymap item that you intended. If you’re on Up Down, and you move horizontally before going up, you would get the Down Keymap. With Blender’s Eight way, assuming you set it like I described, the dominant Keymap item is the one you set to the Any direction. The Left Right and Up down options are a lot more precise so it’s hard for this to happen. The Eight way calculation rounds to the nearest int, so it treats every mouse drag within 45 degrees of a cardinal direction like it went straight vertical or horizontal.
Drag Direction options

Left Right in the keymap
Selection Radius
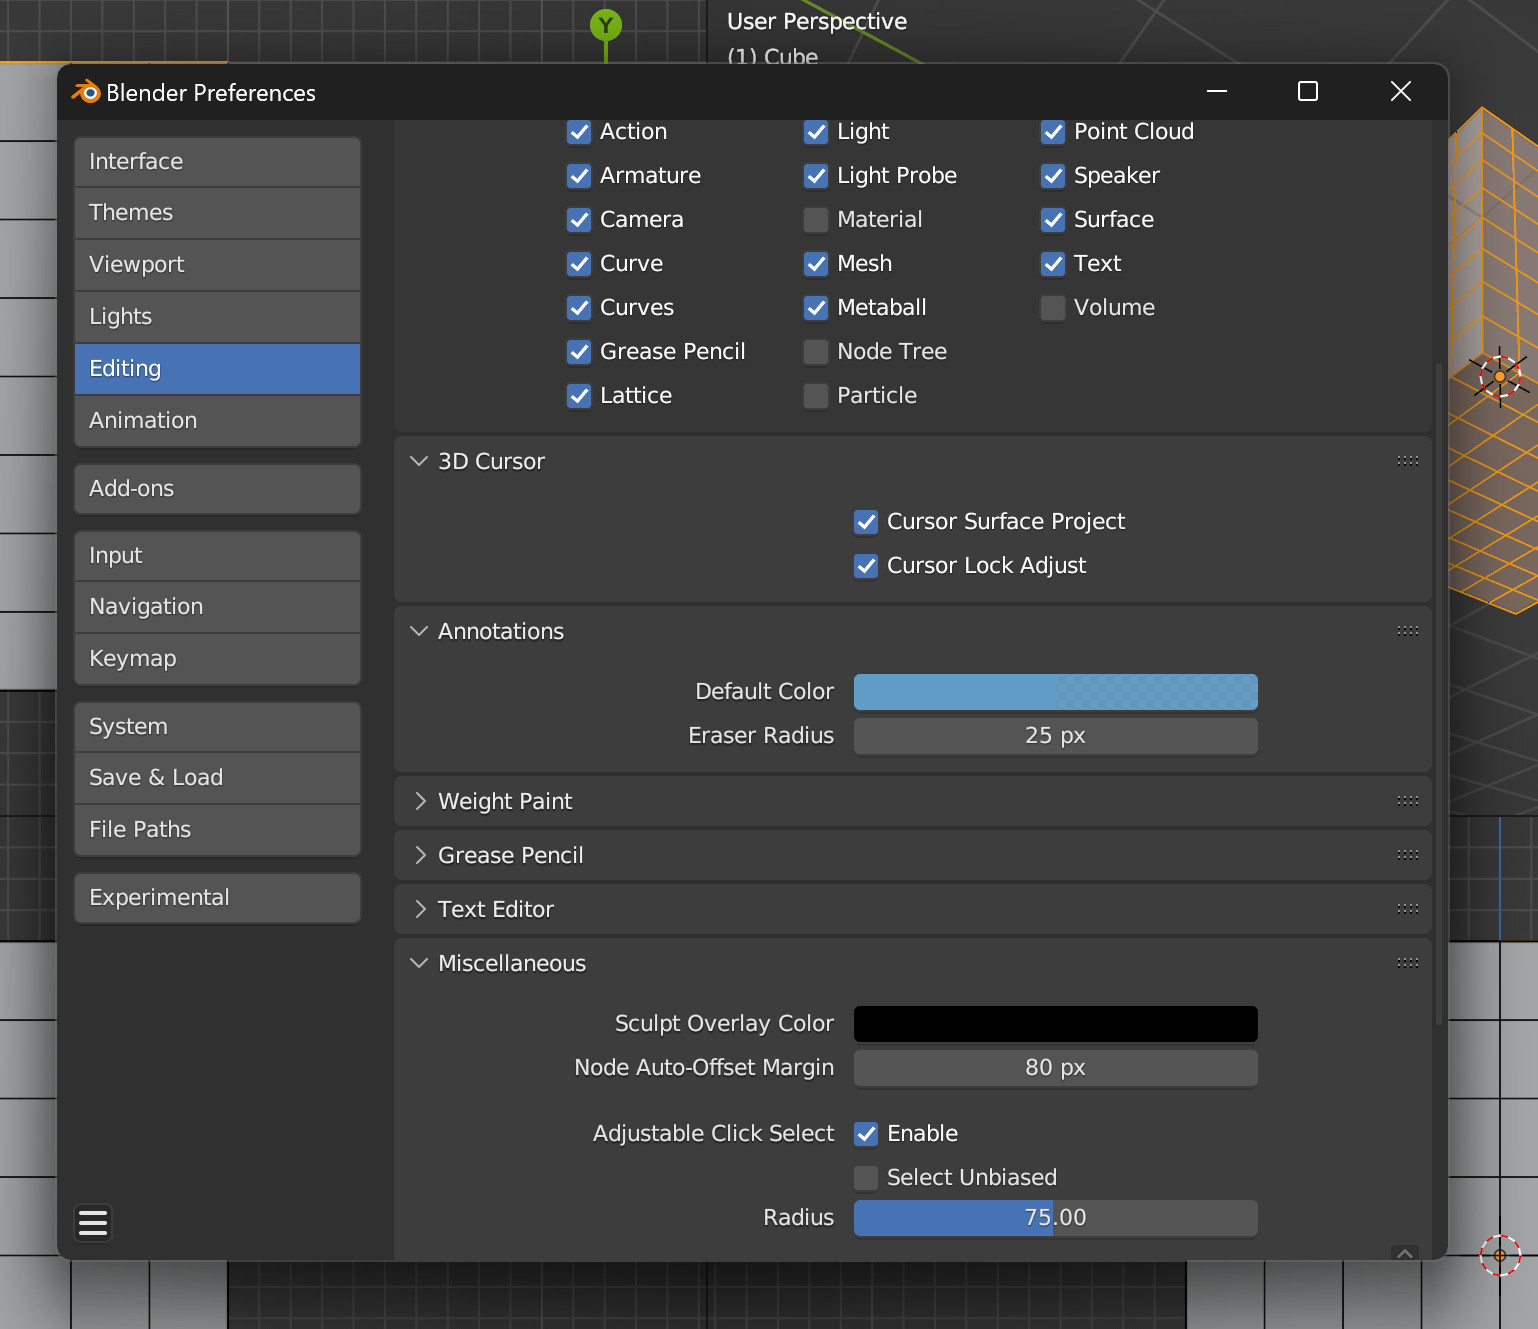
Preferences->Editing->Miscellaneous-> Adjustable Click Select.
Single-click an edge, vertex, or facedot and there’s a pretty big area you can grab it from. Faces in near select have zero radius, so you have to be right on top of them. I made this adjustable and consistent. Faces act the same, and you can change the size of the selection radius. Blender gives unselected mesh a slight bias, this can be turned off.
Adjustable Click Select radius will be at 0 instead of 75 like it should be if you already have a startup file for the same version of Blender

Mouse Cursor
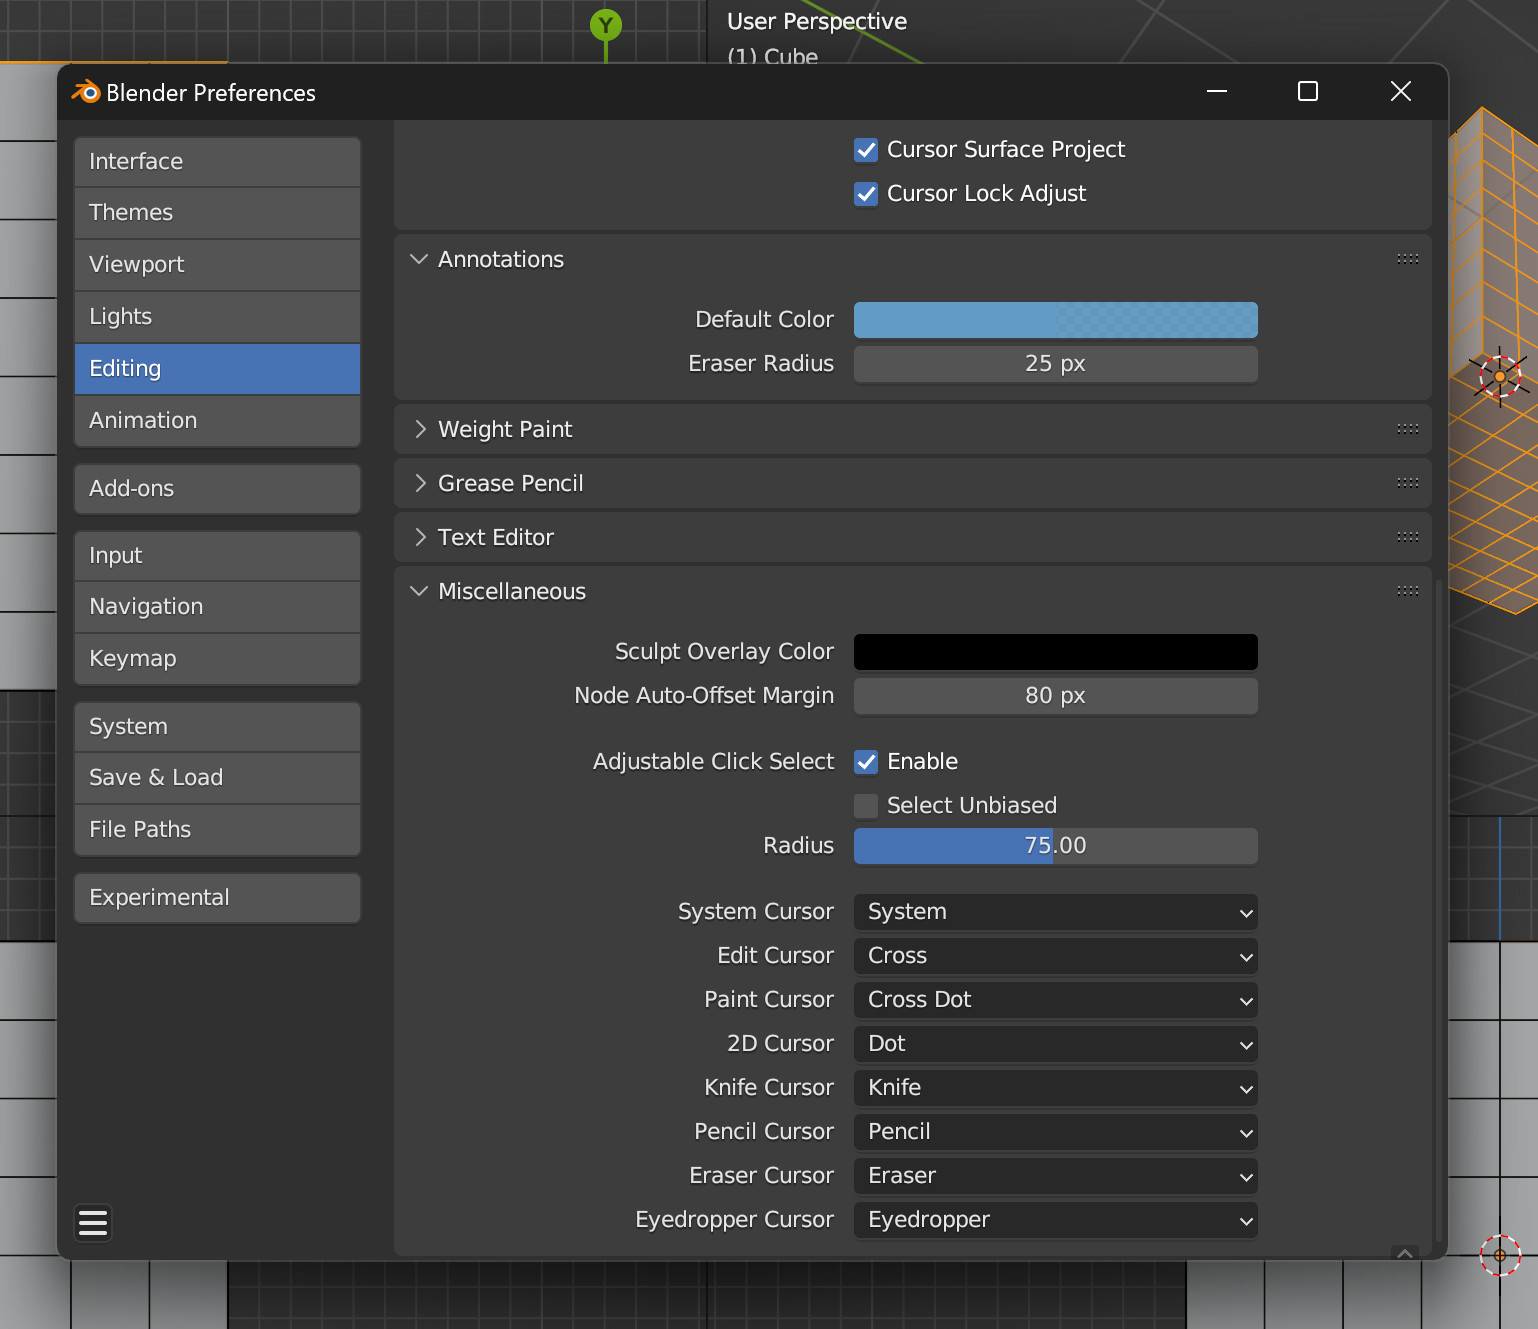
I don’t like the Edit Mode crosshair, so I made a replacement. Then I decided to just make this available to most of the cursors and have a few options to choose from.
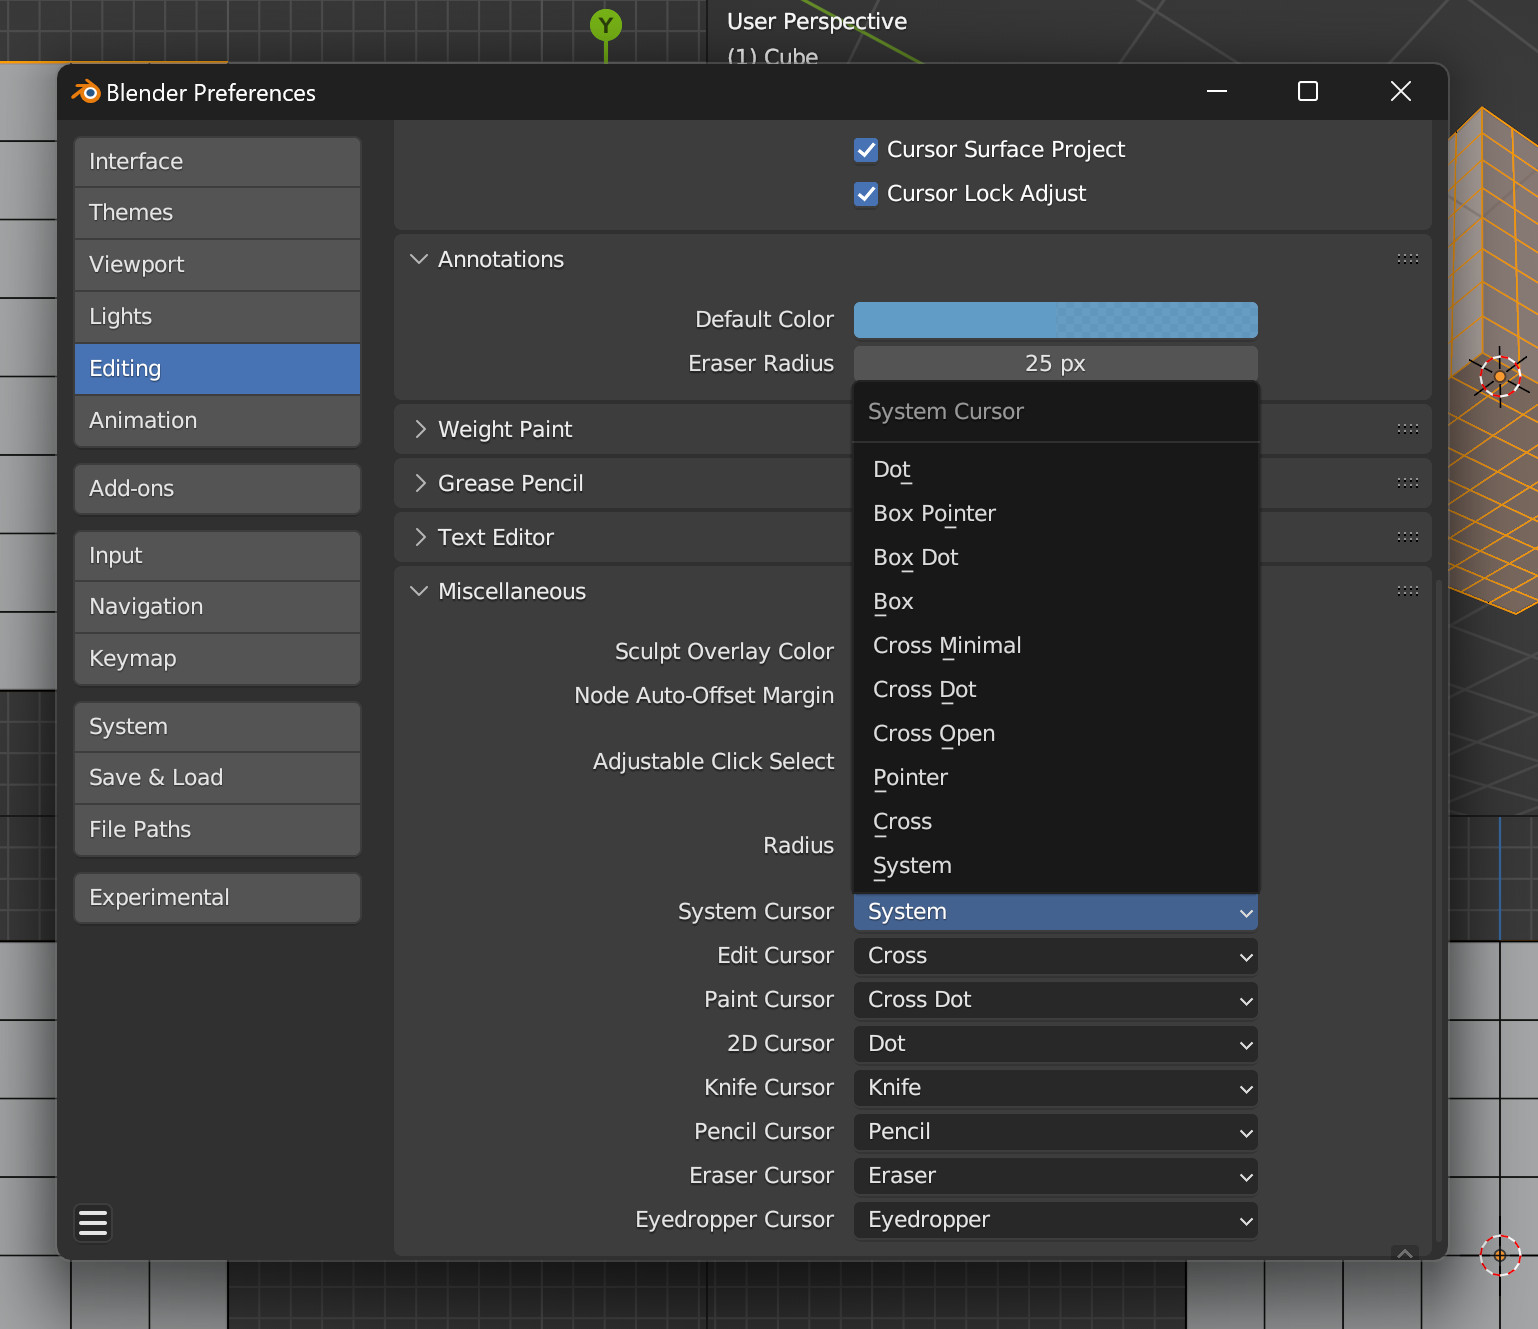
Preferences->Editing at the bottom of Miscellaneous. You’ll need to move your cursor in and out of whatever area they’re from to see the change take effect. If you are on Mac or Linux, most of the cursor options don’t work, but System and Cross should show up correctly if you’d like them as an alternative for any cursor. I’ll expand on this feature if there’s interest.
Mouse cursors that can be changed
Alternate cursor types are basically limited to System and Cross if you are using Mac and Linux
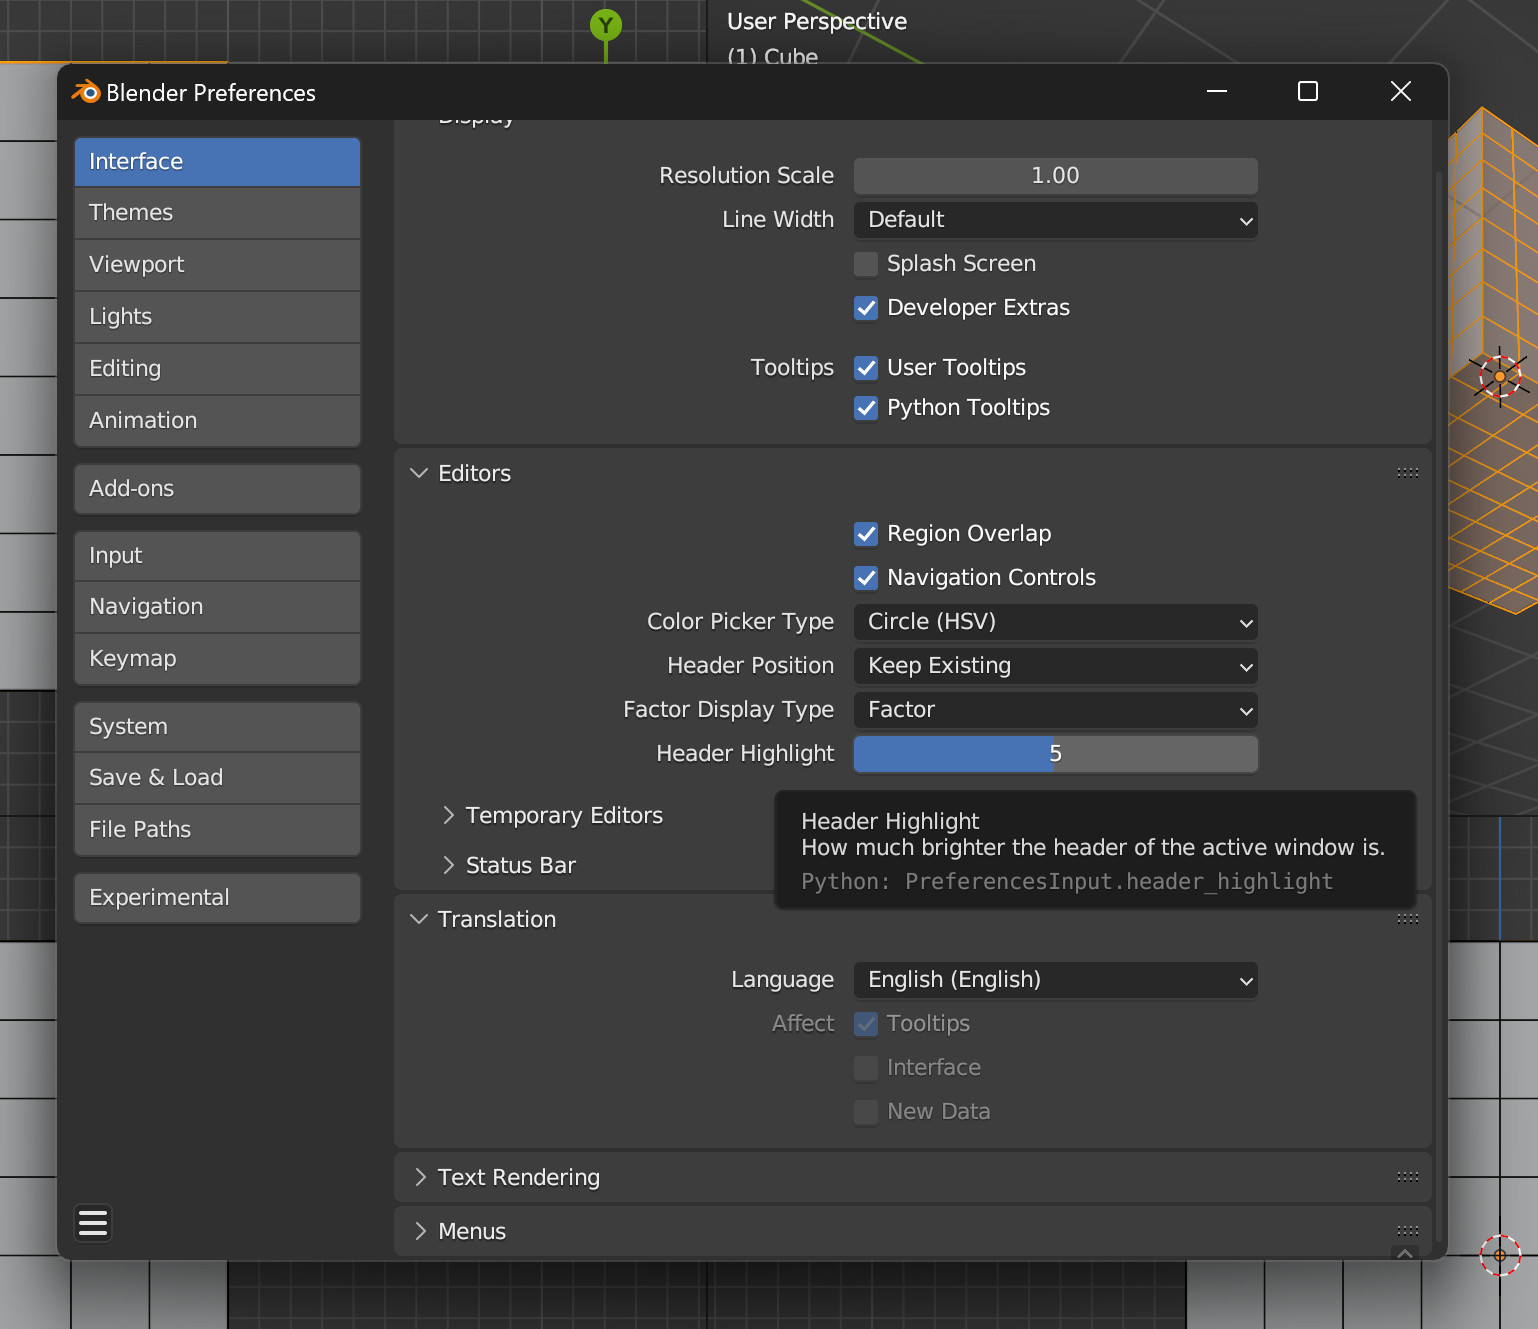
Header Highlights
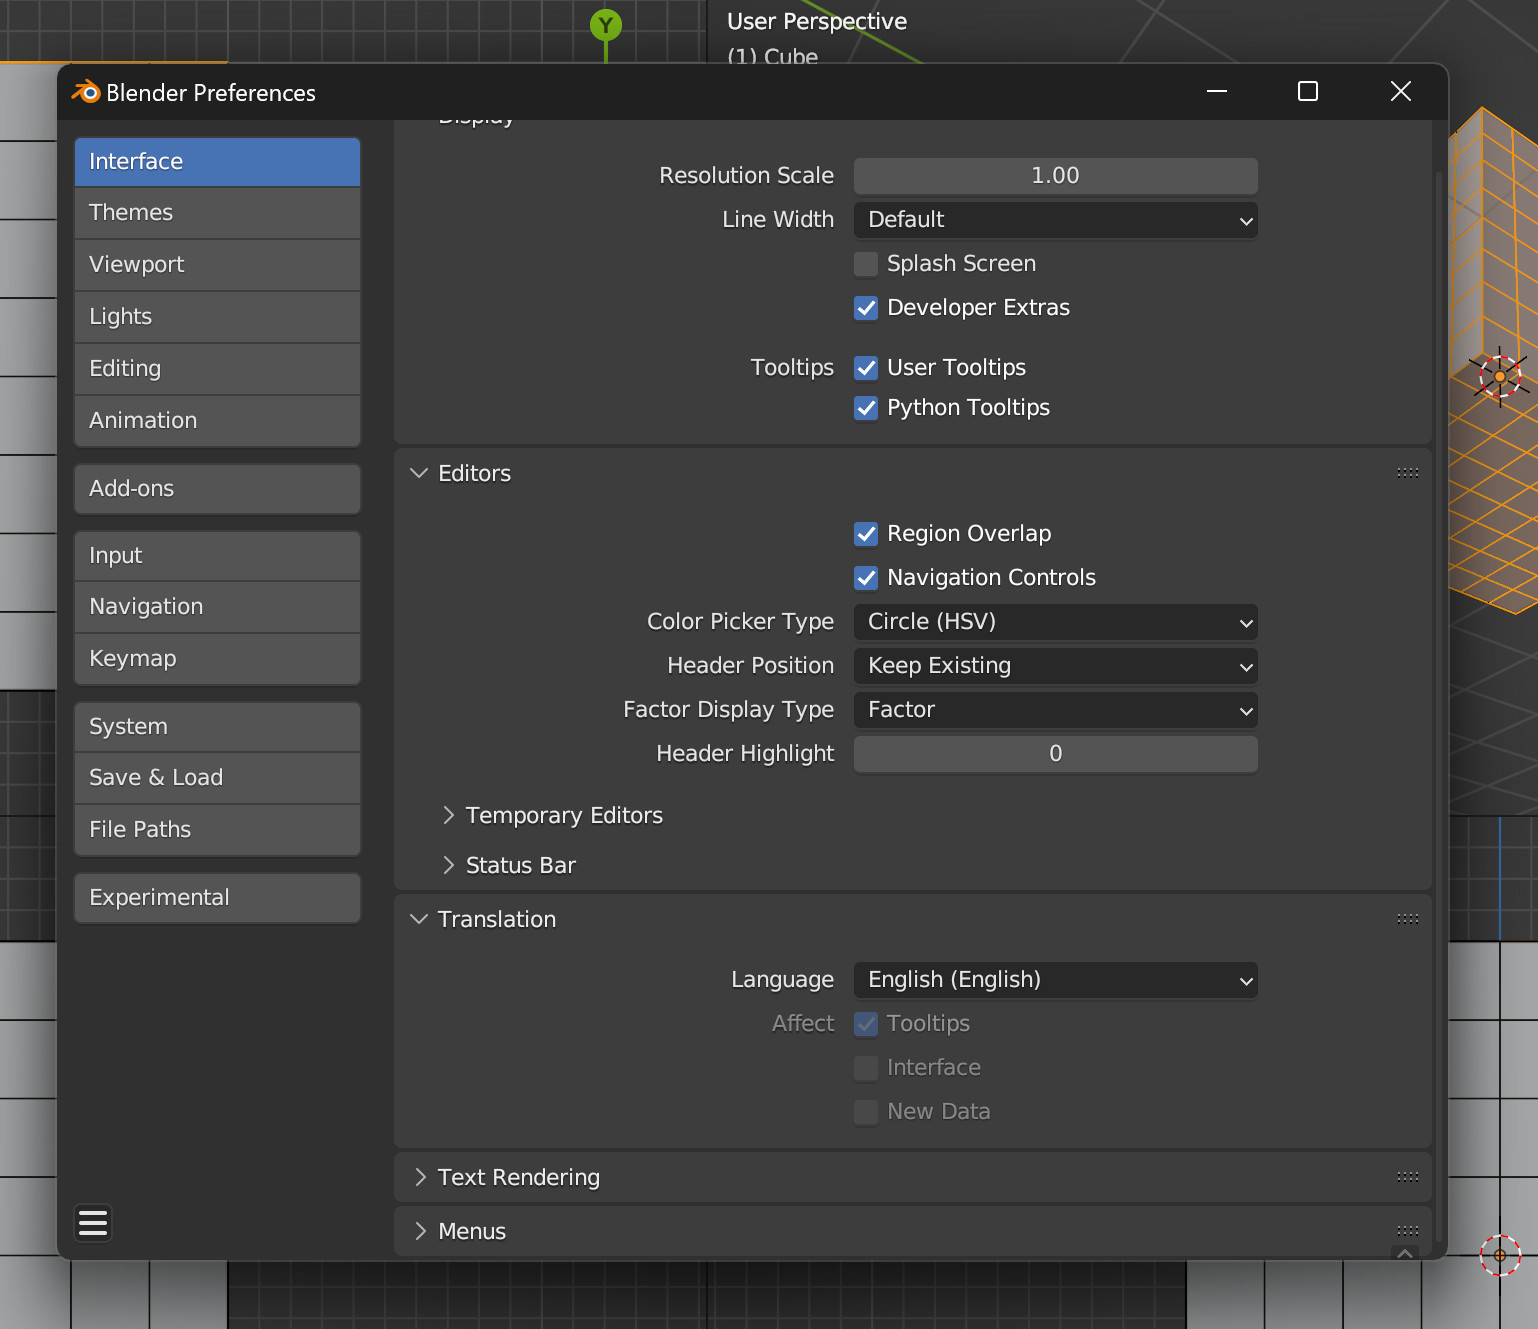
The top of the active window gets brighter. If you want to change that, go to Preferences->Interface->Editors->Header Highlight.
Header Highlight will be at 0 instead of 5 like it should be if you already have a startup file for the same version of Blender
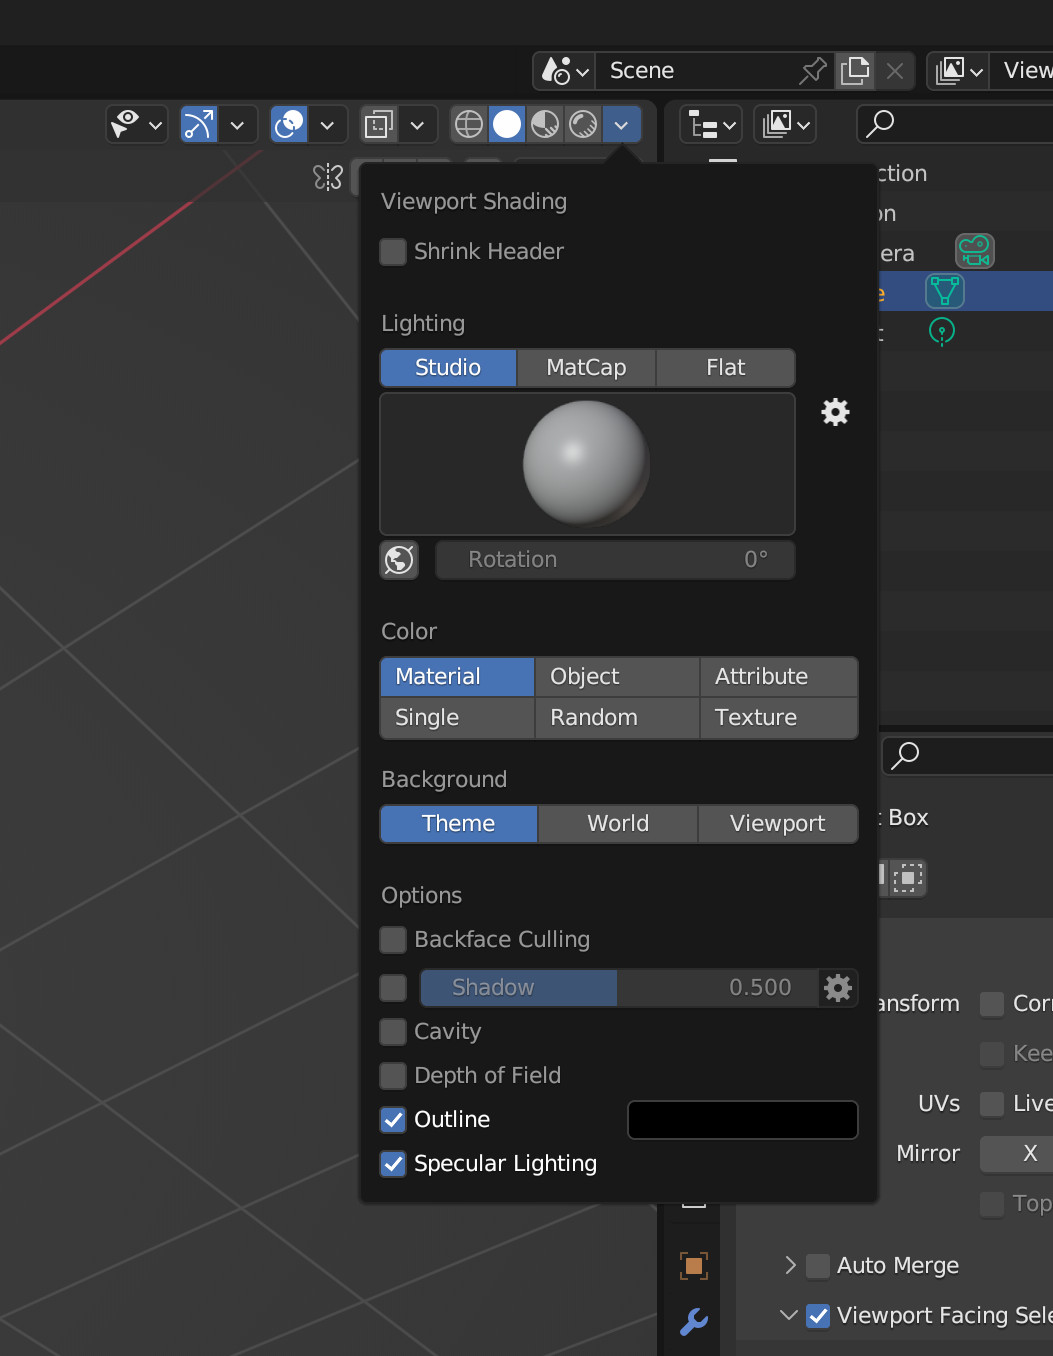
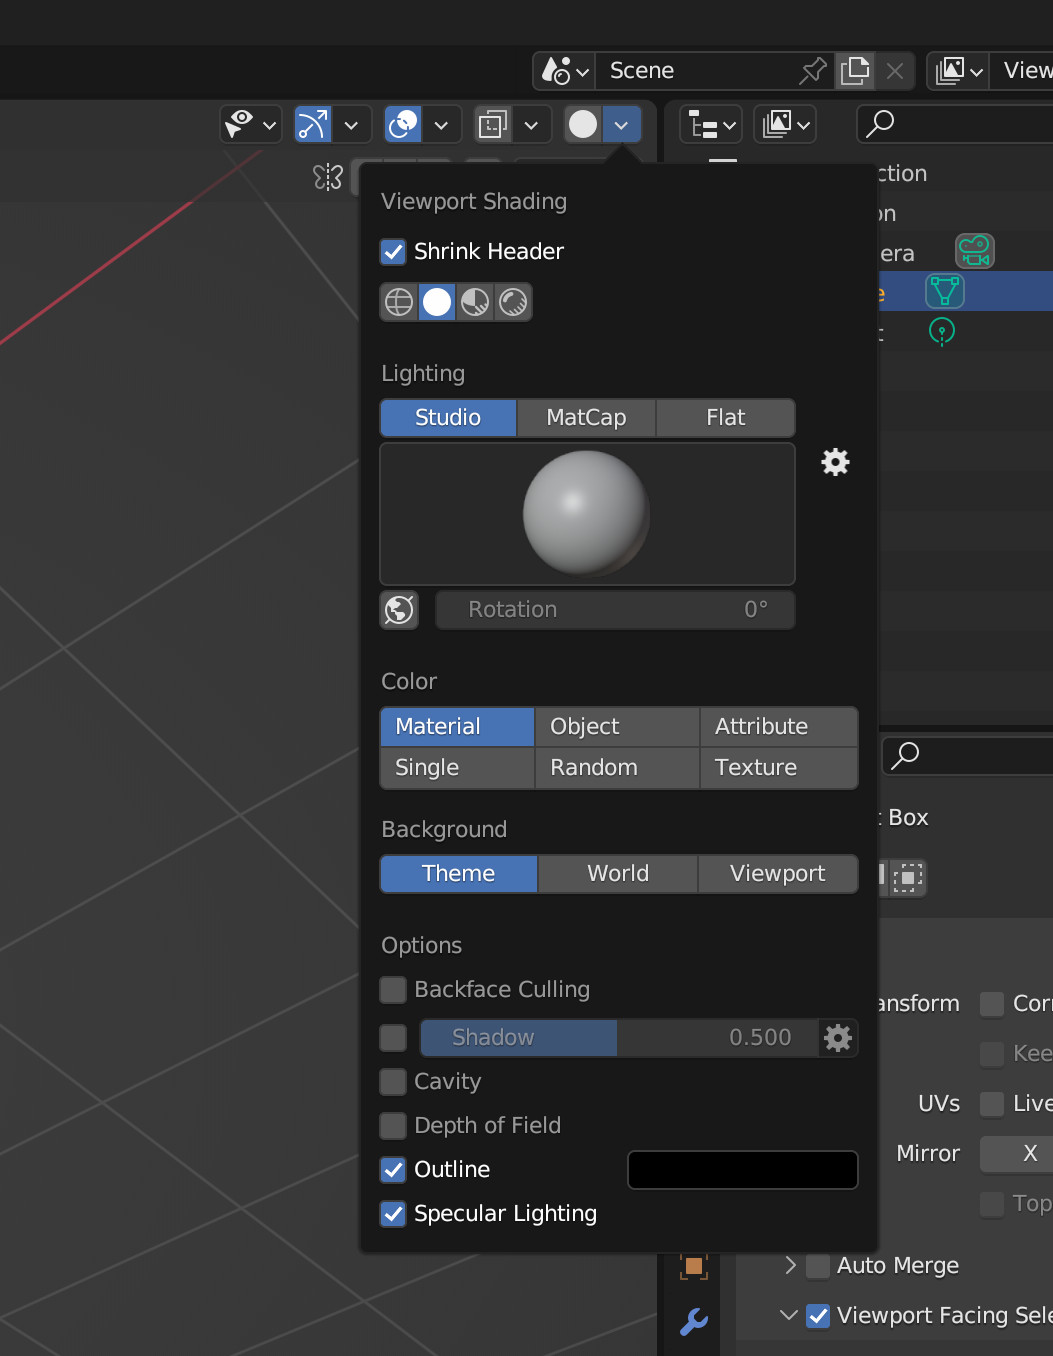
Header Buttons
I don’t need buttons for X-Ray or Shading, so I combined them into one thing to save space. Top of the Shading Popover, there’s a checkbox called Shrink Header. The X-Ray button replacess the Shading buttons, and it changes icon to reflect what Shading Mode you’re in.
Shrink Header off
Shrink Header on
Probably want to replace a redundant X-Ray button with Select Through or Auto X-Ray


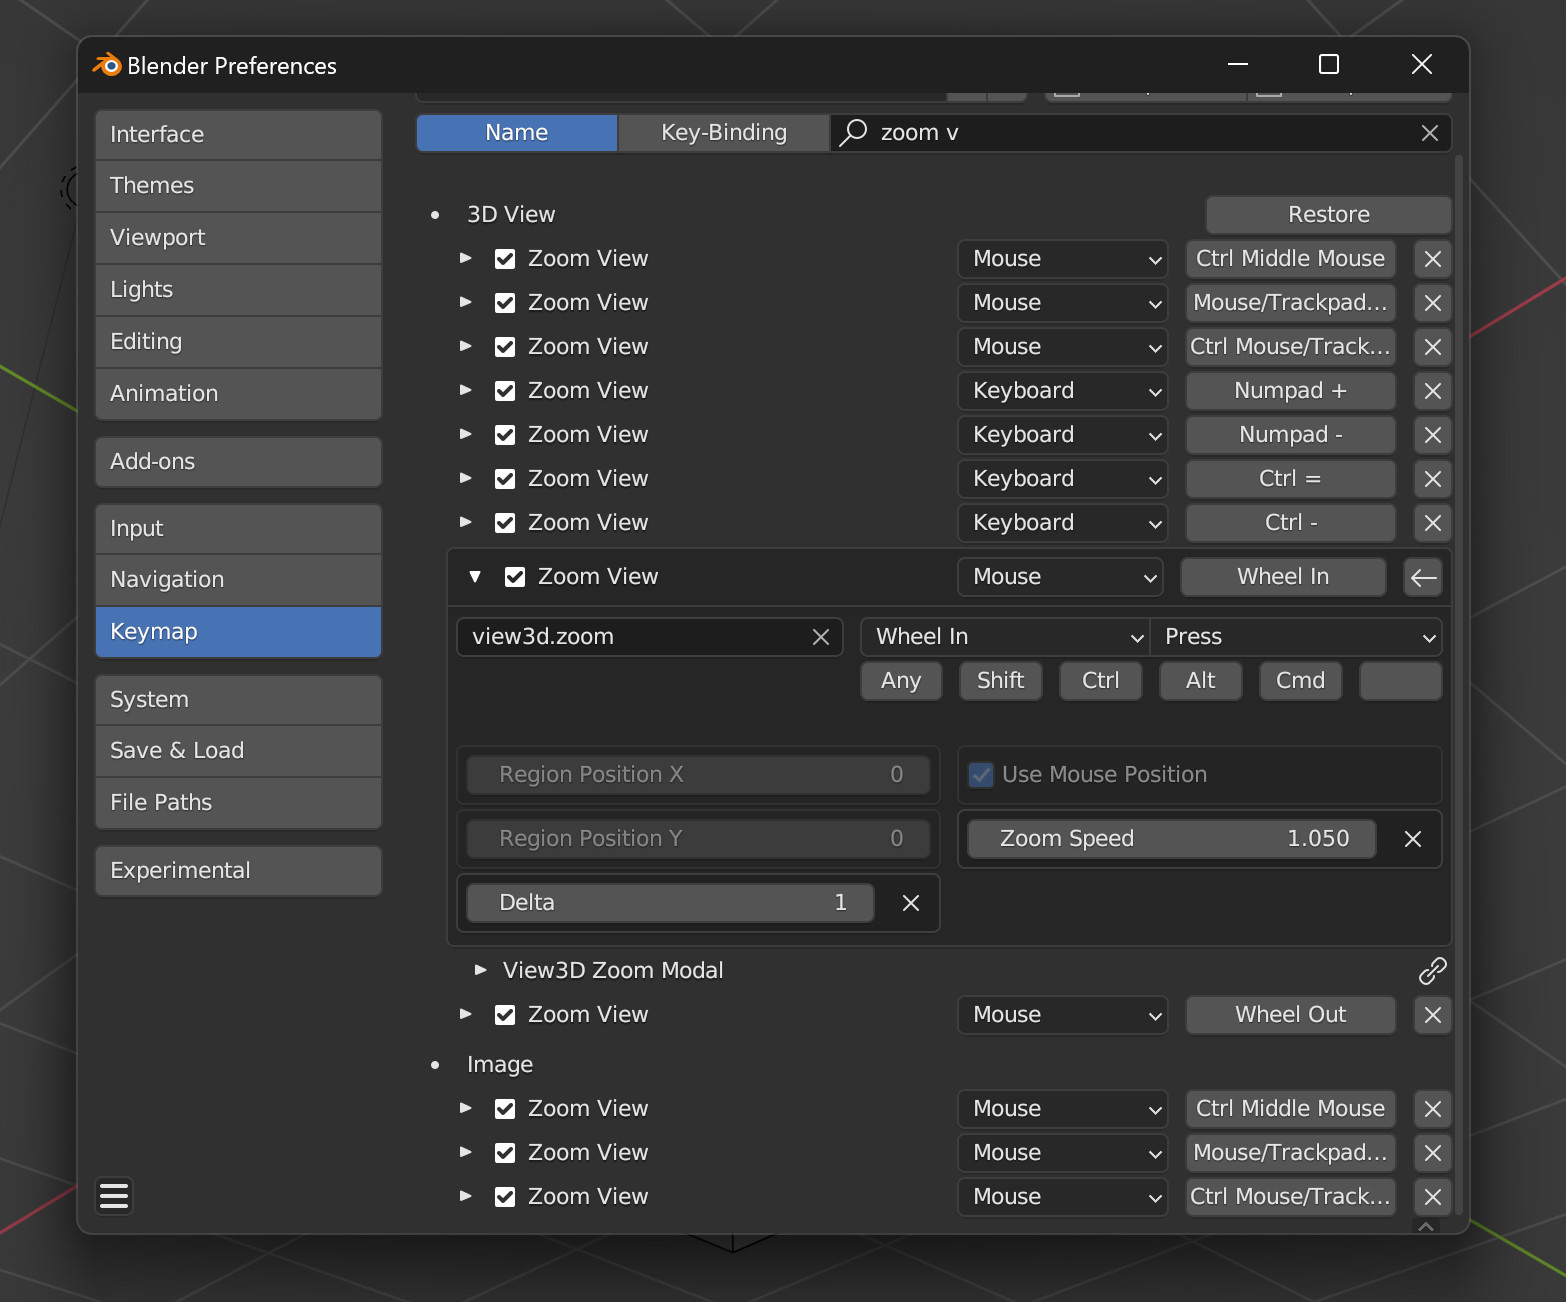
Camera Zoom
You can make camera move faster or slower for view3d.zoom. If you want multiple zoom mappings you need to manually set the speed for the existing zoom keymap or the speed of the new one you make will be used for both.
Zoom default, fast, and slow. Can get out of hand if you go to the extremes


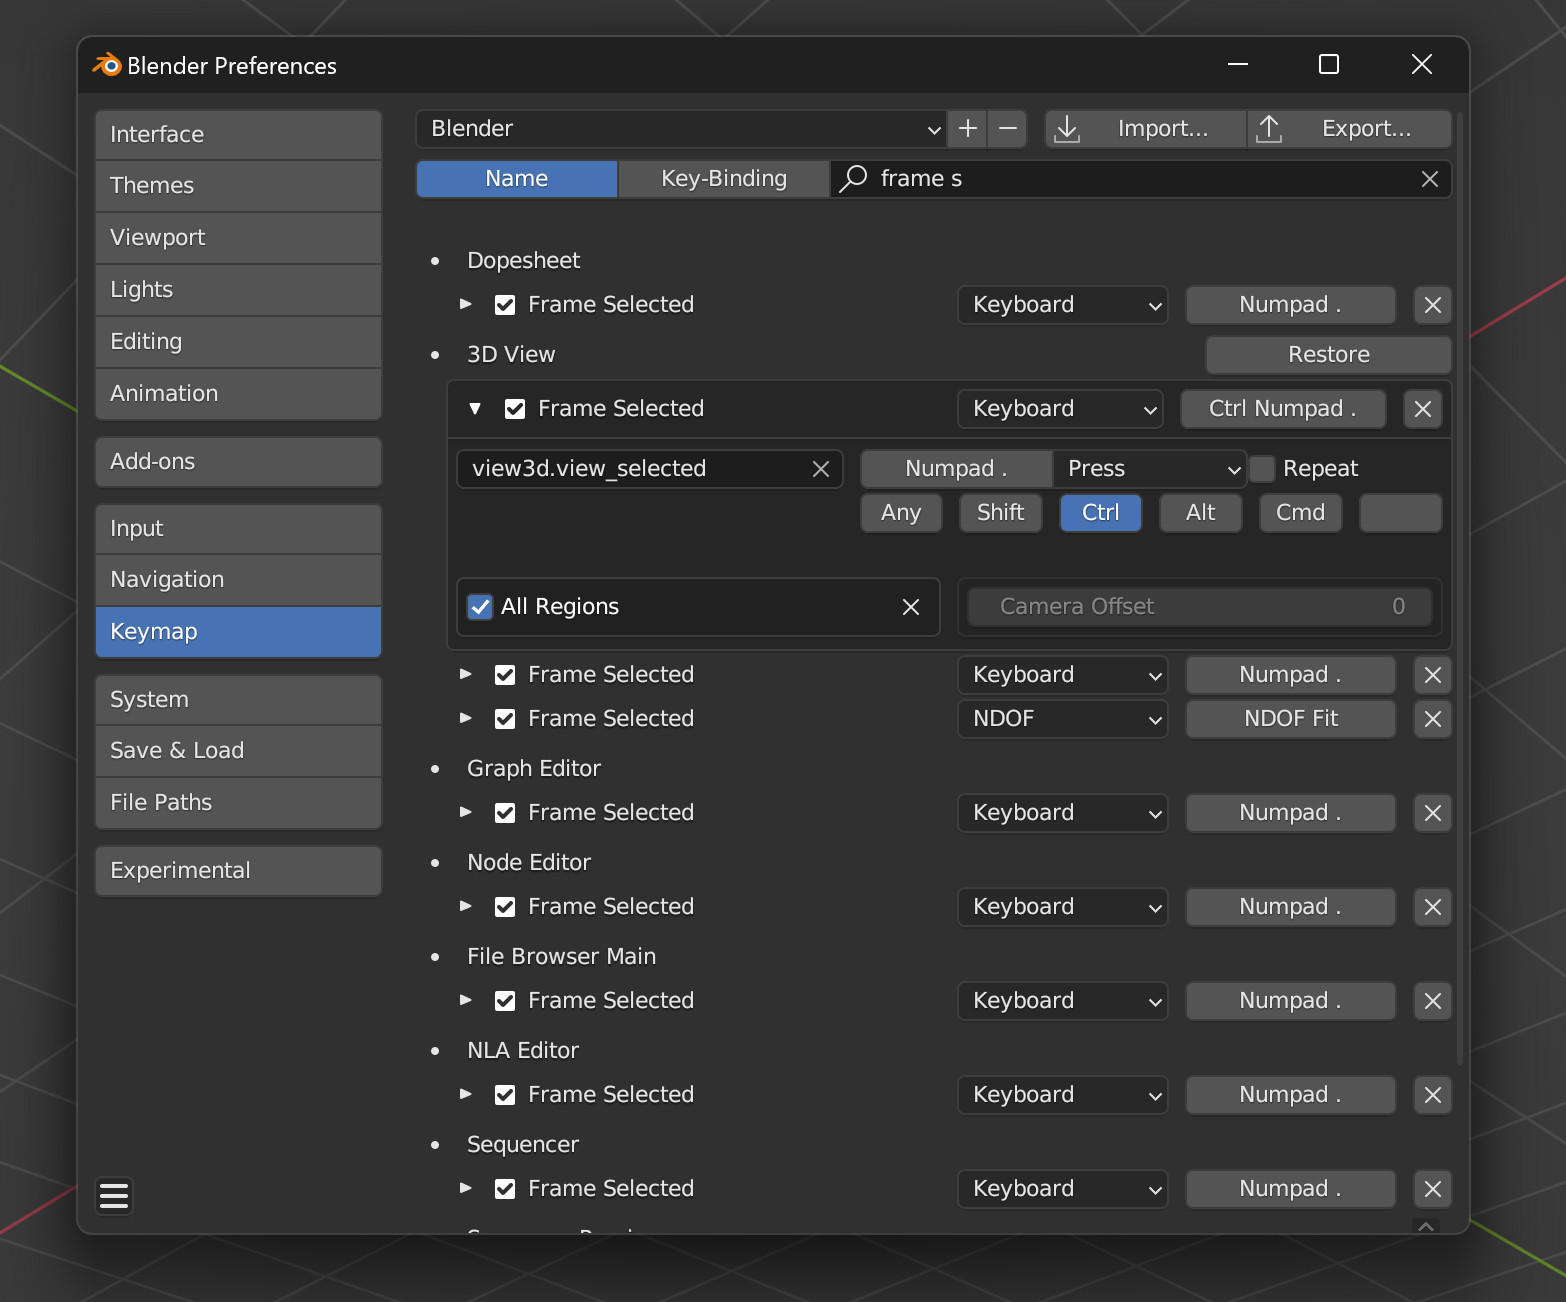
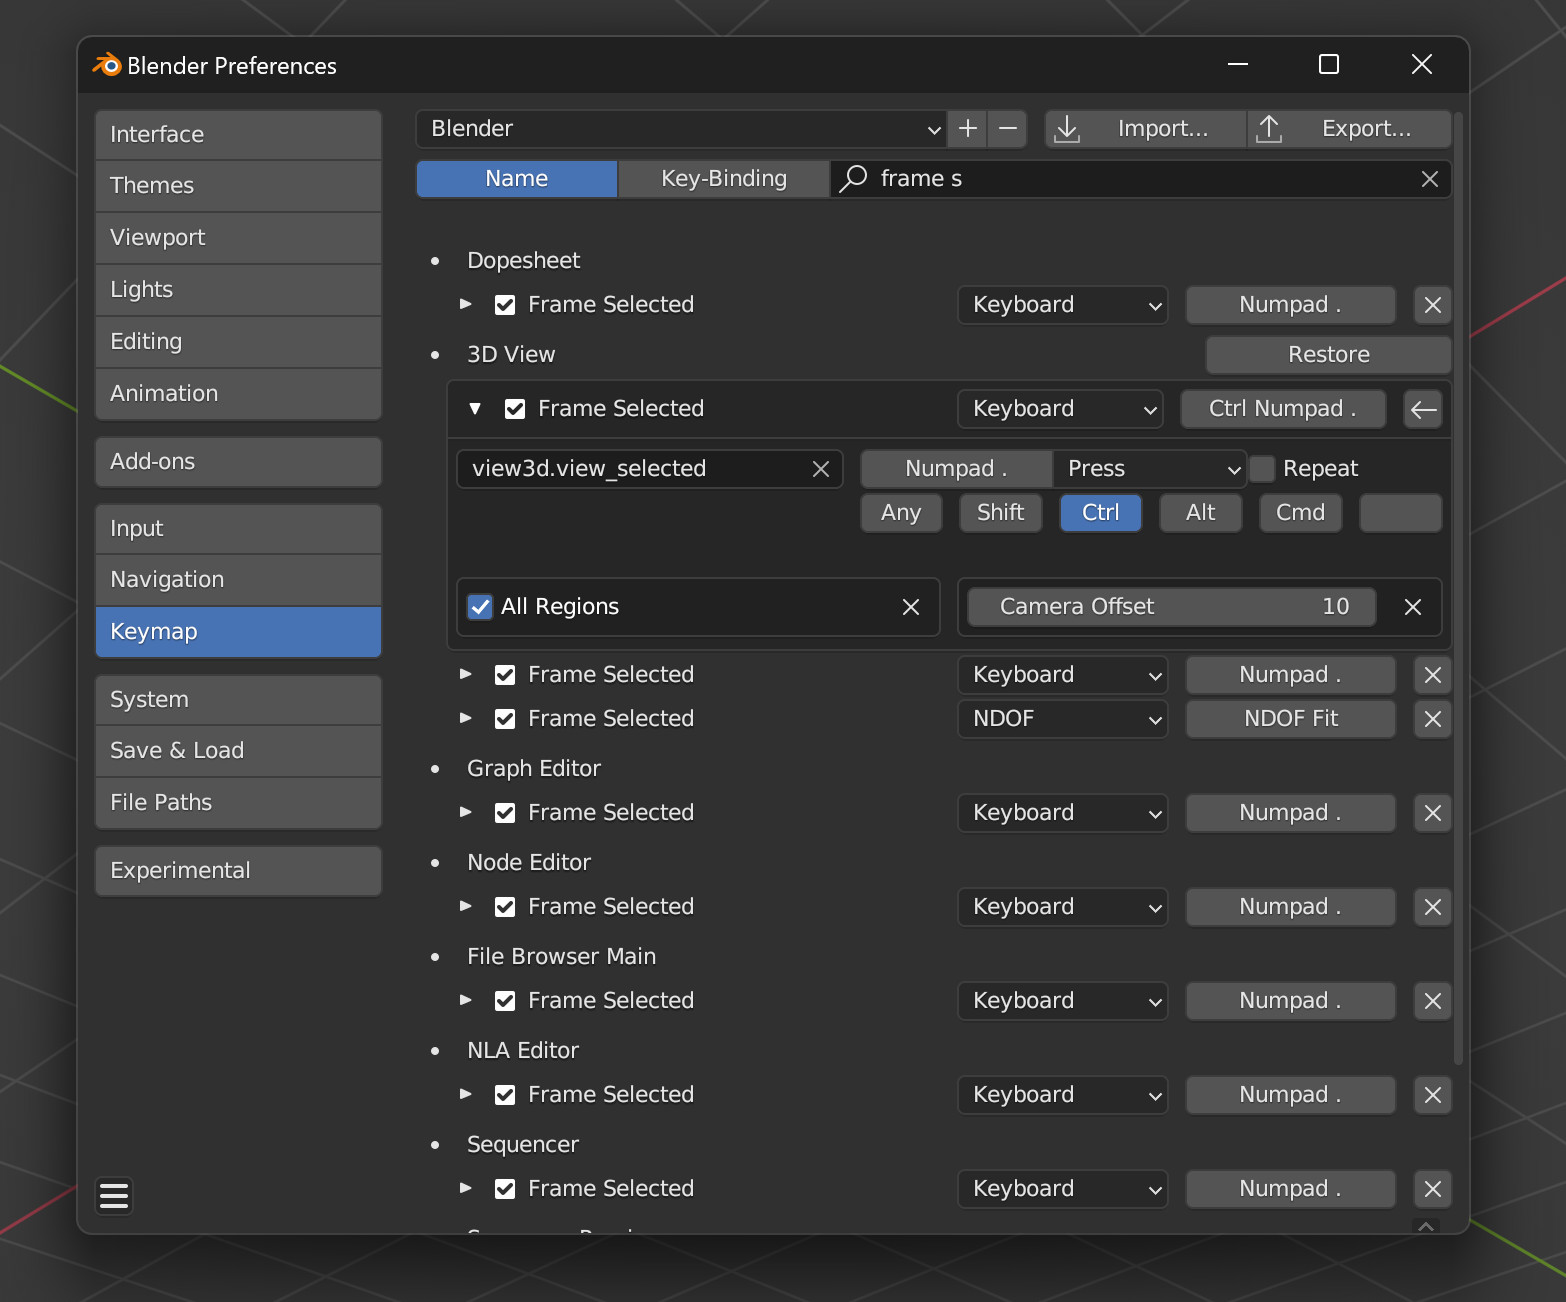
Frame Selected
You can set a camera offset for view3d.view_selected. Like camera zoom, if you want more than one mapping for different distances, you need to manually set the existing one or it won’t work right.
Frame Selected default, and a small offset. Can go way out there to the edge of default clipping if needed
Invoke Last
A new operator called screen.invoke_last that works the same as Repeat Last, except instead of executing everything the same, it just invokes the last operation. You’ll need to add a new Keymap entry for screen.invoke_last. Undo makes it lose memory the same as Repeat Last.
Invoke Last in the keymap

Defaults
Everything has defaults that will preserve what Blender does, but if you already have a startup file for the same Blender version as this build, it won’t know what these new defaults are. Fortunately it doesn’t matter for most of the new features. The only ones I’ve seen affected are Adjustable Click Select (which is opt-in so if you don’t use it makes no difference, and if you do just set the radius to something higher than 0.0) and Header Hightlight (minor cosmetic change that you might not even realize was different)
Thankyou
This build is only possible because of the knowledge and experience shared by the community. I want mention some people that helped me figure things out like Chris Blackbourne, LazyDodo, Brecht, Thomas, Harley, and Campbell. Everyone on devtalk and in the chat, thank you. Most of all, I want to thank kio. Select Through, Facedot visibility, and Touch select faces in X-Ray are from the work he did. Some of it is basically untouched, and I learned a lot by updating it and changing how it works.