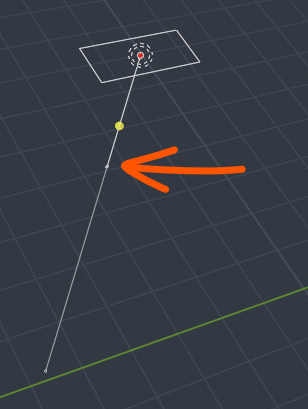
I would animate an empty on that curve and the constraint only position to that empty, or use the influence value to animate rotation inherit. But its still crazy, as the animation properties is not in the path constraint, but in the curve. Thats so stupid, I mean what if you want two objects be animated different on the same curve?
But also the fact, that a camera in Blender points downward by default is obscure to me.
2 Likes
Yeah, I would love to have multiselection editing or selected as a filter. So whatever you do affect what you have selected and nothing else, that is very useful in modeling as well.
You can hide most of that and keep only objects and object children (from the filtering popover at the top).
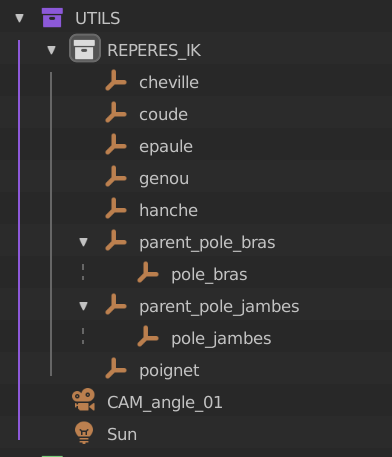
This is not implemented for the “scenes” view though, which is mostly useful for working with hierarchies.
That’s going away soon, in the meantime you should not use it. There’s a constraint instead, “follow path”. I’m not sure why that other thing hasn’t been deprecated sooner, it’s very misleading.
1 Like
You are right, and thats the good thing in Blender, you can find solutions. It just could be easier,
And I‘m really can’t wait for the constraints as nodes build…finally having path animation based on distance on splines.
For example, you can hide all object information and the column on the left. Which is good. But you can’t just hide mesh and material. Some stuff is useful, like knowing if a modifier is on the object. Others like Materials I almost never use. Etc.
1 Like
Yea I would be down with more granular filtering too.
In the meantime you can use geonodes to achieve the same thing as the constraint, including based on the curve arc length (distance along the curve)
1 Like
Things like this is why they should investigate having similar but different operators in the outliner versus the 3d viewport. There are things in both that need to exist in both but don’t, and if they do get ported to both, they need to be just very slightly different to make sense in both areas. I wouldn’t expect to be able to select all objects that share the same mesh data or all empties that instance the same source in the 3d viewport if some of them are hidden, but I would expect to be able to do it in the outliner.
Actually, perhaps they just need to add an “include hidden objects” option in the operator box
1 Like
Yeah I actually use geo nodes to measure curves and then output that distance. Not easy but it works.
Basically the< should focus more on a user workflow based on the new things happened in 3D in the last 10 years. Blender is much older, thats often the problem.
Another thing is that they do not have a lot knowledge about production reality.
For example, they thought editing materials is easy if you just pick the object and got all you need. Instead of hitting the pixel and get the exact material to edit. But then collection, instances, particle etc. came and then reality hit them. No RT render, where user see the final image and can interactive change materials… not global material editor, not even you can select a material in outliner (for scene) and edit the material.
Remembers me a lot to lightwave. Good ideas, but then reality showed a different need.
That’s right, but those are very old design decisions, I wouldn’t be worried about current developments looking away from production reality.
They’d inspire more conversions and donations from people experienced in the industry if they would address these long-existing highly annoying things.
hitting the pixel and get the exact material to edit
Just this by itself would save some of us several hours per week.
Sometimes I want to edit an asset in the context of where it is being used but the source collection of thei instance is in another scene just for assets or in another file. So I’ve got 2 or 3 Windows open now. The scene to be rendered, the scene with the original collections for all assets, etc, just to be able to choose the correct source object so I can access the correct material. It’s infuriating.
1 Like
I’m a former Lightwave user. There is a lot to get used to when switching to Blender. I realize a lot things are vastly different, but I find myself missing things I used to use constantly in Lightwave. I would like to be able to look at all the images loaded into memory, with their actual filename, not the slot name.
1 Like
Actually its not bad that you can rename the images, if you also could save them. Some workflow like append all image to file, then rename them and export them back to a folder. But thats not possible.
PS: I use Material List add-on a lot for this. Its so essential.
1 Like
If I intended to rename them. I don’t like that I can replace an image, but it keeps the name of the image I have replaced. Did I actually replace it? I have to dig deep to find out.
Well it should contain the information. Thats why I pointed you to the add on, there you can list the path and name of each image. Its a bit hidden, under display and filter option in the list.
Thanks. I looked at it, but I’m not sure if it would be helpful to me or not.
Someone in another thread just said to change the material assignment to mesh… and it’s just clicked for me. What the heck is “data”? I mean, that’s only obvious to a Blender developers. Yes, yes, it’s data but to a beginner that doesn’t say anything. To be intuitive it should read “object instance” and “mesh data”. Again, it’s a thousand little things that drive you crazy in Blender.
(EDIT: The above has already been mentioned in this thread and is even on its way to get replaced! Want to place bets on that new solution will as usual be technically sound for a certain “right-click” way of thinking, and the UX will be a shitshow as always?) ![]()
Bonus: I just shortened an area light because I wanted local illumination. Why does it need to still go 40m straight through my model? I can see the little dot move to indicate the end, so why they only partially implemented this in the gizmo is beyond me… I have lines from light going all across my scene!
(Oh, and it’s way worse for spotlights where you can’t shorten the cone gizmo at all.)
Another bonus: Just noticed that “curve endpoints” is gone in Blender 3.3 and you must now instead know to sample a point at factor 1 on a curve or decipher the obtuse “endpoint selection” node. Just another example as to how they really, really have an absolute loathing for beginners and anything that makes the UX more intuitive…
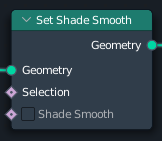
Heck, let’s have more Geometry Nodes fun… there’s no “auto smooth” with angle treshold so if you put your modifier on a curve and want to generate geometry from that, you’re screwed.
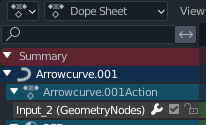
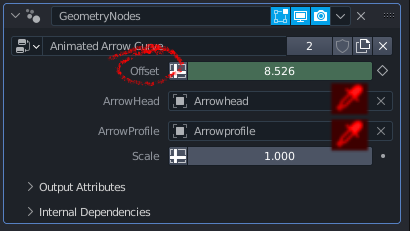
What reads “Input_2” in the Dope Sheet should be “Offset”. Nobody cared to check this? Also, where are my eye droppers for object picking? Plus those inputs accept generic objects, so if you don’t know what the last one needs to be a curve you’re again screwed. UX polish? In Blender? That will be the day!
1 Like
Yeah you right. Blender needs workflow focus update to actually address all the things, that disconnect it to the rest of the world. Even if its just the name. But honestly, there tons if things that drives me mad in other apps too. Someway Blender hasn’t done everything wrong.
I mean in what world move is grab? Or why there are no layers? Every-time I leave Blender, I feel like being normal again. Funny feeling, when you suddenly can control the whole visibility of your scene with a click on the layer, or when it actually renders what you see in viewport and not what every individual objects settings are.
One thing so, I wish they fix is viewport depending to what you focus. So no more clipping of camera, or flicking polygons, because the backside is to close. No more trying to move a polygon 100 um and having to manual input the transform, as snaps are limited to 1 mm. Or adjust rotation snapping from 5 to 45 degrees, etc.
1 Like
While looking into rigging of a cartoon animal I found this excellent tutorial:
")
However, what strikes me is that the default behavior in blender bones when you enable stretching (which, btw, the way you enable is also hair-tearingly unintuitive) is not stretching at all. Blender IK bone stretching, is scaling.
Now, not only is that miserably misleading, but isn’t it also the opposite of what 99.9% of cartoon (the most common use-case for stretching) wants? Don’t all toon limbs shrink down as they stretch, as opposed to scale up?
![]()
For conserving volume you just need to add the appropriate constraint on the bone. It’s good that Blender doesn’t decide that stuff on your behalf, although I agree there should be an option in the IK constraint to do that specific thing on behalf of the user (volume conserving aka squash and stretch).
Hold up, I fired up Blender to make sure this is how it’s done but it seems that I have forged this memory. Maintain volume doesn’t take constraints into account which means you effectively have to duplicate the bone chain, my bad.
Yes, thats all old style. It works, but there are easier ways. Workflow is huge thing not really addressed in development, as the benefits is not fancy new animations, but just happier users and lot more of them.
Anyway, for rigging there is hope, that the nodal approach will improve workflow. There are a few concepts showing all constraints (ik is also one) made with nodes. However, there is no detail about the options and usage.
1 Like