This was a project from about a year ago. I’d always wanted to make a series of photorealistic archviz renders, but at the time I was limited to a 5-year-old laptop with 4Gb of RAM and it really struggled with heavy scenes (especially if the scene objects had 4K textures.) Basically, even after spending a significant amount of time on optimizations, this was pushing the upper limit of my machine. (I also probably wouldn’t have been able to render this if I hadn’t done a quick deep dive into render layers and how to implement them. )
Since joining Blender Artists, I’ve seen dozens of really cool and extremely photorealistic archviz renders, and it’s made me want to try making some more of my own. But before I go off trying to create more renders, I’d like to learn from stuff I’ve already done.
Special shout-out to Davilion on BlendSwap for the kitchen assets and comments.
First of all, this is already pretty well made, especially for an old laptop. I think the bushes, boulders and the furniture inside the house are very realistic.
The main thing that could be improved is the fountain, as it’s a major point of focus in some of the images.
-In the sunlit image, there seems to be a shadow terminator artifact, though that would be fixed by default in the more recent versions of Cycles. Also, don’t be afraid to go bright with the sun, look at ho much brighter your background image is.
-The fountain has bevels that are shaded smooth. It’s hard to tell for sure in these images, but you may want to use the “weighted normals” modifier on it if you aren’t. It’s a modifier that improves the shading of bevels by preventing their curved shading from bleeding onto the flat sides of objects.
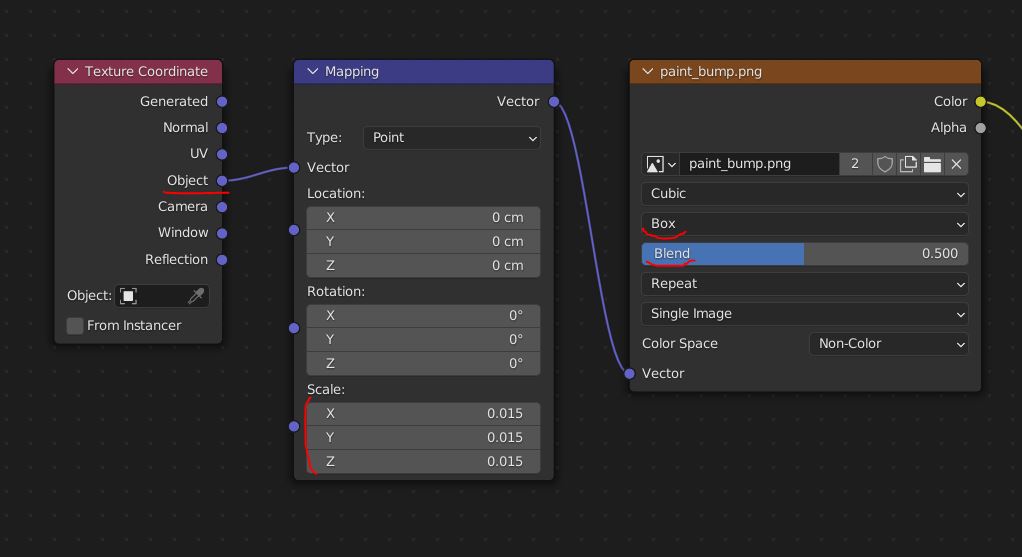
-I think I am seeing some UV seams on the fountain too. A technique that could help you in this case is texture box mapping. If you have a seamless texture without a specific orientation (like stone) and an object that won’t deform, this technique will allow you to texture it without seams. It doesn’t even need UVs.
Is the path made using a flat texture with a few real pebbles on top? That’s what it looks like in the images. If your computer can handle it, using all real stones would look great. It might sound scary saying it like that, but particle systems/geometry nodes can easily handle it, because they use instancing. What that means is that the objects you use for the particles will get stored in memory only once, allowing you to render up to millions of them with almost no impact on memory (and you can turn them off in the viewport). But I will assume you probably have at least some knowledge of that, as you have a fully modelled grass lawn.
One thing you may not know is that you can also instance objects manually to save on memory. If you have multiple identical objects, you can duplicate them using alt+d instead of shift+d. This will cause the 2 objects to share the same mesh and will give you a memory saving effect, at the condition that the objects don’t have modifiers on them. You will know you have done it if, after duplicating, the scene’s polygon count stays the same. If you have objects that are already placed in the scene, you can also do it by going to the “object data properties” tab and manually set the objects to use the same mesh.
I feel there is a little something that’s off about the grass, I can’t tell exactly what. Maybe its color is slightly wrong or it’s not being lit bright enough, But I can tell the 3D grass’ color doesn’t match the photo in the background. Also, maybe the fact that most of the grass is tiny, except for a few much larger plants, is making it unrealistic? Try increasing the size of the small blades a little and shrinking the large ones. Also, this seems like a somewhat forested scene, so having more plant types in the lawn could increase the realism.
The character is overall well made, but could use some improvements in the rigging. The elbow should be pointier and more defined when the arm is bent in the last image.
I would add that the interior seems quite dark, and in the inside shot, the light is coming from space. I would trade the point lamp for an area lamp, and adjust it’s size and power while in rendered draw mode.
Woah, that’s a long comment. But seriously dude, thank you for writing this. I appreciate the time you took, and I love how simple yet clear your explanations for things like the Weighted Normals modifier are.
The bushes (and the shorter grass) are free assets from Blender Guru’s “Grass Essentials” pack. He gave them out for free so people could follow along with his Making A Grassy Meadow tutorial. Meanwhile, the boulders are rock models from Cc0 Textures (now ambientCG.com) that I downloaded and retextured using PBR maps from the same site.
The furniture inside the house is actually around 50/50 my models and Cc0 models from BlendSwap, Poly Haven, and SketchFab. The bed isn’t mine; neither are the curtains, the books, the things on the sidetable, the couch, most of the stuff in the kitchen…
I did make the bookshelf, sidetable and round livingroom table (both of which can now be downloaded from Poly Haven), and rug to name a few things, even though you can’t really see them in the renders.
This is definitely something I didn’t notice, thanks for pointing it out.
I didn’t even know the Weighted Normals modifier was a thing until I read this. Again, thanks for the tip and the explanation.
Out of curiosity, what’s the difference between using Weighted Normals as a modifier and ticking the “Normals Auto Smooth” box? I heard the latter can actually slow down your machine if overused, but I don’t know where I heard it, or if that’s even credible.
From what I recall about making the scene, I made the fountain really quickly with just a cylinder and a subsurf modifier. The primitive object I started with was, in hindsight, way too low-res for an object of this size. I think the fountain was more of an afterthought, something I added only when I realized there was a lot of empty space by the bottom right corner of the screen.
The fountain was UV unwrapped, but I used a procedural concrete texture taught in a Ducky3D tutorial, plus an AO node to add the dirt/mossy bits. Wish I’d known then that procedural textures require a fair amount of memory if you don’t bake them out.
Thanks for the box mapping tip, btw. Again, this was something I’ve been totally ignorant to until just now. XD
The path is a manually-painted vertex group assigned to a gravel texture with a hint of displacement. I think I also subdivided the gravel path vertex group just for a touch more detail as well.
Do geometry nodes use less memory than particle systems? I’m curious if there’s any info out there, cause on the few times I’ve checked there doesn’t seem to be any. My impression is they’re about the same, but geo nodes allow for more flexibility.
Using Alt+D was one of the optimization methods I used. Stuff like the books in the background and a few of the picture frames and kitchen items were duplicated this way. As were the bushes and boulders.
Another question in a long list of (probably very noob-level) questions-- If you have something like a picture frame, and you use Alt+D to duplicate it, what happens if you scale the new duplicate up in Object Mode? I know doing it in Edit Mode will apply the change in size to all instanced duplicates, but I don’t actually know what happens if you do it in Object Mode. (Sorry if this is a, “Dude, use Google” question.)
In hindsight, pretty much everything you mentioned would’ve improved the look of the scene (which is why I’ll be writing down your advice and keeping in mind for future scenes. )
Ah. This character isn’t mine-- it’s a model of Jill Valentine from the Resident Evil 3 Remake game that I thought looked appropriate for the scene XD But you did point out some potentially realism-breaking things, which means I need to be more careful with what character models I use (if any) in the future.
Thanks again for all the help and explanation you provided.
Those 2 things actually do something completely different. Weighted normals will prevent the smooth shading from smaller faces from bleeding onto the larger flat faces around them.
Auto smooth will make edges of the model become flat shaded based on what angle there is between faces. Example: if you take a cylinder and set it to smooth shaded, it will become all weird looking, because the shading is going to be smoothed over the sharp corners. But when you activate auto-smooth, with the default value of 30 degrees, the corners of the cylinder are going to be preserved as sharp because they are at 90 degrees of angle, but the sides of the cylinder are going to be shaded smooth because they have less than 30 degrees of difference. You can also set the auto-smooth at 180 to make it fully manual and decide which edges are sharp using the “mark sharp” tool in edit mode.
On the weighted normals modifier, there is a “keep sharp” option, which allows the 2 effects to be used on the same model. But even if your model doesn’t use sharp edges, auto-smooth needs to be active for the weighted normals to even work anyway.
If there is an effect on performance, it’s a small one. Marking edges as sharp is a very common and cheap effect and it’s cheap enough that it’s used in video games.
They both use the same technique of instancing, so I would think their performance is similar. Geometry nodes have an extra option that allows a minimum distance between objects, but I don’t think it makes much of a difference because the performance impact is mostly in the rendering anyway.
The instancing still works just fine, as there is no deformation or modifier. The only thing is that you can’t apply the scale unless you make the instances unique.