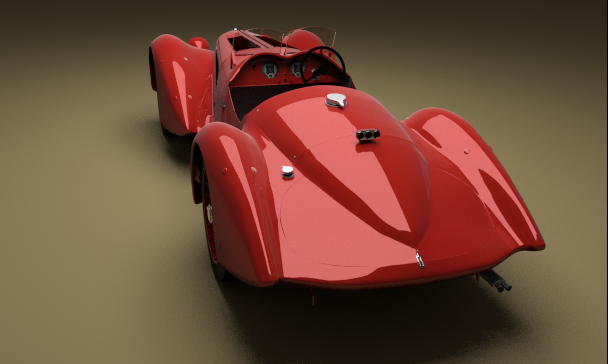
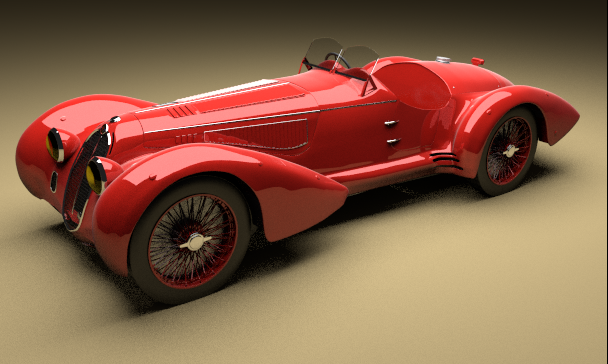
I am starting to appreciate the functionality of rendering with Cycles and the node system. Although I think Luxrender still provides the best car paint materials, you can use Cycles to achieve a similar finish in less time.
I would point out that my friends and I customize and restore cars as a hobby. I have spent a great deal of time mixing, spraying, and observing real paint on real cars. I don’t use photos or movies or TV to compare paint.
The Cycles gloss shader is too shiny and reflective to use alone for car paint. We’ve all seen the renders with an oily finish on them. The clarity of the reflection is adjustable in the roughness settings, not the amount of reflection. As Andrew Price points out in some of his Cycles tutorials, you need the diffuse shader mixed with the gloss shader to moderate the amount of reflection.
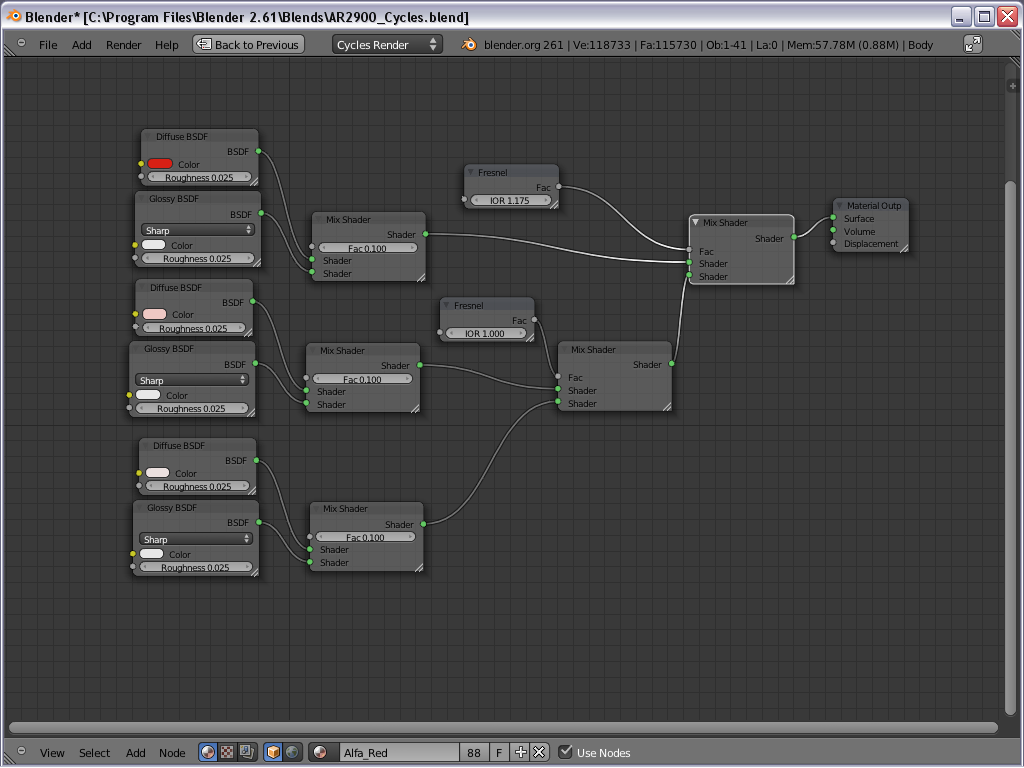
I went back to the Luxrender materials panel to use as a model for the Cycles paint shader. Luxrender not only allows for the main color (diffuse) but allows several colors for highlights (specular). The amount of reflection is much more realistic, so the clarity of the reflection is the main adjustment to make.
Translating that back to a Cycles shader, I ended up with three pairs of glossy/diffuse shaders. The first is for the main color. I used the color on the diffuse shader, then mixed it with a 10% gloss/90% diffuse factor.
The second pair is a highlight wherein the diffuse shader receives a very light version of the main color. This is also mixed with a 10%-90% gloss/diffuse ratio. The third pair is the brightest highlight, using an almost white color for the diffuse shader, mixed like the other two.
Now I take the two highlight layers and mix them together. I want the lightest (last pair) highlight to be 10% and the other highlight to be 90% of the reflection. To give this reflection depth, I add a Fresnel node to control the factor of the mixed shader node. At the moment I have it set at 1.0.
Next I take the mixed shader nodes with the primary car color and use another mixed shader node to combine it with the mixed shader node for the highlights. Once more I add a Fresnel node to control the factor of the mixing. Since I want a deeper reflection I am using a setting of 1.175.
Obviously all of the numerical settings can be adjusted if you desire a different look. This isn’t meant to be a definitive shader, hopefully its a more realistic starting point.
Peter Drakulic recently posted tutorials on making metallic paint and pearlescent paint through his CGI Trainer series on Vimeo. Although he used strictly glossy shaders, I believe his technique for adding the pearls and metallics can be easily implemented with the node system I am using.
I have a WIP thread for the Alfa Romeo that shows the Luxrender results, if you wish to compare them yourself.
So car modellers, I hope you find this useful and please post any improvements you make!
Attachments