Caster wheel rig - need better solution

We use casters, a lot. And usually I don’t have to animate them. If I do, it’s usually not for long, so I just animate the product, then I go back and turn on ghosting for each caster and animate the rotation so that it matches the path of the ghosted trail. Good enough. But, for anything at All longer, that takes more time than it should.
I’d love to rig it.

Wheels rotating? No problem. There are Tons of tutorials out there for that. Of course, most of them aren’t quite right because they don’t actually Finish (they get it to work with the wheel going in a straight line in world direction Only), but I’m sure some of them do, and also show which buttons to check for dealing with parented objects as well.

But casters become difficult. The Z-rotation point is offset from where the wheel touches the ground. I mean, that defines what makes it a caster.

I’m not great at rigging already, I’ll probably consider myself “new” to blender until I stop learning about a completely new tool/button, etc in it. Soooo, forever right? And I could only think of 1/2 ways of doing it. Neither I would consider a rig really.

The issue is, you basically need to include drag in some way.
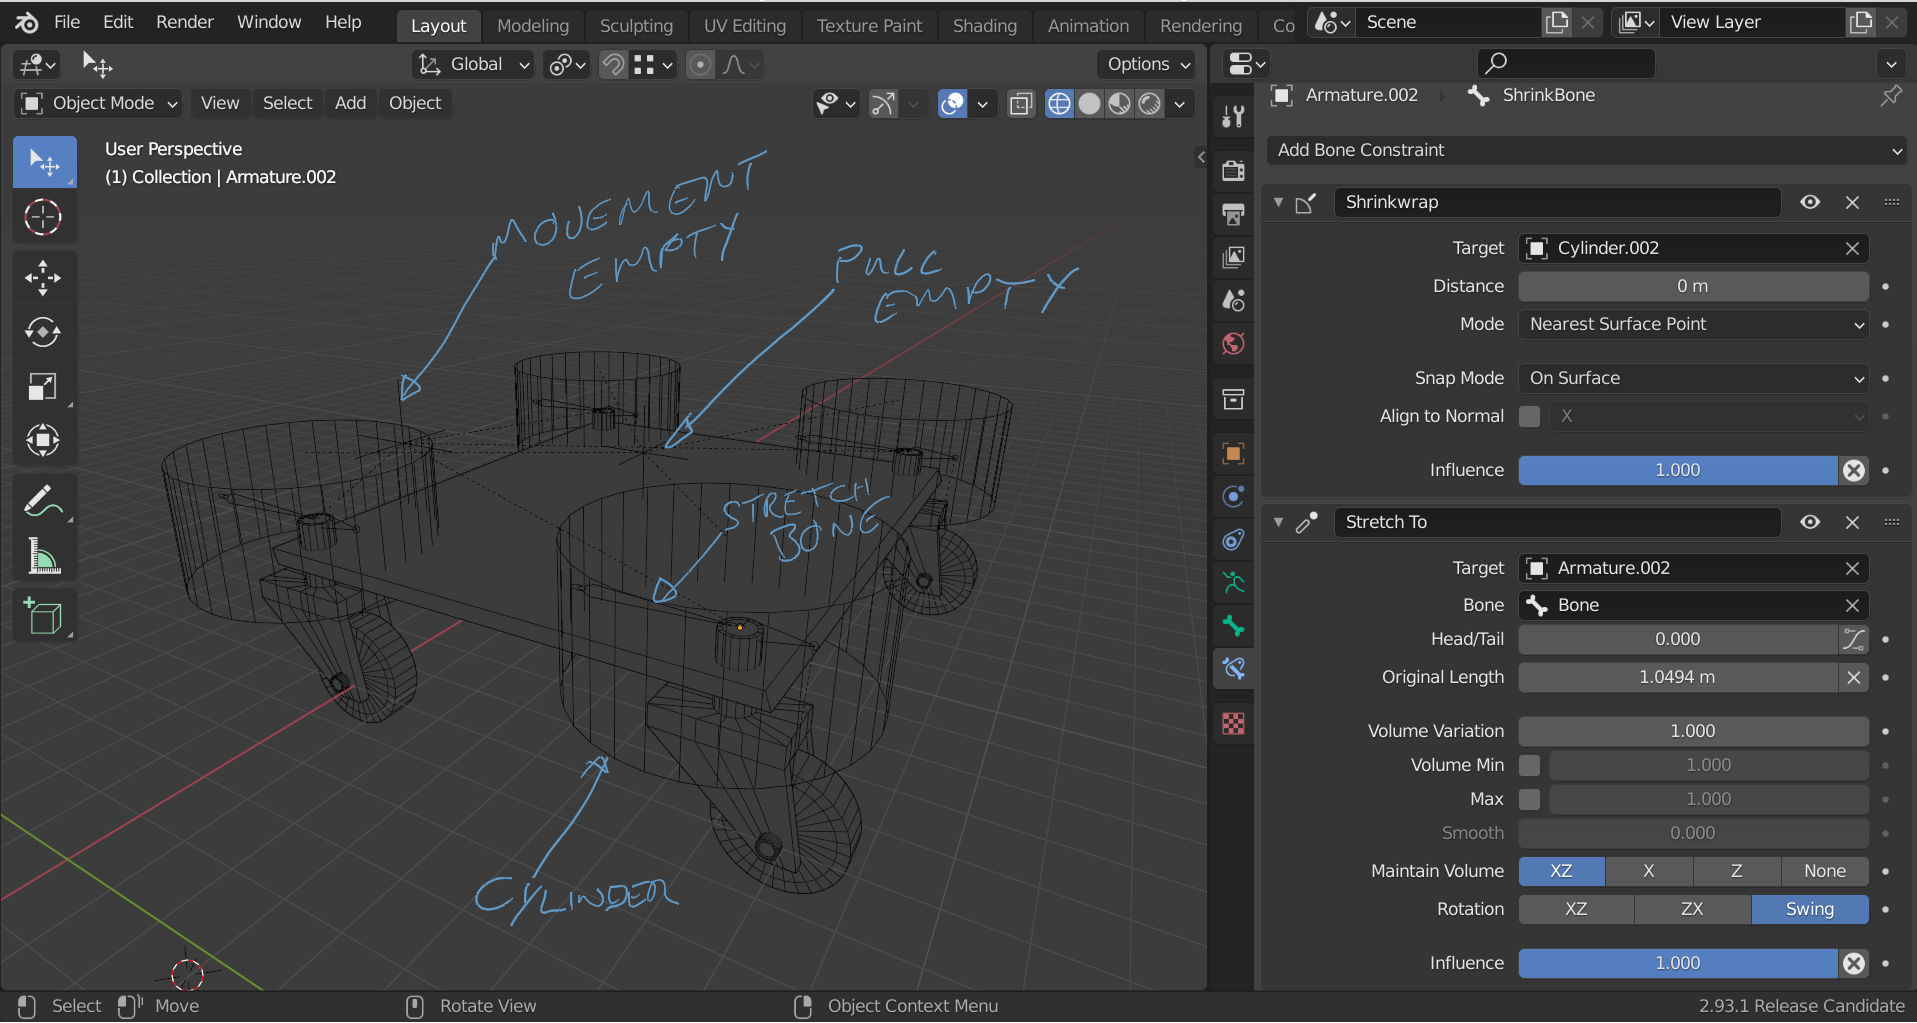
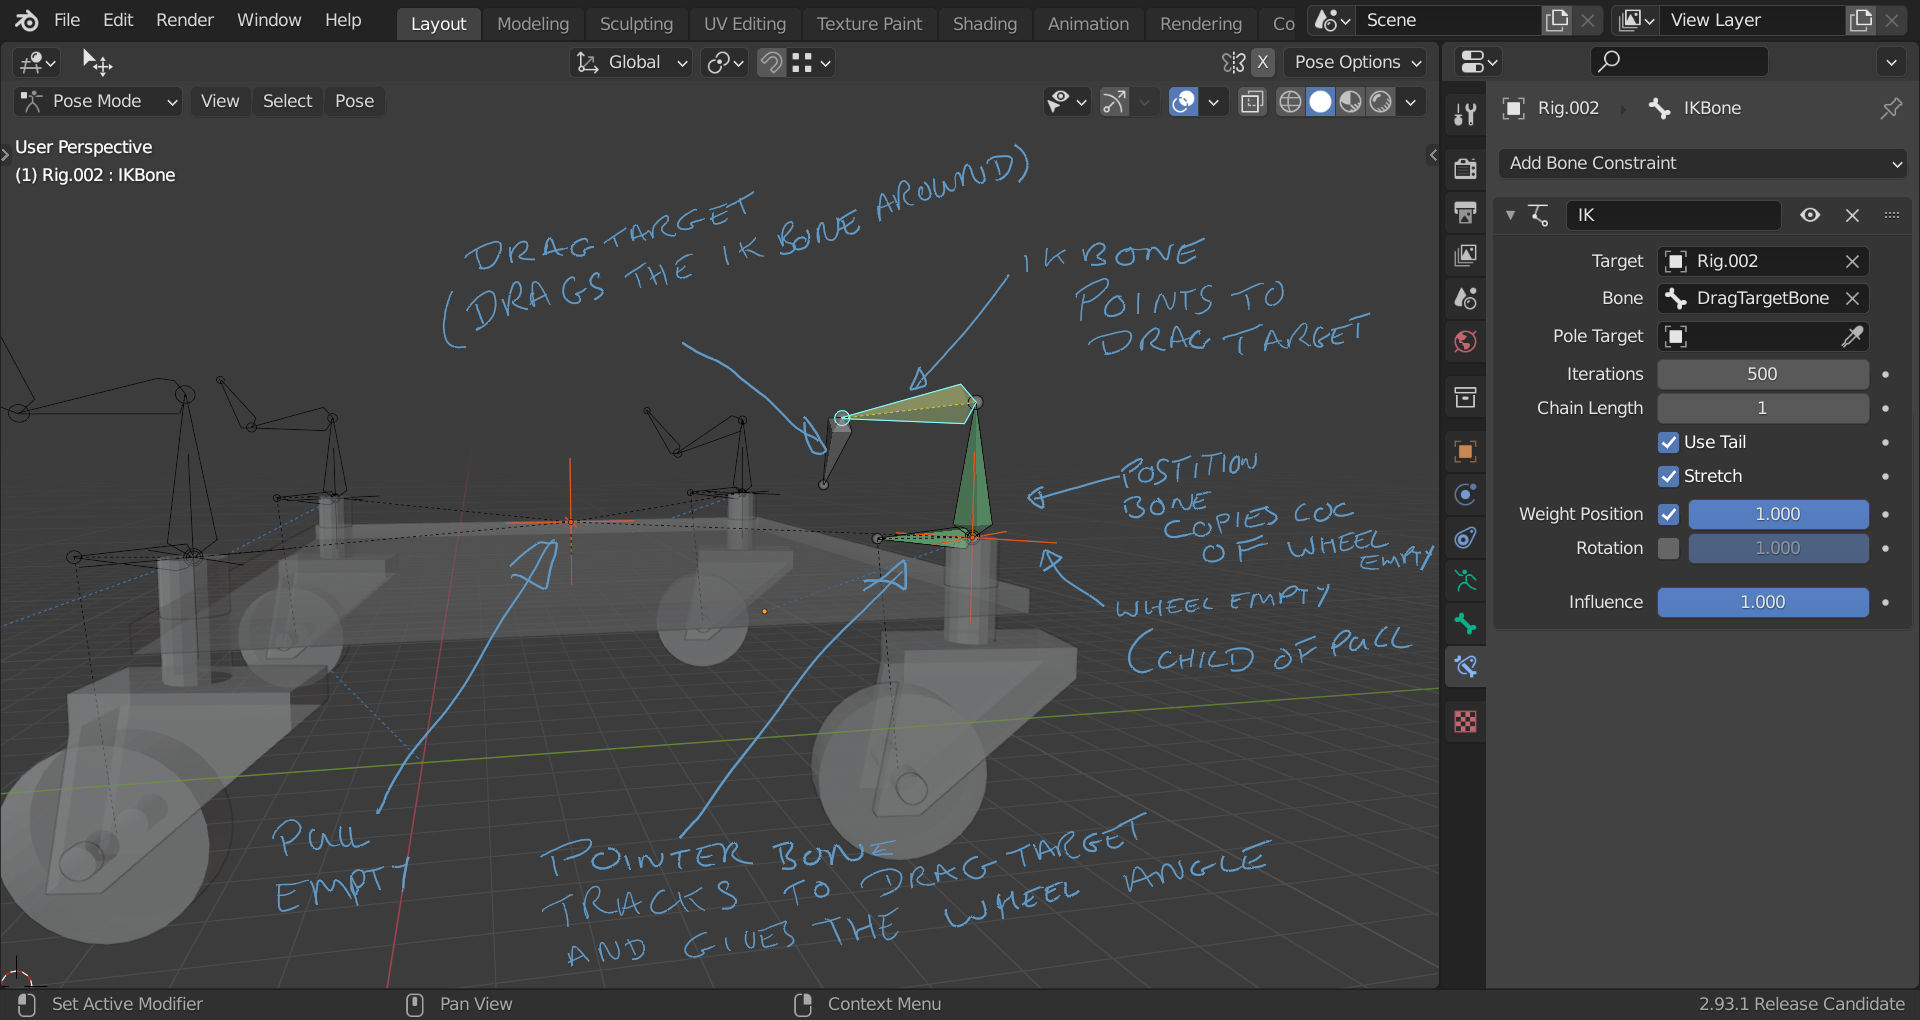
The closest somewhat normal thing I can think of while being something more real-time doesn’t work. If I create an dummy and have it with a limit constraint inner, then a limit constraint outer, you’ve basically got a fixed point for an object that kind of drags behind the wheel’s Z axis. Then caster can then just follow that dummy for Z orientation. Great. Only, that dummy object is remembering it’s own starting position as where it “wants” to be. So I would need a way to use the constraints to push the position back to it’s actual translation values.
And, although I’m new to blender, I don’t think that’s something that should really be done.

One way that Does work, is to create some physical barriers. Do a cylinder around the caster. Then one in the middle as well. Both of those are passive objects parented to the main body that’s moving around. Then have a sphere inside there that is active. (you also need a floor of course). The ball will always stay inside there, and since there is a cylinder in the middle, the caster will never suddenly flip. Orient the caster to the ball.
And that works. But it’s a physical simulation. I’ve done that in 3dsMax a long time ago. At the time, physics was still either crappy and unpredictable, or too heavy to make it worth it unless it was Really needed. Now, maybe it’s a bit better.

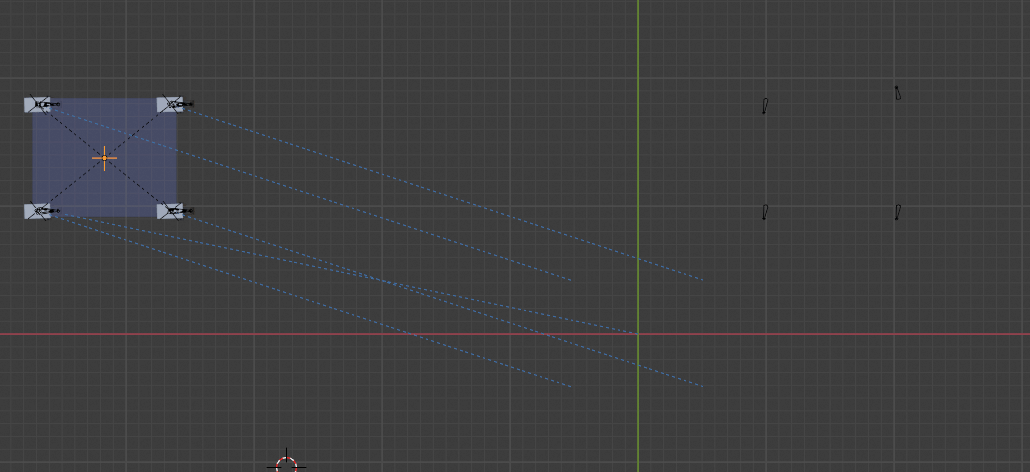
Another idea is to emit a single hair particle. Then use particle instancer to put a physical object at the end of the hair. Turn off gravity, adjust some settings, and yay, you’ve got a basic rope constraint and the object drags. Now do a constraint to That object in X and Y. Gotta make a vertex group since the origin stays put, and it works!
But lets get real. This isn’t ideal is it? I’m pretty proud about the creative solution here using some tools a bit unconventionally, but there are some issues. For one, you have to get rid of the first frame in my file because the hair points straight down.
Also, this was a sloppy test file. Things aren’t quite aligned how they should be. And I didn’t bother to animate the wheel itself, in fact I just used that as a shape and offset the origin to where the Z rotation would be. Those would obviously be 2 (or more) objects parented/linked together. The wheel itself has to be free so it can rotate.
caster hair concept.blend (942.0 KB)

So that’s all I have for my own ideas.
Really you need the rig to have some way of dragging a point/objects/line from the Z-axis of the caster, and limit the length of that (planar to the XY plane) to the center of the wheel. But it needs to be able to get shorter than that if the object stops, then changes directions. The wheel will end up flipping back quickly in that case. IN my physics idea, that’s why I put a collision object in the middle. If you roll it Exactly back in the same path, it would roll backward a bit before finally flipping around. If you don’t have that there, it will flip entirely around in 1 frame. In my hair example, it can do that, so I guess I’d need to create a tiny force object to keep it away from the middle as well.

People rig casters in games right? So it can be done right? I’m Pretty sure I’ve seen a shopping cart in a game before.
And sure, python. I’m sure someone could do it, and maybe even claim “easily.” But I’m even newer to python than blender, so that’s not a near term solution for me.

I found One tutorial on youtube for it, which was Hours long and somewhere in the middle. But it wasn’t an automatic rig. He was just creating tools to select objects and rotate them by themselves, or all together. No automatic rotation.
Realistically, you shouldn’t animate a caster. It should just follow the object you’re animating.
I couldn’t think of any other examples of things that drag behind something else in it’s motion, but really that’s what it’s doing here.

I would approach this with baked animation.

So we have the swivel and the axle. Create an empty, give it a copy location constraint targeting the swivel, world->world.

Bake the animation for the empty with visual keying + clear constraints.

Now edit the animation for your empty. Select all keyframes and move -1 in X (time). So now your empty is at the position of your swivel, just lagging it by a single frame.

Give the axle a locked track constraint targeting the empty, appropriate for the axes you’re using for it. It now points an axis at wherever it was last frame.

You still have issues if you ever stop moving, because then the empty will be at the same location as the swivel and the locked track will be undefined. But you can move those particular frames further back in the timeline if you want.

This used to be doable with “slow parents” but they got rid of that.

Yeah, that’s not too bad, but still not very flexible if I then have to change the animation, so I’d rather spend the extra time there on actually rigging the casters.
I mean, my little hair “rig” Works. But it’s not ideal.

Slow parent, why the heck is that gone? That still wouldn’t solve the issue though because it would need to work in conjunction with a limit distance to be sure the target object isn’t allowed to every reach all the way to the center of the wheel’s axis. The closer it can get to center the faster the wheel flips Violently around as it crosses over. That’s why I prefer using a limit distance there.
And if I offset the target object just a little then that should help eliminate that, but it could still happen.
So maybe the hair method isn’t so bad because I could also add a force or collision object linked there to keep the hair away from the center.

I did find this after you mentioned slow parent: https://blender.stackexchange.com/questions/61780/moving-objects-create-wind/61804#61804
So it’s still possible to get the results of slow parents…which is why I wonder why they got rid of them.

I do wonder how difficult it would be to move the target based on the wheel’s motion vector. Maybe a script that creates a curve and adds to it by creating a new point every frame. Then the wheel’s target has to be on the curve, but at a set distance away? No idea how feasible that is, but that’s kind of where my head is at. Using that method, you’d only need to set the distance to match the distance between the wheel’s axis and the caster’s Z axis.

Shoot, this would be a nice little add-on. Have it handle the wheel rotation as well by just selecting the wheel. Based on bounding box size it could apply the copy transform and handle the math for rotating for you as well. So just define those two things, and boom, automatic caster. Someone had a tool like that for 3DsMax but I remember it being a huge pain in the butt because you had to define it in a specific orientation or something like that.

The other thought is something like this: https://blender.stackexchange.com/questions/81872/does-anyone-know-how-to-rig-a-truck-trailer-so-that-the-trailer-follows-the-truc
Only, I don’t know enough about bones in blender yet so I’ll have do to some learning. I’ve only done some really basic things with bones, and only did that in order to skin a model to get it to bend. So I haven’t done anything with IK there. And honestly, I haven’t rigged my own model with IK since 2003? So it’s been a while, and that was in Maya anyway.
But this really isn’t much different than a truck trailer, except that the truck trailer would need to work more like this truck trailer, where the trailer can rotate 360deg, without having to worry about collision if you jack-knife:
image

Most truck trailer “rigs” that I saw only work going forward because they are just making the truck and trailer follow a path. But with casters, you move the object, like an office chair, and all the casters would have different paths than that of the chair.

1 Like

I found this method very useful (the mesh and curve modifier answer marked as solution):

One bone for the car and one for the caravan.

But wouldn’t that only work for a car and caravan animating on a set path? If so, that wouldn’t work in this case, which is why I used the VW as an example, because the trailer/caravan needs to be able to fold completely over top of the vehicle if the path is reversed.
See, I don’t actually want to travel along a path, because that’s not how casters work…unless those paths are automatically generated of course.

Something like a chair would have 5 casters which all animate independently. In fact, in the case of the chair, the base can rotate with the casters independently of the chair itself. So if someone were to grab the chair and move it around, the chair would not really rotate, but the base rotates a bit, and the casters follow their locations on the base, but each caster rotates in Z based on it’s own direction.
Since the base rotates a bit on it’s own, all of the casters end up being at a different angle if the chair itself rotates on z, or if the base does.
If you rotate the the chair clockwise, all the casters point counterclockwise, so they all point in different directions. If you push the chair in one direction they all become more aligned to parallel to each other, pointing away from the direction of travel.

So what I’m trying to say is, path animation really doesn’t work for casters. And it’s only a good solution for a trailer if the vehicle is traveling down a road or something. In the case of a caster, you basically have 5 trailers attached to 5 points on a circle traveling along a surface.

Yes you are right I did not grasp the whole situation.

The SE slow parent is from pre-2.8, and I’d be extremely wary of that kind of dependency hack. They tend not to work the same in render as they do in preview.

The rigging via IK doesn’t work; it’s another dependency loop.

It would be possible to turn the paths of your wheels into individual curves with scripting, but it probably wouldn’t be pretty.

I think your hair solution is probably the best you’re going to do. It’s not what you’re supposed to do, but it’s elegant and it works. I would certainly love to see more pseudo-physics (like hair dynamics, that rely on physics but only instantaneous physics) for Blender.

Thanks bandages. That’s good to know.
I’ll maybe clean it up a bit and give that a go. And I’ll keep an eye out for other potential solutions down the road as well since nearly every time I’ve been asked to do an animation of one of our, or a client’s, products, it had wheels, and those wheels are casters.

Hi, I have been experimenting with this and have come up with something I am pretty pleased with, It is by no means perfect but does resemble the casters movement.
I put a cylinder around each wheel and shrinkwraped a bone to it that stretches to another bone on the wheels pivot. I placed 2 empties one for the pull force (that is the parent of the cylinders) and another for the movement of the “trolly”. To simulate the friction on the wheels I used a driver from the location of the pull empty and simply divided by 2 (I know it is not scientific!)
The result is quite pleasing when you move the pull empty around the casters will turn to the correct direction and the platform moves.
Not perfect as once you are totally of centre the turns are not so good and it will only work on a flat surface as it is. It might be a starting point and I thought it was worth sharing.

The file (move the pull empty on the x,y axis)
Casters.blend (1.1 MB)

Edit: I have now centered it all and added a few drivers so that the wheels will turn if you rotate/spin the pull empty. Again it works well for the initial rotation but not perfect afterwards.

That’s an interesting idea. I had similar results with creating a dummy with a limit controller to the caster location, then having the caster orient to that dummy. But the issue there, and the issue you’re getting as well (probably for the same reason) is as you move it, the object that it is orienting to is always trying to get back to it’s “saved” location. So whatever location you left it at last, it’ll try and get to that spot.
But in reality, that needs to “drag” behind.
I think it will have to be either something scripted, or something using physics. That’s why I went with the particle/hair method, because that physics is much faster than rigid body, and requires less collision objects, and is less picky with scene scale.

I’ve been looking to see what people are doing in other software when I can find it, and Sometimes it’s super easy, like here: https://tutorials.cgrecord.net/2015/06/smart-wheel-aim-in-maya.html (the concept starts at about 2min)
But, if you try that in blender, it fails, because if you create the objects at zero, the constrained object will try and get back to zero.

Anyway, so far, I think the hair method might work the best. But I don’t like using those because it can be unpredictable, so you’d want to create a cache before final render to be sure it doesn’t flip out.
I was trying to find how people were doing it in game engines, but haven’t found anything yet. That’s usually not the focus, so most people would probably just have them rotate in the opposite direction of travel, and that’d be good enough for them.

Now if you Really want to get fancy with the rig, you’d add a sin value to the rotation amount and the influence of that would change based on a threshold of speed in order to give it wobble if it goes fast. But that would Definitely involve scripts. I’m still hoping someone that is good as scripts jumps on this thread so I can see how they would do it.

Ha, that Maya video does seem easy! Maybe there is a similar way to do it in blender (I had a quick try but with the same results as you)

The “drag” problem is what is fascinating me and I think I am onto something. Yes it is much more complicated than the Maya video! I have made a crane like armature that can drag the casters and turn them even if they are far off the original origin:

The Ik bone only has itself in the chain and targets the DragTargetBone. The drag bone will always be left behind when you move the trolley no matter how far off origin you have moved the pull.

I also added some limit rotations to the wheel empties so you can spin the platform by spinning the pull empty and the wheels turn in a circle. I have not got around to spinning the wheels themselves I will work on that.

This setup works much better than my first, here is a demonstration video:

I was really pleased with the result but as he says in the Maya video there is always a drawback! To reset the wheels rotation you have to manually rotate its armature (in real life you also have to manually rotate the wheel if you do not like the way it has ended up).

But the main drawback I can see is that it only works on a flat floor.
I can think of 3 possible workarounds for that.

One would be to Instance the whole collection to a different scene and use the first scene to animate the flat movement and the second with the instance to get the animated trolley going up and down hills.

Another would be to animate the angle of the floor and other props and parent the camera to them so they seem static! (lol this would be really complicated if you have more moving characters.)

The third and best would be to redesign the whole thing to use local transformations where possible. I will try to do it this way but it will be a bit more complicated and will take me time to work out………if I can.

Anyway I hope you like it, I am having a lot of fun trying to work this out. Here is the file if you want to have a look.
CastersNew.blend (1.1 MB)

I will keep going and try to get it better (wheels themselves turning and going up and down hills/bumps).
Please let us know if you find a better solution, I will do the same.
Edit: updated file.

That’s awesome! I’m getting some issues for some reason. I don’t understand the IK, so it’s all a bit confusing to me how you got it to work.
But this is what I get:
casters wobble
Sometimes as it’s moving, a caster will just flip to a different angle, then start working again. In this example I just animated it in a straight line with keyframes to make sure it wasn’t caused by me dragging it in a funny way or something.

What I do know about IK is, it’s pretty picky when it comes to it’s bone rotations. And the way to “fix” that is to use an object to get it’s pole angle so the bone doesn’t flip around.
From what I can tell here, I wonder if you lock the bones to only allow rotating in the single direction (which also means you don’t need quaternion rotation) then that may help fix the flipping issue. And if you main “pull” object as the pole angle, then that might solve the issue for only working at a flat angle.
The other one is you could create a “floor” to work off of as a parent that would slide along the surfaces and use that as the angle. It’s Pretty unlikely that you would have something with casters that you would want to animate across things with lots of uneven bumps without just using physics to handle it, so that would probably be fine. The only time you might have angled surfaces for something with casters would probably be ramps and thresholds.

So I love what you have going on here. I just can’t quite follow it. I haven’t learned enough about bones in blender yet. I’ve only used them for one project where I had a pair of headphones and the CAD data is modelled as it is manufactured, but the band creates tension on the user’s head to keep them on. So as modelled, the ear cups intersect. So I had to bend the band to fit the ear cups on. I used bones to do that. I also had a crazy weird issue where I could render any one frame, but I any subsequent frame stopped skinning correctly. For timing I just went from machine to machine and queued up one frame at a time. It wasn’t very long, so only had to do that for about an hour. But I was Obviously doing something wrong. Something about caching probably. I’m just kind of learning blender as I go, and I never had issues like that in 3dsMax or Maya. But even when I was there, I only used IK once, and it was a complicated robot arm rig. It took a while for me to get it to work, and it still broke if you went crazy. Who bothers to create limits for everything though? lol

Anyway, I’m interested to see if you take it further. Not that I could replicate it, but it’s pretty slick.

Hmm, at first I tried to reproduce those glitches but could not, then I key-framed the animation and watched it a few times. Most of the time it played well but sometimes similar glitches did appear, so the twitches seem to be a bit erratic.

Yes, Ik’s are picky with rotations especially down the chain (in this case there is only the ik bone itself). I am not sure if a pole target would work in this case as it would restrict the rotation, I have never used them and would have to search info. I have done a bit of mechanical rigging but I am not by any means an expert.

Also I am not really using the IK for its intended purpose. The basic idea I had was that as the IK bone wants to point to a target, I am using the child (drag)bone as a base that is pulled around by the IK bone. The drag bone basically wants to stay where it is but is pulled around by its parent (“ha, ha” like a lot of kids!) In fact sometimes it seems to disconnect, which it should not but then it connects again as soon as you move the trolley. I checked and there are no dependencies registered.

In theory it is best that the IK target is not connected to the IK bone maybe the problem is in there. I have unparented and disconnected the drag bone and given it child of constant instead so now it is not actually connected to the IK bone. For the moment it seems more stable, although I have not tested it extensively.

I work with a lot of flight cases and yes we use ramps and cable covers (bumps) so I would like to get it to work on non flat surfaces.

I will take this further (I am enjoying it) and post the result when I am satisfied.

pole targets! Definitely use them. It doesn’t restrict the rotation for something like this. It only really restricts the bone rotation along the axis that extends down the bone, and even then, only if you want it to.
The basic idea there is you’re telling the bone which direction is up. In an IK, one of the big issues is since you’re driving the bones based on only two locations, the “elbow” can flip sometimes rapidly as the elbow gets close to straight or if the beginning and end of the IK come close to eachother in one axis. Suddenly, it doesn’t know which direction the elbow should go.
So in the case of something like a human knee, the pole direction is straight in front of you. Giving that direction makes it so that your knee doesn’t suddenly flip around on itself if it doesn’t know which way the leg bend should point. You would parent that object to something like maybe your waist so it always stays in front of the front of the legs, but allows other bones to bend nice and freely. If you create a multi-joint robot arm, you’ll Need to use those or it will quickly break. That is, if you’re wanting to animate the end of the arm, which is kind of the point of IK right?

In this case, each of those bones only need to rotate in one direction, if at all. It might be less erratic (maybe not though since you’re using IK to do something it wasn’t necessarily intended to do) if you lock everything that you don’t want it to use. For that top bone, you could use the base part, or dragging object as the pole target. That bone only needs to rotate around one axis, so that’s fine. And since you only rotate on one axis, you can switch back to just an XYZ rotation and don’t have to worry about a quaternion rotation for this…I think. I don’t really know the Math behind IK, so maybe things like that let it work better. I have no idea. But since it’s just somewhat twitchy here and there, I’d control the things you can before letting the IK system just mess with whatever it wants. It’s probably glitching because it keeps going back and forth trying to control two different things.

When I have time to try it out, I’m going to try using animation nodes to just set the position of the target object any time one object is moved where that target has two distance constraints on it. The only reason that doesn’t work is because the target always tries to point back to zero (or wherever it was created) so using animation nodes, I can just set it’s actual position to match it’s world position. That’s why it works in Maya I think. If I remember correctly, the world position is always reported as where the object is in space no matter what is effecting it. Blender seems to only be working off it’s keyframed position, and defaults to having an “imaginary” keyframe for an object. Although that makes IK slightly easier, there are some downsides as well, this case being one of them. If a constraint pushes an object, the recorded world position doesn’t change (in my opinion, it should).

Yes I should look into pole targets it is on my long list of “to understand” things. I will investigate as it could be useful for the ramps problem.
I still think that the glitches had to do with the fact that the IK bone was connected to its target.
In the end I disconnected the target bones from the IK bone and then parented them again but with the keep offset option so they are not connected, (instead of using the child of constraint), this should give the IK bone more freedom. I also repositioned the bones of the armatures in edit mode so that all the rigs start in the same “crane shape” position.

In my tests the glitches have gone and it runs smooth. I have updated the last file I posted (now “CastersNew.blend”) to save a bit of space for BA. I added an animation if you open the file and press play (space-bar) it runs without glitches.

Yes blender treats constrained and parented transformation values differently, I think this thread is related to that

Just looking at the file, and not the entire conversation-- noticing only “twitch” complaints-- there is a dependency loop. The IK target is parented to the IK bone. I don’t know why Blender isn’t smart enough to warn about this dependency loop on the console, but it still exists.

When you have dependency loops like this, it’s going to twitch. But worse, it’s not necessarily going to render the same way that it previews.

Yes I was wondering that, my logic said it was a loop but blender did not report. The latest version does not seem to twitch yet (could be pot luck!)

I finally had a change to try out my idea and it worked great. Rather than scripting, I used animation nodes.
casters.blend (2.0 MB)
It looks Great, right up until I wanted to have the wheels rotate automatically. They do not.
And did you know Every single tutorial on having wheels rotate on youtube is basically useless other than just to teach you one Really basic example of how to use drivers or the transformation constraint? They only work if you rotate in a straight line, or if you animate the driver completely manually. If it is a parent, then you get nothing useful.

You can see from that file, I tried a couple things, both are turned off. I wasn’t getting anything useful from the constraint, and I have no idea what I’m doing with the animation nodes. I kind of just thought I’d cross my fingers.

Realistically, the easiest method here, to actually use over and over, would be to put this all in one animation nodes, where you create a subroutine that loops through the objects. So you could just put all your targets in a collection, then have it apply the matrix transform to the actual transform for each without having to create that a bunch of times. And you can have it copy the modifiers as well? Would be even better if it could just create them. Although, you could also probably just create the same distance constraint type system right in animation nodes.
And then I’d love to be able to also put all the wheels in another collection and do the same thing for having them automatically rotate.

Now, currently, in most of my cases, I have no need for the wheels to actually rotate because they are always just straight revolves with no spokes or other distinguishing items. And the camera will pretty much always be far enough away that there’s no reason for me to put any texture on it. So, good enough for now, but I’d still like to plan this out to work in the future.

So the thing that’s left to do, other than setting up a subroutine to work with a collection, is figure out how to get a wheel to rotate based on it’s location change, in both X And Z. Notice I used a double caster here. So when the caster kind of backs up on itself a little bit and flips around, the wheels should rotate in opposite directions for a bit.

edit: I got the loop working. No reason to upload again.
I just duplicated the caster a few times, then parented each circle to a new “mover” dummy. Of course, I changed the execution to the new object.
Then I moved all the caster targets to a collection named “Targets” and the new node tree looks like this:


It takes about 1.15ms to run on my machine, so I would still consider it “real-time” but I probably wouldn’t try and run something with 80 casters for some reason.

That looks great you have found a good solution. I did manage to recreate your second node setup. Sorry I did not answer faster I have been doing a lot of experiments and also working (real job).

Yes the rotation of the wheels themselves has me stumped as well. I have not found a way to rotate the wheels correctly when you freely drag the trolley around.

I know you said you do not like using curves as paths but it is the only method I have found to rotate and point wheels correctly when moving a vehicle in all directions around corners, even over a complete circle.

With the method I linked to originally (my first answer that did not take into account the casters) you use a control mesh with a vertex group and curve modifier, you only animate the control mesh one axis to drive the position on the curve. The location on that axis can be used to drive the wheel rotation forwards and backwards around the curve (for normal wheels).

I reverted to my setup as I do want to go up and down ramps and my knowledge of animation nodes is limited. I got rid of the restrict rotation constraints on each casters empty that produced the “spin effect” and added a copy rotation to the position bones so it could do the hills.

There is of course the casters problem. “Those flipping wheels!”. In the video my trolley only moves forwards on the curve (which works well), but if you change direction in mid animation (push instead of pull the trolley) the casters flip and the rotation also inverts, this is not a problem for “normal” wheels as they do invert rotation when the vehicle reverses, casters however like to rotate the wheels always in the same relative direction once they have flipped on their pivot.

It is fairly easy to use a key-frameable custom property to change the wheel rotation direction the problem is the moment of transition from pull to push that does not work well. I have tried just about every thing I can think of with no good result.

Did you find a way to rotate interactively the wheels themselves with animation nodes?

The issue with autorotation is that it needs some memory. The rotation of the wheels is a function of where they’ve been, so you need to keep track of running rotation.

Way back when, I believe I saw an animation nodes tutorial that demonstrated how to do memory. I never tested it, and never got much of the hang of AN, and any interest I had in it has been reinvested in geometry nodes (which aren’t good for inter-frame stuff like you want here.)

Just offerring that somebody said they can create memory in AN, and memory is what you need. (Once you have a running total of rotation, you can compare this frame’s position with last frame’s position and divide by circumference, 2pir, to get how much the wheel should have rolled.)