Hi! Can someone please give me an advice about domain/flow settings of how to create cigarette smoke? I need some static cigarette smoke cloud for one of my project but I never useed simulations before and it’s looks complicated to achieve something looks like cigarette smoke. For now I have some strong effects looks more like a smoke from chimney. But I need some lightweight cigarette like smoke.
I should to play with simulation settings or this effect can be achived in shading settings of volume material?
Since it will be static then just using a Volume Scatter driven by Musgrave and or Voronoi textures with a bit of noise should get you pretty close to what you want…be aware if you use an hdri in your scene then you may have to change colors in the scatter node for instance if you want Blueish smoke you would need to set the color down in the reds…
2 Likes
Thanx I’ll try it
Was thinking about this a bit more …since the Volume scatter will only show so much of the Textures ( tends to wash out and in a PBR scene is hard to see)
Take a basic Plane and build your Volume mask using it as the target…bake it into a B/W image file, Smoke as white background pure Black…and use it in your scene as a transparent Mask driving an RGB and a very low emissive… and/or take this into the Compositor do a very light mist pass with the same kind of texture set up to drive the mist and add in the better plane mask as the transparent mask.
2 Likes
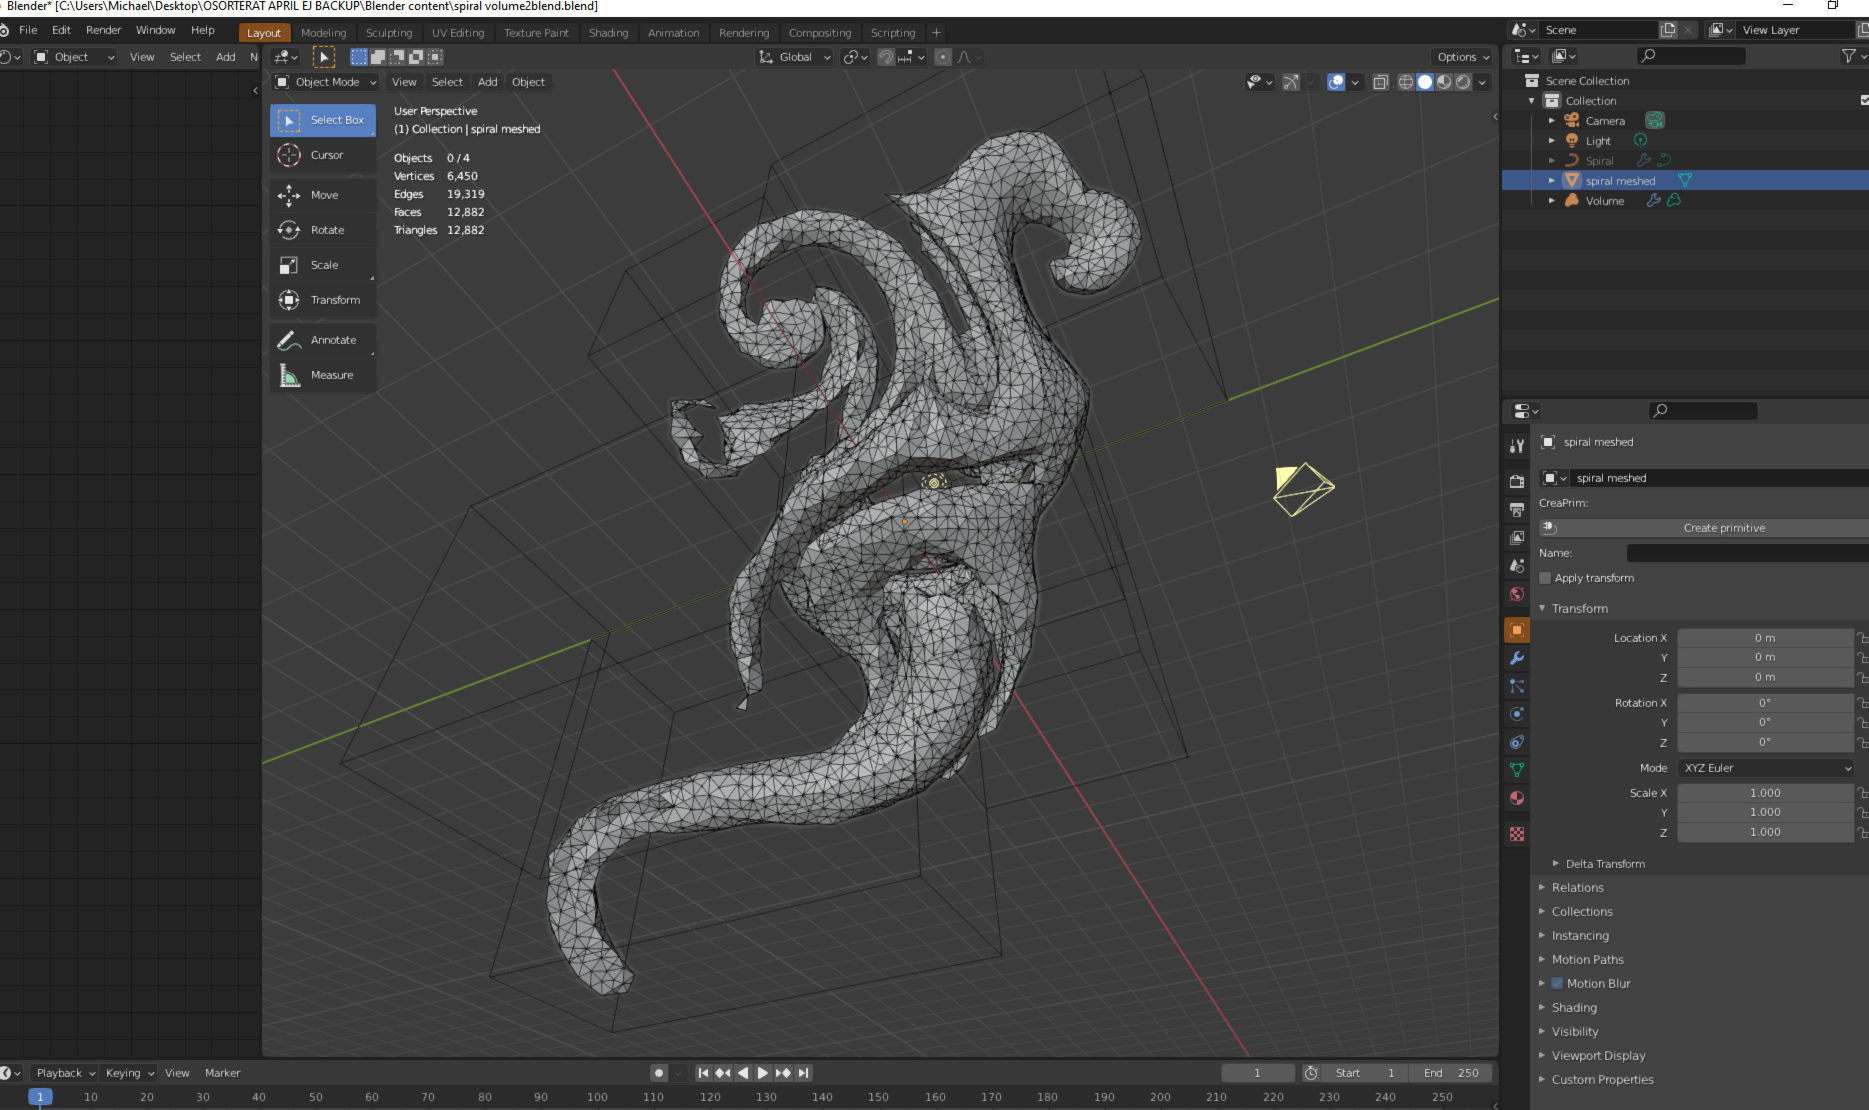
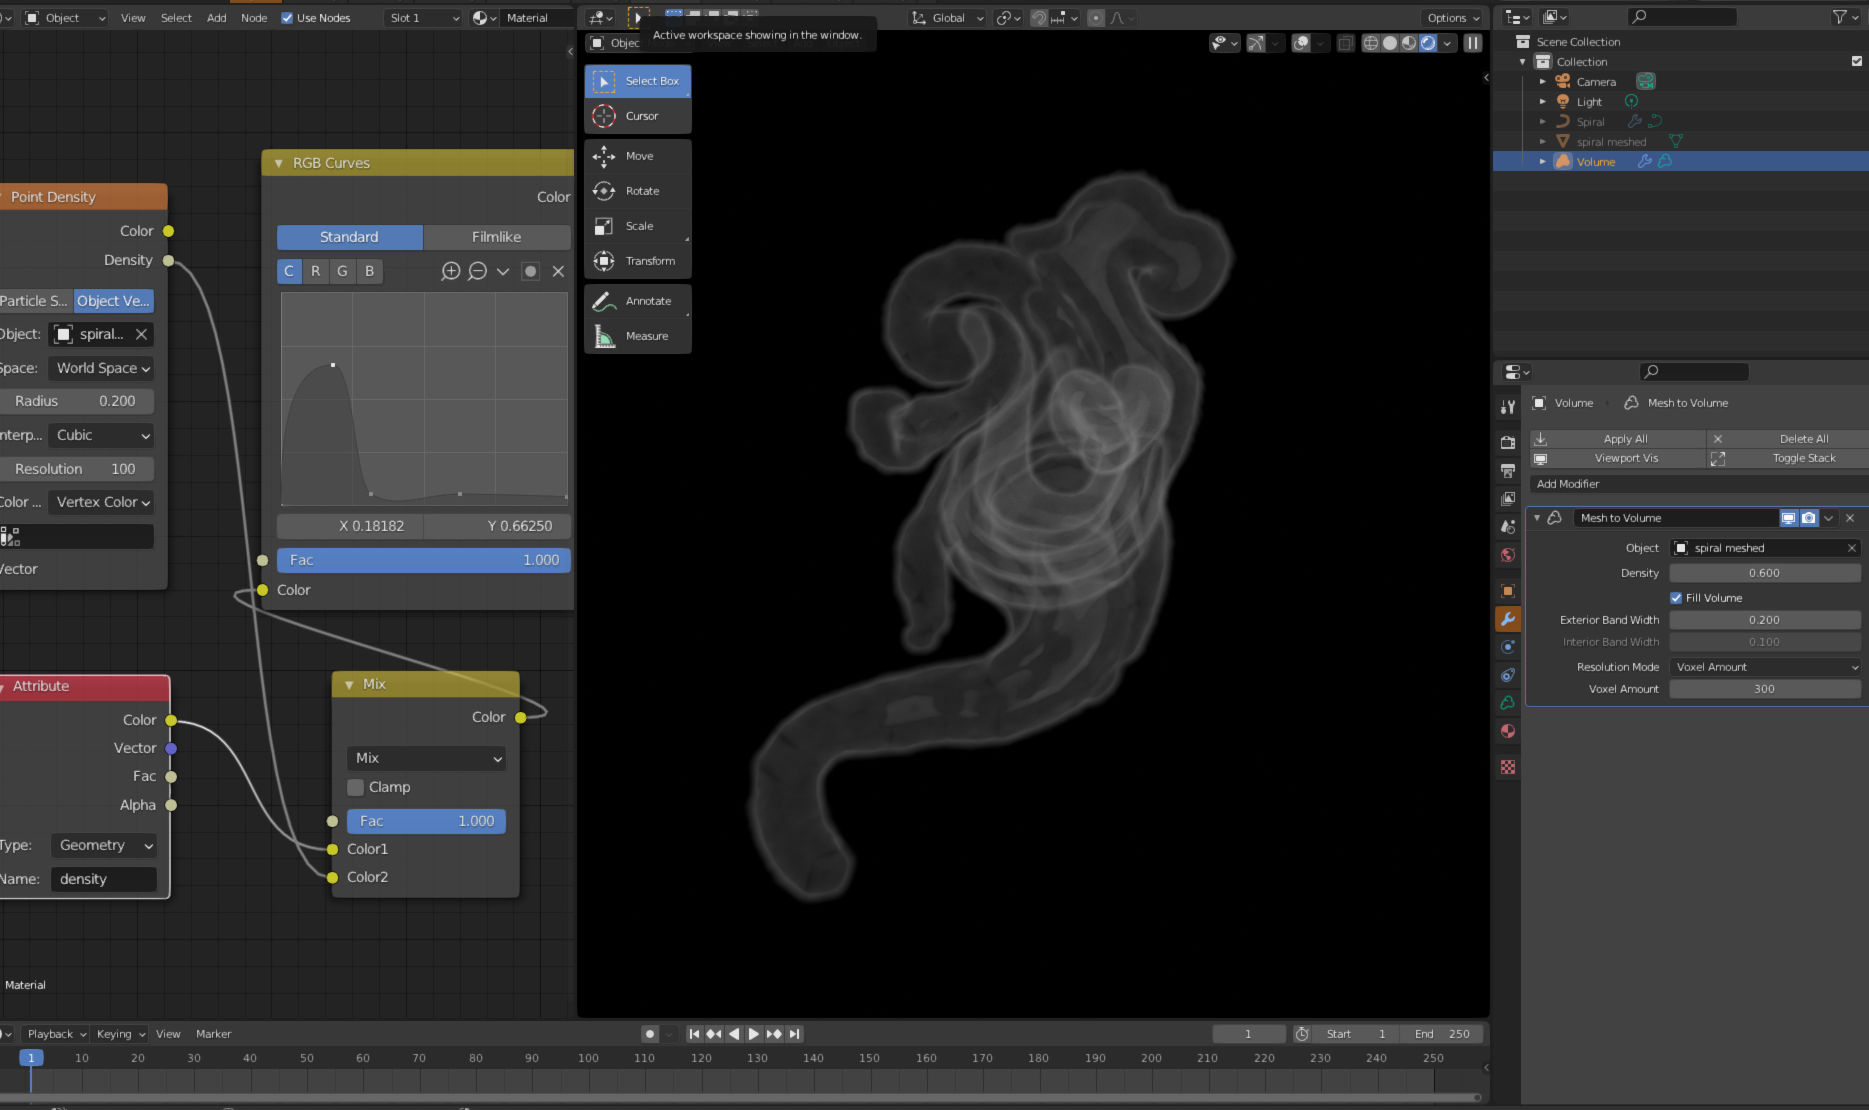
Since it´s static, why not try the newer mesh to volume.
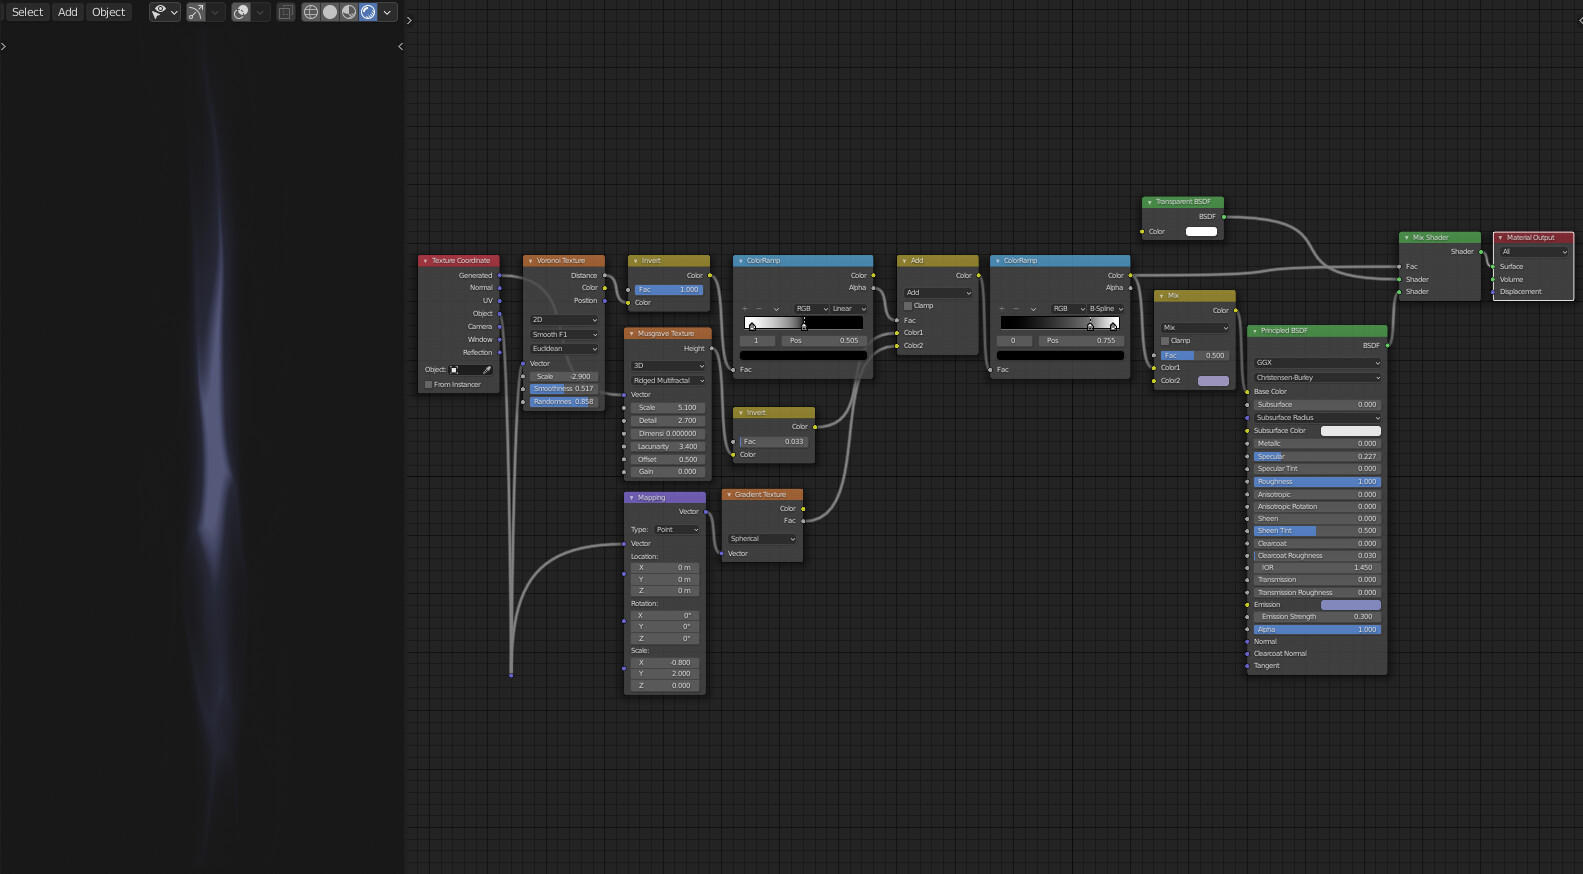
For cig smoke like the thin stuff, you may get away with faster renders and not using any density at all, just adjust the emission channel, but feed it correctly, see my image, tweaking a rgb curve right.
You could use any mesh try a torus know, but increase band width, that determines how much of the voxel volume will expand outside of the mesh.
And also important…add volume texture displace, and distort the voxels.
And you know what, you can even paint in with cloth brush on to any mesh, give it actually a smoke curl, and also use snake hook to twirl the mesh, but then you should not use so much volume displace, I tried this initally but got so nice results with volume displace, in this case musgrave ridged fractal and large size on that.
Now this is only the look of the end of it perhaps, you would need to shape the mesh with a think pillar up first perhaps an expand the model in the ned by various ways.
And you know what, you could even use curves shapes with this.
Now …since they are curves, you can´t just go from volume to mesh,normally you may want to freeze it to a mesh, if you want to sculpt deform it as well, but you can add a remesh modifier on top of the curve shape, so that way you got a mesh from it while still maintaining editable curves, so that is what you could try to get the main flowing shape, then when satisfied, commit to converting to a mesh(keep the original in background.
continue to deform with cloth brush and snake brush, maybe remesh it.
The thing though, you need a lot of voxels, or banding will show up, doesn´t matter if you fiddle with the step size in this case.
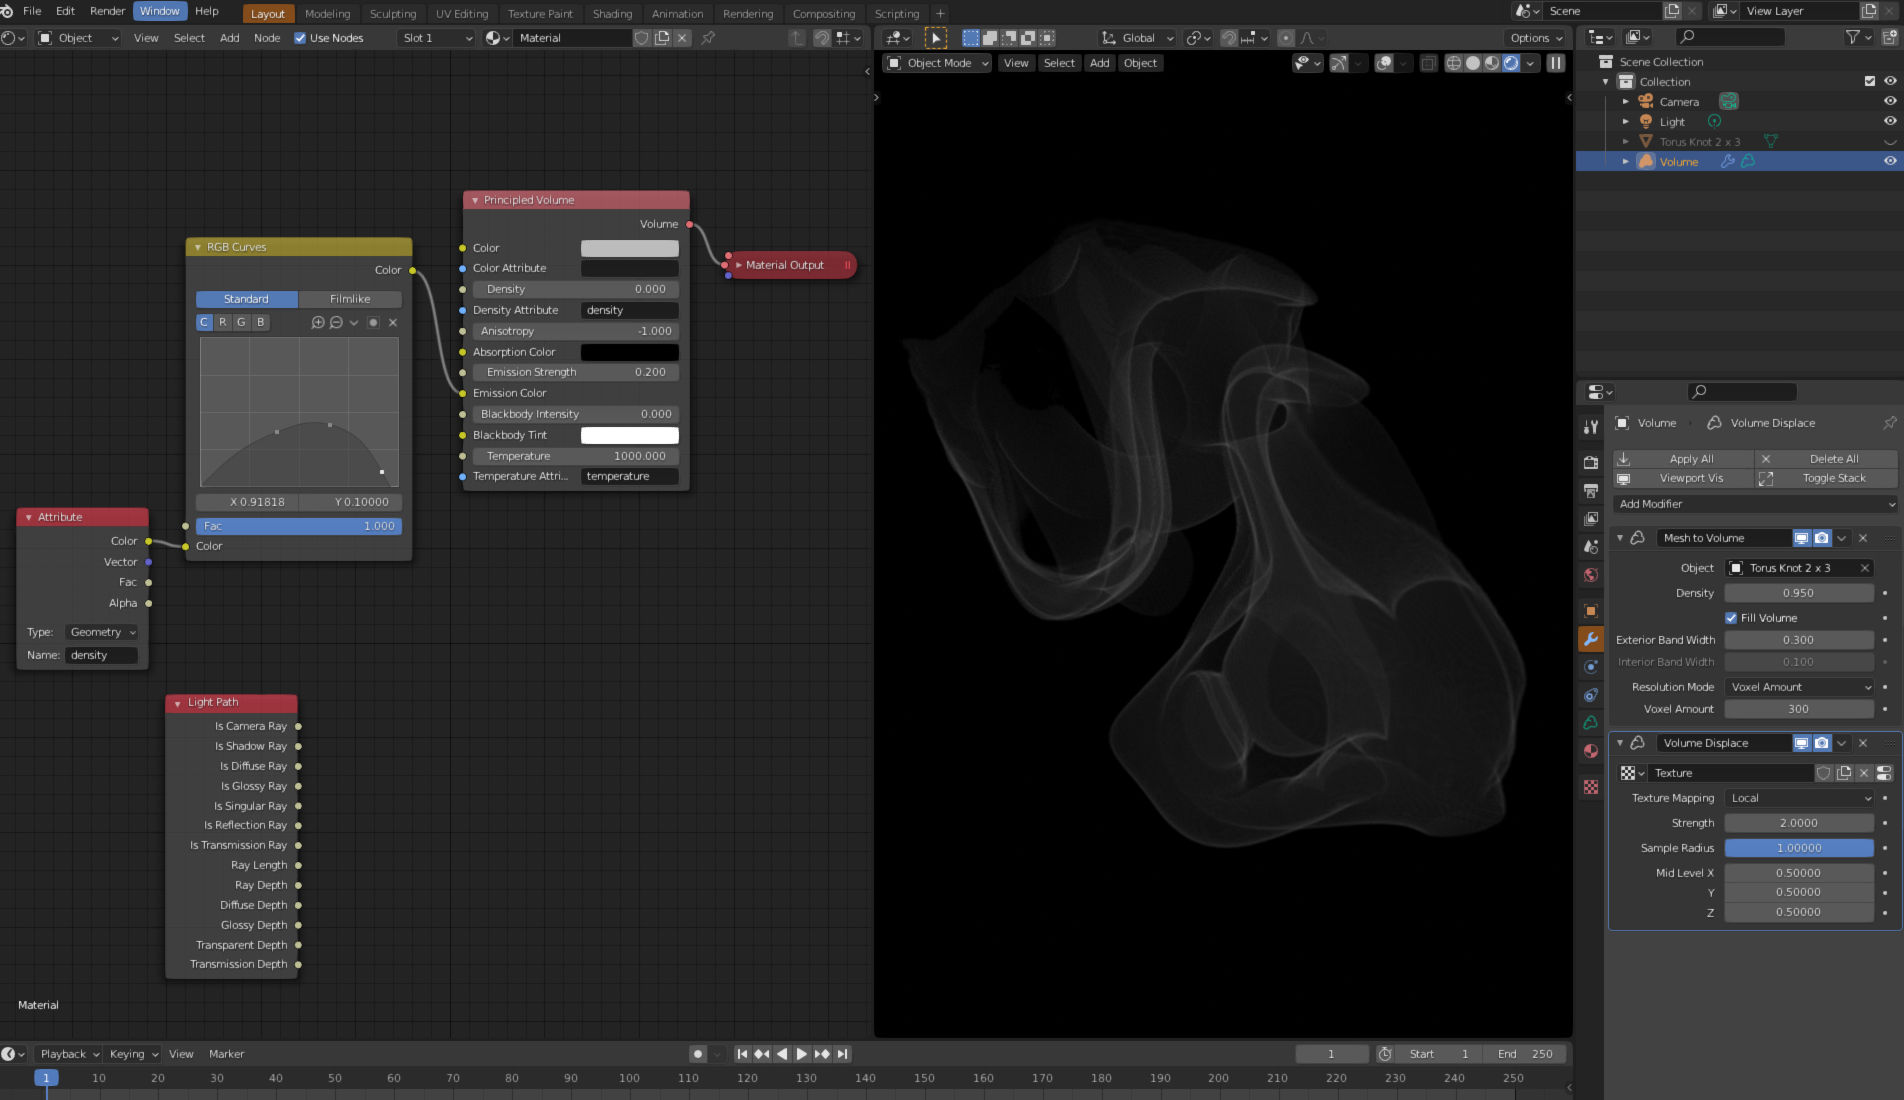
Renders superfast in cycles, with gpu, and you can orbit around in full 3D, but it´s static.
Volumetric scattering isn´t necessary here.
1 Like
It´s still hard to get right with this method, since the fractal textures available are too limited…wish I had Lightwave textures that has all kinds of vortex swirls and advection.
Simulating with true fluids can get swirls that are more realistic, but still hard to acheive that special convectional swirl and turbulence that often shows up.
Save out to vdb, and find a single frame you like and reload, I do that from time to time but wtih 2.79 blender and the older fluids, easier and faster to handle than mantaflow.
copy the vdb frame you like, and paste and rename as single frame.
import to blender 2.9 and up, and mess around with settings like above for instance.
You should need to learn the wind forces, vortex and such though, to get additional effects.
1 Like
Thank you very much for you help and advice! Thats cool solution, I have noted it. In my current project I have statitc smoke but the scene will be animated (turntable) so smoke need to be not flat
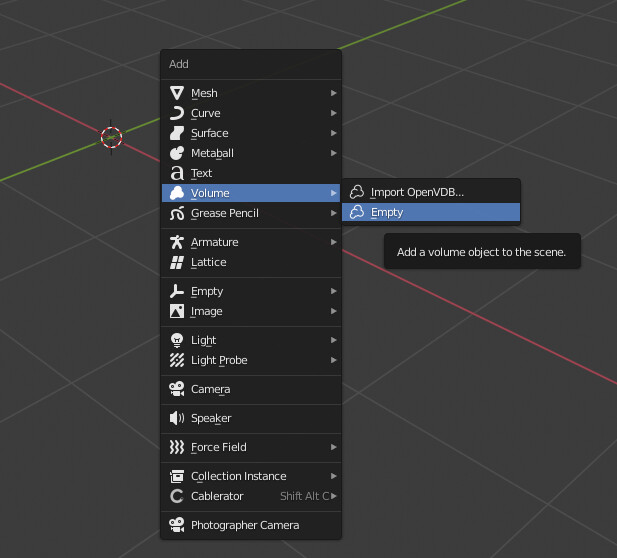
Thanx a lot! I did not know about mesh to volume! Looks cool! And I think this is very handy, and I suppose it will be faster and more control than to try emulate smoke using simulation… I’ll try it… But i try to add modifier to “volume empty” and there is nothing in modifier menu. Don’t You know how to add the modifier to empty volume in 2.9? I forget to say that my scene will be in eevee
Thanks
It is located under add>volume.empty
I liked @MI65 solution but it works better in cycles…
Mine would be a problem for an animated screen…but you could animate the scale etc. in the Nodes I showed to move the smoker around a bit …
Thank You, I mean how to add modifier to empty volume. When I try to add modifier to empty volume there is no midifiers in menu:

But in 2.91.2 version everything is ok, there is modifiers for empty volume
I don´t think those modifiers were implemented in some 2.9 versions, so it shouldn´t be a surprise that it´s not there, I use blender 2.92 Alpha.
As for using a static smoke, like a single VDB volume frame from a simulation, is sort of the way to go for the actual formation mostly, if you have used vortex forces the right way together with that, but the difficulat part is to shade it similar to as if you wuld use the mesh to volume technique, with normal fluid smoke and vdb, the density of the smoke is pretty much the same or concetrated from the center of the fluid emission, it´s very hard to adjust the shading in density or in emission to have the sharp edges you see in the mesh to volume example I showed.
so there is a reason there are still paricle effects made with special tools like Krakatoa, fluids ignore that kind of particle density gathering and does the density distribution more even…without any gaps, while particle simulations will lack on some areas if there isn´t enough particles, but you would get much nicer sharper edges in a particle simulation.
Here´s a sample anim of a technique I used with ripple displacements on a subdivided sphere, then turning off all visibility for the object, and apply hypervoxels sprite shading, you simply add tiny tin hv sprites on to each vertice, and I could balance density by increasing subdivision levels, this technique had disadvantages as to when it displaces to much, the spacing between the vertices causes gaps in the density.
Now…this was made in Lightwave, not for you perhaps…but similar techniques could probably be done in blender, you could try and replicate exactly that with older blender versions that can apply sprites to vertices(seems later blender versions discarded sprites all together?)
But I would like to try this by doing this animation and model in Lightwave …mdd scan it and send to blender and apply this mesh to volume, this means the whole mesh will be voxelized evenly and not per vertices, but then I would need to retreive point information to enhance the shading and increase density or emission in those areas where points are more dense, but at the same time I will not have any gaps, that is the idea.
It works for the intial parts as for scanning to mdd and have this ripple animation going on, and apply mesh to volume, it´s that point density part I need to look in to.

Here´s a static sample with orbit in 3D, this time from a Lightwave particle simulation, and saved the particle animation as freezed points at desired frames, then imported back and shaded with hypervoxels sprites, this was only around 400 000 particles, for this to look really good, you would probably need 6-12 millions of particles, it´s doable now with memory handling I think in Lightwave, but takes too long time too settle/cook.

And a sample images of using fractal textures in a particle emitters velocity channel ( lightwave)

You have to have indulgence with the Lightwave part here, it´s just various techniques, and some of it I would like to translate over to blender if possible, and wether it can be…or even should be translated to be working in blender is purely a matter of interest and finding the right ways to solve the end task.
P
Some of it may translate, some may not.
I would anyway experiment with blenders Mesh to volume, it´s nice for some stuff, you can even try with curves as I mentioned, make a curve that forms in vortext or spiral form, duplicate it and do minor changes on that one, save to mesh and remesh to ge an even point distribution on the mesh, start sculpting with snake brush to manually distort the forms with undulations, or even use the cloth brush for that, then apply this mesh to volume, a difficult part may be to choose where you should use textures and how much in the volume displacment modifier, maybe not at all…or just slightly, remember it will break the main general shape if used too much, so some kind of balance there perhaps.
1 Like
I never said anything about using it elswhere than cycles, the sample of mesh to volume in blender was just that…Cycles.
The best way though to get rid of any problem, quit smoking.
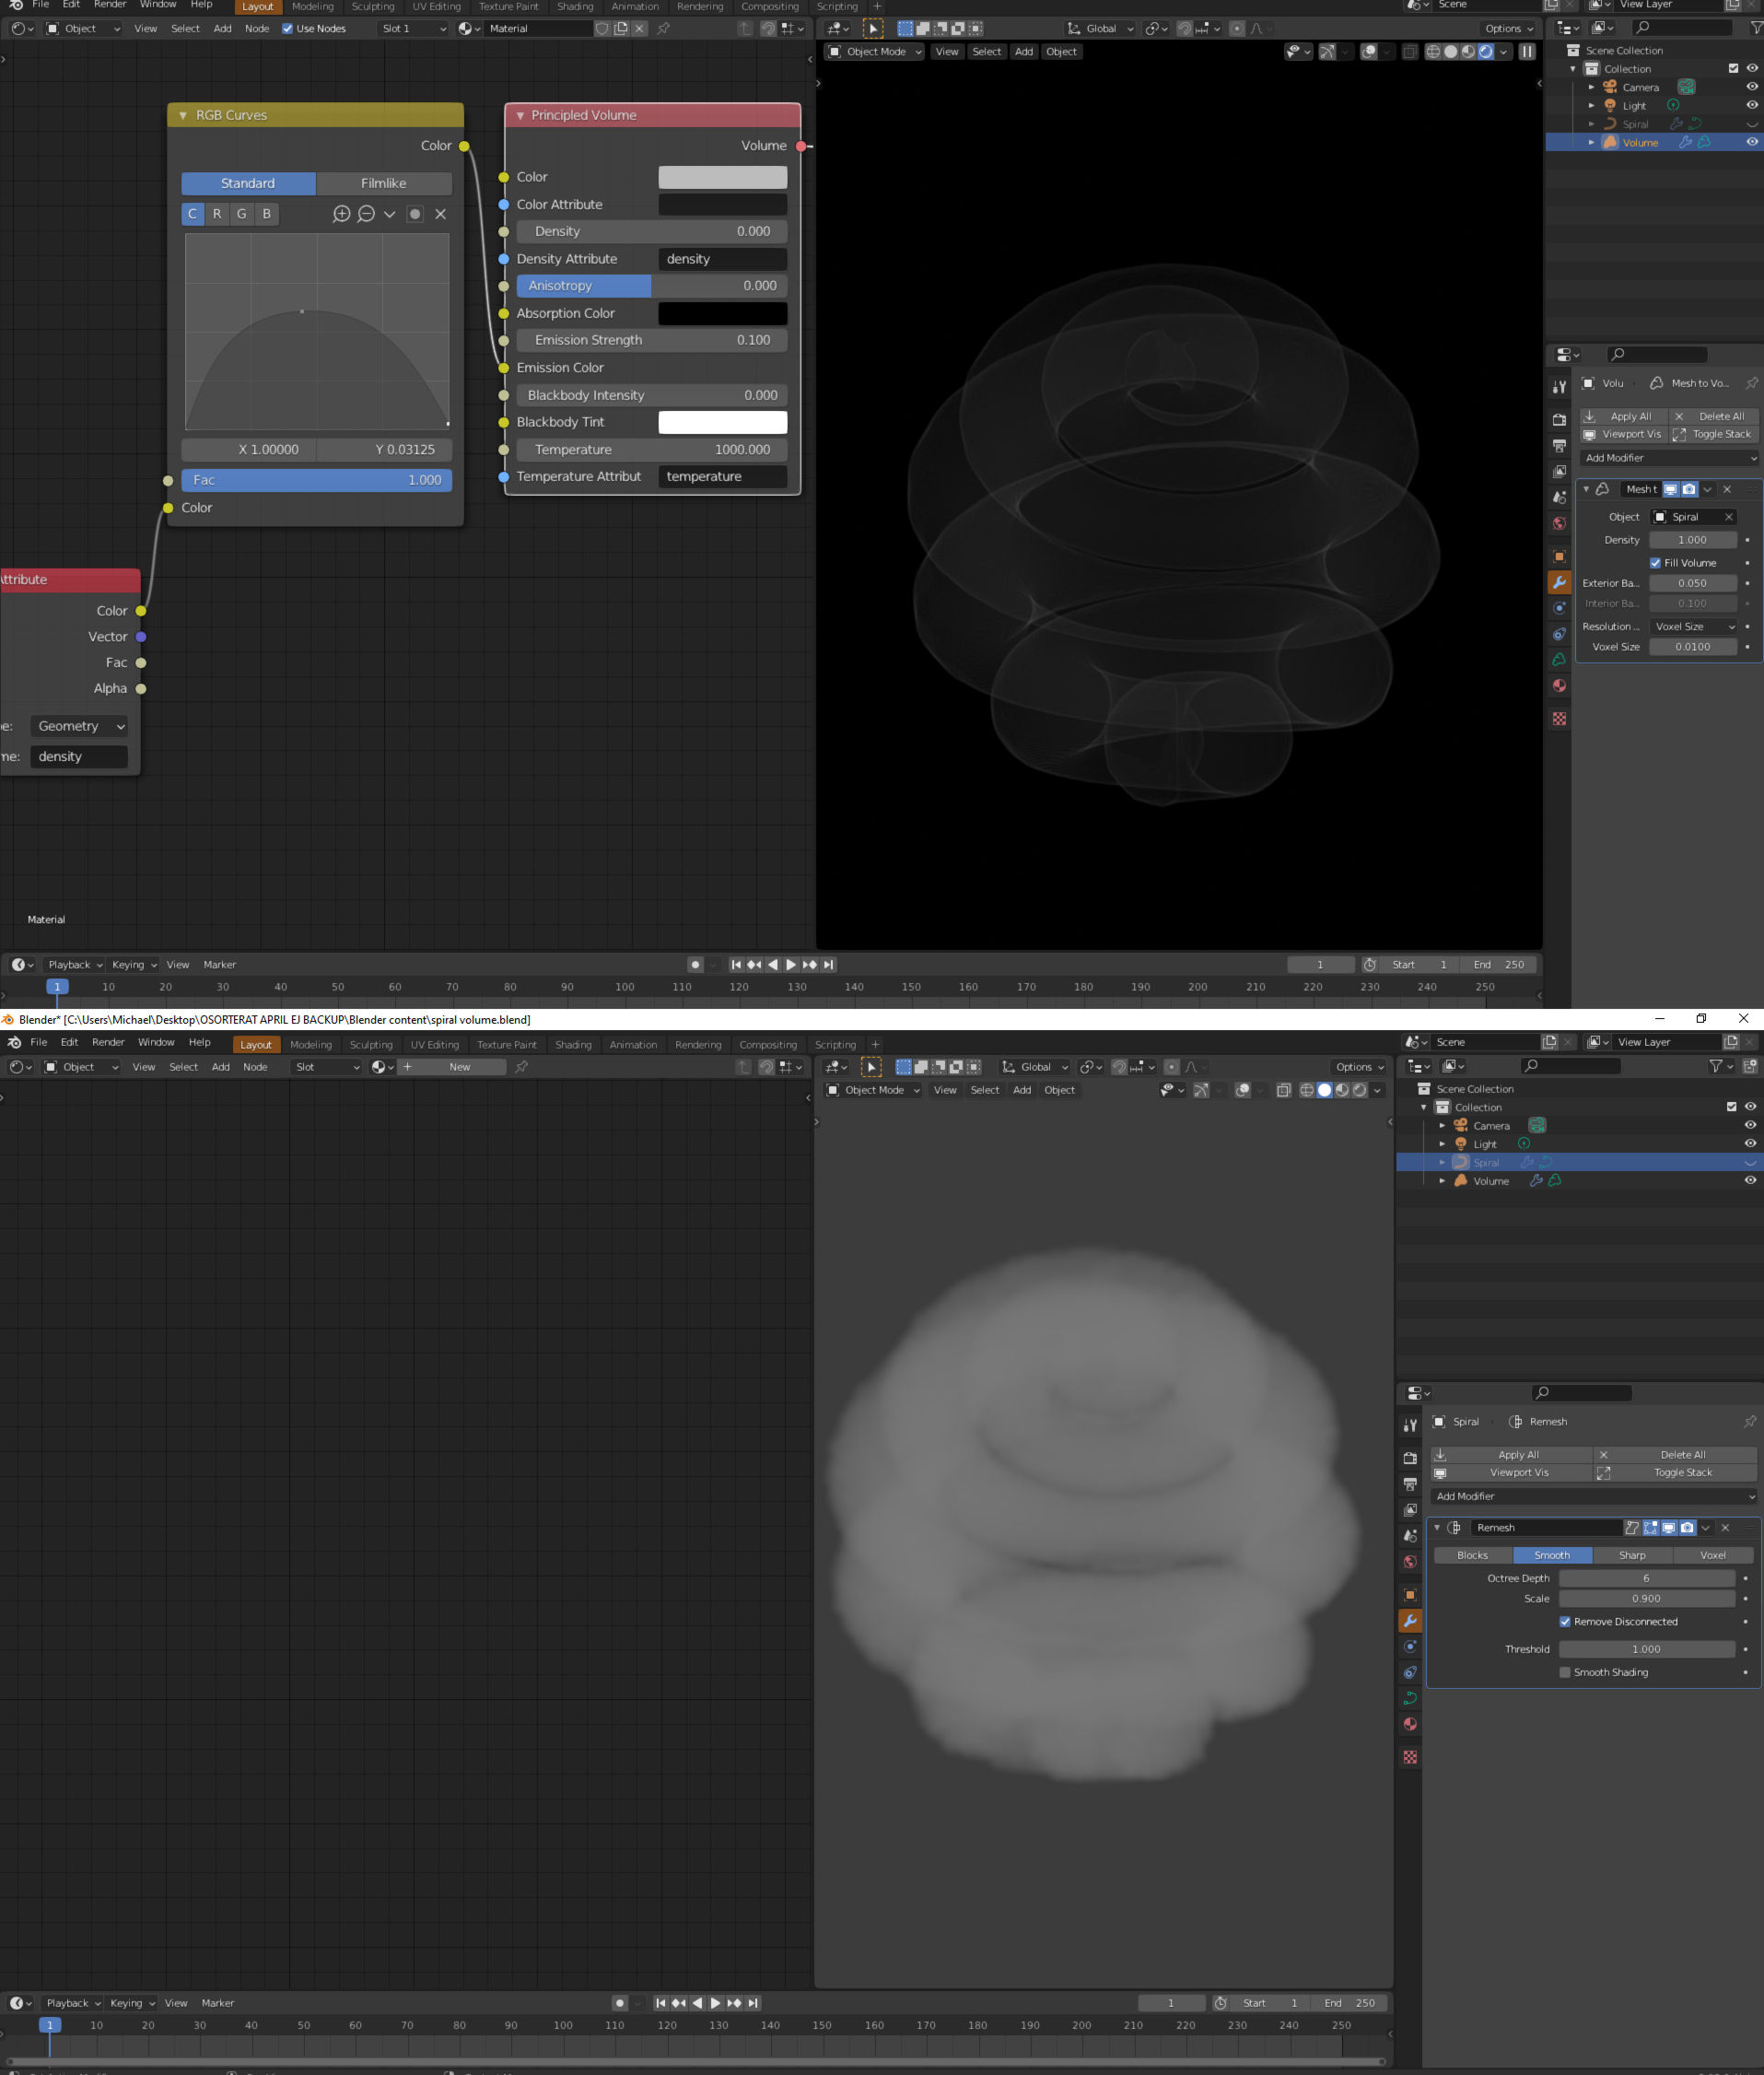
here´s a sample again, a curve object, spiral sphere…and this curve is not converted yet to a mesh, but since I added the remesh modifier on top of the curve, it produces a mesh from that, while maintaining it´s curve editable functions, what I can´t do is sculpt on the actual cure…maybe on the mesh modified, but don´t sure there.
But for final shapes, it´s best to determine the curve edit form, then convert it and continue to sculpt on it, disable the volume to mesh modifier in the viewport while doing that so it won´t lag when sculpting.
Now…in the " old times" many artists may have used or still use plain ol shading methods with weight layering for getting this incandescence look, but it always have too sharp edges where geometry intersects, no way around that with such method, so this is welcome and depending on voxel settings it can look smoother, and you can also of course include density and curves with this to get a slightly thicker smoke.
Point density nodes are there and can be fed in to some input slots in the principled volume material when using this mesh to volume technique, I did some testing some minutes ago…and it may work nicely, though at one point it all got broken somehow, will have to experiment more on that.
Sorry for not providing exact cigarette smoke, but you´ll get the idea of this, it may work nicely for that…but not without work.
The trick is to get the shading going right, and as you can see, use the curve settings right in to the emission, and you need attribute density node or it will overide the density and put emission globably on the full vdb volume…disregarding the mesh.
1 Like
And additionally sculpt on that, though I am just throwing in wild mixing of techniques now, so One should plan this more carefully on to what kind of shapes to start with and when to start sculpt etc, which mesh resolution would be enough etc.
So a continued sculpt on that spiral curve, but after it has been converted to mesh, preferably using snake hook in dyntopo mode so any hook extrude along your mouse stroke will be remeshed, then after that is done, flood fill remesh it with desired even resolution.
sample images, two last images the difference between just a density attribute input for the emision and a curve adjusting that, and the last where I mix that input with a point density input also using the same curve adjustment…mixed by a rgb mix node.
Now in this case, there are some artifacts, probably because I didn´t bother about making the mesh having proper smoothness and point density all over, and I should have increased resolution in the point density node.
Still experimental.

Could still use a bit more smoothness in some places, and adjustment, but just testing.
changing the actual density in the vdb grid for the volume to mesh will either decrease sharpness or increase it.
And you know what, you could experiment more, saving out a gas simulation to a mesh, from there sculpt that mesh and apply mesh to volume, that would bring different density than any pure simulation can do, but still using a fluid sim as the basis.
1 Like
Ok…I just thought it sounded odd, since you refered to “my solution” then but…as if my solution wasn´t to use cycles.
“I liked @MI65 solution but it works better in cycles…”
but ok…misunderstanding is easy 
1 Like
can we make little wavy
Yes, I think it would be possible…
A quick and dirty version of the idea…add this to a half-cylinder tracked to the camera…and should be enough to fool the eye…
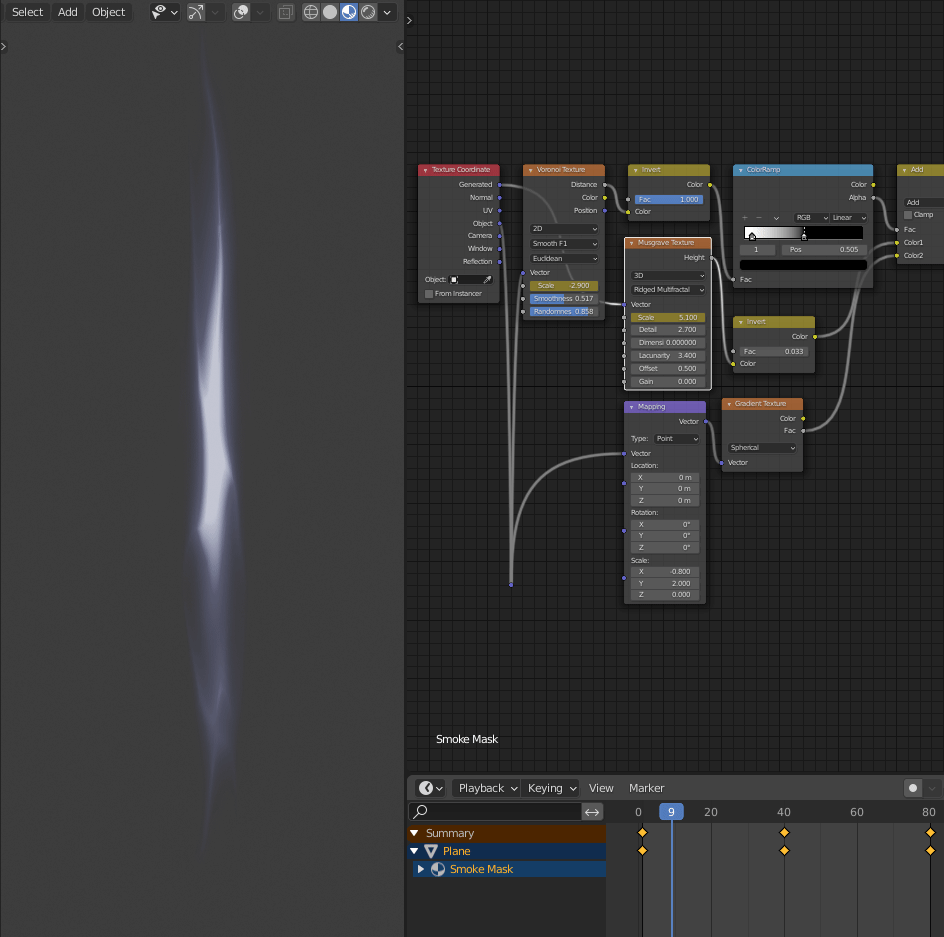
1 Like
the tricky part,
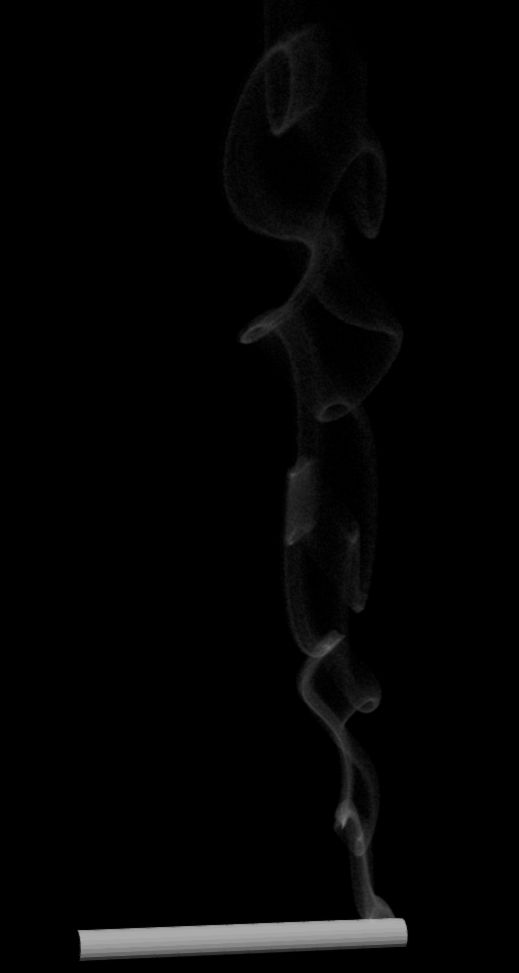
What style of ciggarette smoke is he looking for, perhaps I am confusing that more straight forward uplift going motion with my incence sticks and looking at those, it really curls a lot sometimes.
Cig smoke ala Aliens and Ripley smoking in the first frames after the debreifing, can´t find that online…not the very first frames, but that´s some nice smoke curling.
A particle sample, not in blender though.
269 000 particles, and a couple of wind forces, vortex etc.
Applied sprites with not textures, just tiny sprites, let the particles do the density work so I reduce a lot of the voxel sprite density.
All this yields very nice hard edges of the smoke compared to trying to work out any fluid simulations smoke density.
The tricky parts comes in two´s.
amount of particles, it took some seconds (within a minute for the particles to cook) and you need preferably several millions of them, you could post process with various blur filters too.
Then it´s about getting the forces right, it looks good in animation in with this flow, but something I still have a hard time to get right is a proper full major curl, without breaking particle density too much and the general convectional minor curls.
This looks just the same when I freeze the particles, saving out as partigons, which means they are then static points, and I cand disconnect the particle system and like the so called bullet effect.
I could further on try and duplicate this partigon mesh, and deform it with other tools or just duplicate it and adjust spacing of the partigon points to even out density distribution.
The process of trying to acheive this with just particles in blender, that is something I still need to R&D.
One issue is newer blender versions have discarded sprites, and putting on luminosity is not good enough, maybe by adding volume to it and cut out the actual volumetric rendering and use the emission channels perhaps.
And another question is how well blender will perform with particles both in how many particles it can display and render, and how fast.
Embergen has some nice stuff going on with particles (not just pure fluids) but I need to check out more on that, I think that would really be nice to use for particle smoke, but it will cost of course.
Surely there most be blender masters there that can do good smoke sims and shade it nicely, or use blender particles similar to what I did in another software?
Blender has smoke flow, so utilizing that to drive the particle simulation could work, the key is perhaps not to use fluids for rendering, but the particles…or else having to wrestle that volumetric density shading with curves etc, it´s quite a bit of work.
Edited, this one in blender and mantaflow is quite good, coffe steam, but in principle very similar to cig smoke with a few changes perhaps, bake it to VDB and pick desired frame of your liking, copy and paste that frame and reload as a single frame VDB, and continue to shade it with various materials.
Then again, the thread starter may not be so versed in the fluid system, so it´s other methods…or just take some time to learn the fluids better.

1 Like