Hey, for the past two days I’ve been trying to figure out how exactly do use the Cloth modifer to make clothing that will fold and deform realistically on my model. Theres little step by step documention on this that I’ve been able to find, so I’m going crazy trying to figure it out.
I started by modeling a character. Simple enough. I then modeled, as a seperate object on the same layer, a shirt that will be interacting with the model. I set up the cloth modifier, and set collison on the figure. I parented the shirt to the figure, then set up my armature on the figure, set the approprite modifier on both the figure and the shirt, weight painted each (I read on a clothing thread on here to try using the Bone Weight Copy script, but it didn’t seem to work, so I had to weight each independently), and went to bake the cloth animation.
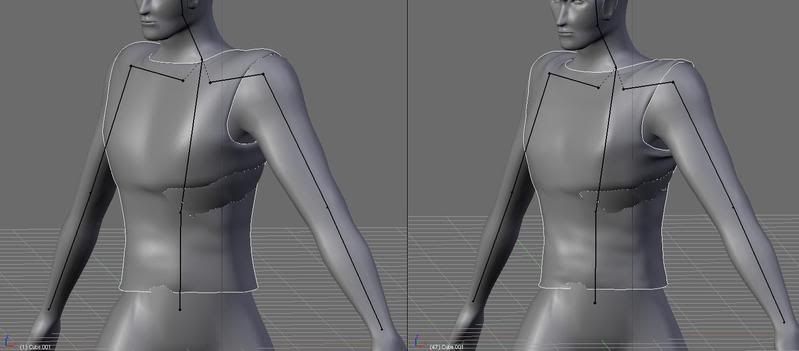
As long as I dont move the figure, the bake works pretty well. Issues begin to arise when I go into pose mode and start moving the armature. The shirt tears and passes through a variety of points of the figure, and, obviously, the resulting bake has a bunch of holes in it.
pic on the left is before cloth simulation, the one on the right is after
I tried to use the Bake Editing to edit the shirt mesh, but going into edit mode resets the shirt mesh to its start position, before its affected by the armature, making any editing pointless.
Now, Im a total n00b at this, but I’ve lost 2 nights of sleep trying to figure this out so far, and, from the looks of it, Im going to lose a third. If anyone can help me out here, I’d greatly appreciate it.
Here’s a Blend that illustrates what I believe is the best way to use the cloh modifier.
You’ll need to save it locally and bake the shirt object of course. (it should only take a second a frame or so to bake)
Points to note.
The shirt object is a seperate object from the body. EDIT ( and both objects have sane scale values)
ONLY the body is driven by the armature
The shirt is on the SAME layer as the body
The shirt is Parented to a bone of the armature (the one in the neck area)
There is NO SUBSURF on either the shirt or the body (it should be applied AFTER getting a good cloth bake)
The shirt has been carefully made to NOT intersect the body at ANY point. (with no subsurf applied)
The shirt has a vertex group around the neck area that is pinned at a VERY low value.
There is a 20 frame “hold” to the animation allowing the shirt to settle into position before the body moves.
ONLY the armature has keys applied for animation, the body and shirt have NO rotations or translations applied.
Final note… cloth simulations are not easy, expect to loose more sleep. For the model you are working with I’m not sure it will really be worth the effort. “Cheating” it would probably save you a huge amount of time.
I can add a few points. I would definately reconsider the suggestion to not use subsurf on the body. In my experience a good cloth simulation requires a nice smooth collision object. One of the problems that can occur is the uneven surface of the collision object can pass through the cloth object. Make sure and set the collision modifier after the subsurf modifier in the stack. This technique will allow the cloth to form smoothly over the contours of the body and look rather realistic.
For the cloth object, I would also like to modify the suggestion about not using the subsurf modifier. I actually agree to a degree. But the modification comes in the fact that the mesh density of the cloth object is a primary factor that gives you the effect you are looking for. For something like a thin shirt with many wrinkles, a high density mesh simulated is the only way to achieve this effect with the modifier. So your cloth object has to be subdivided. An easy way to test how much you want it subdivided is to use the subsurf modifier (below the cloth modifier) and try different levels of subdivision durring the simulation. When you find a level that works you can apply that modifier and then bake the simulation. In theory you should also be able to bake the simulation even without applying the subsurf modifier. This is something I am going to test again soon, but you can test it on your own in the mean time. It is imortant to understand simply that applying a subsurf modifier after the simulation will not affect the cloth modifier. What it will affect is the mesh that has been modified to make it smoother. And I do recomend doing that after the simulation as a method to have a nice smooth render without errors in the cloth object.
In general a real good thing to make a habit of is to not bother with cloth while you are animating. These should be two different functions. Cloth should be added after you are finished with the animation. If you then have problems with the cloth because the animation does not work well with the cloth then you can go back and modify it. But in general save cloth or last and animate your character’s body only. You can even then break up parts of the clothing such as shirt and pants and do those in separate passes.
And finally, remember that you can also plan what clothes show and need to be simulated on a shot by shot basis. Not every shot has to have cloth on the full body. Planning what you need to show in each shot will save time and allow you to concentrate on getting a good effect for each shot.
Having no subsurf is the MOST importent part of getting a fast clean simulation. done this way you get clean collisions and bake times of around 1sec per frame. In ALL of my tests including dresses, pants and now shirts using movements as rapid as “break dancing” it was only the non subsurfed tests that worked well.
If you do as you suggest and put the subsurf mod below the cloth mod, it’s NOT being used in the bake. so two things will happen.
If the two meshes happen to intersect without subsurf applied, and the user does not see this due to the subsurf making it look like there are no intersections, the mesh will have collision errors.
The subsurf will increase the time needed to do the bake, while providing nothing in return.
I understand why one would use a subsurf above the collision for a specialized “cloth on high detail” still, but this approch was to deal with the realities of Animated cloth where the large amount of bake time is not workable.
Here’s a few more videos from my tests using the above approch.
Just for clarification, when you say no subsurf, do you mean apply whatever subsurf you are using, or not use any subsurf at all? I am interested because you said that you are getting 1 sec. per frame when baking. I have a system running an Intel Core i7 920 and I’m getting significantly slower bake times so…
Also, how would I go about “cheating” it if this doesnt end up panning out?
I have subsurf completly removed while doing the simulation. The idea that the mesh has to be hi-resolution for proper collision (as with some other cloth simulation systems) seems to not be the case with Blenders setup. According to the developer it’s the “quality” setting that makes the difference, NOT the mesh resolution.
I’am not saying that you cannot subsurf your model, instead remove the modifier while doing the cloth baking, then once the cloth is baked add it back to the model(s) Theoreticaly you can just have the subsurf modifier under the cloth modifier, but in my testing I have found things to work MUCH simpler with it removed from all the objects involved.
For that horrible little shirt test I posted, I did it exactly that way. And what I posted is NOT the result of lots of fiddiling around, it took very little time to set up and test. And as you can see the model and shirt ARE subsurfed in the final render.
Also there may be cases where the underlying model IS too lowres for valid collision detection. In that case yes I would either apply the subsurf or have it ABOVE the collision modifier in the stack.
Check your baking time with the Blend I posted, I’ll bet it’ll be pretty quick. ASMOF please let me know how fast it does bake.
As for “cheating” in the case of the shirt you have, I doubt that anyone would see more then some bunching of the cloth here and there as the charactor moves. You could accomplish this with shape keys or animated displacment/normal maps and/or probably several other ways as well. You might need to have “helper” bones or use the MeshDeform modifier, but that’s pretty easy to set up in comparison to getting the details of a cloth bake nailed down.
I see. I’ll let you know how fast your file bakes when I get back home, right now Im on a crappy laptop so it was taking about 5-10 seconds to render per frame…
MeshDeform and the other options you mentioned probably are easier, but now that I’ve started Im too stubborn to stop until I figure it out. I’ll check out the other options as well, and update this thread once I have some working results.
Here’s the result of subsurf above the collision modifier on the body and subsurf below the cloth modifier on the dress. Dress is pretty high poly to begin with so has a lot of contact points before applying subsurf.
Baking time was reasonable, IIRC it took about as long to bake as to render out the animation.
Dress flops around a bit too much but I think that’s because I have it set on silk.
Lost another night of sleep figuring this out, but, luckily, this time it was worth the trouble. Its a little flow-ey for a cotten shirt, but damn if that isnt an over 9000 improvement. Huge thanks to you guys for the advice, it worked like a charm!
Oh OK. Looking at your examples Pappy I see what you mean. Yes I am aware of this. I was referencing getting feature film quality cloth effects which is another thing. For that you will need resolution and the points I have laid out.
This reference is regarding collision but it sums up the concept of what quality settings do:
A second method is to increase the “Quality” (in the first panel). This results in smaler steps for the simulator and therefore to a higher propability that fast moving collisions get catched. You can also increase the “Collision quality” to perform more iterations to get collisions solved
The bottom line here is that the resolution of the cloth object is key. Quaity settings refer to the probability. Resolution of the cloth object is the key to the properties of the cloth. Cloth is a displacement modifier. It works on the vertex level. One way this is proven out is that if you change the level of the subsurf it will force you to run the calculation again. This is because the cloth modifer is moving points. When the number of points change the calculation changes. If you add a subsurf modifier after the cloth simulation you are not changing the points of the cloth simulation. Fine wrinkles and folds are not created or affected after the cloth modifier. The cloth modifier works on the underlying mesh much in the same way as a multires object. Think of the cloth modifier as a brush you are painting into the mesh. You can only work on the higher resolution mesh to get fine detail and it works from the top down. Adding a subsurf (or smooth) modifier after the cloth will smooth out what has already been simulated rather than allow you to add more detail.
Again this is borne out of extenisive testing.
And having said this. I only use the subsurf as a tool to test my cloth. When I am happy with the resolution. I freeze it and then calculate that. The reason is I can then save out the vertex animation for later use in another scene. When you save out a vertex animation it only saves out the underlying mesh. So if there is a modifier such as the subsurf it won’t save those points as moved by the cloth, only the underlying points of the model.
Collition object. For feature quality special effects, again the resolution and the smoothness of the collition object is key. It does not have to be higher resolution than what you want to show. But it should be smooth. If you are getting collision errors there are likely other reasons than the subsurf modifier because this is how it is designed to work - and it does.
Here is the manual reference on the stack:
Mesh Object Modifier Stack
Collision stack
The object’s shape deforms the cloth, so the cloth simulation must know the “true” shape of that mesh object at that frame. This true shape is the basis shape as modified by shape keys or armatures. Therefore, the Collision modifier must be after any of those. The image to the right shows the Modifiers panel for the Character mesh object (not the cloth object).
Notice in the above example that the Subsurf is set before the collision modifier. The cloth detection works on the smoothed surface of the collision object. This is what you want for nice effects of the cloth falling over the contours of the body.
And yes it takes time. But the results are worth it. For cartoon stuff you can probably find other ways to work to get faster results. But for more realistic results you have to be willing to take the hit of time.
Cloth simulation is a major portion of your production workflow.
And finally, it is key to undestand that cloth simulation is just as important to the quality of your production as rendering is. Both take time to get nice effects. You can always come up with workarounds that suffer in quality so it is a balance.
There is simply no such thing as getting great cloth effects without taking the render hit. So plan cloth time into your production just as you would animation and rendering. It takes time to get great results.
This example here was done in LightWave. Unfortunately Lightwave cloth self-collision sucks and I had to play with too many settings to overcome it. But the basic priciples apply. I took this animation into Blender and worked with it to do a side by side comparison on the cloth. I can dig that up later perhaps but for now here is the LightWave version. Not as much detail as I am able to get in Blender but it shows proof of concepts I am talking about.
It should be noted than in this example the subsurf modifier is on the collision object. The Cloth objects are high density quads and after the simulation a suibsurf modifer is added to smooth out render smoothing errors. (I used the same workflow in Blender to great sucess)
Oh OK. Looking at your examples Pappy I see what you mean. Yes I am aware of this. I was referencing getting feature film quality cloth effects which is another thing. For that you will need resolution and the points I have laid out.
Feature film quality cloth effects are probably unrealistic for most Blender users, I know they are for me! None of my clients are going to pay for that level, so I don’t even think about it, there’s way to many other aspects of animation that take precedence.
A second method is to increase the "Quality" (in the first panel). This results in smaler steps for the simulator and therefore to a higher propability that fast moving collisions get catched. You can also increase the "Collision quality" to perform more iterations to get collisions solved
Your refrencing “Troubleshooting” here, as in dealing with cases where the collisions don’t work. This is not relevent when collisions are NOT a problem, which is the case when using the “low density” solution - try it, you might be surprised by how well it works. Did you see my “break dance in a dress” test? I mean if THAT didn’t have collision issues what will? (If I remember right, I used a value of 4 for collisions there)
The object’s shape deforms the cloth, so the cloth simulation must know the “true” shape of that mesh object at that frame. This true shape is the basis shape as modified by shape keys or armatures. Therefore, the Collision modifier must be after any of those. The image to the right shows the Modifiers panel for the Character mesh object (not the cloth object).
This is absolutly correct. Except that you are assuming that the “true” shape of the object is it’s SUBSURFED shape. I don’t, I look at the subsurf as a “beauty” level for this case. I mentioned before that IF the body object is very low density, you will NEED the subsurf above the collision so the cloth will have an accurate surface to collide with, and that IS the case. (as you’ve been pointing out) But in most cases of cloth body interaction, there will be no need for this to be done. (and why would you if it slows the bake way down?)
Again, I will mention that having the subsurf on the model will “fool” you into believing that the two objects have no intersections, this is VERY important… IF there is even a single intersection in the non subsurfed meshes you WILL have collision problems. There must be a gap between them that is at least the size of the difference between the cloth collision distance value and the minimum body collision gap. I find a quick way to achive this is with the sculpting tools.
Oh, one more VIT (very important thing) collisions are calculated with gap values based on Blender units. Make sure your objects are on a sane scale (a good system is for 1 Blender unit to be 1 foot, or 1 meter… something reasonable) And again be SURE that scale and rotation are applied.
I’ve been following Daniel Genrich’s development of cloth almost from the begining, it was from his statements during cloth development that I developed this process. The tests have generaly proven this out.
I would like to see more interest in the other components of the cloth system, everyone talks about collision problems, but as far as I can tell they work fine. Whereas the entire “edit bake” system might as well not exist. I’d love to have someone show me how to realisticly make use of it.
I thought I made a point to mention that that reference was in regard to collisions and only an illustration of what resolution handles in general. This also applies to what the resolution setting in the cloth panel handles - probability. Again, high density mesh equals better quality cloth effects. Sorry if I was not clear on making that point.
I did not assume anything about what most Blender users are going to do. But I would say that most Blender users see examples such as what I have referenced and try to aspire to that level and are then frustrated when it does not go so easy. So at that point you have two choices. Go for a quick dirty lesser-quality solution. Or understand that cloth works on a vertex level and give it what it needs to produce the effects you need and take the time to get it right. Understanding how it works is a great help in that direction and saves time in endless experimentation.
For those artists interested in better quality there is no reason not to explore those solutions. (or on the other hand as I have already pointed out for cartoons and some projects low density solution is most adequate)
In the end do what you need to get the job you are working on done. There is no silver bullet.
Your assumption about subsurf “fooling” the collision is certainly based on your tests at your level of quality. On my tests at the quality I shoot for it is not a problem and in fact is part of the solution.
It seems as if these two way to go produce separate problems and solutions. That is interesting.
Great that you got some help, regardless of what method or direction you used.
Something I completely forgot to add and is an important part of this actually. That is the fact that one of my very important findings was that collision problems pretty much vanish with a high density cloth mesh. The reason for this is because the cloth cannot fold around something if the distance of the edges from point to point on the cloth object are too long. This creates an area in the cloth object that can pass though a curve in the collision object. To simplify think of a box around a sphere. Unless the box is always larger than the sphere there will be no pass through. But if you were to try and wrap the edges of the box around the sphere, it would eventually pass through because the box has a flat plane that passes through the curve of the sphere. There would be no physical way to accomplish this.
Now you take this over-simplified example and you apply it to a more complex collision object such as a body and you have a cloth object that is only very lightly subdivided you multiply the opportunities for the body to pass through parts of the cloth. This is just again quite simple logic.
Now you may be in a situation where you want to have a low density cloth object. At that point your problems are increased and you may have to jump though other hoops. But you can do it. The cloth modifier if very well programed. It is just that you will be in this case limited to the effects you can create.
There is a flag example at the bottom of this page:
Download it and look at the modifier stack. The Subsurf is located below the cloth in the stack. Select the flag object and go into edit mode. You will see that the flag is well subdivided. So even without the subsurf you have a decent series of folds. But with the subsurf modifier you can see that it is much more defined. This is the primary method of controlling your cloth effect. Through the density of the cloth.
It is also how you get predictable collisions with something like a body. When I run my cloth simulations with this method I have very few if any collision probrlems. But again, I am going for a more realistic effect of cloth. Not easy to achieve, but the cloth modifier is designed to be used in this way and it works best and most predictibly when used how it was designed. (in my opinion of course)
The dancing dress example I have already mentioned and referenced again here in the above link was presented by Daniel Genrich who wrote the cloth plugin. Study that example for the level of quality that the cloth modifier was designed to be used for.
Obviously you can use it for many things and in many more ways than this and with other methods as Pappy has well documented above. But if you want realistic cloth with detailed folds and to have the cloth wrap around the body such as it does in the Daniel Genrich example, it takes time. You have to work that into your production time estimates just as you would with rendering. I just wanted to mention this little bit about the collision factor.
So I started the pants, but I’m having the same issues that I was having with the shirt, just to a greater degree. I’ve been working on this for a few days, messing with settings, even remodeling the pants themselves a few times now, but no luck.
I’ll post the blend file, cuz I’m just totally out of ideas at this point. Im considering either just having the clothes be part of the mesh, or just go back to 2D characters for my project.
Needless to say, any advice you have would be appreciated.
just my .02, Subsurf as a modifer changes the topology of a mesh. If you apply the suburf modifier, you make those changes permanent and the subsurf modifer goes away, and you are left with a mesh that 2x the number of verts.
If you use subsurf as a modifer to the mesh to make it more high-poly, apply the modifier to the body mesh before baking the cloth sim. You will then have the condition where you dont 9at that time of baking) have a subsurf modifer.
Subsurf can change the shape of the mesh, which throws off where the cloth actually comes in contact to the body. If you subsurf the cloth, since subsurf tends to smooth out in-between verts, applying the modifer after baking can also be disasterous, so if you don’t think your cloth is fine enough (high enough resolution), apply the subsurf to double the resolution (or apply a multires), and then bake the finer mesh.
the reason you shred your pants at frame 10 is because, like the Hulk, the cloth can not simply be that tight AND bend that much. Try it in real life, and you will see that you cannot simply bend that much with skin-tight jeans.
Here’s your setup modified to the way I’ve been suggesting. Bake the cloth and check it out.
Some of the basic changes,
A. Scaled EVERYTHING down to a more realistic value. And applied scale/rotation
B. Removed IPO’s that were driving location and scale on the armature etc.
C. Edited action to give 10 frames to settle before leg raises.
D. Edited action to reduce mesh intersections in the underlying body that were trapping the cloth.
E. Removed collision from the pants object.
F. Removed existing weight paint and applied armature to object using heat.
G. Reduced pant and body geometry, except where needed.
H. Changed “pin” area
If your trying for Pixar quality, super high resolution, extra wrinkily super cloth… please feel free to ignore this.
Nah I’m just trying to make it work. Too lazy to go for super detail like that.
Based on your post, I dunno if I should be messing with cloth at all at this point, a few of the changes you mentioned went right over my head xD, namely B, F and G.
For B, I dont even know what IPO is, so I dunno how I even got involved with it xD (I feel so dumb haha)
And F, again, not exactly sure how this works. I went to unhide my armature, but I can’t seem to unhid it. Is it gone, did you apply it to the mesh itself? Is that possible? If so, how would you animate? How much of a n00b do I sound like right now?
G sounds awesome overall, reducing geometry just seems efficent even out of context. How do you go about doing that?
D I understand, I guess I’m just curious as to how exactly you went about doing it, as I figured, based on how the pants were tearing around the joint areas, that was an issue, just wasn’t sure how to go about fixing it.
Another thing, is that, despite using the denim setting, my pants moved like silk. Your settings are working infinitely better. Again, dunno why that is.
Well, I’m off to make head and tails outta this and attempt to replicate it myself…


")

