I’ve featured you on BlenderNation, enjoy ![]()
1 Like
Only parts of the tutorial i dislike so far is the parts where you speed up the video, i have to pause it at those parts to catch up 
But don’t we all pause the video? I usually watch 30 seconds to a minute, pause then replicate what was done in the video. Kudos to anyone that can work at the same time as the video is playing. I guess 2 screens helps.
1 Like
I always jump On anything chris puts out there you have awesome renders , you followed to a tee , because there is that shading on the rear quarter panel where over the wheel it looks like it lifts up , I use the techniques from the course to a truck , I will do the vette next week Can’t wait !
Awesome renders you got thanks for sharing !
1 Like
Thanks for the comments guys!
@bartv Thanks again!
@GrimZA Ah this is pretty infrequent but when there’s a part that I literally do the same operation 10+ times in a row I’ll timelapse it since there’s really nothing new to add there.
@Artie61 Thanks man! Hope you like it =)
1 Like
Great work !!!
1 Like
Fantastic!
1 Like
(my first post) I just wanted to put my 2 cents in for Chris’ courses, he’s an awesome instructor. He has the perfect voice for teaching, very thorough and the logic of his approach to model making is phenomenal. I’m doing the Jeep Wrangler course presently. - Rich
this topo looks so beautiful i want to have a baby with it
Thanks guys!
@rgarber Thanks man I appreciate the compliments and glad you’re liking my training. Hope your Jeep’s coming out awesome =)
@3dfan haha thank you 
Section 2 - Chapter 12 - Front Fender Finish. 13 minutes 49 seconds. If anyone else has trouble snapping the selection on to the guide mesh you’re probably like me and didn’t have Project Individual Elements On The Surface Of Other Objects enabled. Screen grab below.
I was scratching my head trying to figure out what was wrong and went back and replayed the video a few times until I noticed this options was enabled. Also if you’re like me and coming from another 3D app I didn’t know what the Ctrl key did after pressing the G key did. This just enables snapping while the key is held down when using the Grab tool. Also be careful not to move your mouse otherwise the selection will move around.
Really enjoying the course so far.

This is perfect!
1 Like
@3DKiwi Oh yeah, I try to remember to mention that extra option in case someone turned it off after we used it previously. Looks like I forgot a reminder there whoops, thanks for letting people know.
Wow that looks insanely well done. I’ve seen some good vehicle models but that one is truly photorealistic.
1 Like

I’ve hopped on this tutorial too, midway through making the hood with cutouts etc (ie projecting onto the guide mesh) and I’ve learnt a lot so far. Hoping to use the techniques to improve/detail a cadillac model I have that is lacking in a few areas, and then put it to the test and model a ferrari 308 :o
I’m having a bit of a weird problem - I’m midway through Section 2 - Chapter 6 - Hood Finish, just after we’ve duplicated the hood and reshaped the bevel at about 20:14, by the time I get to deleting some edge loop a bit further on it seem like I’ve got more edge loops than you. I’ve the copied mesh and started afresh a couple of times now, but always seem to end up the same way. It probably doesn’t matter, but still, I can’t figure out how I’ve ended with extra loops…
corvette_3_Too_many_Edges.blend (1.2 MB)
(Original is hidden, as per tutorial)
@3DKiwi That looks fantastic nice work. Looks like your up to the headlights? Tough stuff but so satisfying in the end. Good luck with the rest of the course, looks like it going to come out great.
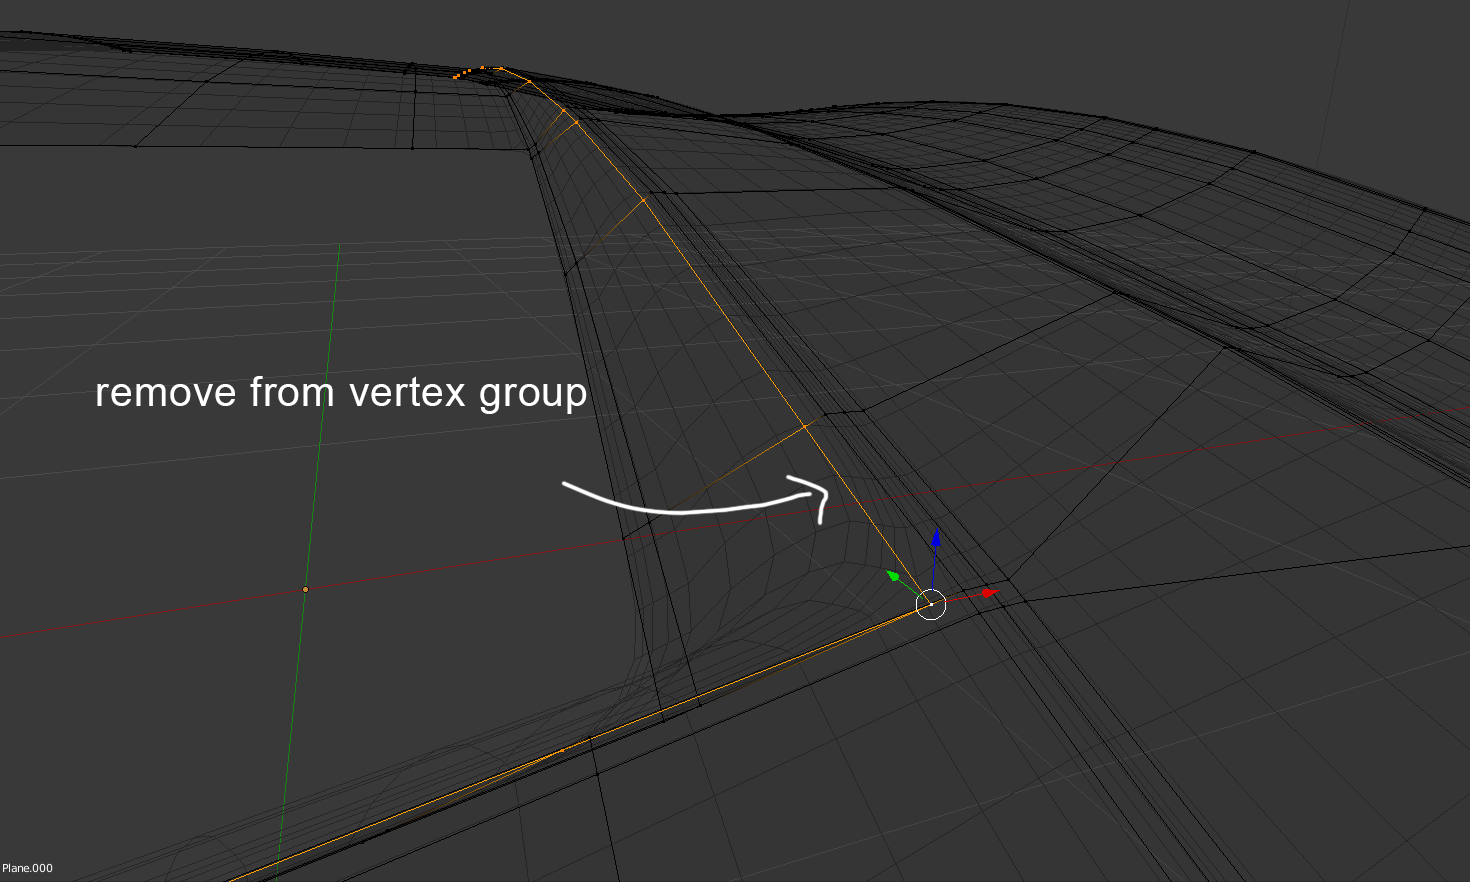
@Tedri_Mark Ah! I think I found the issue. Check out the original hood that didn’t have subsurf applied yet. Go to the vertex group buttons and click on “Select” to show all the vertices in that vertex group that are being shrinkwrapped. You can see that the inner container loop of the bevel is in that group so it’s being shrinkwrapped. This is pulling some bevel geometry to the surface, giving the surface some excess edge loops after you apply subsurf. The solution is just to select that container loop for the bevel and remove it from the vertex group, then you can re-do the instructions about applying subsurf then optimizing by deleting edge some loops. Picture of the trouble maker:
1 Like
Thumbs up!
1 Like
Yeah that was it! Many thanks, back on track…
…but then a new problem…
***** EDIT: This seems to be just something that happens with sallow viewing angles, my mesh seems to be behaving like yours when viewed from more top down. Can you confirm? *****
, I’m at the point at about 24 mins, where the low poly mesh has had its shrink wrap modifier assigned to the Hood-Guide mesh, and I’m about to add in the edge look at the top of the cutout, but as you can see, the shrinkwrap modifier means the surface obscures the vertices/lines. This isn’t an issue in itself really, but I’m just concerned that it’s not behaving the same as in the tutorial…
