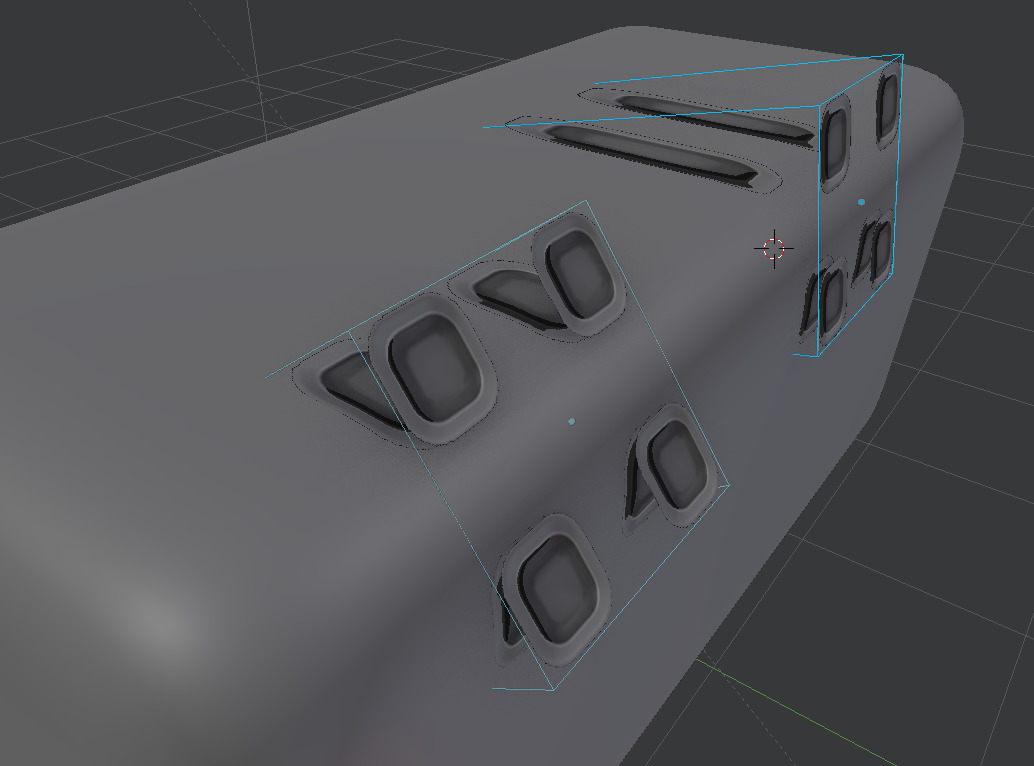
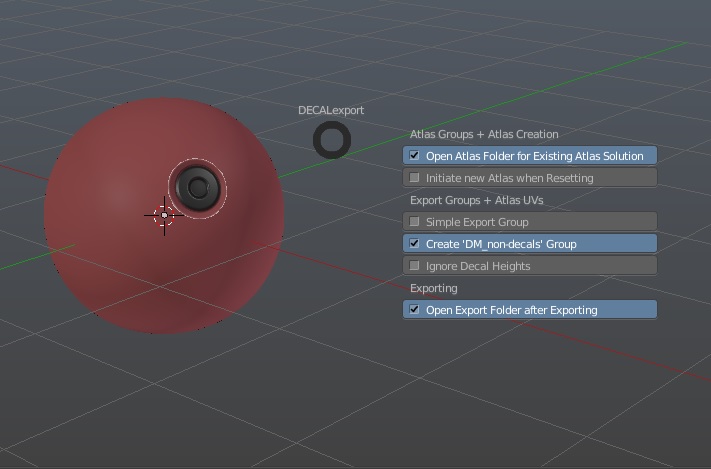
The decal projecting is happening based on the z axis of the planar decal. If you have a huge decal and project it on a relatively small radius you will have distortion. In your particular case you seem to have your decal aligned more with the vertical surface of the cube, hence the extreme amount of distortion on the top surface.
You can minimize this distortion just by aligning your decal better before you project. Activate the move tool and hold down the control key to snap it on the surface as mentioned in the documentation at https://machin3.io/DECALmachine/docs/basics/#asset-loaders
Notice the difference the angle makes, to the amount of distortion:
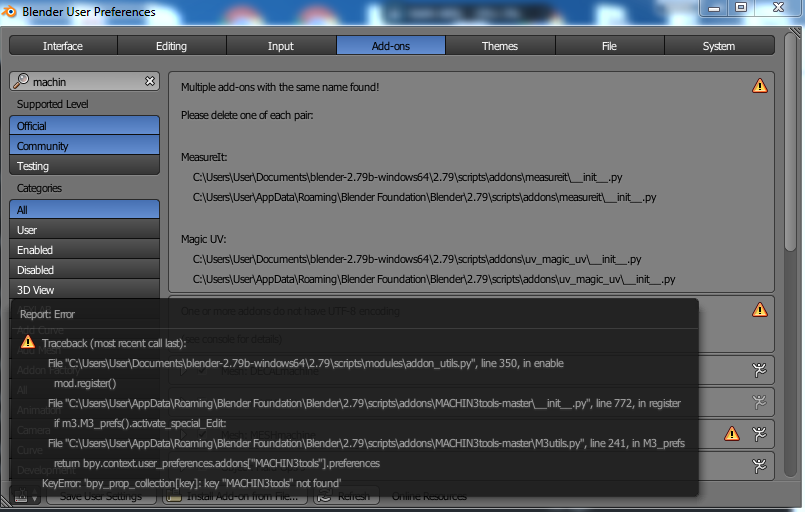
I am not able to install. I followed closely your video. I have the DECALmachine_v1.4.2a in the addons folder. I extracted the PILwin64.zip and “cut” the PIL and "pasted it to the modules folder (that I created).
I opened Blender and went to preference/addons and typed in “decal” and nothing came up.
What did I do wrong? It shows up when I try to “install from folder” but when I go to put a checkmark in the box it brings up an error message.
New development. After I sent you the email I went back into Blender. In preferences, it still did not show anything when I typed in DECALmachine. Then I went down and did the install Addon from File and installed the full DECALmachine v1.4.2a.zip file from my original download from Gumroad and this time it put it in and I was able to check it. So now it must be working but I have not tried it yet or learned how to use it…but at least it appears to have installed. I have no time now to try it but will later tonight and will get back here to say it works or it doesn’t. Thanks
In your previous attempt, you have put a DECALMachine_142a folder in your blender addons directory. I’m not sure if that’s just how you extracted DM, or if you have renamed the included DECALmachine folder to this.
In any case, the DM folder needs to be called just DECALMachine to ensure seamless integration with with other addons(such as my MACHIN3tools addon collection).
I’m not familiar with the internals of ‘installtion from file’, but it looks like it puts the contents of the supplied zip file into the addons folder. You’ll likely have som redundant files in there now as well, such as the zipped PILs for various operating systems and the installation guide md and html files, which you can delete.
Yes thanks MACHIN3 it did recreate a file but it renamed it properly to just DECALmachine without the version. so i deleted the other one with the version on it. If i find a problem then I will Remove the addon and re-install and make sure that the version number is not on the folder name in the scripts file.
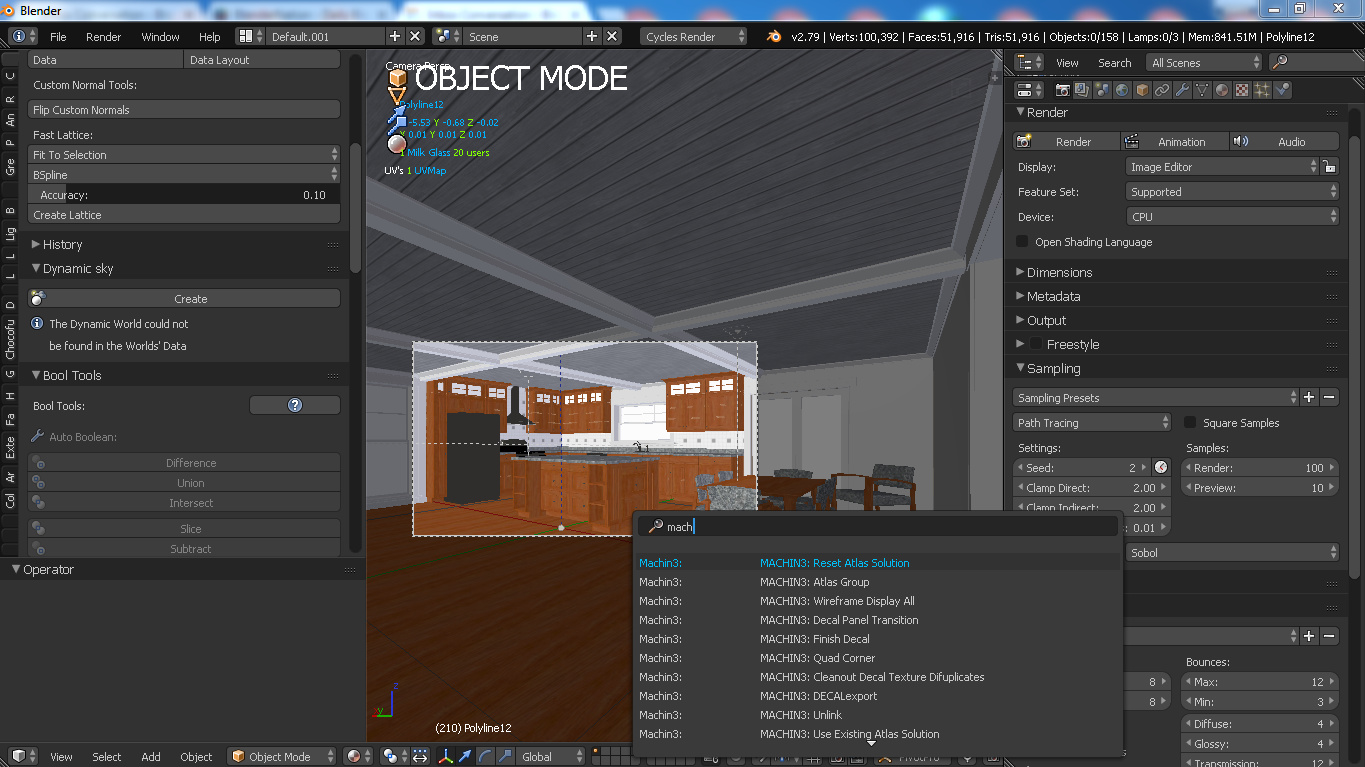
I do not seem to get the pie menu showing the decal thumbnails when I click D with my object selected and in object mode. At first, I thought I was doing something wrong so I removed the addon and then reinstalled, again having the same problems I had initially with it not showing up after putting the folders into the addons and modules folders as explained. I again had to also “install from file” before it would appear in preferences/addons. Oh well.
So maybe what I am going to show here will simply reinforce that something is wrong with my installation.
The screen grab shows the pie menu I get when I have my object selected and am in object mode and I hit the “D” key. I do not get the pie chart with the thumbnails appearing.
What am I doing wrong? I feel like a complete klutz. I have never had such problems with any addon I have installed in the past…but this one is killing me.
First idea, Decal Project by only selecting the Decal and not have to select the target Object.
So you just select the decal, then go Decal Project and it finds the object automatically by ray casting/searching down it’s -Z local axis and returns the object. It would be a tiny time saver not to have to select the object itself, most of the times you do place the decal with Snap > Face on so it’s right there above the target Object face mesh.
Second idea, add Adjust Decal Height checkbox at Decal Project pie menu.
So, quite often you have to adjust the decal once it’s projected. It’s not that huge deal to go D_key + A_key to get into the decal height adjustment, but I think if possible. It would be neat to have a checkbox for calling Adjust Decal Height directly after the projection is done.
Just some ideas, keep developing the add-on it’s insanely fast and great.
Still have to check out the new atlas feature, and looking forward to the “Library” feature.
Suggestions and usage questions are fine, that’s what the thread is for, I just don’t think support issues need to be here
I’ll look into how to do raycasts. I can see how this would remove a small amount of friction in using DM. Thanks.
Not so sure about this one. Often I don’t have to adjust the height and would then be forced to exit out of the Adjust Decal Height tool if the checkbox is checked, or uncheck the checkbox. This can uncessarily add friction, issue as pies in blender only accept one action before the menu is closed.
Have you tried to use the Decal Height object property of the Project tool instead? It will keep its value from one projection to the next, so if you keep finding you need to add the same amount of height after projecting, setting it once(per blender session) in the object properties should do the job. I have it mapped to Mouse Button 4, where my thumb is, I think it’s at F6 by default(Redo Last). It’s also at the bottom of the T panel of course, if you have that open while working.
You could also use that property to readjust the height for each projection, instead of using the Adjust Decal Height tool. The downside of it is that it does the entire projection again, for each value change, so might be slow on heavy meshes.
Yeah, maybe there is a way to piggy back of the Snap > Faces method or something. I’ve never done ray casting from scratch just used function calls like in threejs or in unreal engine it’s super simple to ray cast and get an array with the hit objects.
Hopefully there could be something already in place in blender to use, I think this would just add a auto-magical neat function.
It is not super hard to select the target object, but when you have lots of like screws/rivets to project to the same object over and over again its tedious.
Regarding the Adjust Decal Height, yeah I forgot about the setting, been using it before. I guess you are right, it might be a feature that is more in the way. You’re right!
I don’t know if this has been mentioned before, when turning on both options of SwitchShading of The MachineTools addon, the alpha portion of the decal turns black when rendered. In the viewport all is fine however.
Turning off one option, either the compensate dark material or white border removal seems to remedy the glitch.
You can bring up the spacebar menu and run ‘Reset Material Viewport Compensation’, before doing any real rendering(using the F12 key)
The Material Vieport Compensation (and the Fix White Decal Boarders option) hooks into the Shift + Z keymap to enable you to render in the viewport. It doesn’t do that for the real rendering done using F12 or the render button in the render tab.
I need to revisit this and think of something better or remove this stuff completely.
As you’ve figured out, you can also disable Shading Switch or the ‘Material Viewport Compansation’ and ‘Fix White Decal borders’ options in the MACHIN3tools prefs.
If you want to use these features, know that for the shift + z hook to work, you need to at least switch the shading to material view (if you start in sold shading) once per session. If you look into the terminal, you’ll see feedback about this.