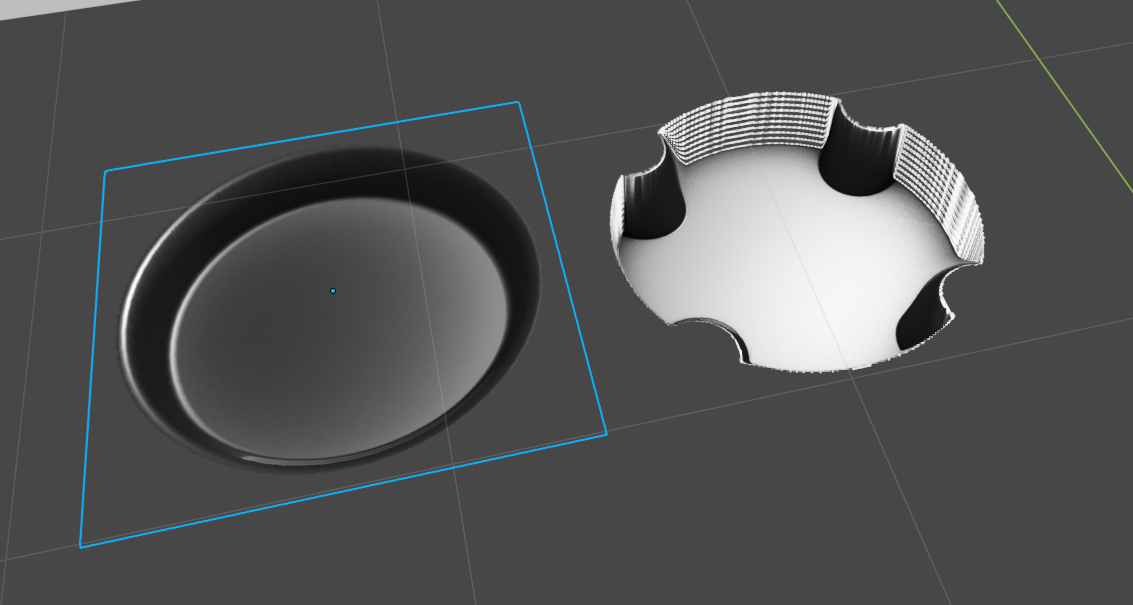
I have bought DECALMachine and I really love it. I want to create some basic decals to speed up my work but I get some problems that I can’t solve. When I create a basic circle and create decal, it works perfectly. But when I add some details to my circle mesh and create decal, it looks like flat layers stacked together. There are jagged edges between these layers. I attach my blend file and images to help you understand thoroughly my case. I hope you can help me to fix this problem.
Hello, I downloaded the receip and it says sales taxes are 0 is it correct ? are all the blender market products taxesfree or just decal machine? I need to declarate all the taxes for my freelance activities . thanks
I have bit of an issue with DECALmachine in 2.8. Every time a new decal is placed it completely messes up my snapping settings, setting them to aligned face snap, but doesn’t set them back when the decal is placed. This makes DECALmachine pretty much incompatible with using snapping tools, since manually setting the back to correct settings after every single DECALmachine use isn’t really an option
Great, thanks. Currently I am bit worried to use DECALmachine any time, because I know as soon as I do, I have to re-setup all my snapping settings.
I was wondering of it would be possible to make some “Decal Tweak” operator, which would:
Save current snap settings
Change snapping settings to planar decal snapping
Activate snap (if not active)
Activate grab tool
On release confirm grab tool
Deactivate snap
Restore saved snapping settings
All that would be mappable to a single key. So that you select your decal, hold the key, move cursor to position the decal, and release the key to confirm.
Sorry for asking so many questions today. It’s the first time I got into DECALmachine since 2.7. I have watched pretty much every video in the documentation to the end, but there are still some things that leave me confused:
I am currently trying to make a very simple door lock decal, and I’ve ran into two issues:
It appears that the decal parallax depth is constant, not automatically calculated. This causes issue if I want to work on my scenes in true scale. The door lock is just 5 x 2.5cm rectangle. Here is a screenshot of the door lock decal made at 100%,1000%,10000% scales respectively:
It appears I have to always scale up the decals to unrealistic scale just to match the right height.
After seeing all the videos, it is still unclear to me how do I actually bake decals with materials. I would like this lock to have old, spotted worn metal material, which I’ve created and applied to the material before baking, but the decal still got generic shiny default DECALmachine material. I thought that to define the material, the decal object just needs to have assigned, and it will only apply generic material to the objects with empty material slots, but that’s not the case.
Lastly, I was wondering if you have any tips on bringing this decal workflow to UE4. For quite a few reasons, it’s impractical to have decals broken to one texture set per decal, and the more common workflow is to have atlases of decals, so that multiple decals occupy one atlas. There are two ideas I have for that: Either manually grab all the decal maps from all the folder and painfully construct the atlases by hand in Photoshop, or actually join multiple meshes together to bake entire atlas at once. But the issue there is that max resolution for bake is capped at 1024, which will not be enough for an entire atlas
It works as expected right now. You can scale your decals without the parallax changing in relation.
I’m not sure why you have 3 objects with different scale, yet the all appear the same? Why are the meshes scalled as well to compensate the object scale? Just build your object at scale 1, whatever dimension that is, and adjust the parallax amount to your liking.Then add the decal to a library and be done.
You can’t. Decals are created and saved with a simple metal material. Decals can then be matched to compatible scene materials when used.
I will bring back atlasing for version 2.0, once I have the baking focused 1.9 out.
Oh, I think your issue is that the height map is normalized in the 0-1 unit(m) space. So if you try to bake a decal from a tiny piece of geometry like this, things may get weird. Try adjusting the Height/Distance value in the decal creation settings accordingly.
Or even better, always create your decals in the 0-1 space. Decal base size is just based on texture size, independet of any real world size you intend to use a decal at.
Alright, I’ve already sent you a mail with the scene, so you can double check.
As for the materials, yes, I kinda knew that DM just does neutral decals, but I was hoping for textured decals too. My use case here is a simple. I have bunch of wooden doors and I want to put decal doorlocks on them. Having just the material-less decals now means that since door wing is wooden, I would have to either cut precisely around the decal on the door geometry, and then use that cutout polygon to replace the wood material with metal material, or I would have to have two decals on top of each other, where one would be just sheet of plain worn metal, and other one would be the decal stuff with the depth. Since UE4 has some issues with decal stacking as is, I am not sure that would not fall apart at some point.
Right now, I’ve reached some sort of a compromise, where I grab the normal and packed maps from the DM addon folder, bring them to UE4 and combine them with the material I want.
I have just tested this again, and I can not reproduce the speed improvements you are seeing. In fact setting the tilesize the same as the render size is a few seconds slower for me. I’ve tested resolutions 256-2048.
So, I’m not going to enable this. I suspect it has something to do with the GPU one is using. i have a GeForce GTX 1050 with 4GB here in my XPS.