You know, technically you could have two copies of the game 
But I think, it’s a nice idea to have both.
Heh, I guess after all this you’ll have enough of hard-surface modelling for a while… but still: It would be awesome if you completed the other consoles and hand-helds together with their corresponding Zelda games… 
that would be a lot of work ![]() I know it would be really awesome to do, but I don’t really want to stay stuck in a project, I have others planned once I finish up on this one and on Dream Forgotten’s Zelda short… there are so many things I have to do, like modelling a car (looking forward to that one), organic modelling/characters, practice animation, etc…
I know it would be really awesome to do, but I don’t really want to stay stuck in a project, I have others planned once I finish up on this one and on Dream Forgotten’s Zelda short… there are so many things I have to do, like modelling a car (looking forward to that one), organic modelling/characters, practice animation, etc…
not really ![]() even though it’s sometimes a real pain trying to properly build a mesh, I really like it, I don’t know why…
even though it’s sometimes a real pain trying to properly build a mesh, I really like it, I don’t know why…
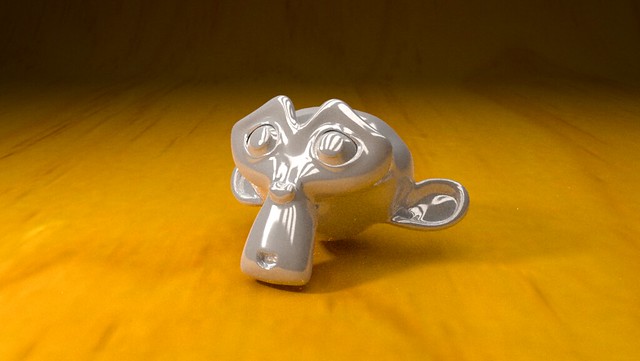
just finished the heads of the screw I’ll be using everywhere on the console pieces!
on the left is my first try, with a structure similar to those of the Magnemite; on the right is the final version, which is much nicer 
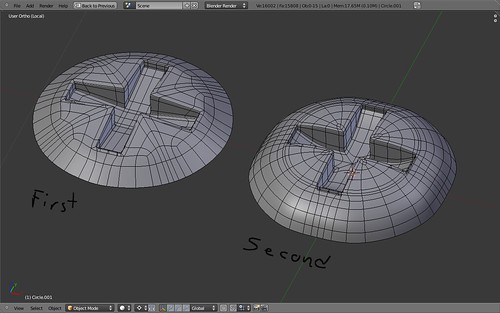
took about as long to make both, but I took a bit more time to think about the topology I needed before actually starting on the second cap, which really made a difference. I usually do a 50/50 of topology planning and topology improvisation/tweaking.
That corner on the inside of the bit-head was kinda tough though - I ended up incorporating it’s sharpening edge-loops into it’s structure instead of them being easily removable and editable.
the final one (on the right) isn’t 100% circular, but once I get to the actual thread-section I’ll fix that up
Back with a real update! (the screw heads were basically a filler to keep you all interested  haha)
haha)
A collection of WIP snapshots featuring the TV set I’m going to be using in the scene:

The back plate where all the input sockets are located - uploaded yesterday.
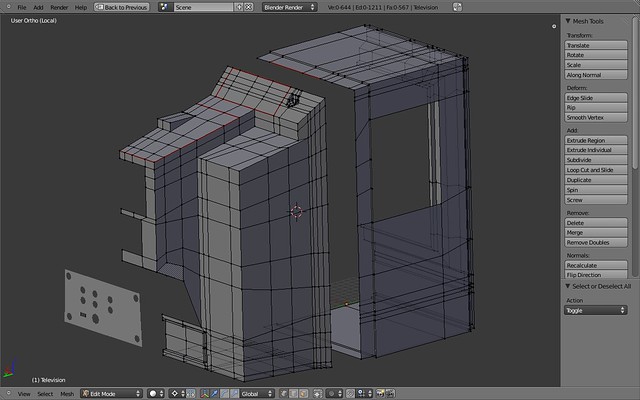
Overview of the whole mesh - also uploaded yesterday
And, last but definitely not least, the clay render of the FINISHED MESH!
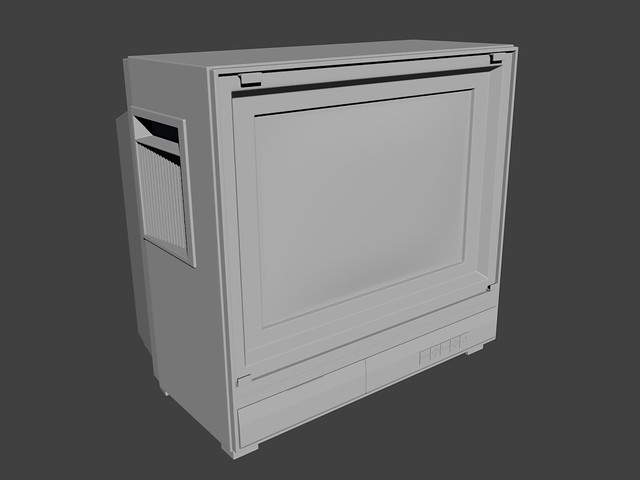
There’s a lot more to the TV, but it’s all on the back  I plan on rendering out a turntable of it sometime this week, so you’ll be able to see it in detail.
So, just one thing left to do with this TV, and that’s to set up the power cord’s controls. No modelling involved, just Modifiers.
Before starting to texture anything, I’m going to set up the scene itself and the lighting, and once that’s done I’ll create duplicate *.blend files for each object, texture them individually and “Link” them into the main file instead of Appending. Not really sure I need to do this, but it’ll be a bit of a learning exercise (Linking vs Appending).
If you go looking for these on my blog you won’t find them, haven’t posted anything there yet about these new developments. :o
P.S. I think the only reason I was able to finish the TV in one day is because I listened to Sonic the Hedgehog music the whole time “Sonic’s the name, speed’s my game!”
very solid hard surface stuff you got going Meshweaver and if you get the materials right than you could really knock this out of the park. the only crit I can give is that the cathode tube looks a bit flat for an old school t.v. what brand of tv are you modeling it reminds me of an old sharp we used to own.
nice update you’re doing really well.
@tyrant monkey - it’s heavily based on a ~20year-old 13" Emerson. I did give the screen a curved surface, it’s just that it might not be very visible on the render - maybe the lighting is too even…I’ll check a bit later :yes:
anyway, thanks a lot to both of you!
I personally see the curve of the screen, however it seems quite weak.
It could be, that reflections would show better how strong the curve is.
How did you do the curve, btw? Carefully by Hand or with the help of a Sphere you projected on or…?
the curve of the screen? it’s much easier than that, actually - it’s a subdivided plane, and I just grabbed the center vertex and moved it forward with Proportional Editing set to Sphere fall-off I probably have to tweak it some more though…better go cancel the Turntable render :yes:
Hey MeshWeaver, I had some thoughts about your (awesome) project that I figured would work better in video format-
Wow, killer response ssawer! I have to say I learned from that also, nice use for the cloth modifier. Pretty cool.
wow…thank you very much ssawyer! I’ll definitely try and rework the topology on the screws, your version was much less dense…the screws alone make my laptop slow down when displayed with the other objects, haha.
I don’t really need to use a Cloth system for the screen though, I only need to scale up the bevel along the Y-axis, I just didn’t make it strong enough the first time. all the same, it’s a pretty awesome trick, I’m going to keep it in mind for future projects :yes:
about the control pad, the edge loops on the flat area around it are actually to sharpen up the hole where the pad comes out, so even if I separated it into another object I’d still need those edge loops…however, I’m definitely going to re-examine the whole thing to see what I can improve topologically, there were some great tricks you used that I want to try out :yes:
btw, I have to ask… how did you record that video so smoothly? I see you’re using a Mac so right off the top you have an advantage there, but the program doesn’t appear to be Camstudio
Thanks Quandtum and MeshWeaver, I’m glad to hear that some of my suggestions are going to help.
I’d love to see this finished someday (personal preference - go with Mario Brothers, and call me next time you are in Utah for some retro gaming…)
I use a program called “ScreenFlow”. It helps that my screen records in its native resolution of 1440, when I export the video at 720 hd it tends to look pretty smooth.
screenflow, huh? I’ll look it up
I’m pretty far away from Utah though… like, ~4000km, lol
edit - shoot, ScreenFlow is Mac-only… 
double!
So, I just finished rebuilding the Screw, and by following your video, ssawyer, I managed to bring down the vertex count by ~240! :eek: I ended up mixing some of your own model’s topology with mine, as there were a few things I had to keep in mind - mainly the edgeloop-based Subsurf creasing.
Also, I compared the two version one next to the other, and the 745v model looks a lot better than the 984v, which is really great :yes:
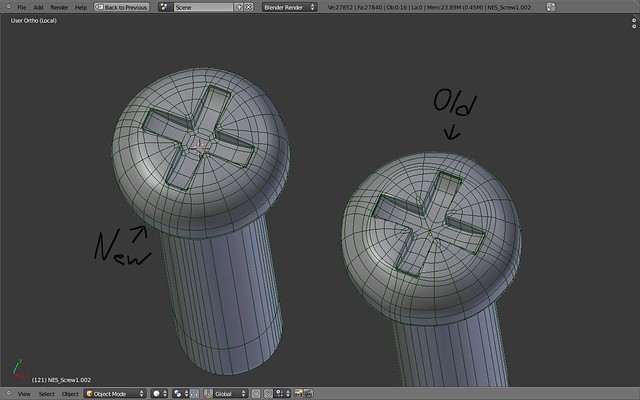
edit - at first glance there really isn’t much difference, but when you look at it more closely you’ll see that there are edgeloops in different areas and also not as many of them.
btw, Shift-Alt-S ROCKS!
ssawyer, if you don’t already do so (at least I didn’t see anything about it), you should really consider doing video tutorials. That’d be awesome
That videoresponse was really nice and you had some great ideas
MW, oh darn, you didn’t know Shift+Alt+S yet? I could have told you that but I assumed you made heavy use of it already.
There are occations where it doesn’t really perform as well as I’d hope, though. It really works well as long as you keep your selected topology flat.
+1 to that, definitely! :yes:
yeah, I noticed, I tried it on one of the wrong edgeloops… it actually went a bit nuts and the vertices kinda spread out, it was weird ![]()
The thing to note is that feature is “To Sphere”, so if you do it “2D” it will make things more circular, figure in 3D vertices (not all vertices in the same plane + 3D cursor), you get spheres. This can be useful, but if you’re not ready for it… it’s weird.
…I think I’ve found the perfect render engine for this project :yes:
I followed Jonathan Williamson’s “Intro to LuxRender” tutorial on BlenderCookie, and got this result after just one hour of rendering :eek:
I’m about to go test some of the other kinds of materials, some look absolutely awesome!
edit - actually, I’m going to work on the project a bit instead
Heh, so you’re going photoreal with this… nice