Discussion of Animation Workflow/Pipeline in Blender

Hi all, so this will be another of my epic posts (in terms of length), as such, clear the calendar, make a mug of coffee and find a comfortable reading position :stuck_out_tongue:

Mods: I’m posting this here as it covers multiple areas, from modeling to animation, simulation and rendering. I thought it best to keep it all consolidated in one place rather than spread out all over the place.

I would like to discuss the subject of an Animation Workflow/Pipeline in Blender and not just some high level flow chart (like Animatic → Layout → Animation → Render) but more the detailed process of commands, file formats, step-by-step procedure, order of modifiers in the stack and if there’s more than one way to achieve a similar outcome, along with the pros and cons of each method.

A key factor in the workflow is likely the ability to link one asset (Blender file) to another file so that any change made to an asset is automatically updated across all production files which use that asset. With that in mind, for all of the production steps below, is there only one way to link assets/production data (such as key frame animation or simulations), are there stages were even if you can link the data, there’s a good reason not too and are there any cases were it would be really nice to be able to link the data but you just can’t?

Character Model

Clearly in order to animate a character, one would usually have the model (mesh) with a full shader setup and complete rig in a single Blender file (Collection) for file linking and Library Overrides. However, I’m aware that in many studios, the actual mesh, shader setup (also called surfacing) and the animation rig are all in separate files and then combined to create the final full character file.

A couple of advantages are obvious, namely you can have different people working on each part somewhat at the same time. You can adjust the shader setup without fear of messing up the rig or it getting in the way.

But it raises the big question of HOW do you do that. Are you linking in each part or importing/appending it to a final file? How is weight painting being handled, you don’t want to have to do redo that each time or workout where it went wrong if something about the mesh file was changed? Where are corrective shape keys stored, the mesh file, the rig file, the final file and again, what happens if the mesh is ‘updated’?

Or at the end of the day, is it just better (easier) to just do it all in a single file for a small (solo) studio?

Character Simulation Animation

Following on a bit with the character workflow, lets say you have the character linked into a file with a rough layout (more on that later) and whatever else is needed to start the actual process of character animation. You then key all that animation (likely using the controls on the rig) which moves the mesh just how you want it to be, however loose objects like cloths and hair usually aren’t hand animated, they are simulated instead.

The general wisdom is that any simulation is done in a separate (new) file with the exported (baked) animation of the character and any additional objects, settings, etc that are required in order to produce the simulation.

For the most part this is usually done at a larger scale in order to allow for fine tuning of the simulation settings.

This therefore raises a few questions:

  • Best way to link/import character and scale to 5 times larger
  • How to ‘copy’ baked animation from animation file to simulation file (will it still work correctly if character is now 5 times larger)
  • Best way to export final simulation baked data and scale back down for final rendering

Are there also different things to consider depending on exactly what is being simulated for, be it cloth or hair or liquids/fire/smoke, outside of the specific settings for each simulation type?

Layout

Based on the shot list, storyboard, concept art and animatic a Rough Layout file would be put together using just enough linked assets and directly added objects, such as the camera, a ground plane, maybe some walls, etc in order to establish the basic scene for the action along with starting and end position of the camera and any characters that need to be animated.

Now while it’s only ‘Rough’, it does pretty much become the blueprint by which the rest of the production (Character Animation, Final Layout-the overall look of the background environment and the final lighting and rendering) will be based on. In fact in many ways it almost sets everything else in stone, since if you go back and change the camera position or character(s) position or add/remove a significant scene object (something that a character is looking at or worse, interacting with), then anything already done down the line is at best wrong or at worse totally broken depending on how and what has been linked back to the Rough Layout file.

So, for the Character Animation, does this mean the Rough Layout is linked mostly as ‘reference’ while the character(s) are library overrides for animation? If so, what’s the best way to ‘link as reference’ and do you even want it as a live link, in that any changes made to the Rough Layout file would be automatically updated in the character animation file?

One assumes that much the same ‘reference’ process would be used to then create the Final Layout file which will be used for lighting and rendering.

Lighting and Render Prep

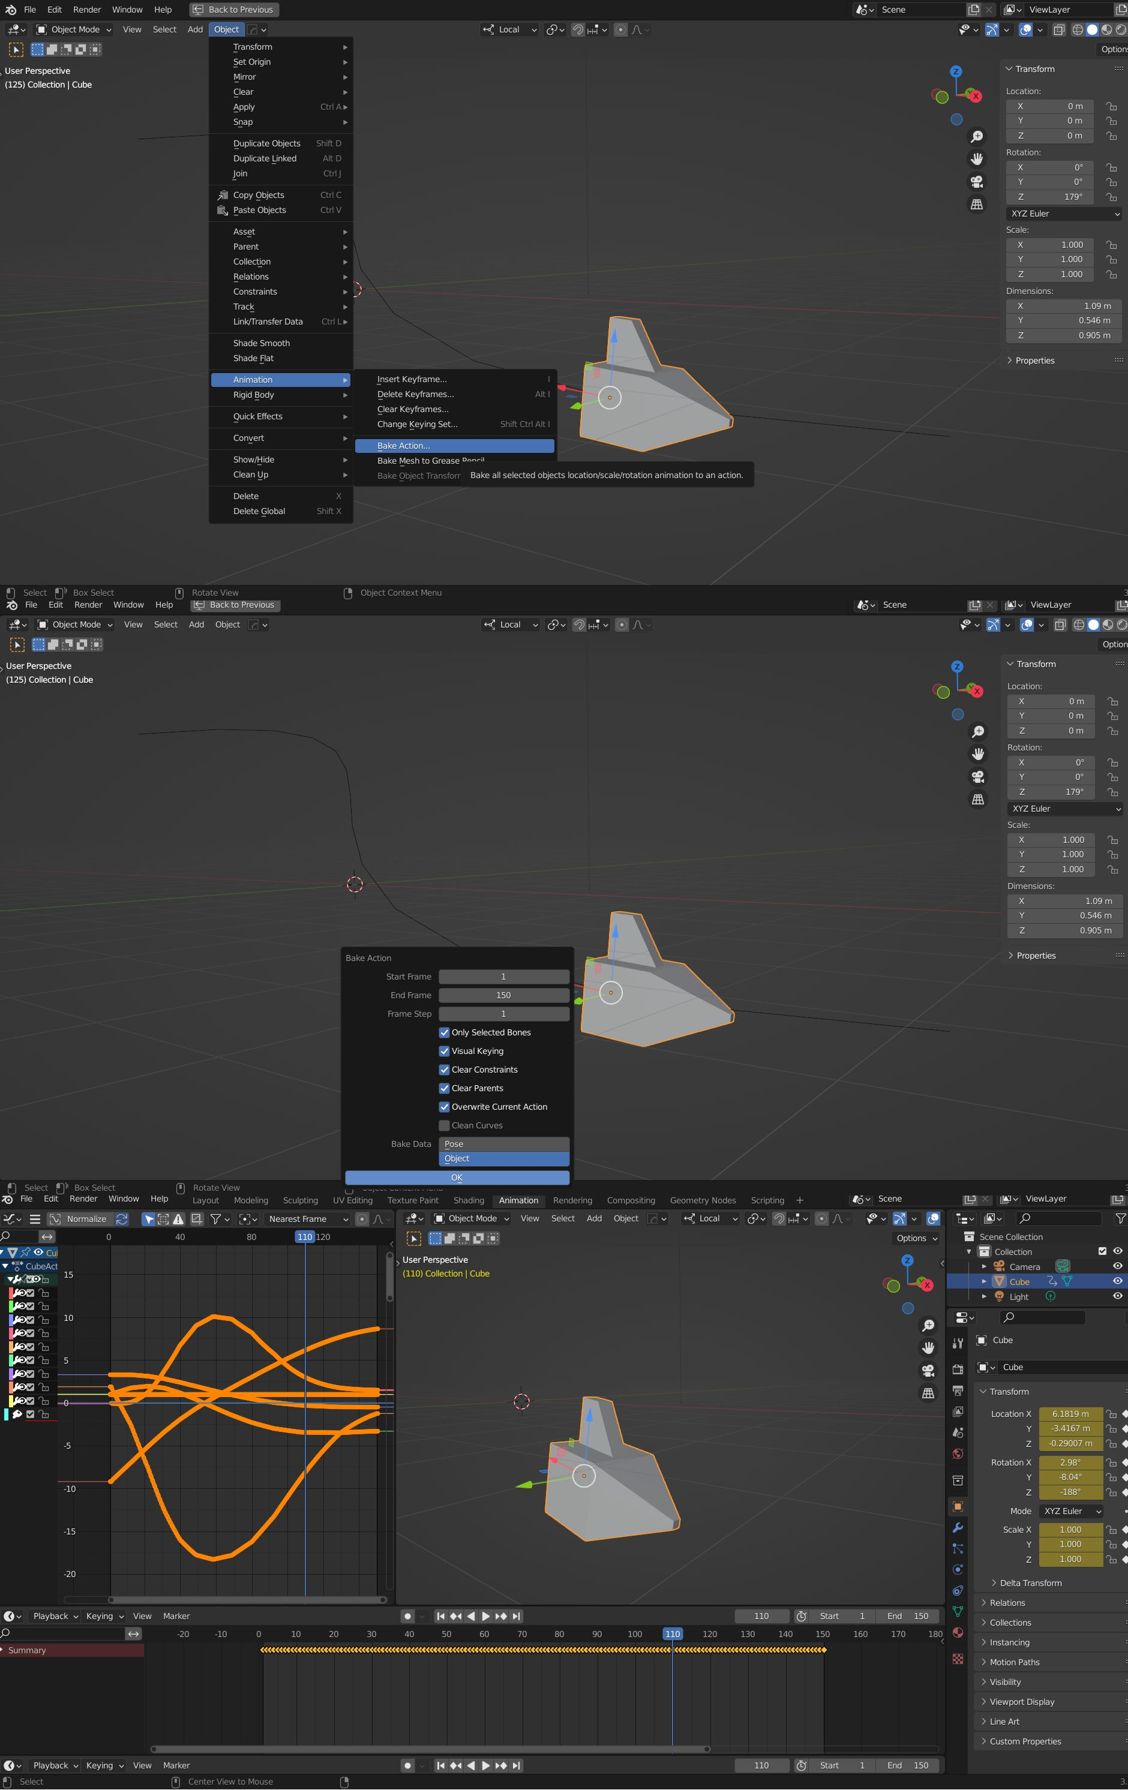
This is generally were everything gets pull together and final lighting and polish is done before then rendering out each frame. The general wisdom for the final rendering file, seems to be to make it as simple and light as possible. By that I mean they bake all of the animation, etc directly onto the base object/mesh data, removing all the complexity of rigs, key frames, interpolation, etc so there is just nothing else that can maybe go wrong during the actual render process.

If that is the case, then once again we have the question of HOW. In general you still only have each character asset, which has been mostly linked throughout the production process, so how do you now just pull out the basic mesh objects and then somehow apply the animation that has been done in Pose Mode on the various animation controls as part of the overall rig/armature and bake all that into something that I guess just moves vertices from frame to frame?

I think that’s mostly it and yes, long post, so well done and thank you if you read this far without skipping bits. I’m looking forward to any insights to any/all of the above.

1 Like

So I take it no one has any insights then or those that do are keeping it to themselves :frowning_face:

But it raises the big question of HOW do you do that. Are you linking in each part or importing/appending it to a final file?

Yes. But you also have the ability to save a file as a copy to produce variants.
Or at any step, you can make data local.
Wherever the linked object is coming from, you can still import a datablock from a variant and switch old datablock with new one.
Or in any advanced file, you can remap a link.
So, you can be very methodic or very flexible.

Most studios are probably versioning their advancement.
The keypoint is to name your work in a way that makes sense for the whole crew to know if data is coming from up-to-date library.

Weight Groups are mesh data. They have to be named according to bones names.
So, if you modify a part of mesh for a character without modifying the rig, you may just have to redo weight painting for corresponding weight groups, not for the whole character.
Weight is a data that can be inherited from surrounding vertices for some mesh editing operators. It may happen that you have nothing to redo.
There are also weight data transfer operators/modifiers that can help you to transfer weights from an old mesh copy to new mesh.

It will be more complicated if you add bones to rig.
But automatic weight painting operators can also be used to created new weight groups bone by bone, instead of the whole armature as one.
So, the problem with rig editing will rather be to be forced to modify nomenclature, to invalid weight groups or custom properties by changing names.
A rigger used to an iterative process, will already have in mind nomenclature rules to economize his time.

Shape keys are mesh data. They are stored in the mesh.
But any data can be modified through python.
It is also possible to create python files corresponding to them. So, addons can create objects with shapekeys.

Shapekeys are relative to a basis. When you edit a mesh that has shapekeys, you can edit the basis or edit a relative shapekey.
Changes made on basis are propagated to shapekeys.
Addition of new vertices/edges/faces on a shapekey are propagated to basis. But the shape of basis will stay unchanged.
If an automatic adaptation is not satisfying, there are mesh operators to propagate a change from one shapekey to another, to mix shapekeys or to transfer them.
When a mesh editing or sculpting operation can destroy shapekeys, there is a warning.

So, like for weight groups, you may encounter a range of situations that are going from no work to a lot of work. That only depends on the amplitude of modifications.

But if there was no work to do, there will be no need to employ riggers.

If you are just one man working alone, that may make no sense to accumulate a lot of files without somebody to review them.
But it will not hurt you to make several versions and be diligent about naming data.
Anyways, it is better to avoid to confuse files containing original assets and the ones containing animations.
Too much partitioning may slow you down when you are in a rush.
But no management of assets will penalize you on the long run.

That will depend on how the rig was made.
If scaling the ultimate parent/root bone is affecting all children or not.
If python scripts can handle it or not.
If you are confident, you can link mesh+armature as a collection, create library override and scale armature (ultimate parent).
If you are not, you can create an alembic file, cache of mesh animation.
When you import alembic file, you should end-up with objects that can be scaled without problem.

When simulation is baked, there should be not problem to scale down object/domain that handle the cache.
But to be safer and avoid to unbake simulation, you can re-export the result as an alembic file for meshes/hair or import vdb files of fire/smoke simulation as a volume object.

You can link a Scene and use it as a background scene.
You see it but you interact only with another objects of main scene.
You can not create library overrides in a linked scene.
But with Edit Linked Library addon, you can switch between file containing final scene and the original file of linked scene.
Don’t forget that at any state, you can create a copy of any data and make it local.
That is also possible for a linked scene.
So, if you prefer you can copy linked scene, make it local and choose copy as background scene.

As I already said about skinning, as long as naming convention are respected, that should work.
There is no magic. If animation is fine in animator file, it should be fine in file to render.
The storyboard is supposed to come, first. Animation, Environment Set have already been fixed according to camera position, a long time ago.
You don’t have to cache anything, you just have to link collections and deal with visibility of objects.
Don’t forget that lighting can be modified a lot in compositing. You can create several View Layers from same scene. And you can create an additional scene, just to obtain a useful renderlayer to mix with original render.
But if it is necessary to tweak objects, library overrides should allow you to make expected adjustments.
If it is not sufficient, you still have the ability to make data local.

That is how I would do in Blender : use library overrides, make data local or remap libraries.
Now, if you are working with a team exchanging data from/to other software ;
you will use USD files to have necessary granularity to tweak data that needs to be modified.
USD export/import is recent and a work in progress.
Older exporters/importers available are FBX, Alembic, obj. mdd, pc2, etc…
And before USD, people had to find to a satisfying way to work using those ones.

4 Likes

Thanks for that zeauro. I’ll have to sit back and think about all that info before I actually make a proper reply, just to make sure I’ve got my head around it all.

One thing that “limits” me is: I can’t draw. (My nephew can “just, doodle” and produce fine art on a paper napkin – I hate him.) :wink:

I make illustrative shorts for use in museum displays and such.

So, I use Blender to create what will very likely become the final version of a scene, using “stand-in objects” … (library-linked …) cubes and such … that are nevertheless to scale and meaningfully named. I’ll set up various also-named cameras from which to shoot the action. I use the “stamp” feature to mark these frames with various identifying information.

And then I use Workbench renders to quickly produce material which I then take over to my personal video editor of choice – Final Cut Pro.

I try not to think about it too much. My initial goal is to “just crank it out.” I want, and can get, accurate renders very quickly. I “leave a lot of plastic on the cutting-room floor.” But, I also make it a practice to “keep everything.” You never know when the idea that you discarded will become the one that you will use. I more-or-less work things out in FCP, shifting back over to Blender when a new idea hits me. Still using cubes and cones.

I really try to put a lot of time into this, because I’m really trying to work out what will become the final version: the only thing left to do is to replace the object stand-ins with real ones. You really can get very close to the final version of a project before you address object-design details, and this definitely informs you where you do and where you don’t need to lavish your attention. There’s no point in designing something that you won’t use.

I do everything with Workbench and EEVEE, because it is easily sufficient for my needs – and fast.

2 Likes

Quick note: I’m a Pipeline Technical Director at an animation, so these sort of questions are things I have to solve every day. Ask me anything!

Linking data

Generally speaking, we can split data into three parts. The data (blend files, alembic, textures, etc), metadata (some high level representation of the data… like vertex counts for meshes, or texture resolution), and entities on a database (publishes, assets, shots, users, etc).

If you publish rig in a standard pipeline, then at minimum, there will be some entries in your database that include what the publish is, what asset it is connected to, any upstream publishes that it depends on, etc. Also, if you link a rig into a shot scene file, and publish out the animation, then Blender will store that it is linking the rig, but also the anim publish may link to the scene file it was published from (generally the scene file gets published in the process), and also the rig publish that was used to generate the animation.

Usually the only data that doesn’t get tracked in the database would be work files (since they are very volatile, and not “pipeline managed”), renders (takes up a huge amount of space, and also can change frequently), and maybe fx caches (also same issue as with renders). But we try to always be able to re-create data that we don’t track.

Assets

The separation of geo/shaded/rig really depends on a few factors, such as what application you’re modelling in, animating in, and lighting in. You could have the geo/rig/shaded all part of the same asset that gets passed around to each department, or you can split it up any way you want. What I’ve seen in studios where animation and lighting are done in Maya is that the rig and shaded assets also contain the geo. When you publish a geo cache from the rig (using Alembic, USD, etc) in animation, you attach the cache to the shaded asset in lighting. But if you light in Katana, then the surfacing data is usually just the materials and how they attach to the asset (called a KLF or Katana Look File). Either way, you need to manage syncing between rigging and surfacing. That’s usually done by artists with tools that will automatically pull in the geo from wherever it needs to be pulled from and applied onto your asset.

If you are a simple studio, then it might be a good idea to keep the rig as simple as possible, and then decide if you’re going to have the rig in the lighting scene, or manage attaching the surfacing data onto the cached out Alembic/USD file.

Animation

The usual layout (also can be called camera/staging) → animation workflow is something like this:

  1. Layout creates a sequence with multiple cameras (each camera will become a shot). They animate the cameras and do a rough anim of the characters/props/etc (the only animation that is expected to be final quality is the camera animation). Then a tool goes in and breaks up the sequence into shots, and if it is sophisticated enough, it will also automatically detect if an asset is not visible inside of a shot’s camera and remove it from the scene.
  2. Animation either loads up the scene that layout produces, or creates it from assembling the animation data from layout and does their animation. They then cache out the anim curves and geo cache (Alembic or USD) for the next stage (fx, lighting, simulation, etc)

Usually animation is done without any sort of simulations run. Animators prefer being able to playback at 24 fps (or whichever frame rate the project is at), so anything that can be done to get that frame rate is done.

If you scale up a simulation for one department, then you need to scale down for another. There’s a few ways to do it, but the simplest would be for everyone to standardize their units and say “don’t change”.

FX and Simulation

Even if you’re doing FX in Blender, it is best to do the FX on a geo cache such as Alembic or USD, so that’s one less thing that could cause your simulation to go wonky. Then when you’re done, cache out the result of the simulation to Alembic or USD. The lighting tools should be able to automatically merge all of that data for you (assuming you have someone who have developed that).

Lighting

When you build a lighting pipeline, remember that your lighting team will likely always be behind, stressed, and can’t afford things to break. So, they should only work from cached data for that reason, and the reason because then you can easily send their work to your farm and have multiple machines work on it (without having to run any simulations that are not the light simulation in a renderer).

As for the actual how to do this, I haven’t experimented with this a whole lot in Blender, but if you go the cache route, you have to keep in mind that some attributes (for example, the camera FOV) will not get brought in from a cache (but last I heard, the core dev team is looking at how to do that). As long as you can attach the geo cache onto your surfacing asset, you should be good to light and render.

4 Likes

Thanks guys, just going to reply to the character/asset part at this stage since it’s the only part I’ve so far taken in and tried some simple tests to understand it and see how it could work.

I totally get what you mean by mesh data and basically how the vertex groups (weight painting) and shape keys move with it, even to the point where the object and mesh data can somewhat be separate things and you can ‘assign’ mesh data from an imported object to an existing object, make it unique, delete the imported object and you suddenly have any mesh editing, along with previous weight painting, applied to your rigged character and it all still works.

Assuming bones/naming has stayed the same, hence, yeah, naming all very important. It’s a bit of stuffing around as a manual process, but I can see how with set standards, a lot of it could be automated with scripts.

Having said that and while this extra knowledge could come in very useful as a ‘one off’ fix for various things, for a small (solo) studio, it seems to be much more work and hassle then its worth. But I at least now have a much better idea of how it would all work.

Now on to considering the other stuff.

Hi Tony20

This is such a vast amount that you have written that it is hard to know where to start.

My first question would be are you trying to set up a studio pipeline for several people to be working on concurrently or is this for a solo project ? The reason I ask is because a lot of these issues you mention are designed to coordinate studio productions where there is the need for multiple people to share and work concurrently on the same scenes and assets.

What I can say is that Blender is superb for small team animation projects and brilliant for pipelining into itself. I have a bit of a background in studio pipelines already but I have also been using Blender on small scale animation projects for quite a few years now. Most recently while working with an established gallery artist on large scale projection works and animation installations. But the extent and complexity of your pipeline also depends on how many people you need to coordinate working on it.

For these sorts of Blender projects I have been setting up what essentially is a mini studio pipeline but this can be kept quite simple as well since I am mostly the only one working on it. So the complexity of your set up will often be dependant on that. If you are working solo or in a very small team more pipeline complexity could likely be more of a bottle neck than a time saver especially if you are needing to multi task. But it’s really down to a question of the situation, the project itself and past experience.

I would suggest building up by starting simply. Create separate library link master files for character rigs and static scenes. These in turn would each have their own dedicated texture folder. So your character rig asset would have it’s own texture folder. And each room or environment set 3D asset would also have it’s own texture folder. Perhaps also you could do the same for any hero prop assets too. Basically any asset that needs some sort of a rig or animatoin save as you would a character rig.

Next set up a folder for your animation block out scenes. Then just start on the project building the pipeline as you go. So when you get to animation. Save that as animation scene files in their own dedicated folder structure. These could either be worked directly over your block out scene files or started from scratch. Both methods are viable. It depends on what seems best. As long as you work clearly and methodically and there are not too many other people working on the project then I think this would be the best way get experience. Every pipeline is going to be slightly different.

You talk about simulations as well and you are right to mention baking. Most of the time complex 3D scenes these days are baked out as point cache files before render. Fortunately Blender now has great Alembic support. If it is a small scale project then rather than bake out the whole scene. I would suggest simply baking the animation on the actual rig to stabilize it rather than Alembic bake and point cache the rigs. I would suggest the same for any dynamic links involving the character rig. Any object being picked up. Just bake the animation onto the object. Then look to baking any other complex simulations as Alembic point cache files. I am not sure how cloth and hair baking is working in latest builds so can’t speak in any detail there. I did do quite a bit of hair caching years back and wrote a whole guide and thread, But that was a much older version of Blender and I think the information there now is well out of date.

But if you have difficulty with any of it I would suggest Alembic baking. Alembic can be a bit unreliable reading parent links so anything static that needs to follow a rig or parent like eyes etc normally would be skinned with a single skin weight.

Anyway hope this helps. Nice to talk about Blender stuff for a bit after all the time I’ve spent in the scary Zbrush thread.

All the best.

Yeah, sorry about that, I tend to get carried away at times.

Largely a solo project, so while somethings can likely be avoided as it only adds several levels of complexity to allow multiple people to work on the ‘same’ production tasks at once, there would still be some stages were a certain process and workflow are beneficial.

I have already thought about and documented an overall folder structure that I think will mostly work (Naming Conventions and a Production Workflow - #8 by thetony20) but chances are it’s going to need some adjustments as I start to think about it all a bit deeper.

At this stage I’m trying to more look ahead to how it will all work from a more practical point of view, as in the step by step process (the actual Blender commands, etc to click) to make it happen, compared to the usual high level flowcharts or the ‘just bake that out’ solution statement.

So a case in point, what exactly do you mean by that. I’ve had a bit of a play with saving out animation to an Alembic or USD file and then importing that back in to a new file. But how exactly do you bake the animation on the actual rig?

Hi Tony20

As regards animation baking.

Here is a path animation demo I made for an earlier help request on here about paths.
The object moves along the path then slows and comes to a stop at the end.

Once it is baked like this the animation is identical but the object is no longer
a path animation but simply keyframes. It is now independant of the path.
This would make the scene more stable for working on for render and other processes.
That is … for saving and moving through other studio departments.

So to bake in the animation in Blender you got to - object - animation - baking.
This creates a key on every frame and locks the animation into world space
removing all constraints and if you want as well … parenting. Although in
the case of an animation rig you would never remove hard parenting nor internal
rig constriants as this would break the rig.
You should never hack into a library linked rig of course.

To bake a rig in a scene you would select only the main keyed rig controllers and then
bake in the original key framed action once animation is at final approval.
This is a legit and common way of sending finished animation scenes to lighting VFX and render.
I worked on several studio productions that used animation baking rather than point caching.

I suggested it as this could help simply the process a bit more as you are keeping the original
scene and all of it’s associated links and dependency. Rather than reconstructing it from a point cache.
This is because it sounds like you are setting up a small team project where you might
likely be working on it a lot solo. But try and see what works best as you go.

1 Like

Ahh, now that’s the sort of information and explanation I’m looking for, never even knew that was there as an option. So thanks for that, it sure does give another to explore and test to see what would work best.