Sorry, complete newbie in this area here… it’s apparently very difficult to ensure minimum distance between particles in Blender’s built-in particle system… is it easier to separate scattered objects and avoid collisions with this add-on?
Just tested the point cloud display and I love it. I’ve never been that happy to see a bunch of points on the screen. Huge respect for implementing it 
It seems to work flawlessly with moderate amounts of high poly trees (1 mio+ faces) and the general UI responds immediately.
With higher amounts of particles (e.g. the biomes on large surfaces) it takes a few seconds. But that might not even be caused by drawing the point clouds themselves. It looks like you have to have the particle systems visible in the viewport to display the point clouds. Would it be possible to draw them without having the actuall geometry visible. Maybe that could be an additional speed up.
Anyway, this is huge. Your commitment is very much appreciated.
1 Like
There is a message in the Biome manger that says “please install lodify”
I did see a lodify.py in the zip file and I have Auto run python scripts on.
I extracted it from the zip file and Added it.
Blender version 2.82a I also removed the old scatter, closed blender, reopened and added the new one.
This may be user error but can you scatter by material instead of a selected object?
Sorry, complete newbie in this area here… it’s apparently very difficult to ensure minimum distance between particles in Blender’s built-in particle system… is it easier to separate scattered objects and avoid collisions with this add-on?
Just tweak particle count that’s all
If the particles are not dense they will not touch
particle collision is an extremely demanding task, each particles can be instanced millions of time and can have millions of polycount. analyse all this data is just impossible. Even if someone propose a solution, it won’t be perfect, possibly just a bounding box analysis wich far from ideal.
we may implement such task later, but until now, a simple particle count change is far than enough !
yes @carbon did an excellent work,
as for performance, well i think the limitation is mostly python being too slow for this task
particles API is also limited as it seemed that it’s not possible to get particle position while having them hidden (idk i didn’t work on this).
yes please install both lodify.py and Scatter.zip, its two addons
it’s distributed alongside the Scatter.zip not inside of it.
I have Auto run python scripts on.
i don’t understand why this is relevant
Blender version 2.82a I also removed the old scatter, closed blender, reopened and added the new one.
This may be user error but can you scatter by material instead of a selected object?
no in the installation, i say that you need to just install Scatter.zip, nothing else is needed, we don’t use the script/preset folder anymore, i also precise that, as for the user error i didn’t understand sorry
i don’t get why everyone care about this, when scattering large amount of assets we don’t see that anyway, especially for vegetation

we may start working on similar feature as it can work between psys but it’s still far from ideal and must be slow af and complex to handle
1 Like
Bounding box analysisis is not 100% perfect but is working very well in skatter for SketchUp. You can even input a percentage of bounding box so it can be reduced or enlarged based on your scattered model so you can micro-adjust and have it overlap just a bit or not at all.
Tweaking particle count doesn’t work for this, because you will always have parts where there are 3 particles overlapping and parts where there are none. It’s the blender particle distribution that is not working correctly. Don’t understand why nobody fixed this already inside blender
@dbalex To keep distance between particles, you might be interested in Molecular Script. https://blender-addons.org/molecular-script-addon/
@BD3D Lodify is working, but when I change Viewport Shading Display (for example solid to render preview and back), the Mesh Data that is linked is not updating from Hi res and low res and vice versa. Stays always in low res mesh, no matter what I set in ui_dsp or ui_rdv. Not sure, but behavior seems to be slightly different in EEVEE or Cycles as well.
2 Likes
Thanks for the report good thing i didn’t released Lodify yet,
first of all did you toggle the status from the mesh-data panel right ? and not from Scatter batch operators ?
that is linked
linked, meaning you used linked meshes ? or something else ?
i didn’t build this addon with external blend linking in mind, as blender already have a solution for linked proxy data
low res mesh
sure that the Level of detail panel is enabled ?
edit:
i think your problem comes from your shading switch method, the addon switch meshes on depsgraph update ( when clicking/interacting) and some shading switching solution (like custom pie menus for example) don’t send any update, so you may just want to click in an empty space when in rendered view. if it’s working when you switch with the header than we found the problem ![]()
it was already the case with Proxify at the time
Great addon. But
call proxies automatically while in rendered viewdon’t work if i change to rendered view with hotkey, only with pie menu/toolbar. Blender 2.81/2.82, Windows 8 64 bit.i had the same issue with my pie menu editor, it does work . ( it’s just that certain (custom scripted?) approach don’t send despgraph update when switching view, which it should at the first place, so proxify can’t detect despgraph change when pressing the specific non-update approach )
so the solution is really simple:
click on the viewport after calling your non-despgraph update solutionunfortunately there’s not much i can do as the problem doesn’t come from my end
To set up Level of Detail, I go to Properties Panel > TAB: data properties > Level of Detail. (and from top of my head: enabled the checkbox and clicked plus. etc)
Not linked as in linked meshes, but linked Mesh Data. (That is what your lodify addon is doing, mainly when switching viewport shading or render, right?). When you go to Properties Panel > TAB: data properties, You see that on the left, next to the name there is a small button which tooltip says: Browse Mesh Data to be linked. (So you can assign other mesh data to an object).
Yes, lod_enabled checkbox.
I switch shading in the top menu in the 3D viewport.
Update: I noticed that only in the solid view, I can to to Properties Panel > Data Properties > Level of Detail. When I switch there on and off the first icon (for solid view I suppose, the tv) I see that the viewport is updating. (Using EEVEE). When I do this in Material preview, nothing happens (But the first icon still changes the Mesh Data of my Object in the viewport if I toggle that. )
I am not familiar with non-despgraph update solution. What is that?
Not linked as in linked meshes, but linked Mesh Data.
thanks for the clarification
this is how it should behave with this scene when i switch from the header
test.blend (904.8 KB)
and this is how it work if I’m using a shortcut or a pie menu, i need to update blender by clicking on a second time
i will do a video tomorrow explaining lodify to clear out the confusion
1 Like
Ah, I see it now. My apology. I mis-interpreted the Icons in the Lodify addon. On top of that I tried only one level of LOD. But now seeing your gif, it’s clear.
BTW, the scatter addon is amazing. I had first doubt because of the price, but its definitely worth it.
1 Like
no worries
BTW, the scatter addon is amazing. I had first doubt because of the price, but its definitely worth it.
Apprecieated !
(as for the price, the addon is a lot of work, without this price-tag i wouldn’t be able to work on this so hard thus getting a useful product ![]() )
)
3 Likes
Did a quick test of Season2 and lodify an Love it.
Also may need time to go trough all improvements 
Love it
2 Likes
I will do a quick video about What’s new 
4 Likes
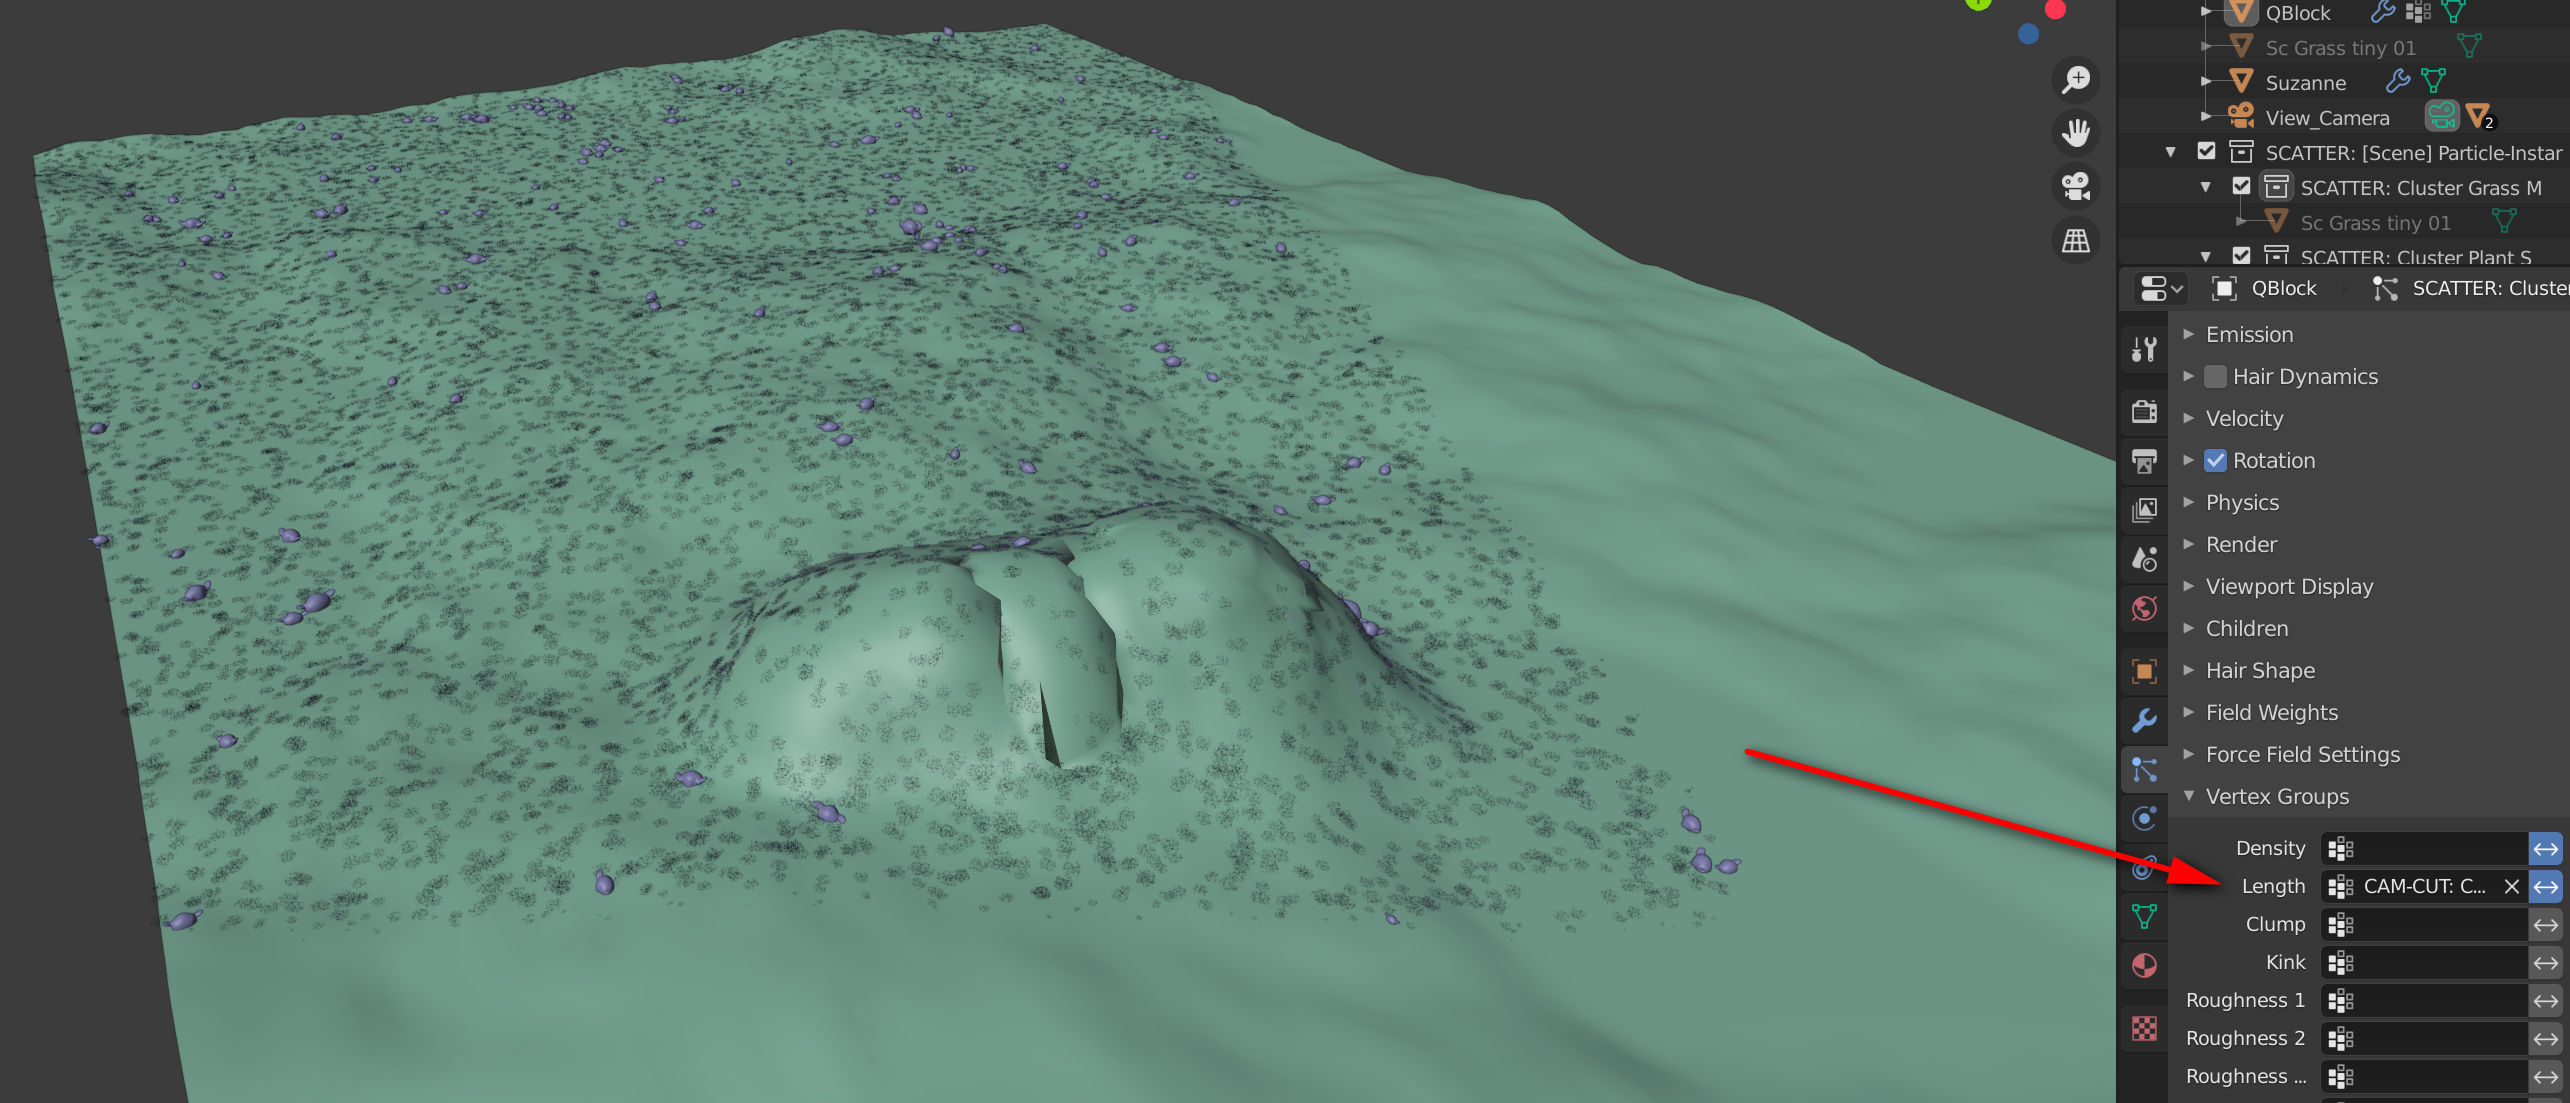
scatter is assigning camera clip vertex group to particle density slot, messing particle density, cause total particles number are confined inside clip area and particle positions change after any camera movement… with camera clip vertex group assigned to length slot, all work fine… no density change, fast update… but we lost distance clip fade.
eevee render…

viewport preview with camera clip keeping general density unchanged…
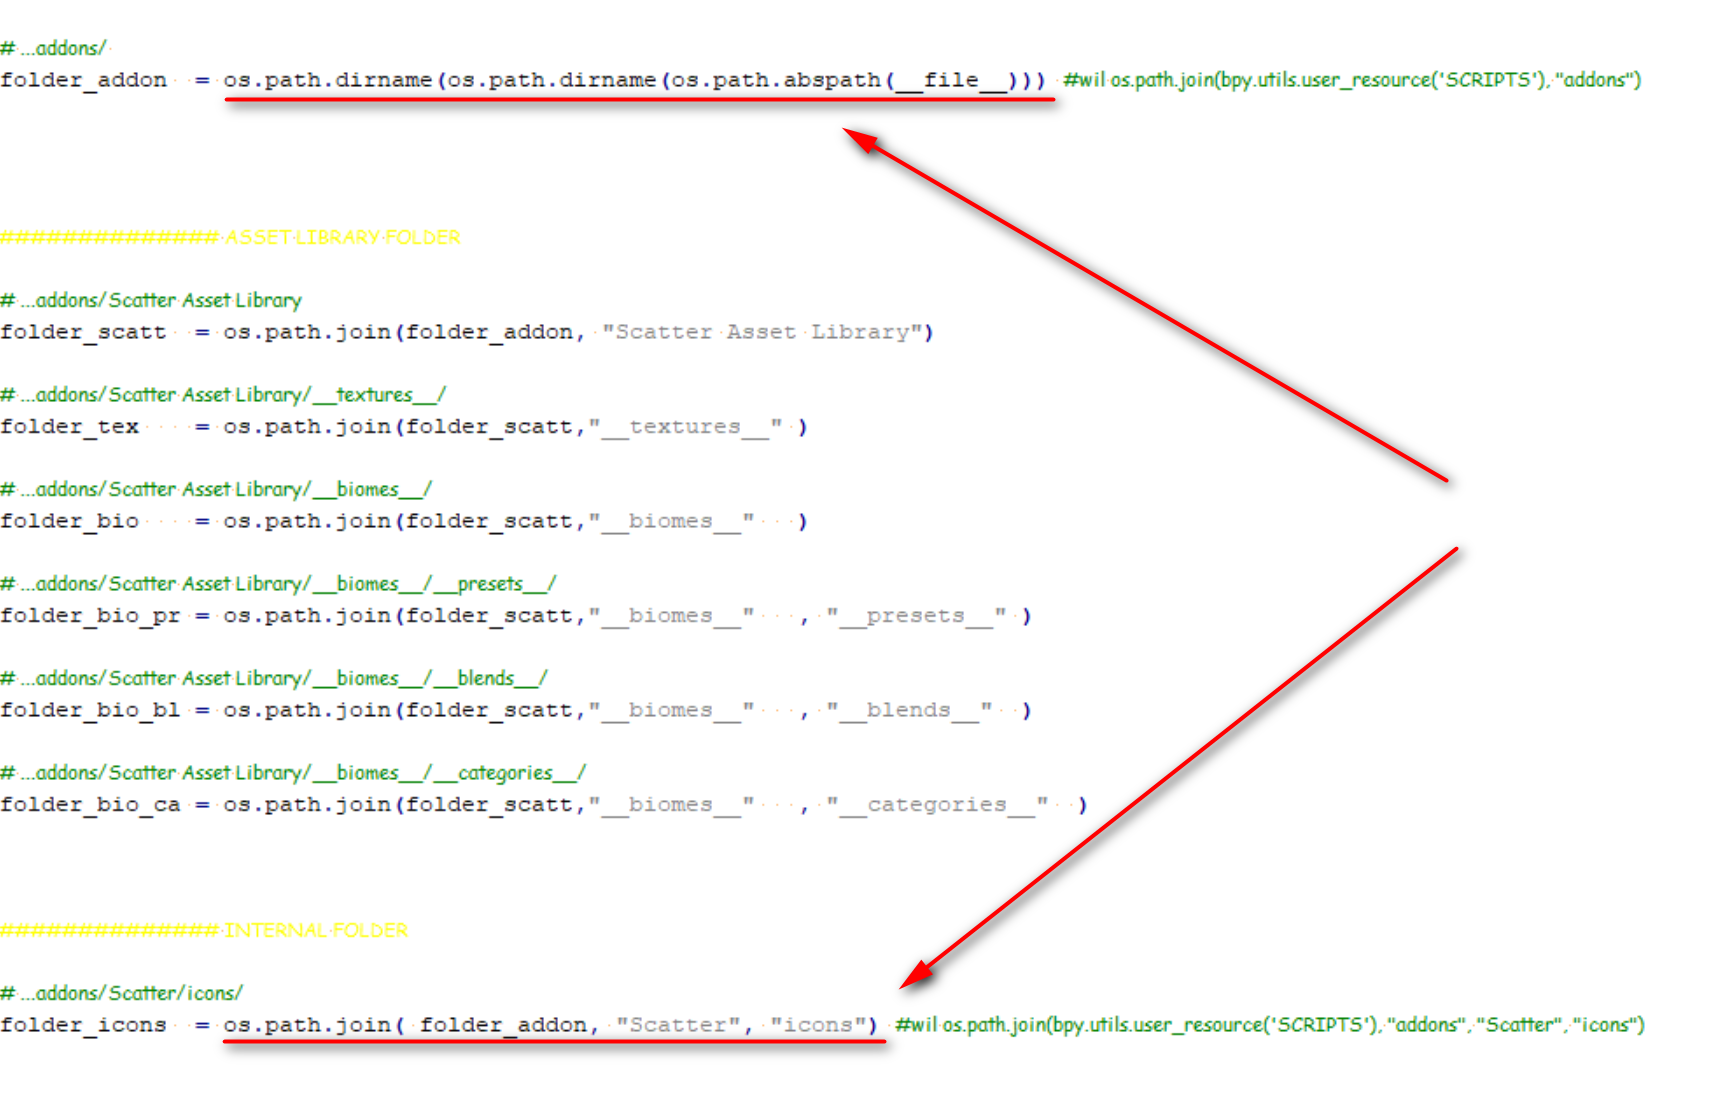
changing 2 lines inside sc_folder.py I can to do manual install to my custom addons folder without missing paths… (coping “Scatter” folder and “Scatter Asset Library” folder to my custom addons_contrib folder)
Except that this method give minimal performance boost, thus making the camera clipping feature useless
changing 2 lines inside sc_folder.py I can to do manual install to my custom addons folder without missing paths… (coping “Scatter” folder and “Scatter Asset Library” folder to my custom addons_contrib folder)
user_resource(« script ») is supposed to take the custom user script path. I did not test it but it but it should work, thanks for the report I will investigate
1 Like
Dorian so do we remove the old scatter and proxify and then install the new scatter and lodify?
Yes, it was explained in the change logs
1 Like
Dorian, are we not able to do a 2nd instance of Scatter in any given scene? I’m finally using Scatter on a commercial gig - I just setup my yard with grass, mulch (wootchips), flowers, etc - and now I wanted to hit another terrain geo with a separate Scatter setup for the woods behind… Is this not possible?
Also, back when I first bought Scatter and played around some, I believe there were proxy boxes for the grass chunks etc… Now there doesn’t seem to be any when I grab an aio grass… :-/
Please advise D. : - )
Hello
there’s the target system for that, just change your target
there’s the LOD system for that, it’s disabled by default now
please check out
Properties>Mesh-data>Level of Detail
1 Like