Hi there, I’m trying to get that 90s look for my renders and I’ve read that POVray seems to do a pretty good job at that, but I’m having trouble getting it to work and there are no straightforward tutorials out there (because no sane person is using POVray in this day and age, apparently).
I have the 3.7 OSX version downloaded and installed as it said to do in the instructions on the wiki and I enabled the add-on in Preferences. But I have the same problem as everyone else attempting to use it, the renders are coming out unrendered and I simply don’t understand what to do here. Help, please and thank you.
Technical info: blender 2.8, because macOS 10.13.6, because MacBook Pro 2015
Addendum: Alternatively, I’ll take suggestions on how to make a cycles or eevee renders look like povray; look like the style I’m going for
Welcome ,
since this is the first time in the forum who is everyone else you are refering to ?? (I’m on linux…) You have the 3.7 OSX version downloaded… from where (as i can see no binaries for apple/OSX on the site) ? I assume megapov.inetart povrayunofficial mac ? (Ord did you compile the sources yourself on the mac ?)
Did you tried some example files (directly via command line not from blender)? … Looked into the WikiPovray ?
So many questions even if someone doesn’t have a mac or use povray…
Sorry for throwing so many questions and thank you for your reply.
Of course I searched for previous posts on the topic and only found it mentioned in this forum two other times, both without conclusive solution.
The version you mention is the one I’m using.
I did try to import some of the included sample scenes, but I get a Traceback error message, I’m apparently not allowed to add images.
You would wonder what some people are asking here with there first post… …so +1 for searchign first…
Well… i meant pure PovRay examples using the command line to render examples. Tracebacks are usually reported in python… so in the addon… So first i tried to exclude the possibilty that PovRay isn’t working at all
Mayeb you just refer to this post you already tried?? Like:
(In this one for example two possible solutions where suggested and the OP never ansered… too sad… no further possibility to solve this then… )
You can usually do this by clicking on the chain icon (share a link to this post) in this thread then copy it with the "double sheet" icon (copy) and simply insert it in your post… so everybodu will know what you tried…
(By the way: I did some experiments with PovRay back in the days.)
Of course you also may have a look here:
And/or simply use the Render Properties → Render Engine: Workbench renderer.
Thanks, yes you’re right, those are the posts I was looking at.
But you’re saying I should test POVray by itself, without blender, first, to test functionality? That’s a good idea, I’m just not sure how. Most povray tutorials on youtube are out of date and blurry, so I was pretty apprehensive about checking them out. I haven’t been able to find a more contemporary tutorial on a (relatively) modern Mac - to have the chance at it working for me.
I’d be glad to look further into it. Do you happen to know of some tutorials or resources to get a better understanding of working with povray? Keep in mind, I’m not a very patient reader (probably ADHD) and therefore prefer watching videos.
EDIT: I don’t seem to have much success with workbench, since it doesn’t seem to use materials? I’d like to stick with povray and similar solutions
POV-Ray predates widespread video tutorials. And the Mac was always the less beloved stepchild. But whatever you can find should still work, since POV-Ray hasn’t fundamentally changed in many many years. I recently ran a couple programs I wrote 28 years ago, no problem (not from Blender though, so I know nothing about that, and my old Mac Pro’s network is b0rked, so I can’t try this).
POV-Ray is definitely worth learning if you’re really into mathematical modeling, and it excels at procedural texturing, but to make your render look like it was done with 90s tech, that’s not the way I would go. You can possibly find more videos on how to create a certain 90s looks in Blender, and I expect you’d get more help for that here as well.
So, you could start by defining what 90s CG didn’t have, and adjust that in Blender:
Thank you, this is helpful. I’ve been looking to make my renders more 90s by researching different methods and povray seemed relatively straight forward. I’m only now realising it’s probably too difficult.
I’m definitely going to tweak what I previously had, using your tips as a guideline; or rather, I’m going to look into Phong and Blinn shading, as you suggest, to get me the rest of the way there.
I’ve already been doing low poly and low res, but these old raytracing renderers from the mid 90s, I’m shooting for, I think had spline modelling (?), which looked rather smooth than lowpoly. Those also had pretty crisp, bumpy textures and even accurate reflections and some AO if I’m not mistaken. I’m thinking MYST and these old bowling alley animations.
Cycles, procedural textures, drop light bounces to zero except glossy and transparent, samples up and use simple diffuse, mirror like glossy and transparent shaders. There should be no blur in reflections.
Don’t use normal mapping. Procedural textures and a lot of polygons to create shape, or perhaps bump mapping in surface.
Use only one light source to create shadows and add 0-7 fill lights (no shadows). Don’t use filmic tone mapping, instead render in sRGB.
Thank you, this is also really helpful.
I did try to do this yesterday and shared it on reddit. Let me know what you think how I did, if you don’t mind.
In the first one it looks like there is some roughness in shader. You should check that glossy shader. that there is no roughness and it is set to sharp. Also in Cycles light paths, “filter glossy” may be problem, you should try to get reflections sharp as possible.
In Eevee screen space refletions are by default half resolution. That is good idea to check off, while you don’t need to waste memory on textures you can try to keep reflections sharp.
Agree that the red one is too rough. I mean, unless you want it to be rough, but since the others are glossy…
The reflections are too good; in my mind you wouldn’t get multi-hop reflections. But I should really look at some reference images before I say more because reflections did improve in the late 90s.
Back in early 90’s, there was 3D Studio, Lightwave and POV-Ray. 3D Studio and Lightwave work like Eevee but they use environment map to do reflections. Eevee can easily simulate early 90’s. 3D Studio and Lightwave, just optimize every asset (textures + mesh) below 2Mb size, only one light source make shadows and 2-7 fill lights, no indirect light, screen space reflections, no AO, no reflection planes… Post process glare is ok.
POV-Ray was raytracer and that did multi-hop reflections. I did try limits one version and up to 160 reflections worked so it was possible to put camera between two mirrors and look how light bounced to eternity. default was 5. Probably limit was based on stack size so the maximum may be less in early 90’s.
However, it was biased renderer, it doesn’t shoot multiple rays from glossy surface, only one. So the reflections were always perfect mirror. That’s why there was a lot of reflective chrome spheres. Back then when doing realistic rendering, it was better to left reflections only to water, glass, mirror, polished metal and wet surfaces. Less reflections was better than scene filled with sharp reflections.
Also there was no global illumination early 90’s so in shadow, it just take ambient color.
Cycles can do that today, just drop diffuce bounces to zero and use fill lights. There is also that FakeGI setting and that probably work too if setting AO distance to zero, because there was no AO.
Blockquote Agree that the red one is too rough. I mean, unless you want it to be rough, but since the others are glossy…
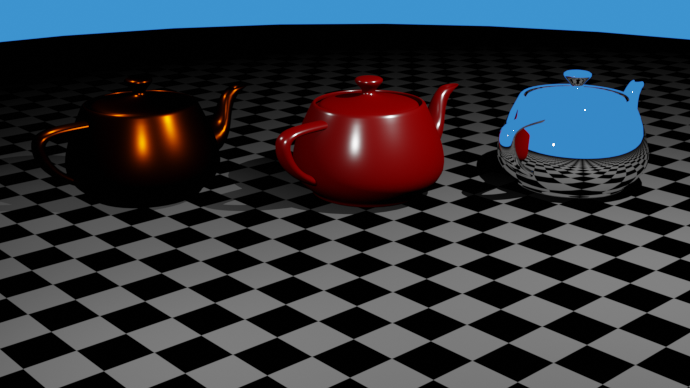
Yeah I wanted a diffuse material, the red one, a glossy diffuse, blue, and a metallic material, the third pot, since these three types of material are all the ones I need for my original project and I wanted them as a baseline.
Basically: use tools I know I can use (Blender 2.8, no addons), to create a render that most closely resembles the examples: MYST, old renders such as from the render challenge.
Blockquote After all the discussion… why not here ?? (You properly are aloud to post images here be now…)
You’re right. I posted the reddit link for context, so you could see the other side of this discussion, but here is the direct link to the images (and added two new images):
@GruntAxeman This might be the most comprehensive lineup of suggestions on how to get Eevee to look how I want it, yet. Thank you. I think this might be the answer; short of having to sink more time into learning POVray and how to get it to work with blender (I’ve just about given up on that).
I did some testing… Cycles has major problem, background will work like emission shader and emission shader shoots rays that make wrong look.
So I got better results using Eevee. Set world background to black, then I add sphere to as background texture so it doesn’t affect to shadows and I can lit scene purely using light sources.
No texture in sky sphere, just quick test. I recommend to disable screen space reflections and use only high resolution cube map for reflective object, and reflection plane to plane like reflection. Disabling screen space reflection makes possible easy to contol what objects reflects environment. While you don’t need much ram to textures, you can use high resolution on cubemap and shadow map so they are sharp.
I like this. Would you be able to show or tell me what setup you used for materials?
In Eevee I mixed a diffuse shader with a specular shader for the coloured teapots, and a glossy shader with a specular shader for the chrome teapot.
The only major difference I see, is that your skydome (I used a cube) shows up in your background and in your glossy reflection. I suspect that has to be because you used a cubemap instead of screenspace, right? Because, as you can see, in Eevee my skybox doesn’t show up in my teapot.
Lastly, did you assign an emission shader or background shader to the skydome?
Copper like teapot was only glossy shader, no cube reflection. Red teapot was diffuse shader and glossy shader, add together. Mirror teapot was only glossy shader roughness at zero but I put I bake first cube reflection map.
Eevee uses background in reflections, or screenspace reflection. So black background give desired effect and having skysphere you can make it visible in mirrorlike objects.