A little while ago, I was taught how to duplicate edges and intercept them using the TinyCAD add-on to create disposable reference pints to assist in positioning new geometry with CAD-like precision, akin to the way Sketchup’s Tape-Measure tool works. See the topic’s exchange here (Is there an easy way, tool or add-on to emulate Sketchup's Tape-Measure tool functionality? ) if you are curious. Thanks a lot to JohnMalcolm1970, SublimeSpaces as well as to DamianJ.
In hopes of having some continuity with the questions I am asking, such that those like me switching from Sketchup can have a smoother transition, I bring you another question about how to replicate in Blender a functionality I found very useful in Sketchup. So, without further ado, here is my question:
For a concrete illustration, I will use the same example I used in my previous question since I am building on it. Say that we have added a circle on a cube’s (like Blender’s default cube) top face, positioning the circle’s center at 0.4 units from the left edge and 0.7 units from the front edge. In Sketchup, the circle automatically ends up mesh-wise integrated/connected into/with the cube’s face and the face’s surface is re-allocated to be distinctly selectable (in a mutually-exclusive fashion) areas following the contours of the circle. See the animated image bellow.
When doing the same thing in Blender, even if the circle was added to on top of the cube’s face in edit-mode, it remains a distinct object mesh-wise speaking, disconnected from the cube’s mesh, even if it is on it and part of the cube’s data.
You can see in the animated image bellow how selecting the cube’s top face produces shading artifacts on the circle’s region (and vice-versa) resulting from their faces being still separate faces on top (coplanar) of each other, instead of a unified single face re-allocated to be distinctly selectable areas in a mutually-exclusive fashion. Another way to tell they are disconnected is the lack of edges connecting the bounding edges of the cube’s top face with the bounding edges of the circle.
QUESTION: Now, what can I do, such that the circle or any other flat geometry (e.g.: a plane, a character from an alphabet, or a custom-shaped flat geometry) I could put on the cube’s face, ends up mesh-wise integrated/connected into/with the cube’s face and the face’s surface is re-allocated to be distinctly selectable (in a mutually-exclusive fashion) areas following the contours of the flat geometry I am placing on the face’s surface? I am looking for everything that allows me to accomplish what I describe in the question, whether it is a technique (series of steps), a tool, a modifier (or a combination of mods), an add-on, etc. The more the better, so please don’t hold back if you see an answer that accomplishes the result I want. Particularly, add-ons that could do what I described in a clean fashion and with a few clicks would be ideal, although I am a bit concerned about being dependent on 3rd-party add-ons, but for now I want to consider them.
To get us started, here are a couple of things I found while doing some research for this question.
The Knife-Project tool, under the Mesh menu in Edit-mode, allowed me to project a cut on the cube’s face following the shape of the circle, even (and more conveniently so) if the circle had been created exactly right on top of (coplanarly with) the cube’s face. After the cuts are done/projected on the cube’s face, contouring the circle’s shape on the cube’s face, you can dispose of the original circle. The circle-shaped cuts on the cube’s face have effectively re-allocated the surface/area on the cube’s face and all the resulting areas are distinctly selectable (in a mutually-exclusive fashion). All that is left is to get rid of the circle used to project its shape on the cube’s top face. One thing to keep in mind for this technique to work is that the circle has to be created in object-mode separate from the cube’s data. See in the animated image below how the top face’s surface is re-allocated to be distinctly selectable (in a mutually-exclusive fashion) areas following the contours of the circle. Just like in Sketchup, except for the two extra edges connecting the bounding edges of the cube’s top face with the bounding edges of the circle, which break the face into more than two areas.
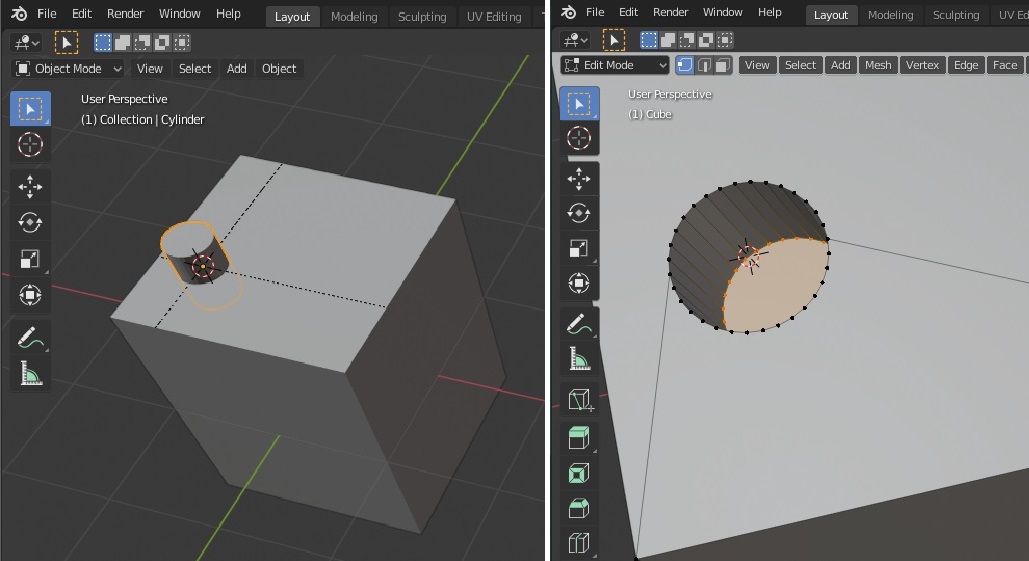
We can get the same result by adding a cylinder primitive in object-mode and using it with a Boolean-modifier (difference option) but it would require more steps. Since we are interested in creating the desired results (described above) only on the cube’s top face, the cylinder would have to be located on the upper portion of the cube, mostly above it. However, the Boolean-mod would not work if only the cylinder’s bottom (n-gon) face is in-touch-with/right-on-top-of/coplanar-with the cube’s top face, different from the circle and the knife-project technique above. So you would have to push the cylinder down into the cube’s volume bellow the top face’s surface. See the left side of the picture below. Because of this when you apply the Boolean you would have effectively created a cylindrical cavity into the cube as deep or shallow as you pushed the cylinder into the cube’s volume. You would have to select (see the right side of the picture below) the vertices at the bottom of the cylindrical cavity and delete them to get rid of the cavity. Then you would have to “mend” the circular hole left on the cube’s top face by selecting the edges or vertices bounding the circular hole and pressing the “F” key, which will create a face effectively closing (“mending”) the circular hole. This is more work than the previous technique, so this is why I favor the use of flat geometries like circles, planes, etc.
Please, let me know what other techniques, tools, modifiers, add-ons or combinations of them could be utilized to accomplish the same.
Thanks in advance for your forthcoming help.