Hi, I’m trying to make a type of “sweater generator” and wonder how it is smartest to start.
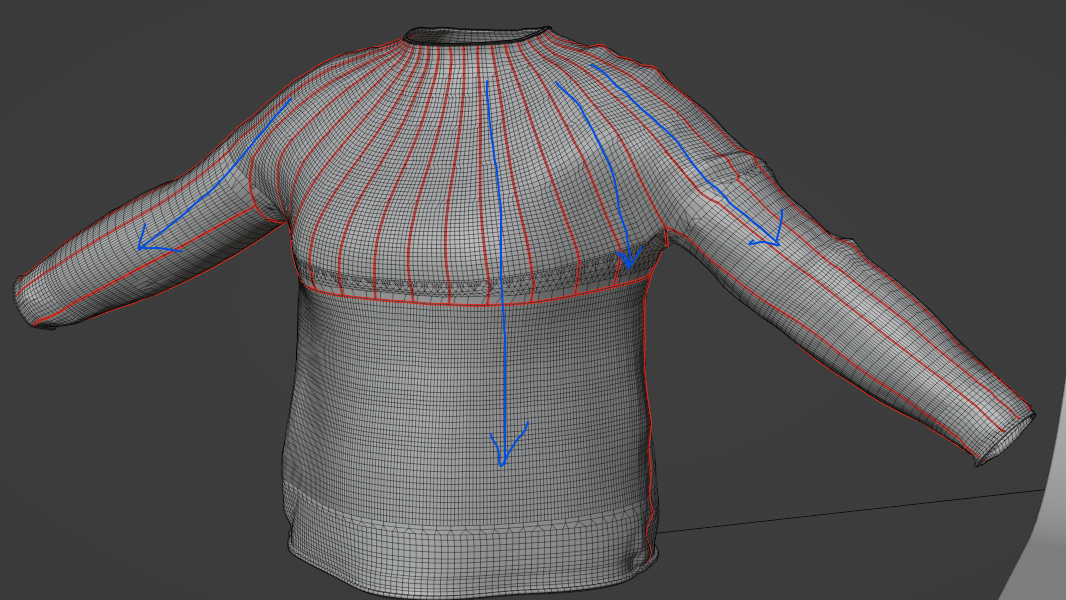
I have made a simple model of a sweater that is fine to start with (see picture). Maybe I change details in it later or different poses when I know how to solve the rest.
What I need to do next: Put a specific pattern on the sweater, and the different parts of the pattern must be able to change color of individually. And on top of this it needs to look knitted (real yarn-look).
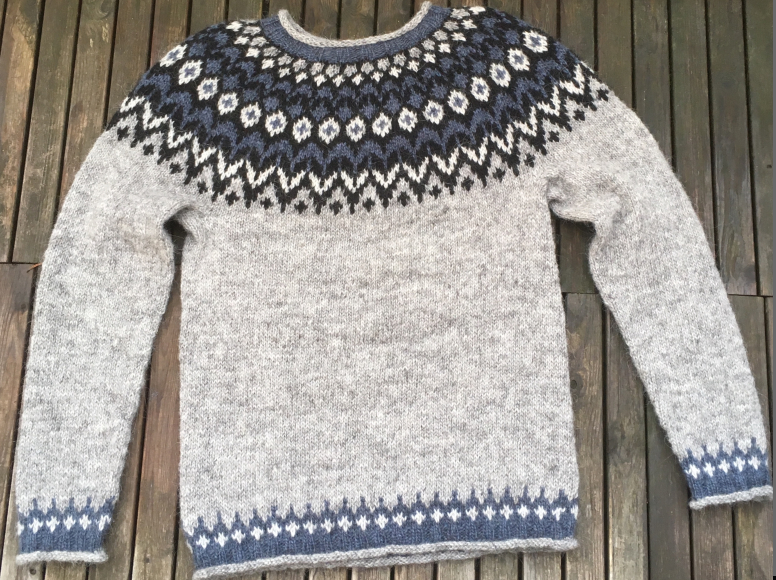
The pattern need to follow the shape of the sweater of course and the look is something like a christmas sweater (doesn’t really matter but just to get a picture of the end result).
What would the next step be for you guys? How would you go on?
Draw the pattern as a picture? Or like a mesh in blender? Project it somehow? The knitted look comes last I guess? Procedural?
For something like this maybe just look at the real thing first? There a dozen of sewing patterns in the net… with this you also already have your UV layout… there are also sewing cloth simulation tutorials for blender… so maybe just combine this and…
I second @Okidoki - my wife is a seamstress, and I’ve learned, if you want to make clothes in Blender, find some real clothing patterns and learn how they work. You can use scrap fabric, tissue paper, or even plastic garbage bags to practice with. Once you understand how sewing patterns work, making clothes in Blender is a breeze. If you don’t, your clothes will never look realistic, because you won’t have a understanding of how to unwrap a piece of clothing into a flat pattern
I’m not that concerned about the knitting pattern, tried it just a bit and it should work. Of course the direction of the knitting and also the basic shape of the sweater needs to be worked with. Fast example:
And as you say, to make the cloth realistic it best to look at it in the real world, will do.
My biggest concern is how to make the pattern so that the colours can be modified afterwards. And that this has to do how the knitted look is made.
If I use a picture to texture the pattern I guess I have to change the colours in the picture everytime and reload it to change the end result.
Here is an example of the pattern, all the colours must be able to change afterwards from time to time.
The wish is to have some sliders in the shader to change each colour to get the right look.
If I make the knitting pattern procedural I guess it would be hard to change each knots colour individually?
(In a desperate attempt I tried making a knot and make it follow a curve on top of the sweater model. Using modifiers array, curve and shrinkwrap. Felt stupid doing it since there must be a better way. Was tempted by making as many knots as there are in the real world and then assigning different knots different colours and so on but feel like I would run into problems with making it even and looking good. Like this:
Big thumbs up for both @Okidoki and @joseph
One of my fav reality TV challenge is British Sewing Bee
Sewing patterns are like UV maps. You create these big islands and then you basically texture them evenly amd have your unwrap already.
Knitted clothes are usually made the same way. Knitted in parts, then sewn together. I have a few clothes like that, think of cardigans.
@stefafo if you create an even geometry for front, back, and lining at the bottom, arms, and neck, then you can vertex paint those edges to create mask, then you can simply put the textures of all parts together.
For that method, good old Blender Guru came to my mind. Check his teddy bear tutorial for vertex painting, and applying a similar material, exactly from 9:00
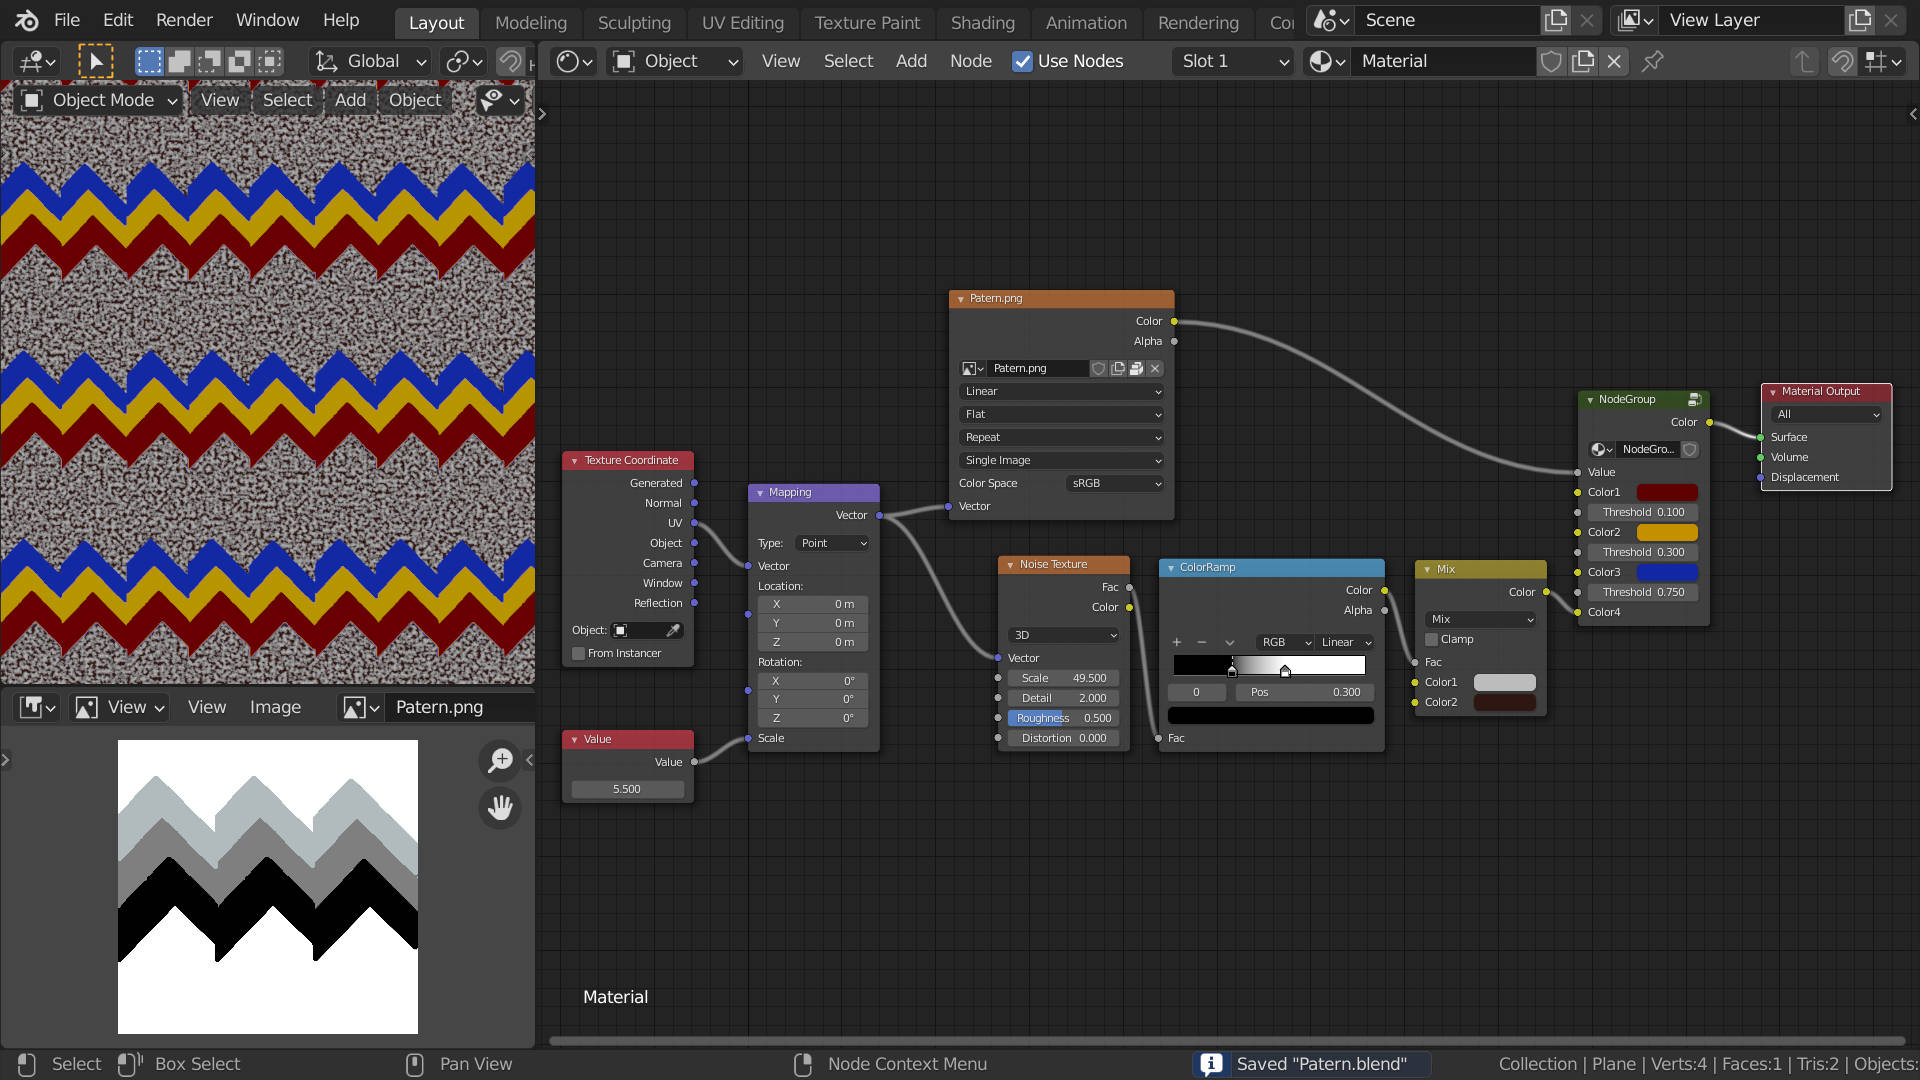
The pattern image has different shades of grey, inside the node group the greater than nodes separate the shades of grey so the mix nodes can assign the colours.
The threshold values will depend on the value of shades of grey you use.
I added the noise and colour mix to the last colour just to show that it does not have to be a solid colour.
Remember I saw that video when it came out, but had forgotten about it. Watched it now again and there are some nice things there I could implement.
So the solution (one to start with at least) seems to be:
Make a natural looking sweater
Put knitting texture to it (procedural or image texture)
Make an image with pattern in different shades of grey and put it in the right place
Apply the colour node from DNorman
By the way, this type of sweaters are knitted in “one piece” more or less so there are no visible seams actually. We knit these sweaters ourselves so I have many of them to study. Not sure how to make the knitting go the right way across the front and also the arms because of this but I can probably put seams where they can’t be seen in the render.
Hi DNorman, many thanks for the nodegroup. It seems to work as planned, hope to post some pictures later.
Can you tell med how to add more colours to the node group, you made 4 colours and I would need about 18-20.
I think get how you made it with “greater than” and so on, but if I ungrooup it (CTRL-ALT-G) and add more colours I can’t get it back in a group again like you made it. How?
To add more colours you need to add successive greater than and colour mix nodes then you can add more inputs to the node group by pulling from the inputs (threshold of the greater than and second colour of the mix node) to the empty socket of the group input node.
When you do it this way (pull from a value to the empty socket of the group input) Blender automatically sets the correct input type and uses the current value as the default for future use.
There is no need to ungroup the nodes you can add nodes inside the node group.
Things will get a bit complicated with so many colours, there is also a limit to how many mix colour nodes you can use (especially if you use a texture image as colour the limit will probably be under 20.)
I have checked it out to see if 20 “plain” colours are ok and it works, bare in mind that if you over complicate the setup (by using image textures instead of colours or adding many more colour mix) you could run into the limit and the whole texture will just go bright pink warning you that it can not calculate.
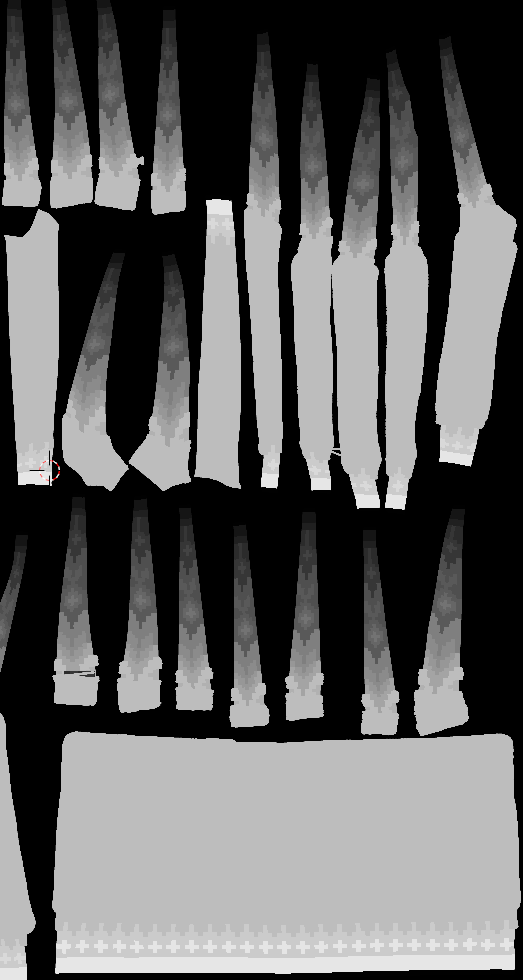
In the example file I am posting I set the thresholds to 0.04 0.9 0.14 0.19 …etc that way your main grey scale image texture can use grey values of 0.5 0.1 0.15 0.2 …etc up to 20 colours!
It looks like this:
You will find it is best to use solid colour for the setup to work well. Ie 20 solid shades of grey (no in-betweens) set the image to linea or non colour (you only need the value)
Save your patterns as .png (not jpg)
Edit:2 I have corrected the pattern image so that the greyscale values are correct 0 0.05 0.1, 0.15, 0.2…
You can see all 20 colours. This is the tricky bit, you have to make the grey scale values exact, if not you would have to change the thresholds, which would be “fiddly” to get right.
If you add an “Object Info” node, and plug the Random nodule into a ColorRamp, set on “HSV” and “Far”, with both ends of the spectrum set to a pink colour, you can generate random colours each time you generate an object.
I haven’t used this node that much, but I’m sure someone can add to my answer a way which you can have a texture fed through this, generating different shades of the same texture. There might even be a way to do this with a Hue/Saturation node somewhere in there.
I hope this can add to the already helpful answers you have received.
Thanks for the help with the node group, it seems to work as planned. I just need to put some more work in the image file for the pattern, so the colours don’t mix where it shifts.
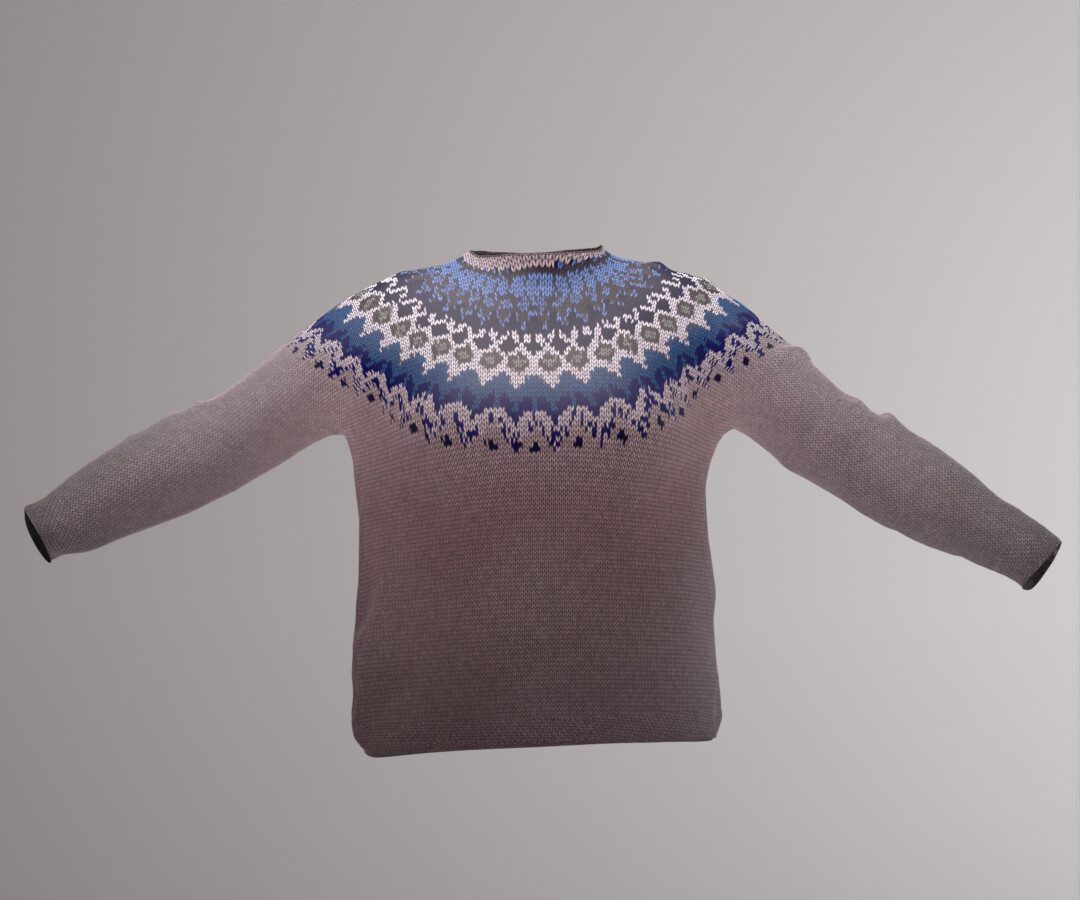
Here is a work in progress with the latest node (keep in mind, still haven’t put that much effort in the modeling or unwrapping correctly. Want to have this working first).
It’s starting to look like something that can be useful. There will be a pattern in the bottom too, and on the arms. Just need to figure out the best way to unwrap and get the pattern where I want. I’ve mostly done hard modeling before this so it’s kinda new . Maybe I have to retopo the whole thing.
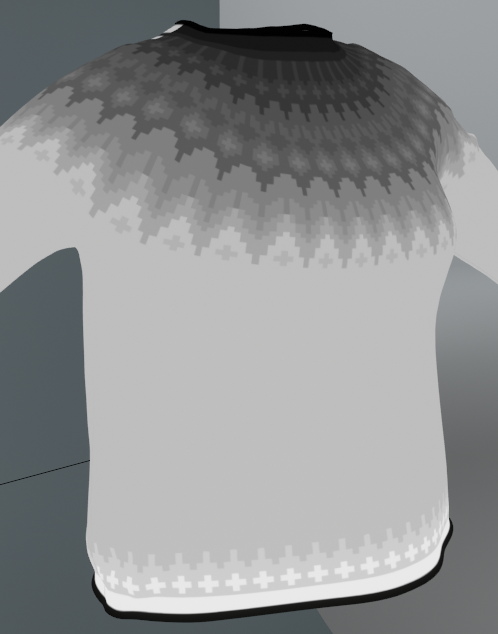
Update, the sweater generator is kind of working right now.
The next thing to do is remodel the whole thing and make it from scratch, and also with different patterns but that is for another topic.
Thought it could be fun to update and show how the test turned out and how I did it.
Here is an example of 3 different sweaters, it took about 30 seconds between them to switch colours (without rendertime). The only thing I have to do is drag and drop colours into the node that Dnorman provided. I made a colour palette using the addon “Colorbox”, the colours in the palette is the same as the available knitting threads we have.
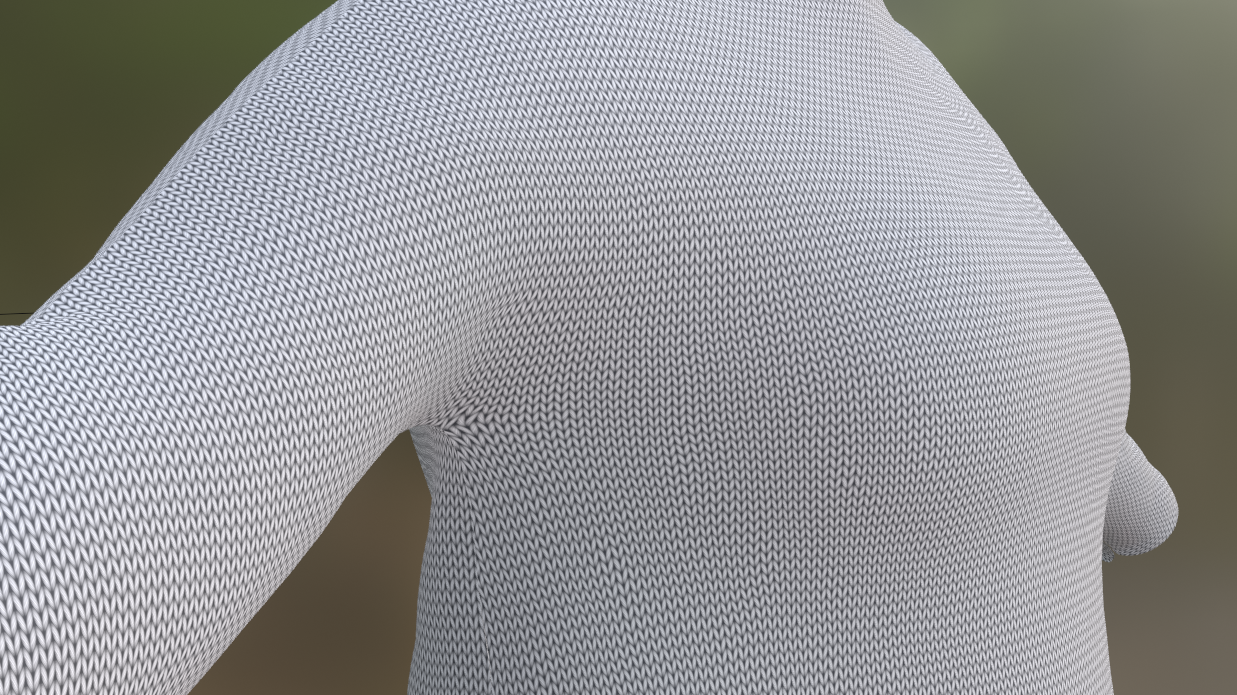
The knitted look is made with the shader “Woolly” found on Blendermarket.
I couldn’t find a good way to make the pattern so I tried dividing the sweater into small faces and colouring each face according to the pattern I needed, and sticking to the 20 shades of grey. Then baked the texture as an image and used that. One problem was the direction of the knitting had to go in a specific direction without visible seams, so I put some seams between each patterngroup and placed them correctly on the UV map so the knits would run the right way. (There must be a better way to do this but I solved it for now)
It’s not perfect when you look close but for quickly testing different colours before starting the real knit it works fine
And comments or hints will be gratefully received.
@stefafo would you be willing to send the .blend of your final prject? I was going to take this project and go the extra mile by making a generative texture along with the generative color scheme that exists in its current state, which is absolutely a whole thing, but I feel like this would be a wonderful point to start if you’d be willing to share or possibly even work with me <3