Great, i´ll be waiting for your post about the topic.
hey Chris, I noticed you make your own music so why not make ASMR-ish relaxing videos featuring your renders? Your environment renders are pretty neat from what I recall on your debut animation piece, being able to indulge on it would be a treat for me. I love studying your works while it switches full-render to wire frame mode and I’m not sure if it’s just me.
By the way I’m pretty new on Blender, but seeing your works on YouTube made me started it. Such an inspiring artist you are. Oh and thanks for answering questions here for others so I can just sit here and take them all in (haha)
1 Like
I bought the pack including the facerig. But I have a situation where I need to remove the face rig and only use the bodyrig. Is there a clean way to remove this by any chance?
@lalanana I wouldn’t necessarily go out of my way to make relaxation videos, however you can probably expect more wireframe dissolves in future while I’m doing WIPs. 
@BlendNewb If you want to keep the eyes and teeth/tongue attached, the easiest way would probably be to select all the face proportion controls in armature layer 3 and parent them to the Head Bone on armature layer 9, then delete all the bones in armature layer 4. Then you can clean out all the face-related shape keys if necessary.
3 Likes
Hello Chris.
Im interested in your universal human rig so I purchased your asset and making some work. but Im wondering can I replace from basic body to another body what I made?
It doesn`t work when I tried to replace it
I want to make my model rigged and morph like yours.
The model is so intrinsic to the rig that unless your model is a robot, you’d be better off shaping the base mesh to conform to your model, and then baking displacement maps etc. That way you won’t have to redo (or somehow transfer) all the weights, shape keys, drivers etc.
1 Like
Thank you Chris.
If I have another question, I will send you a email.
have a nice day man.
hey guys there is a new addon for better drivers functionality for blender https://gumroad.com/l/rbf-drivers i bought yesterday i am still testing it and learning to use it, there is a discord channel for getting support as well, so this driver addon is specially good for rigging such as for getting complex shape keys to work for a complex deformation in a character rig…
4 Likes
Ha, these are on my radar as well for one or two weeks now, would be nice to get some experience updates from your side Michael! (btw, have you seen HumGen3d.com?)
1 Like
yep i saw that, seems like a nice tool for blender, but personally as an artist, i think its too procedural for creating characters,but is useful for making several characters for something detailed enough (not like those shitty low poly people scans in the internet) and save time in production if its for a short film or something, but still i prefer the traditional way of doing character modelling over that…
1 Like
Yeah, but for hobbyist noobs like me, aside Chris’ rigged bases, a good way to learn pros and cons. 
(And till now we don’t know how detailed these models/features are…)
1 Like
Wrinkles!

And nary a tension map in sight. I started getting somewhere with @shteeve’s add-on, but along with a creasing problem (which I now suspect is due to linear vertex group falloffs - see my closing paragraph below) I found I couldn’t get enough sensitivity out of it without the “spread” variable discussed in the comments on RCS. So I’ve reverted to plan B for the time being, which up until recently was just a crazy untested theory.
Plan B consists of the same dual height map setup I was using before, but instead of activating parts of the images automatically using tension, I’m using masks driven directly by the shape key values.
The maps are baked from sculpts, and there are two of them, to account for wrinkles that cross over other wrinkles, e.g. vertical frown lines vs. horizontal raised-eyebrows lines. There may need to be a third, to cover special cases like “worry”, which diverts the direction of the lines into a different shape on the forehead.
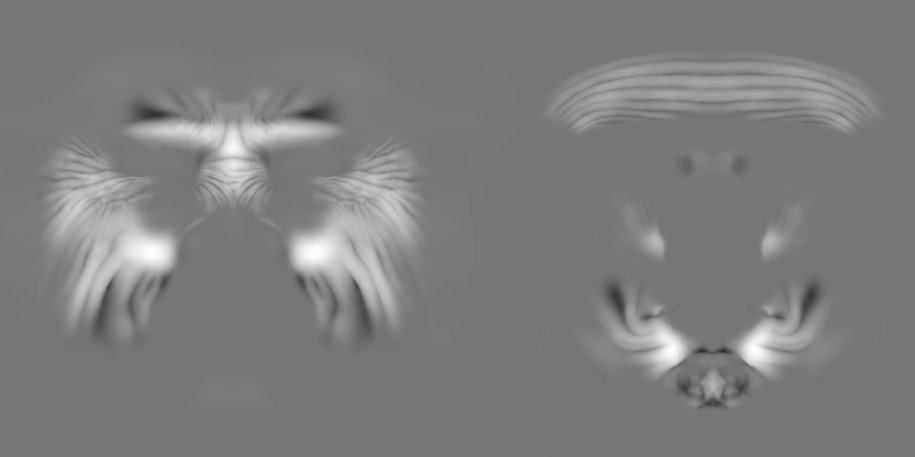
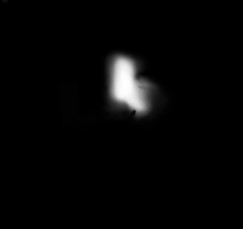
For each shape key there’s a mask image that reveals a portion of one of the wrinkle maps. I’d have used Vertex Colors instead of images, but for some reason there’s a limit of eight (and I’ve already used up four of them for other things). Behold the spectacular majesty of the “Nose Sneer L” mask:
In the nodes below, the Nose Sneer L shape key is driving the Value property of a Math node, which changes the intensity of the Nose Sneer L mask image. This is sent on to a MixRGB node where it’s combined with the other masks. Here it’s being mixed with the Right Nose Sneer, which uses the same mask image flipped horizontally by scaling X by -1.0 in the Mapping node. This minimises the number of mask images needed, and automatically mirrors any mask edits to the other side of the face.

The face consists of a whole battery of these nodes daisy chained together and mixed with Wrinkle Map A, and then run into a displacement node that’s mixed with another battery of nodes controlling Wrinkle Map B:
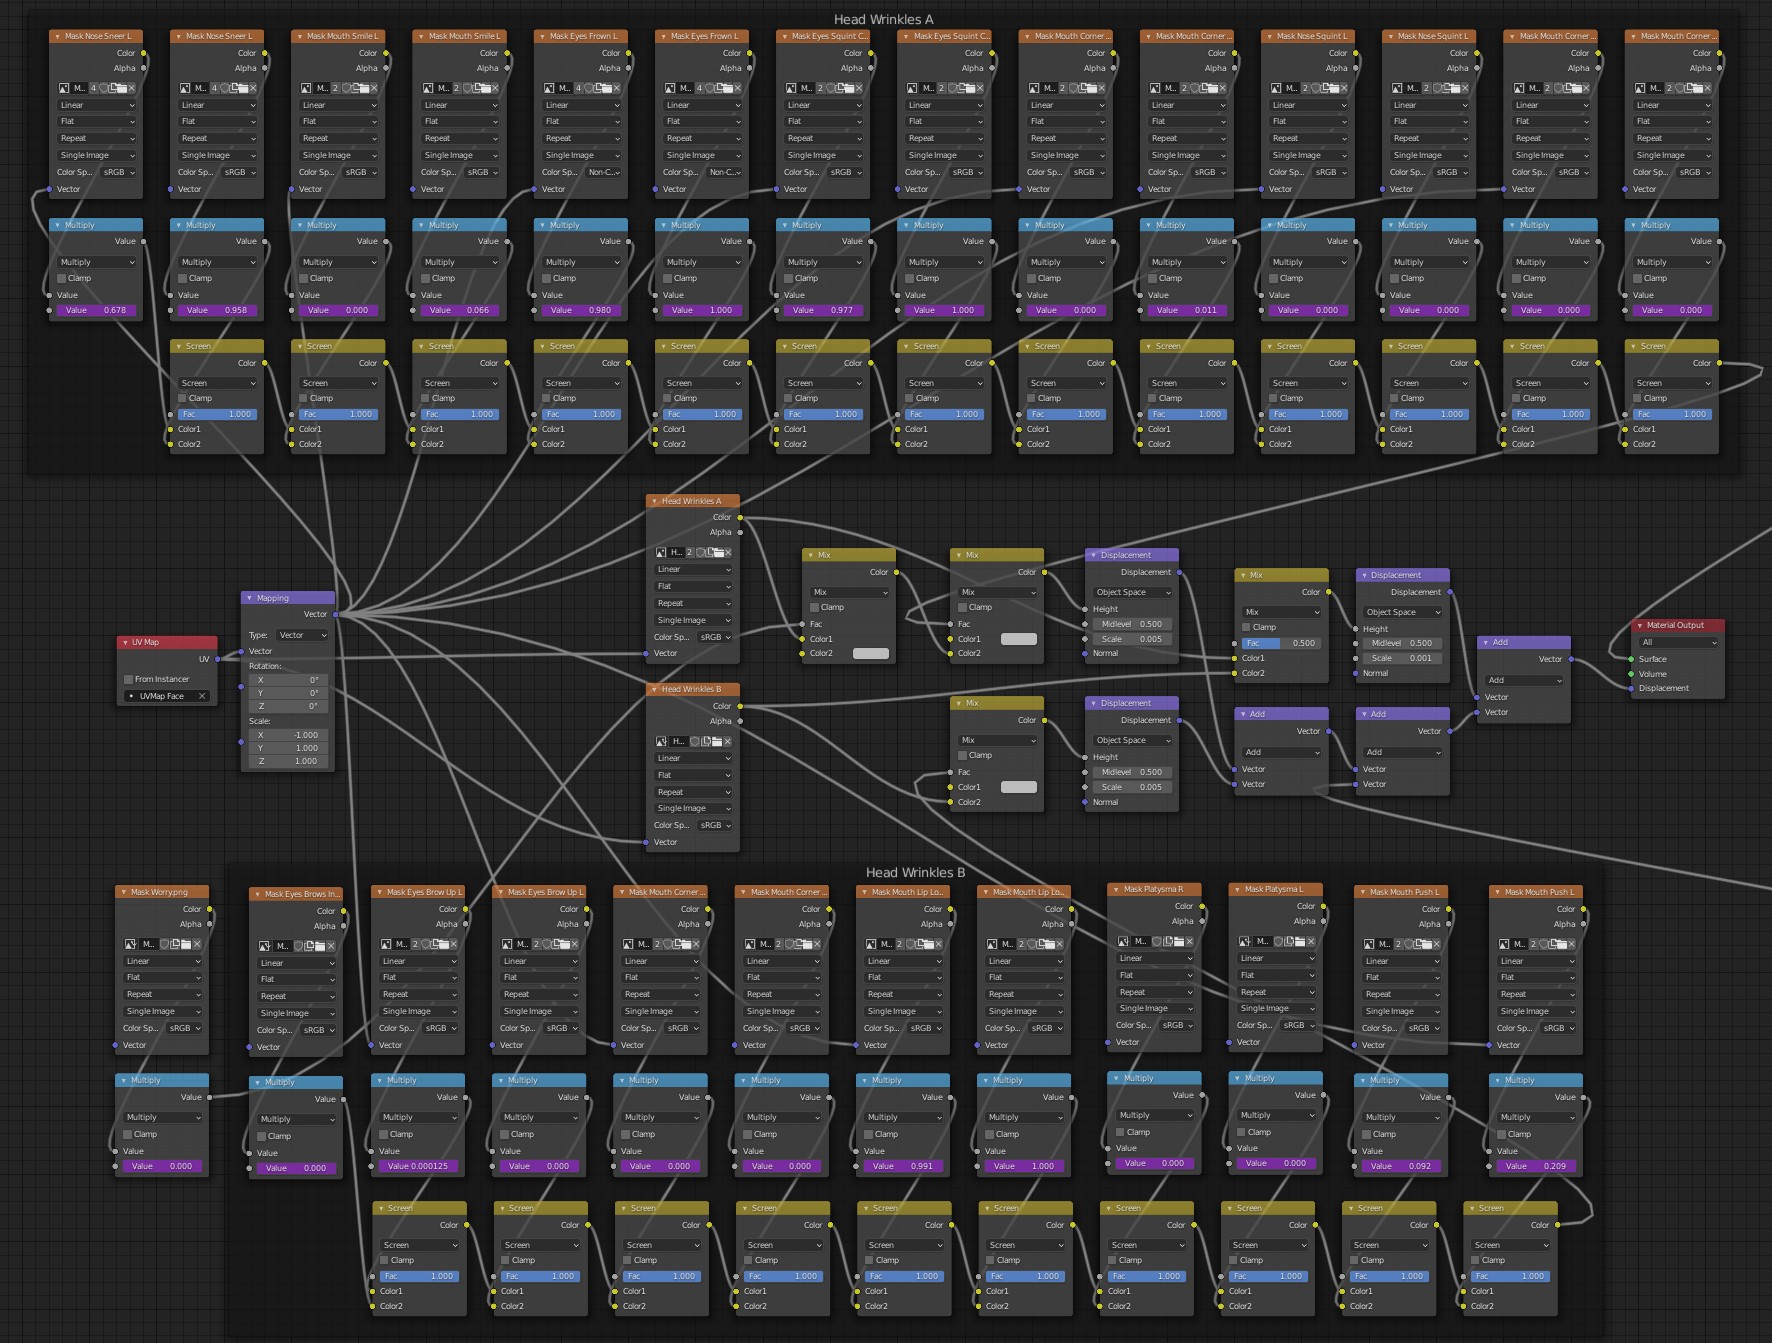
The hardest part of this was mixing the masks in such a way that they don’t cancel each other out, double up where they overlap, or deliver the wrong displacement Midlevel value. Key to this was to use Screen blend modes to mix the masks, and to add the A and B maps together after displacement instead of beforehand. It’s not quite perfect though, and no doubt there’s a well established “proper” way that someone will care to enlighten me about. ![]()
Clearly this setup is a lot more cumbersome than tension maps, and I haven’t even started on finger joints and other bendy body bits yet. It’s not quite as organic as tension maps either (something as simple as this would be a challenge), and I have to approximate the areas of influence rather than relying on tension to automatically generate them for me “correctly”.
On the other hand it works in vanilla Blender (even 2.79), and there’s more control over the wrinkles, even if it’s less accurate. Ultimately though this is just a stopgap, until tension maps are a workable option.
In preparation for the wrinkles I had to refine the shape keys and reconfigure parts of the rig, as well as redo the eyebrows so I could see where they were in relation to the wrinkles, since the hair particles had lost their symmetry and started to stray (along with the eyelashes). I revitalised the skin as well, since it had lost its lustre at some point.
And there’s something else you might have noticed…

This is an interior “skull” structure onto which the head is shrinkwrapped, and onto that I can sculpt bony landmark definition for the skin to slide over (the features are exaggerated somewhat for the purposes of this test).
I’m gradating skin thickness by using vertex groups on the exterior object, however there are creases which I think are caused by the linear falloff of the vertex groups between polygons. So far it’s subtle enough that I can get away with it (with the help of some surface texture), but I have further plans for this that might not be so forgiving…
88 Likes
This is just mind blowing, what you are actually doing !! I can not find anyone doing this that realistic !
I just have a little question, how do you make the wrinkle map, with sculpt ok, but how ?
5 Likes
This is amazing! Your attention to detail is a thing from another world, but I’m honestly more impressed by your patience and discipline than anything else…
Going through all that process looks so painful! I definitely don’t have the patience for it 
I think you should use this example as yet another reason to ask the devs for a proper implementation of tension maps natively in Blender, maybe with a thread on the devtalk forum to ask them directly there? Something like this, which is not a corner case or some strange use of the tool should be possible without such complex workarounds, specially if Blender is meant to be used in production, right?
12 Likes
Hey, Im sorry but this is way too good to be true. We need some form of tutorial on this because it is actually mindblowing. You really outdid yourself again on this one chief.
Oh boy that sure is a lot of textures… I’m sure a better/ more optimized technique will be discovered in the future
You continue to blow my mind with this project! Just…such creativity, not just artistically, but in the general way you solve problems and come up with neat solutions. And you do it, all whilst making us smile. Thank you! 
2 Likes
Fantastic work Chris, it looks amazing. Can you preview those wrinkles in the eevee view-port while doing the animation?
2 Likes
this is what i need to know… it will completely change my world LOL
Blender is used in production every day in hundreds of projects. It just don’t have every and each imaginable tool in the world, but it doesn’t mean it can’t be used in production. Obviously if your production is to make an hyperealistic animatable fully functional human model, yes, it has it’s limitations. Having said that, tension maps would be very useful indeed
1 Like