It is releaving to know I am not the only one that forgets what I already did ![]()
1 Like
烧麦老师,问一下您是通过什么方式替换或者改变模型的。是雕刻吗,还是有某种将这套骨骼系统转化到其他模型上的方式,谢谢!
I’m far from able to do and even understand how you do those awesome things…
But… Shit ! you guyz trick my eyes !
This needs no word except when ( as i do ) you know those are CG !!!
Gives me some shivering… this is… insanely beautifull art !
Thanks for all your great ability !
Thanks ! It’s kinda orgasm for the eyes…
Thanks !
1 Like
Welcome to Blender Artist!
If you would, could you please use a translation site, like Google Translate …and post in English Please.
欢迎来到搅拌机艺术家!
如果您愿意,请您使用翻译网站,例如 Google 翻译 …并请用英文发布。
you can use this addon to transfer the shape keys, drivers, vertex groups, and vertex colors, of any mesh from one to another as long as their UVs are aligned.
1 Like
Hi, when i append the skin shader, the wrinkles group node is missing, so i don’t know how to connect the wrinkles maps.
Not sure I understand…
The wrinkles node group isn’t included with the shader, because it’s integral to the rig. So you’d need either the Face Rig or Body & Face Rig (which it is included with), or you could try constructing your own if you want to use it with another rig.
that’s so helpful,thank you!
Thanks, i found it on the original head material.
Hey chris ! i dont know if you already answered this but i am truggling to get a nice smile with the rig right now .
Here is my reference
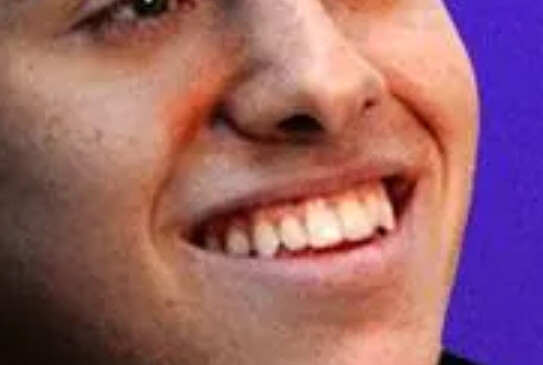
and here is my result
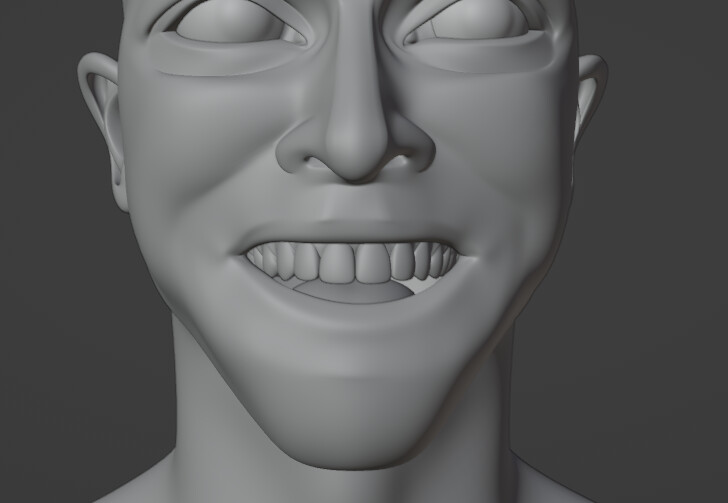
and i think it looks really different from the reference, i’d love to be able to see the process to get a good smile, thanks !
Yeah something looks out of whack there… to get a smile I’d normally move Mouth Corner 1 up diagonally, Lip Lower down and Cheek up slightly. Your reference looks like it has a bit of Jaw down as well, and not much in the way of Cheek up. You’ll need to do some reshaping for the more personalised characteristics like thinner, more raised upper lip.

If you’ve sculpted or changed the proportions around the lips and the eyes, bear in mind you’ll likely also need to iron out any kinks that’s created in the shape keys.
2 Likes
Hello, I want to buy your eye shader and tearline. I have been making it myself for a long time, but I can’t make your effect ![]()
1 Like
I’m currently testing the eye materials and preparing renders and documentation.
I haven’t decided how to distribute the tear line yet; it’s presently part of the body object, but if I come up with a way to do it with a shader trick at a later date, that would pose a problem if I’d already been distributing it with the base meshes. I’m not sure if it even makes sense to include such minutiae with a base mesh (the vellus hair is in the same boat)… and if I can’t make them separately appendable items, they might end up as part of a more complete version of the head.
Excuse me, I bought your project file. Why is there something black on the double eyelid? It looks unnatural. How can I set it to be as real and beautiful as your rendering? Looking forward to your reply, thank you.

I don’t think there’s anything black there, it looks like shadow to me. You can scale the light up to soften the shadows. Turning on denoising and feeding it lots of samples should help with realism.
Hi Chris, the eyeliner on your most recent render looks real good, and I was wondering if you could shed some light on how you achieved it, regarding roughness values and such? I assume it also affect SSS too? It’s something I’ve often struggled with.
Thanks! ![]()
1 Like
The eyeliner is an opaque, almost black material with a roughness of 0.3 and no SSS. There’s also metallic eyeshadow which is mixed 86.8% with the skin material, and has a roughness of 2.68.
3 Likes
That’s super helpful, thanks!
1 Like
Hi Chris,
I just bought the universal human shader. Which is great. But I can’t seem to find the Wrinkle map node to plug in the wrinkle texture into. Am I doing something wrong?
Thanks
See the post above: