Little Jonny

Oh, and about the flameblade.
Is it possible that you could create with less particles if you used a colorband that extends from transparent to black to transparent for the alpha channel of your material?
I wonder if it would create some nice long, thin flame threads.

Seems like I saw a tutorial on it once, a long time ago…

Errr not sure, could you elaborate? I’m not entirely sure what you mean. Sounds like a good idea though, is it animateable, because the only reason I’ll keep the fire idea is if I can animate it.

Try adding the loops where the red lines are but pretty close to the current loop.
I dont know what causes this but I know this usually fixes it :eyebrowlift:

Updated blend attached with switch ‘cut out’

Attachments


electric guitar.blend (182 KB)

Oh for your particle flame effect it might be worth taking a look at the blender art magazine Number 16.

You can download it plus its blend files at: http://www.blenderart.org/issues/

I’m not entirely sure how it works or even if it works. I just had a vague memory of a tutorial that I can’t even find anymore that used the colorband. I suppose this advice is about as useless as it gets.
I think it had something to do with a plane that used the alpha of a colorband to mimic blades of grass. Then that was particled across the ground or something.
I’m just trying to think of ways to give you bigger particles, so you’ll need less of them.
As for animating it, I suppose you could animate the texture or the particles.
I don’t really use particles much, so not much experience in that matter however.

I did just find something in my own mesh that might help.
Your extra vertices tend to warp the surface, correct? Well I have the same problem time to time. The mesh I’m working on now (a simple lighter) has that problem in spades. However, I noticed that at every point the mesh is warped, there are multiple edges running across the same space. I delete them until they’re all gone, then undo to put the last one back. After refilling the spaces, guess what? My mesh is no longer warped there! Still gotta figure out how I screwed that up in the first place, tho.
I wonder if your problem isn’t related. Try finding an edge that’s causing you a problem, and delete it. See if there’s another one under it.

I think it’s caused by extra poles/vertices/edges adding extra stress to that face.
I’m not sure whether CG can be compared with welding, but the issue seems similar to one where too much heat is applied to one spot on metal.

Makes sense, you could also try ‘removing doubles’ to get the same effect as deleting overlapping edges/verts etc. If you hit ‘W’ its in that menu.

I have had it before when modeling a wheel but this wasnt caused by overlaps but in fact close verts not being the same height but with a really stretched face. When I shortened the face / simplified it or sometimes just made them the same height this can fix it.

Yeah Remove Doubles. D’oh!:stuck_out_tongue:

Adding loops to the problem spots seems to be helping really well too.
Looks like a good way of adding support.

Krayton particle effects are very easy to animate and dont tend to add too much to the render times.

I think how to animate them would be in the blender art mag :slight_smile:

Thanks for the advice guys, yeah, I got the blenderart mags, just haven’t had time to really go in depth, may do that after school is done.
Yeah, I get where you’re trying to go on the delete vertice bits, though most of the time there aren’t extra vertices nearby, usually I’ve noticed, it’s caused by either lots of vertices over a long distance meeting at one point or a triangle of vertices at a long distance.
I went over your .blend odeas (the old one) and that was a really good reference for remodelling the guitar. It’s looking much better now, except for a vertice stretch:


The mesh:


The model:


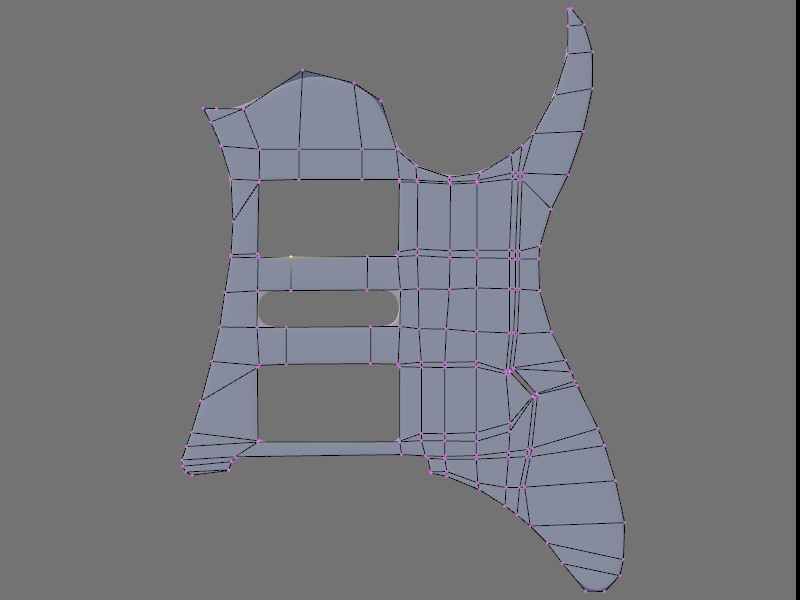
The pickboard:


It’s all going nicely now except for that stretch… Those things always manage to pop up.
I realised in the shower last night that this would make a good resource for newer blenderers if all the questions were answered because not only can they learn what not to do, but they can learn what to do when modelling. And since I post changes based on an approximate work of 1 to 1.5 hrs the updates are pretty much to latest you’ll get outsideof a tutorial.
For my benefit and others I’ll list all the unanswered questions in this thread, note I may miss some as I’ll definitely cover them later anyway:

  1. How do I get sword flashes on blade impact?
  2. Any ideas on the weapon materials?
  3. What does edge split do?
  4. How would a get a good energy blade effect, so it actually glows etc?
  5. The copyright issues behind using a song that I have bought and have on my computer currently in the project…
  6. Microphone head modelling method, to get a good mesh effect?
  7. Animating the textures?
    I think that’s pretty much all of them… for now. I’d like it if someone(s) couldl help with all of them.
    The render/preview render problems still going even though I’ve tried all suggestions and a few of my own inventions.
    A close up of bloth:


    The blend file will come in a sec I’ve run out of add on space.

The blend files of the powerblade and the firestaff, you can take a look at the blade emmitter and tell me what you think…
Katana.blend (439 KB)
The bladestaff can be found here:
http://www.savefile.com/files/1769882
Enjoy =).

About that stretch: I notice that you have 2 edge loops very close together at that point. Try deleting one of them, or if your mesh really requires them both, move them farther apart.

Sword flashes on blade impact: A small particle spray set to the Collision sensor should do it. (If this is for GE, if it’s a regular animation, you would need to start and stop the particle spray yourself.) It shouldn’t require too many particles, as your just going for a few sparks, right?

Edge split: Indeed, what does edge split do? I’ve seen on several threads that it’s important, but not what it does.

Copyright on a song: Whether or not you bought a song, the artist still owns copyright. Read the FBI warning at the beginning of movies for a pretty good idea of what you can’t do. (Without permission) For example, you can’t copy it and distribute it.

Animating textures: The IPO window has a material type. You can use that to set keyframes. (On color, scale, offset, and a lot of stuff.) Have the mouse over material buttons and press “i” to get keyframe options for it. The logic bricks have an IPO actuator, that you could presumably use to play given frames of your IPO. (The ones containing your material animation for example)

Weapon materials: Well, metal generally is reflective, so experimenting with RayMirror should eventually give you a good result (compare with real metal objects to get the right reflection) But hope that RayMirror can bake into a material if you’re using GE, because that takes forever to render, even assuming the GE can handle it. Or just wait for Blender 2.5 and figure out how GLSL does it.

I have attached a quick, dirty material animation that works through the GE. Press P to play and the box changes color.
IPO window and logic bricks are visible to show how it’s set up.

Attachments

AniMatTest.blend (128 KB)

Great thanks, I’ll check it out.
Next up the neck, won’t be able to work on it today though since I’ll be getting home somewhere around 12 midnight…

Where you have the 2 close edges causing that stretch effect try deleting the top one of the 2 close edges and you should get rid of the effect.

I dont tend to really use edge split as I normally crease edges or add loops but here’s additional info: http://wiki.blender.org/index.php/Manual/EdgeSplit_Modifier

Also you might want to check out this lightsaber tut for the glows:
http://blenderartists.org/forum/showthread.php?t=62611&highlight=lightsaber

As for the microphone i’m not sure. I’ve had a go at this before but it didnt turn out very well. I’ll try and find some information or a model to take a look at.

I’ve had a go at creating a microphone head.

It simply uses a normal map, spec map and color map that I’ve created myself using CrazyBump.

You can easily see where it tiles but it was just a test :slight_smile:

Attachments


Great, thanks, when I have time I’ll look into it.
I was hoping for a way to model it literally rather than applying a bump map to it, buuuut I do realise that bump maps are a bit better in a lot of respects for that sort of thing.
Checking out Crazybump as I speak, unless someone can recommend a better free program…

Well its free to demo. If you want the maps i used let me know.
As for modeling it. I think it’d be a bit of a nightmare.

I can have a go and try to use an array to create a large section of it but think i’d have to use a lattice or something to shape it to a sphere as I dont know any other way to then get it to follow the exact shape… hmm. Play time :slight_smile:

This is about the best I could do.

Using techniques learned from the cage arena thingy on this thread
http://blenderartists.org/forum/showthread.php?t=133815&highlight=all+those+tris&page=2

Attachments

MicHead.blend (891 KB)

@Odeas: Neon’s got the idea on this, I’ve seen it around just never understood. It should work, I’ll see what I come up with, if it doesn’t work I have your idea to fall back on. =). Actually I’d like to test out both. To see which works better.

Fair warning, that little ball has 19,800 faces.