I know that it’s impossible to achieve the same level of realism in my computer with Blender as artists who have been doing this for decades and have specific renderers coded for each use.
But in the two weeks I’ve been learning Blender, I’m very impressed with the level or realism you can achieve with a free software, and I would be impressed as much if it was a render from Maya. But I know that I can’t get to that level. I would just like to get close, as close as I can with Blender.
I’ve been playing around with this model for two weeks and having a lot of fun with, editing shaders, trying out different things, and setting a render before going to bed and loading it in DaVinci Resolve the next morning to see what it looks like.
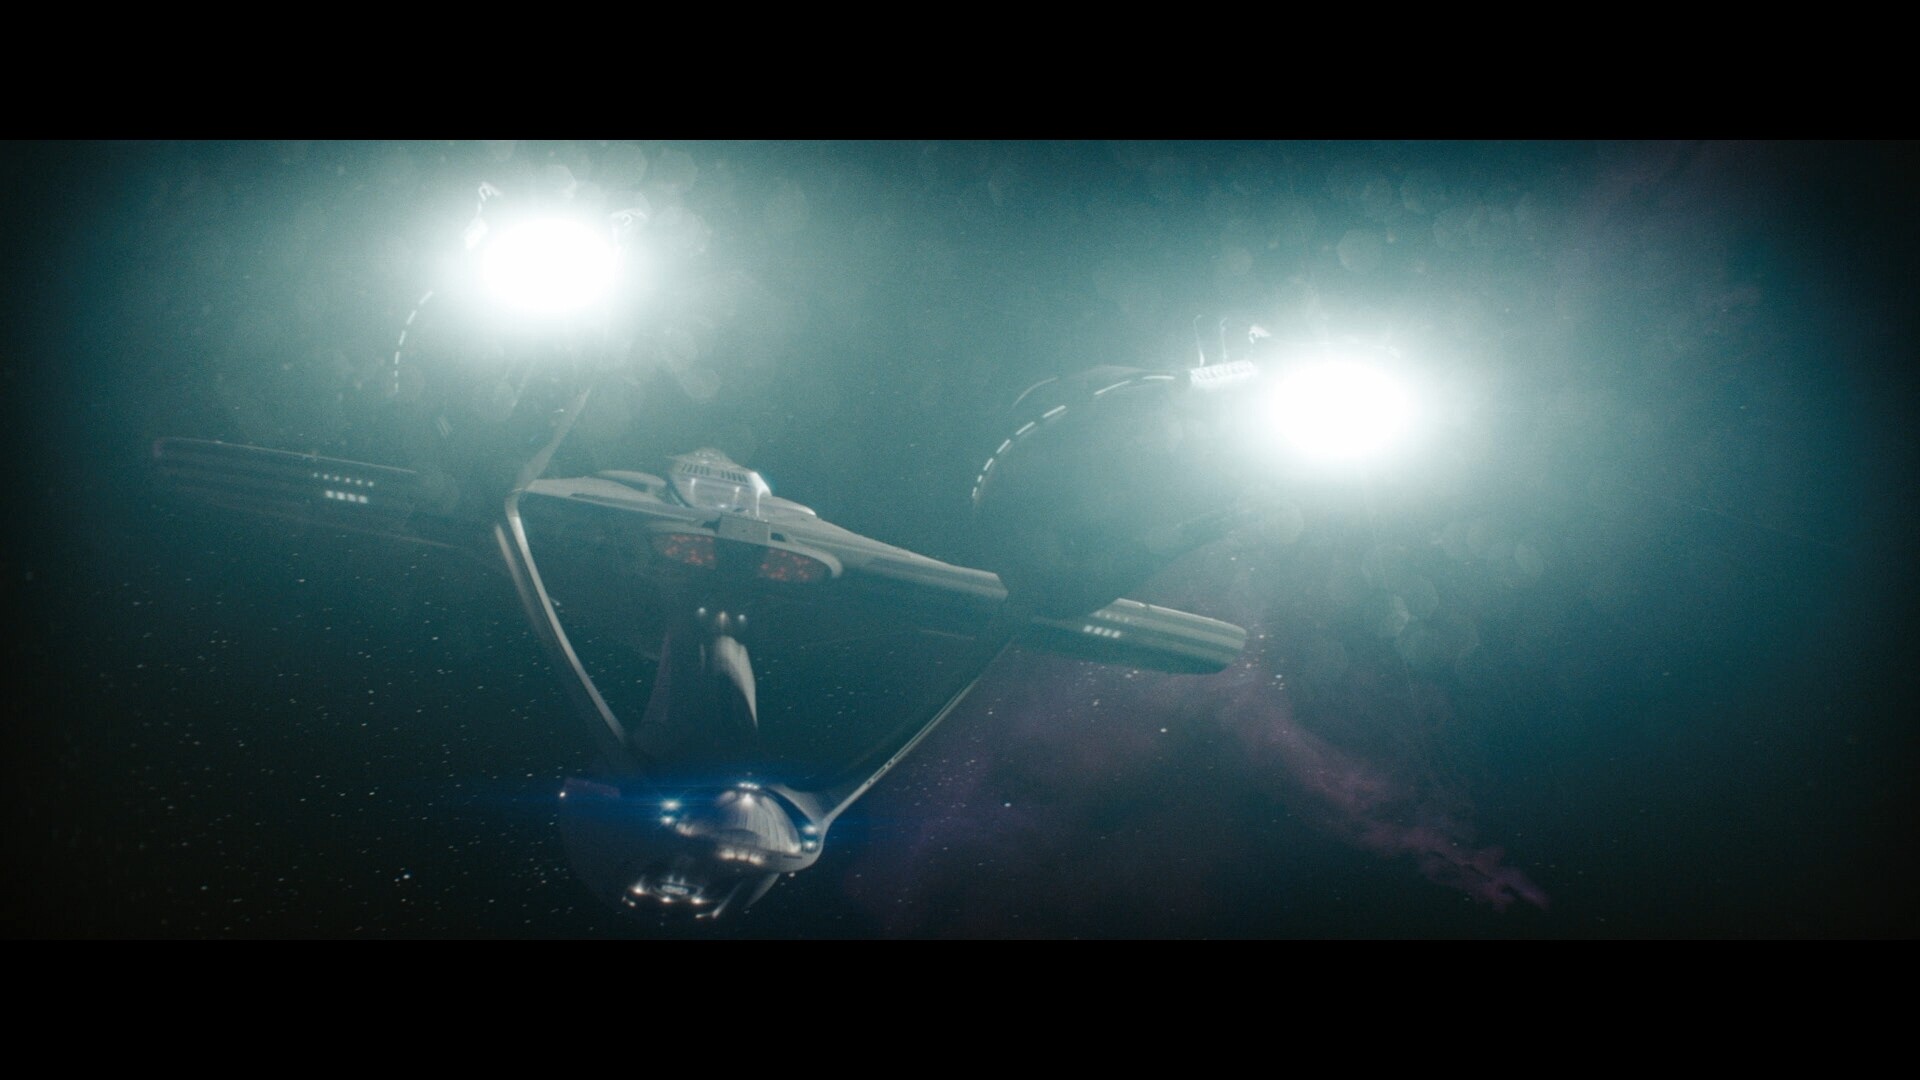
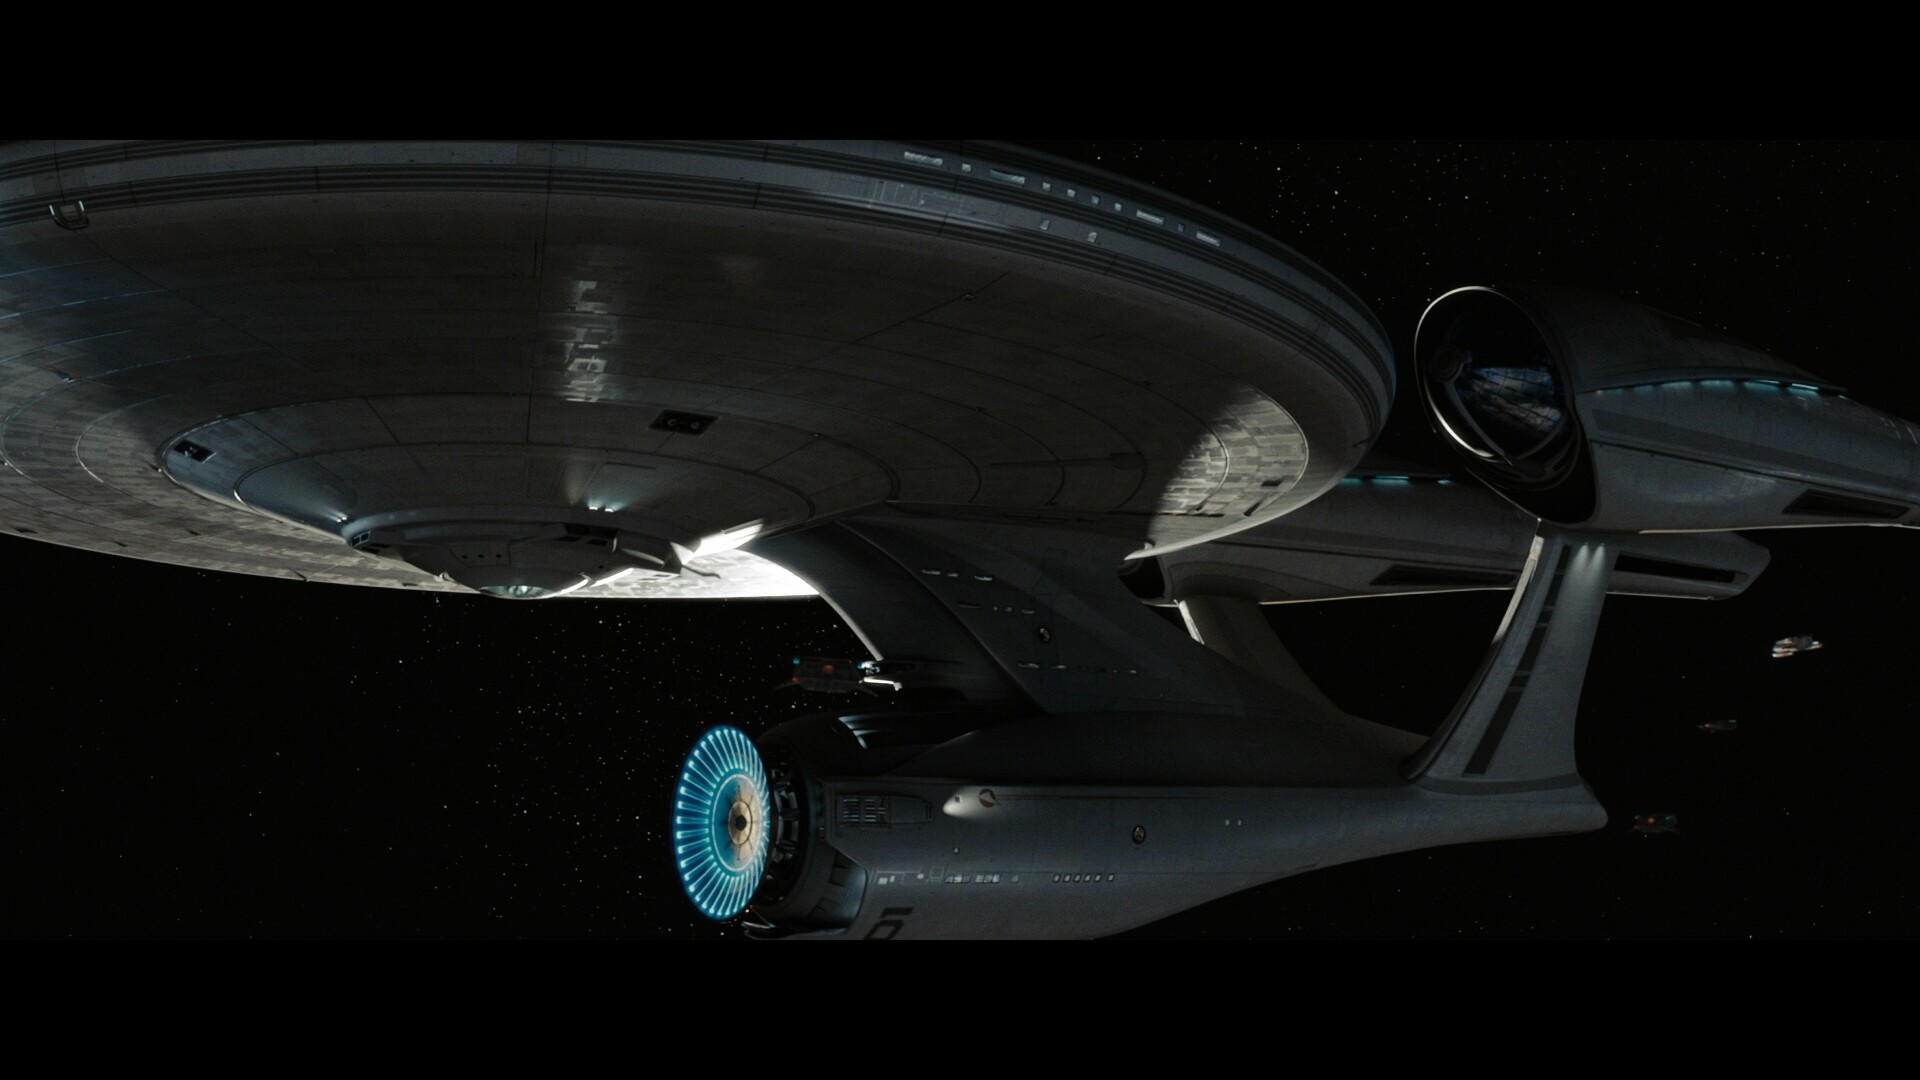
So I’m just looking for tips on how to get as close as possible to this, all within Blender, not external renderers, just Blender Cycles. This is what I’m using as reference:
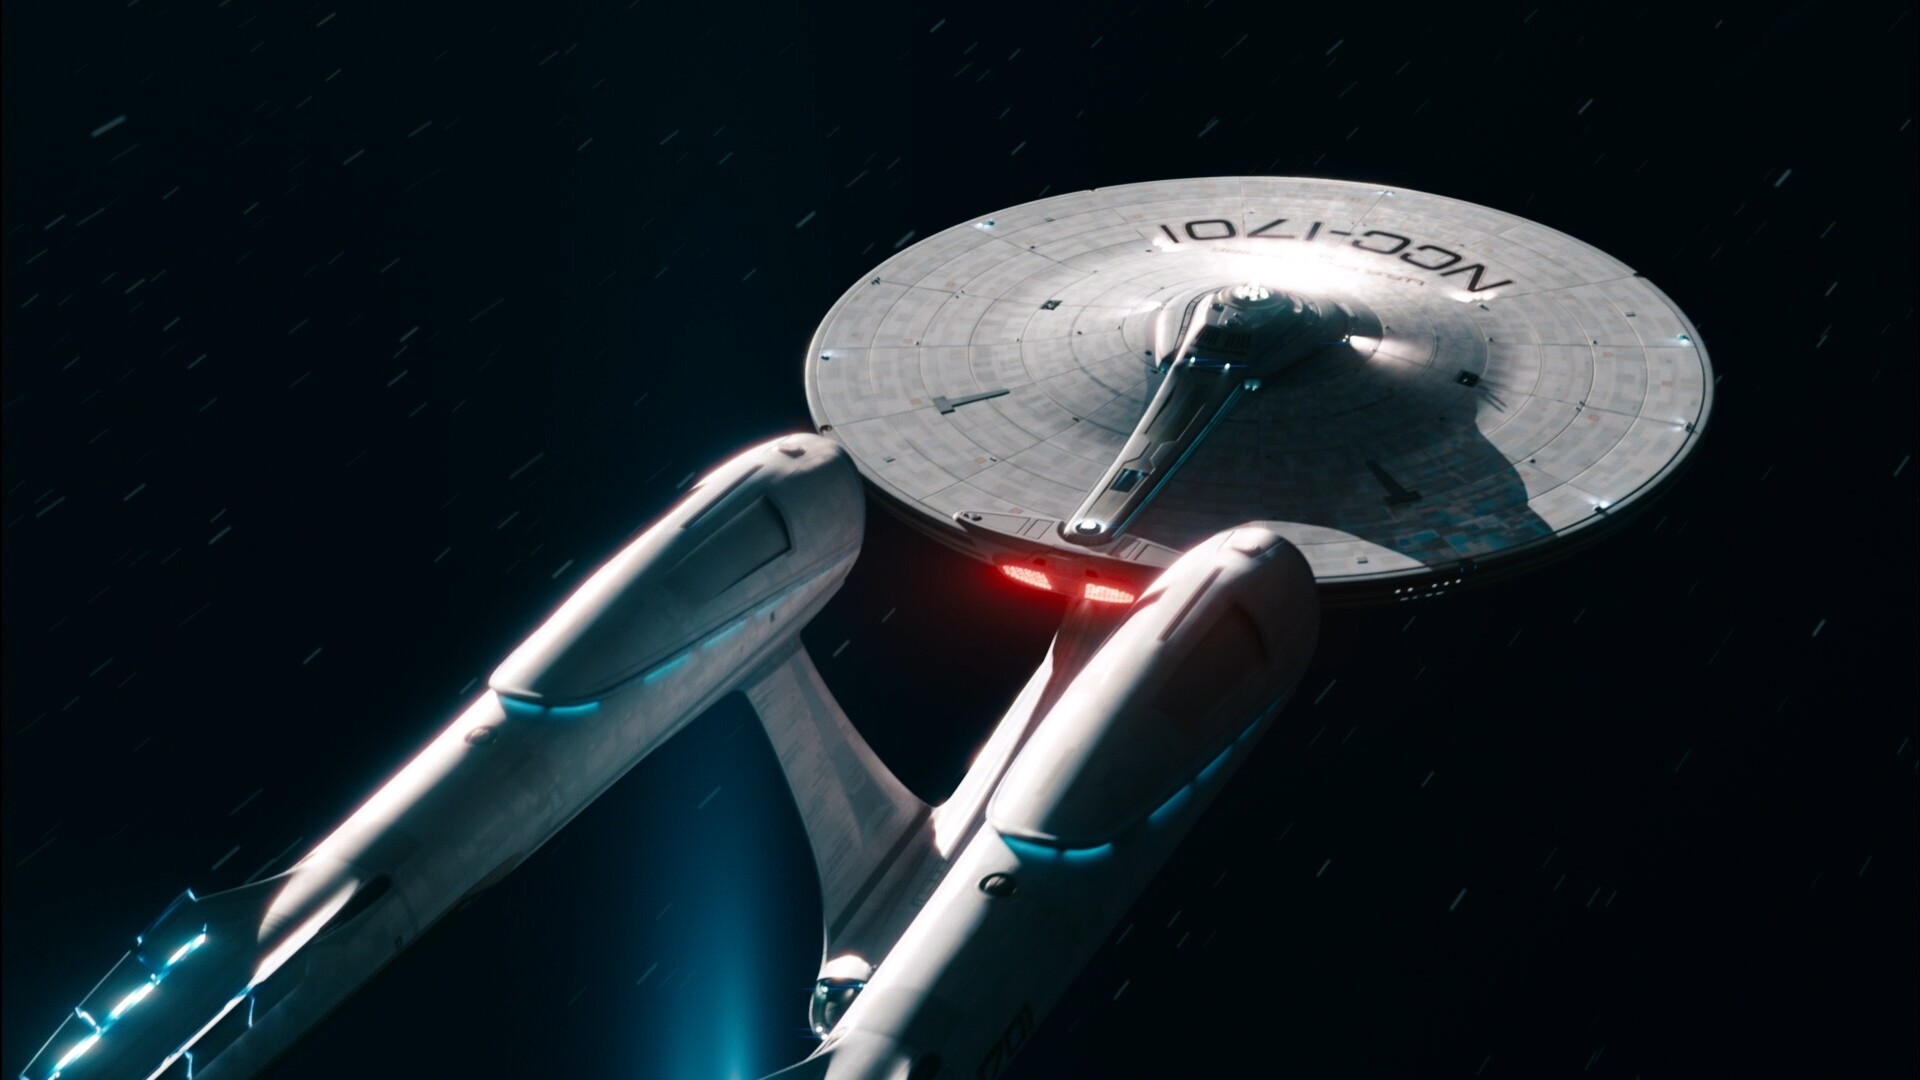
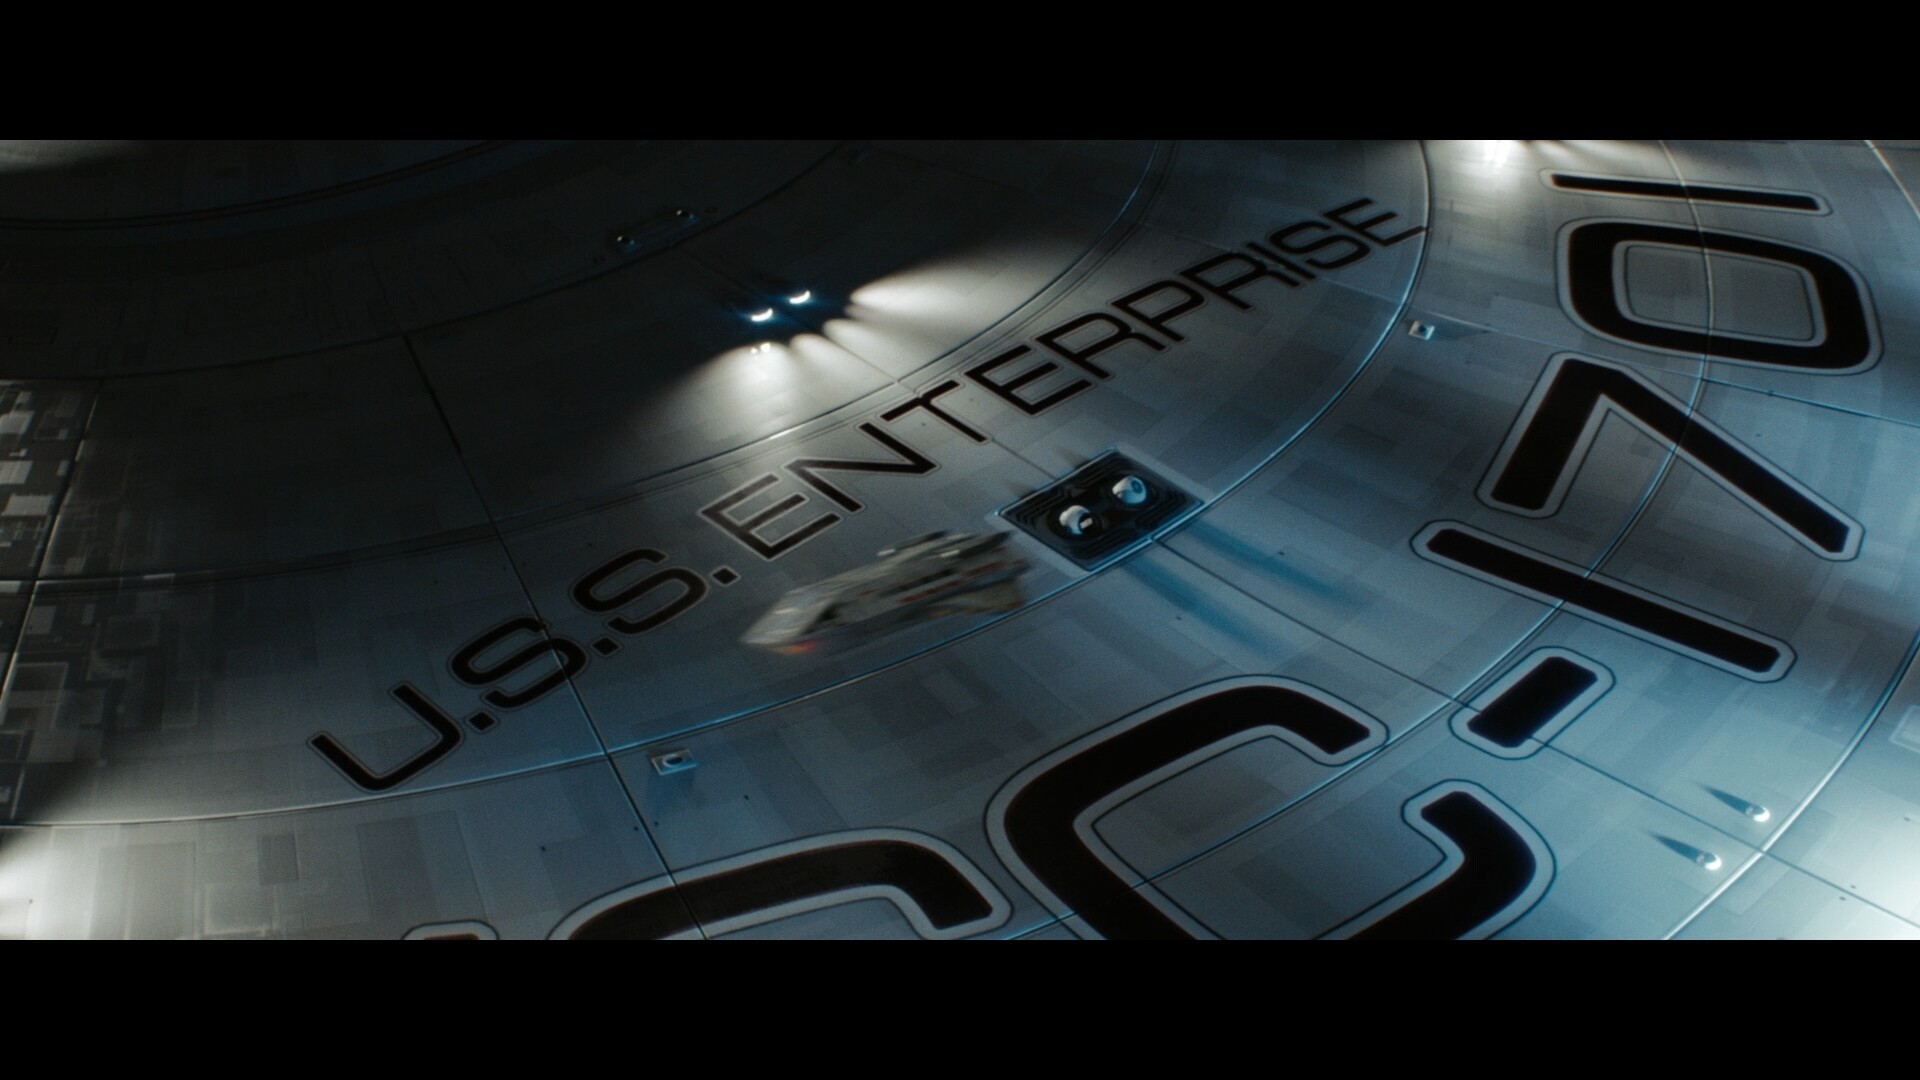
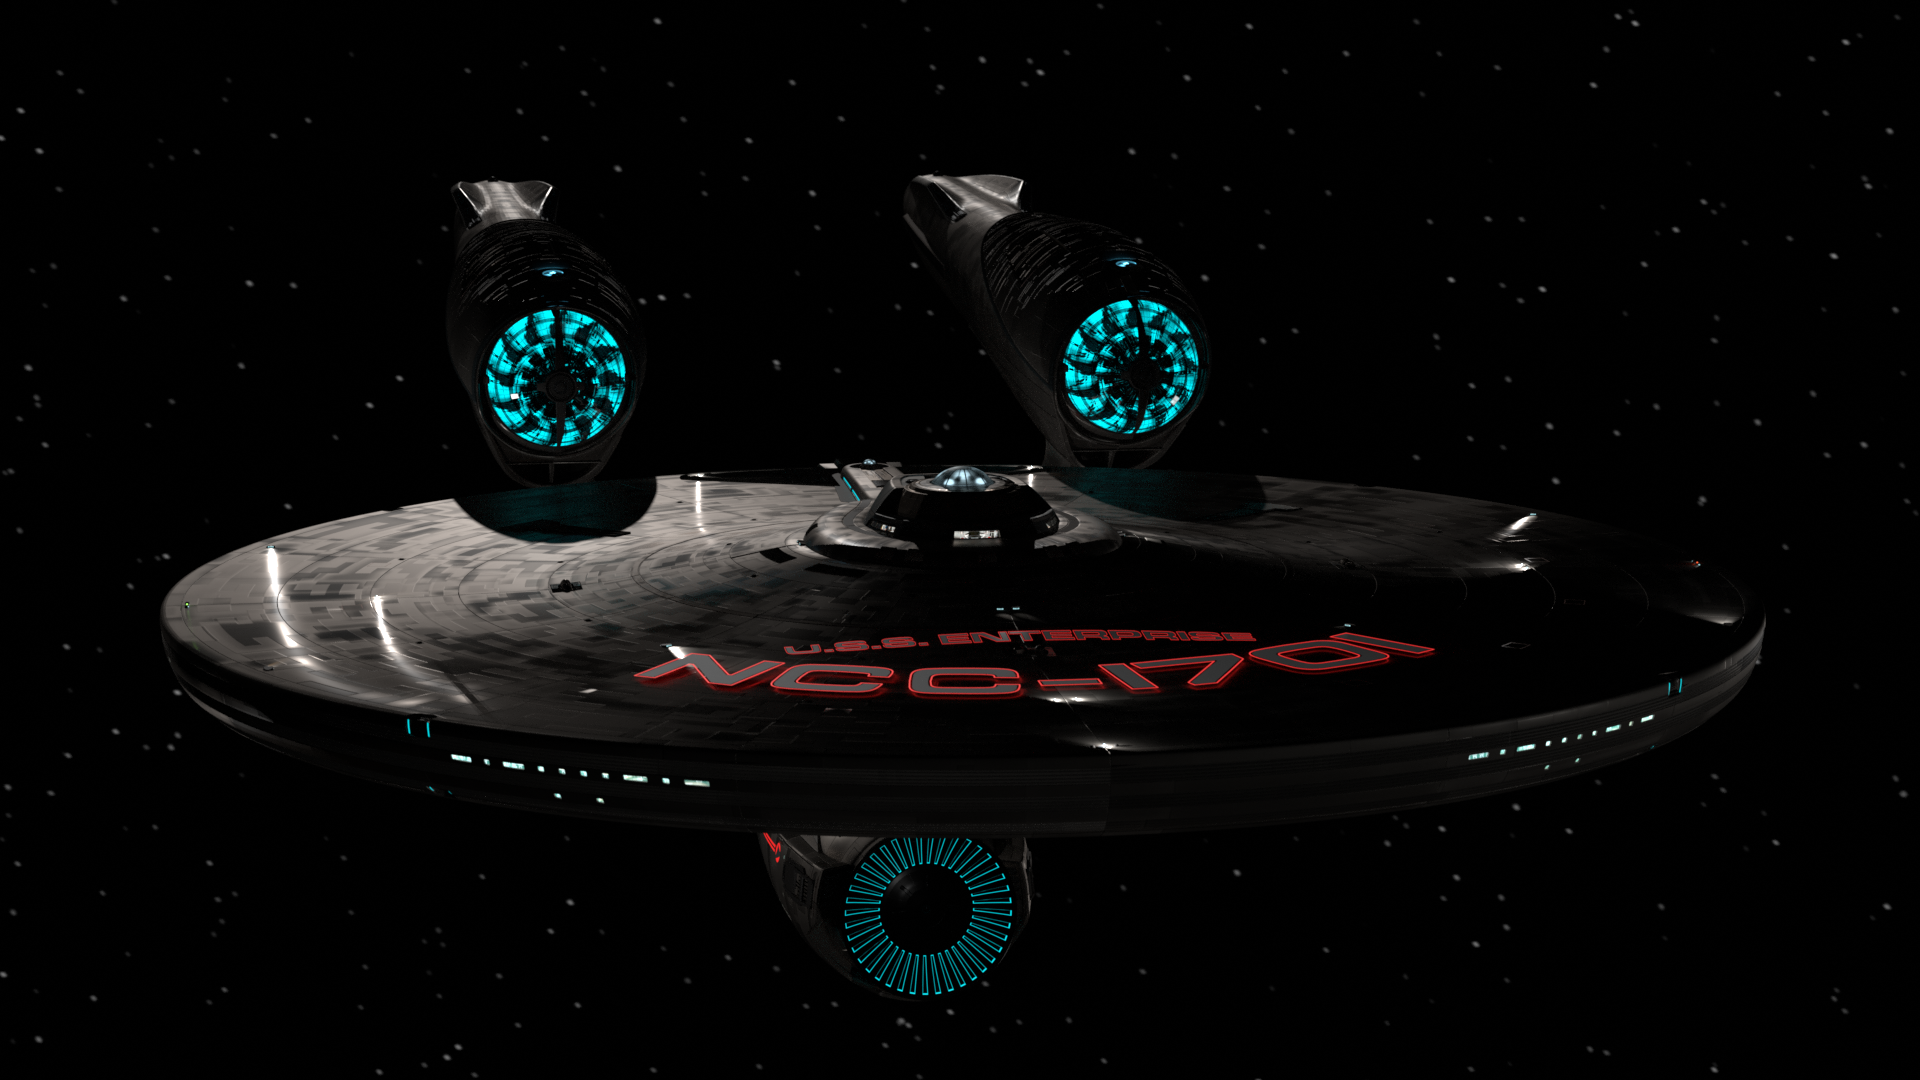
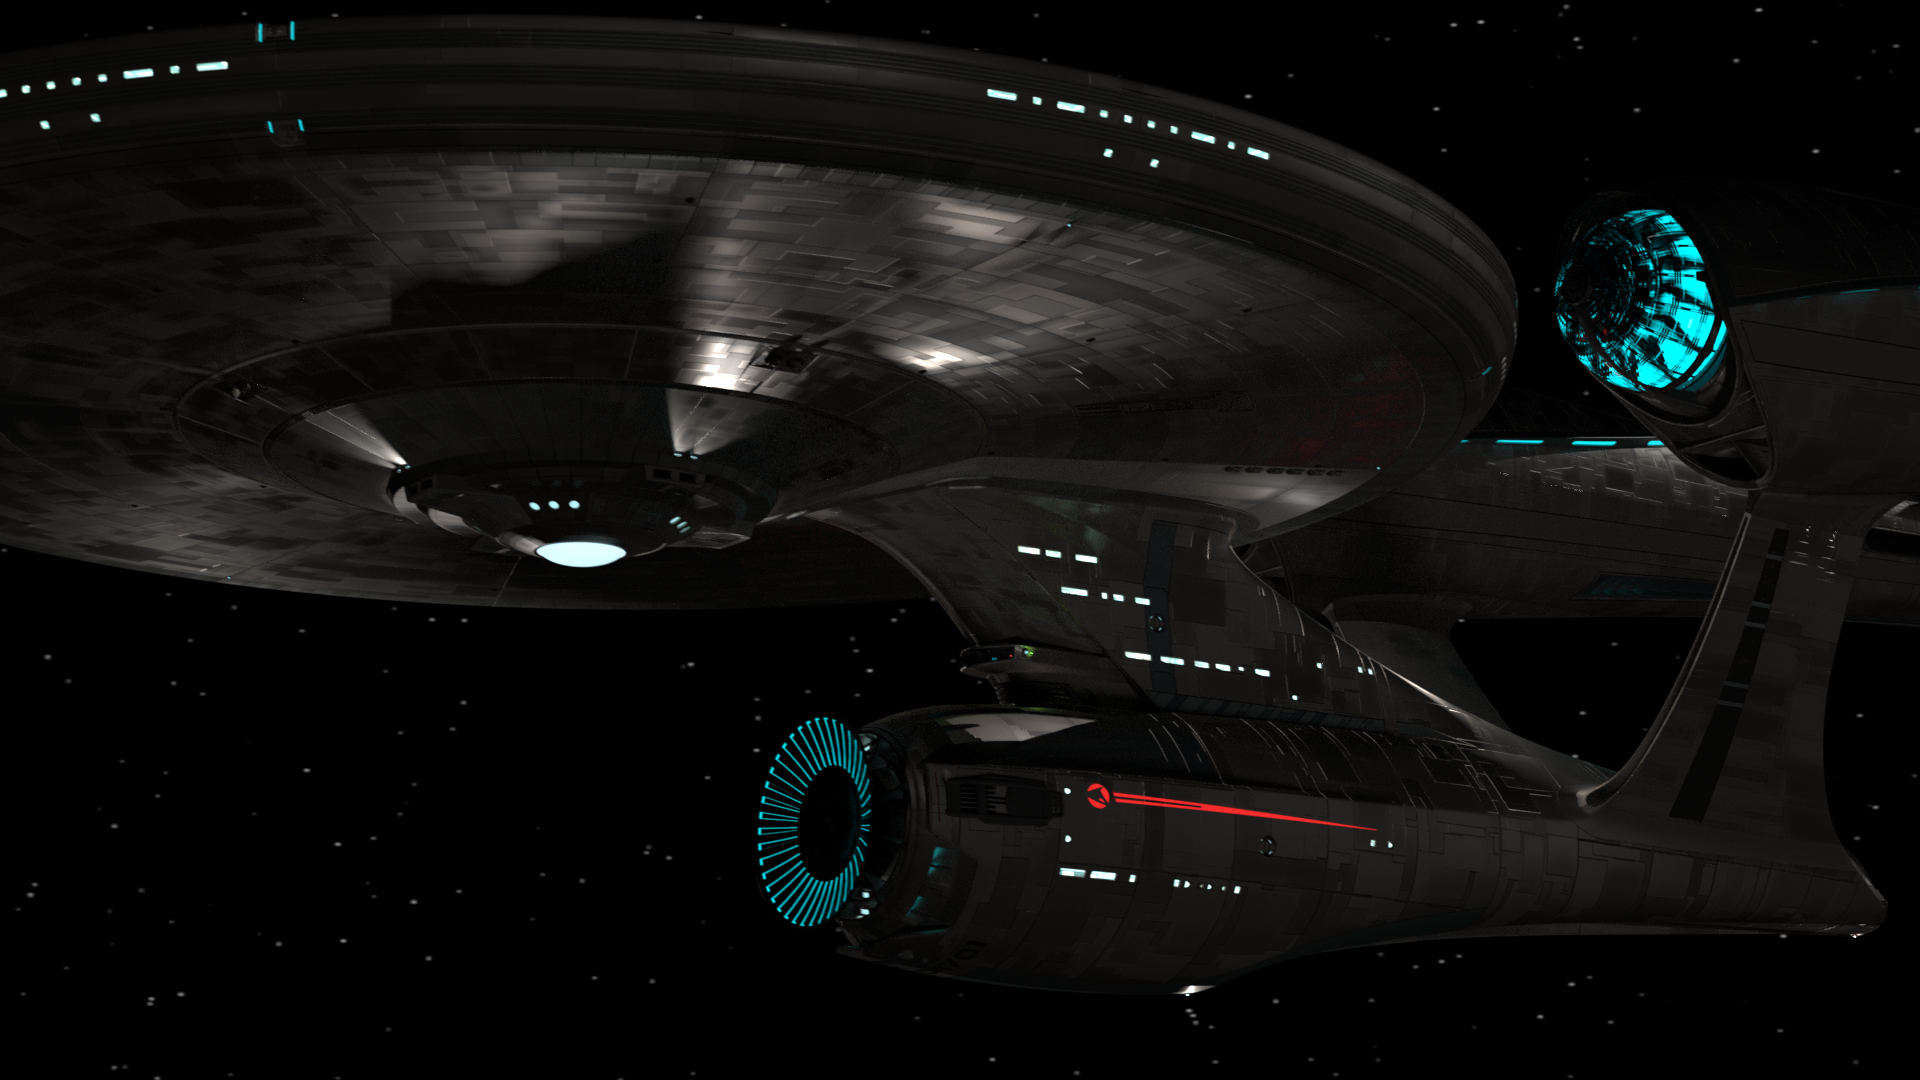
Now, this is what I have so far, but these are straight from Blender, without all the FX in DaVinci Resolve, like grain, lens dirt, etc. Obviously nothing that’s going to wow anybody, after all, two weeks ago I didn’t know Blender at all. You may notice it has a more metallic look, and that is on purpose, after all, something tells me realistically they wouldn’t waste millions of gallons of paint on these ships. How many ships do they have in Starfleet? Hundreds?
You may also notice that the big letters are a bit suspended in the air, and that is also on purpose, because I just like the way it looks, and if these people can teleport human beings hundreds of km away, I bet the science to have floating letters on top of the ship would be a real piece of cake.
Still, I would like to make it look more real. I’d probably should render the different passes individually and learn how to composite them in DVR, or even in Blender (I’m amazed at how Blender can handle the whole pipeline from start to finish including compositing and editing video). But I bet there’s a combination of shaders and other things you can all point me to so I can play with them and see what comes up.
Realism for full CG shots are usually achieved by comparing reference images, a lot of them. You can use frames from other movies like Gravity, Interstellar, Stowaway, movies that you consider good, and also real pictures from Nasa. Then you art direct some lights to get a creative look. I believe you’re on the right path by copying the exact camera position, just try to match exact lights. Scale matters, don’t need to be 1:1 just big enough that a sun light can behave like your reference. Hero assets have a lot of UDIM’s, a lot. Also using real world sensor size and focal length will help, Blender has some presets. Check this website for camera data. Final touch is always done in the compositing stage, don’t try to get a ‘real’ straight render.
I’m a Blender user but I must say that Cycles isn’t designed for production level, you will get a good image but will feel that it still lacks something to cinema standard. Arnold, Renderman and 3Delight will get a better look.
Also check the studios that actually did the job, you may get some insights. Movies have higher budgets so they usually have better quality than episodics. https://www.artofvfx.com/?s=star+trek
Remember that those shots were created by a big, experienced, supervised and payd team.
You have done pretty well on the model itself for a single artist, though the original seems to have some very fine detail that would be hard to replicate.
However, I think the big difference is in ligthing and compositing. The lighting in the original isn’t entirely realistic, it’s done in a way that looks pleasing to the eye, with beautiful soft gradients that wrap around the shapes (and the shading of the ship is arranged to work well with that lighting).
One thing that is very important for a realistic film look is to emulate camera effects (lens distortion, dispersion, halation/glare, vignette, film grain).
Here is a video that showcases all those effects. I’m not sure if it’s a bit too fast to follow along, but it at least shows the potential.
keep camera effects subtle, or it will end up looking like a miniature filmed with a cheap camera.
Texturing spaceships with smart materials. This one is more for a grungy, Star Wars style look, though you might learn the potential of some techniques and use them in a reduced way if you wish.
It´s not impossible to create the same level of realism in blender, nor that it wouldn´t be designed for production level.
it´s about your sense of light/color and surface shading texturing, and knowing what cameras to use and so on.
First of, star background, remove all stars or remake them to be smaller…and with more size variations, they are too big, and too little of variation in size, so until that it done, make it mostly just black
the reference images have a very high amount of “unrealistic” GI illumination, just for making it look good in space, while real things would mostly be more harscher.
so you could use a simple white backdrop, or slightly tinted blue backdrop global color, or even an hdr specificly made for space background light, or add a gradient.
now that you would need to disable to not be seen in the viewport obviously, just effecting the lighting of the ship.
You have only harsch direct lighting, no GI…so it is very dark.
The other way is to use additional lights, you can for instance use a sunlight with high angle size, so it acts more like a dome light.
Then it is also a matter of tone mapping, exposure, gamma controlling, and finally…grading and using compositing effects.
this one may be of interest, though using noise filter for animation, not sure that built in will deliver any consistant result, so you probably need to render it without that and post filter any noise in video compositor.
Star wars style, not exactly the same lighting as star treck, but could be tweaked.
coming from Lightwave background, which has been used a lot for the actual real startrek series, movies…I can tell you that blender should be up to the task.
it´s about you foremost, not the lack of lighting quality, shading in blender.
Thank you all so much for the tips. But I see that I didn’t make myself totally clear. Someone sent me a PM and made me realize that. And what you guys put in your replies also made me realized I should’ve clarified my intent.
When I said “more realistic” I wasn’t necessarily talking about the real way the NCC1701 would look in space. Like you pointed out, there’s no GI illumination in space, it’s the harsh light of the sun (or a sun) lighting up the surface that is directly against it, and the rest looks totally black, or close to it. Like you guys mentioned, Gravity and Interstellar are great examples of space realism, hell, 2001 is even more of an achievement given it was shot in 1967-68 and looks more real than most space movies out there to this day. But hell, Kubrick was a genius, after all, he shot an impecable landing on the moon…JUST KIDDING!!!
So what I’m trying to achieve is the look in these Star Trek movies. Sorry for not being more specific. Although, I will also do a real space version where the sun is seen on the top completely overexposed and the rest is completely dark save for the lights from the ship itself. But my first goal is to achieve the look of the movie, for no other reason than I happen to like it quite a lot.
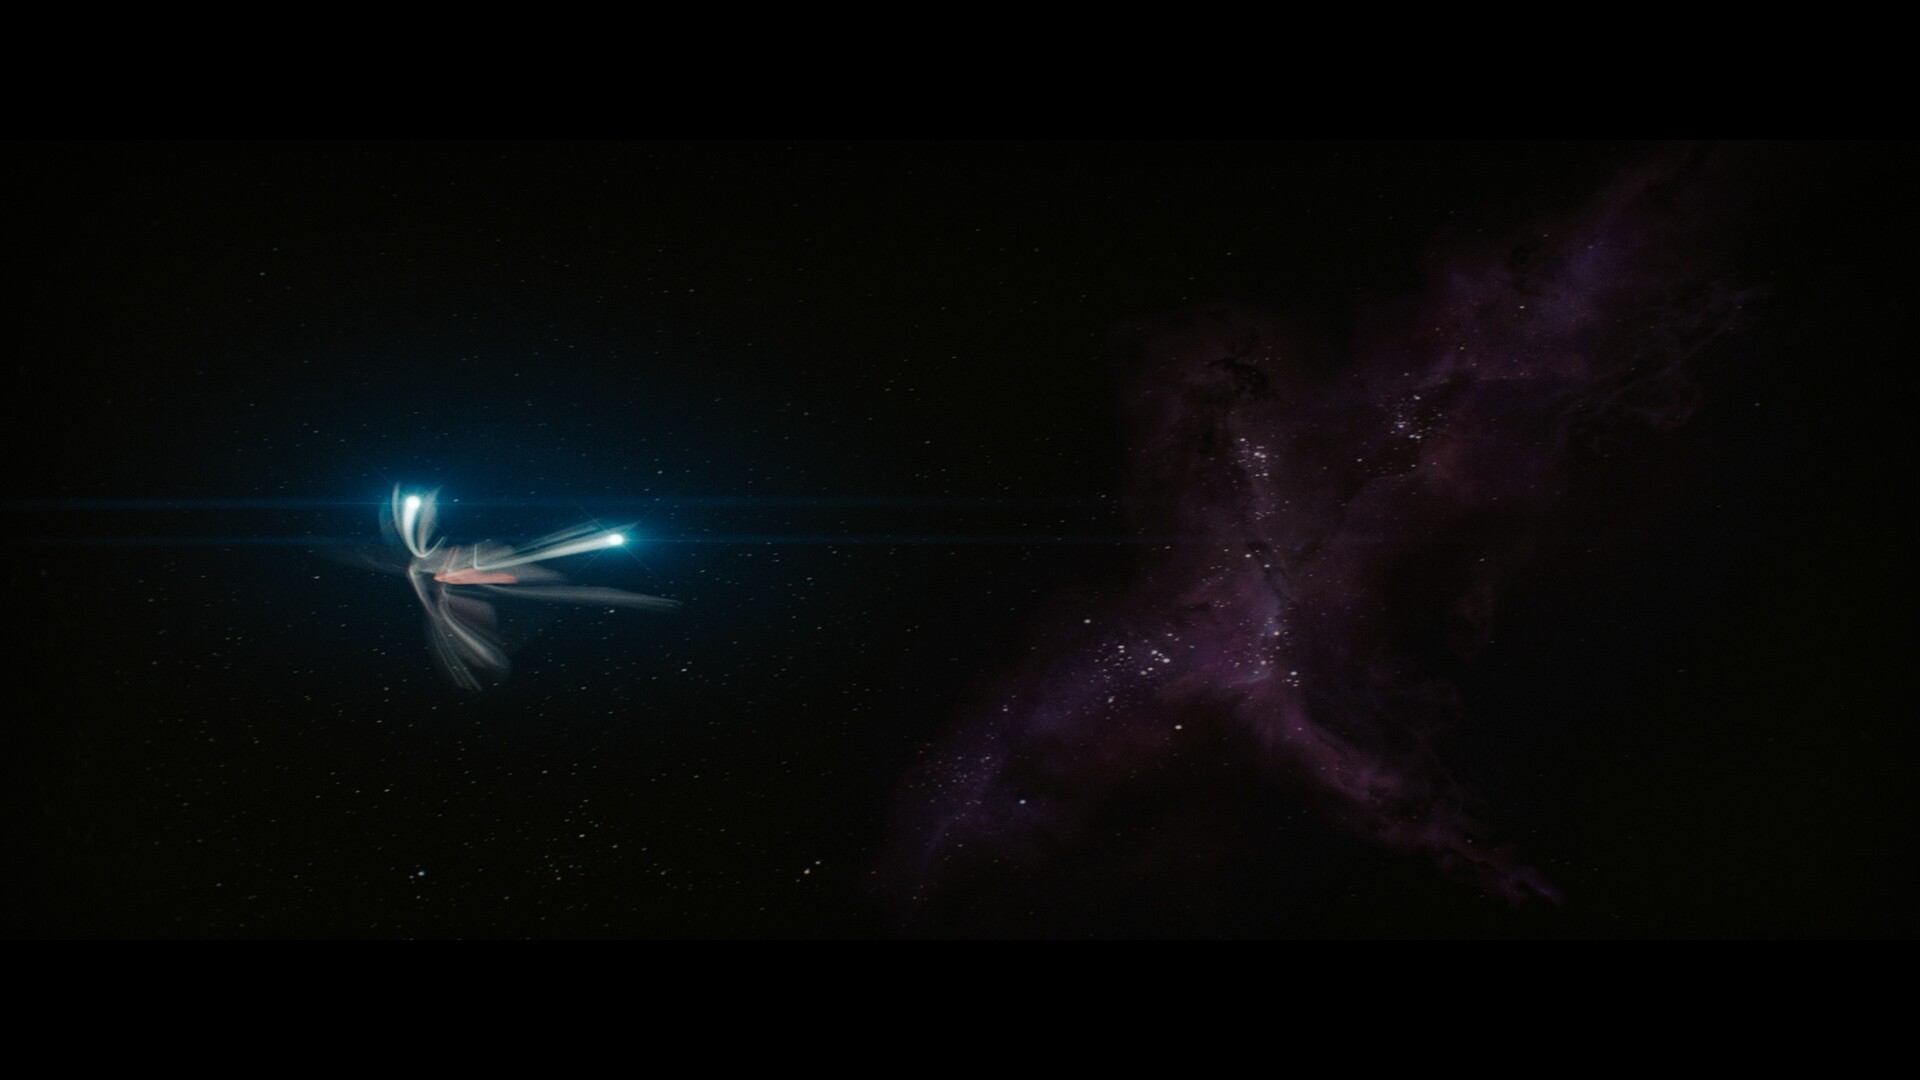
For example, these Warp trails, I spent all weekend trying to figure out how to get at least something close to them:
This one is specially hilarious because the ship goes to warp and takes a curve. That seems a little far off to me, but at the same time, it looks awesome.
And these two from Into Darkness are beautiful. So I would appreciate any tips on what Blender feature I should look into. Because one thing is the ship taking off into warp in the 2009 movie, which while it takes a curve, the streaks are rather smooth.
But if you look at these, they are messy, like the ship is not flying completely straight, but there are some air turbulence. Oh, right, there’s no air in space.
GI …or at least a lot of light bounces are often used anyway, depends on how much of the ship you want illuminated, so regardless of no GI in real space, as no sky illumination, the direct light is bouncing, and you need light bounces doing that.
that´s the direct sun, if we were to look at ISS, dragon ship, you may get the actual earth to illuminate the space station it is in full sunlight at right angles.
So you may want to fake that illumination based on the location of any planet.
often that can be seen in star wars with a tinted blue look at the bottom of the space ship, or orange if it´s a desert planet
The trails,…it requires fluid or particle work, I know how to do that in Lightwave, in blender…I haven´t tested it.
Then, post process quite a bit.
In lightwave it is so much easier to work with particle trails I think, and also add varitions to the velocity motion with fractals, that is something blender can´t do.
But…perhaps with the geonodes simulation tools, this can be done…but I haven´t even started on those yet.
Though…I would probably use embergen further on, if all the camera matching is working and render out there.
Well, all three of them. Can’t wait to see what they do in the fourth one, if that ever sees the light of day, they’ve been promising it since the third one came out. Tarantino was going to direct it at some point (I love some Tarantino movies, but come on!) and I think I read about 5 or 6 different people attached to the project.
I just hope they don’t decide to bring the Klingons. I’m happy with cannon for most things, but I can’t stand the Klingons.
The thing with the reboot movies, they indeed are darker than the predecessors, but…it´s not completly dark, they still have a form outlined in that darkness, so…yeah…a bit tricky to work that out.
You can instead of backdrop GI, use point lights, at a proper distance, but it´s tricky if stuff is moving, and to set the right distance, but using such lights help give a more spherical falloff than pure backdrops, and thus also highlighting round shapes on the ship.
So using that as a bottom light/fill light, and with one or two sunlights.
The actual pbr material needs to have the right rougness to reflect the round areas in a smooth way.
I could show you samples in Lightwave, but…not ideal since we talk about blender here, though principles are the same.
Like I said, you can check the studios that actually did the job for some hints. There’s a lot of work involved, and it’s more about art direction than technical details. I would study some art direction and a ton of compositing. Art Directors usually create stunning images using few tools. Cool sequence and I also would like to recreate, it’s a good way into big VFX studios. Yet they only use Blender for concept and not for final image.
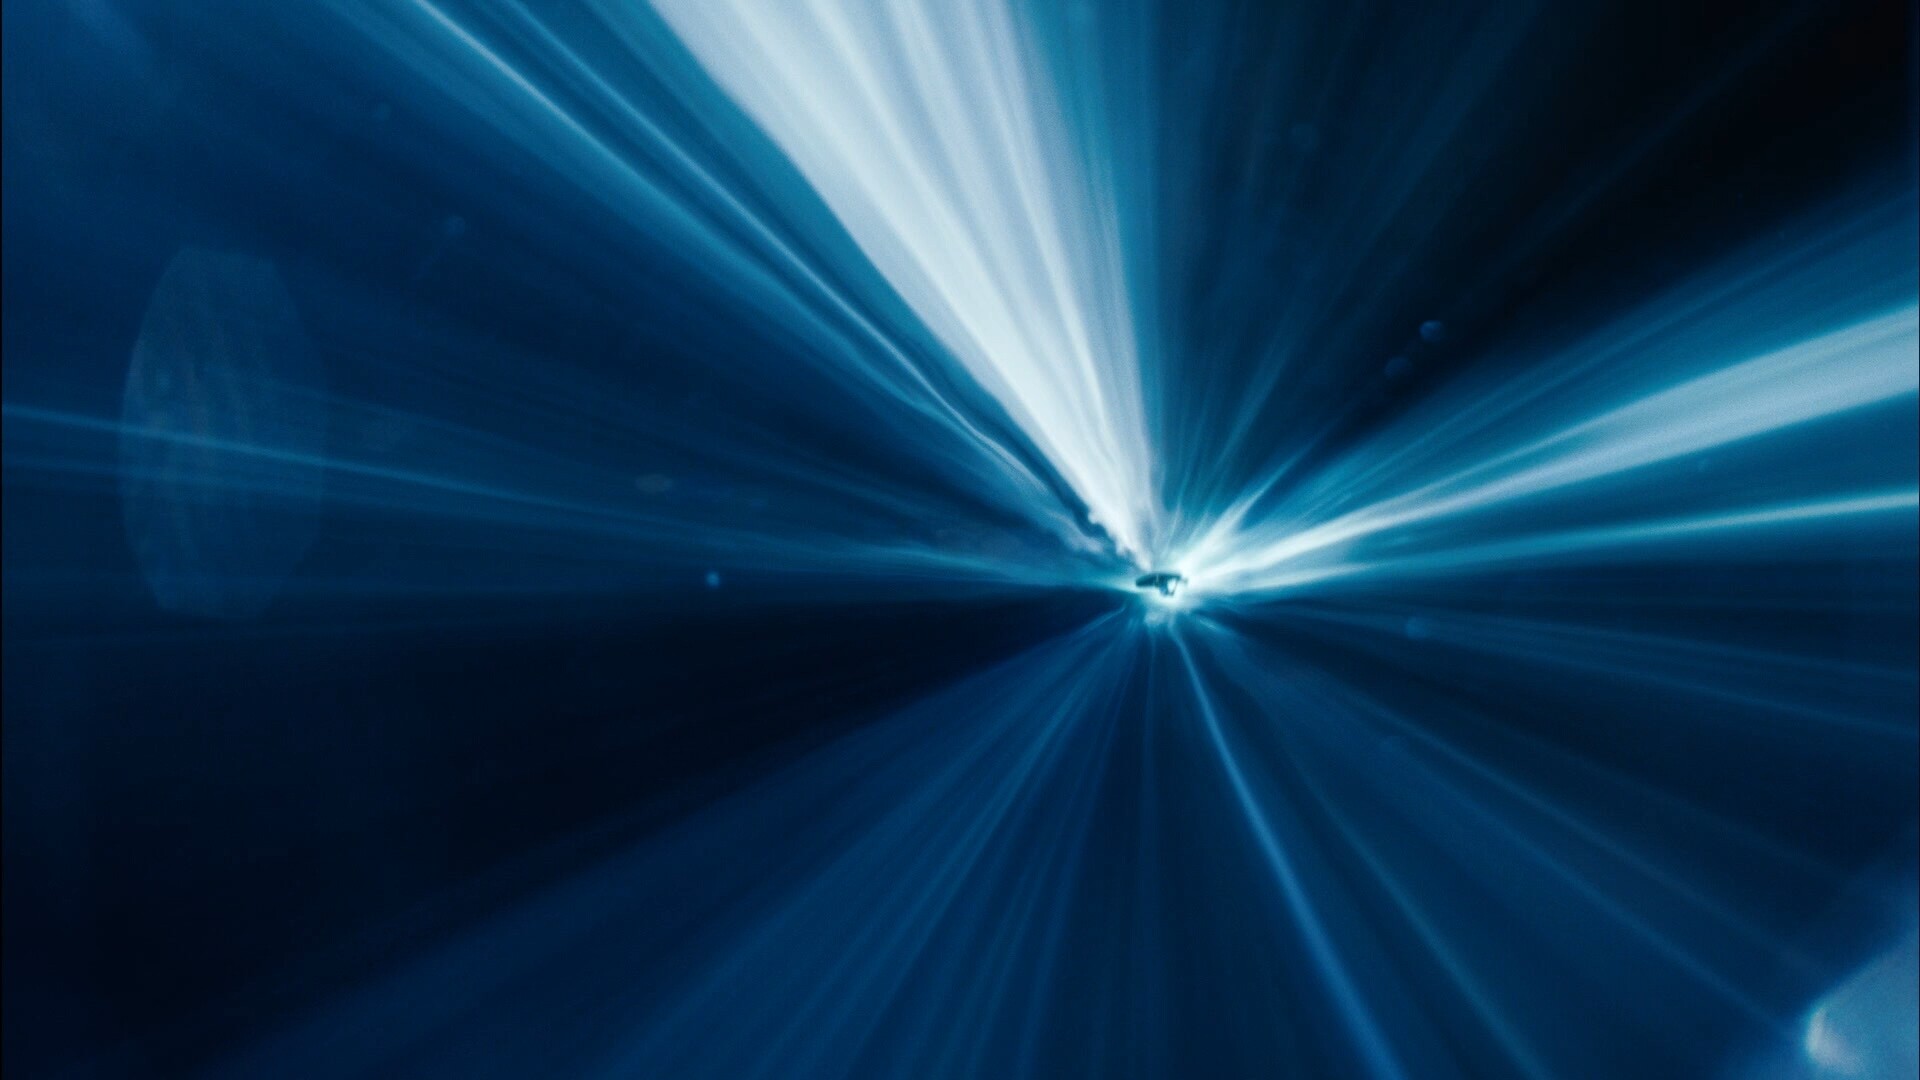
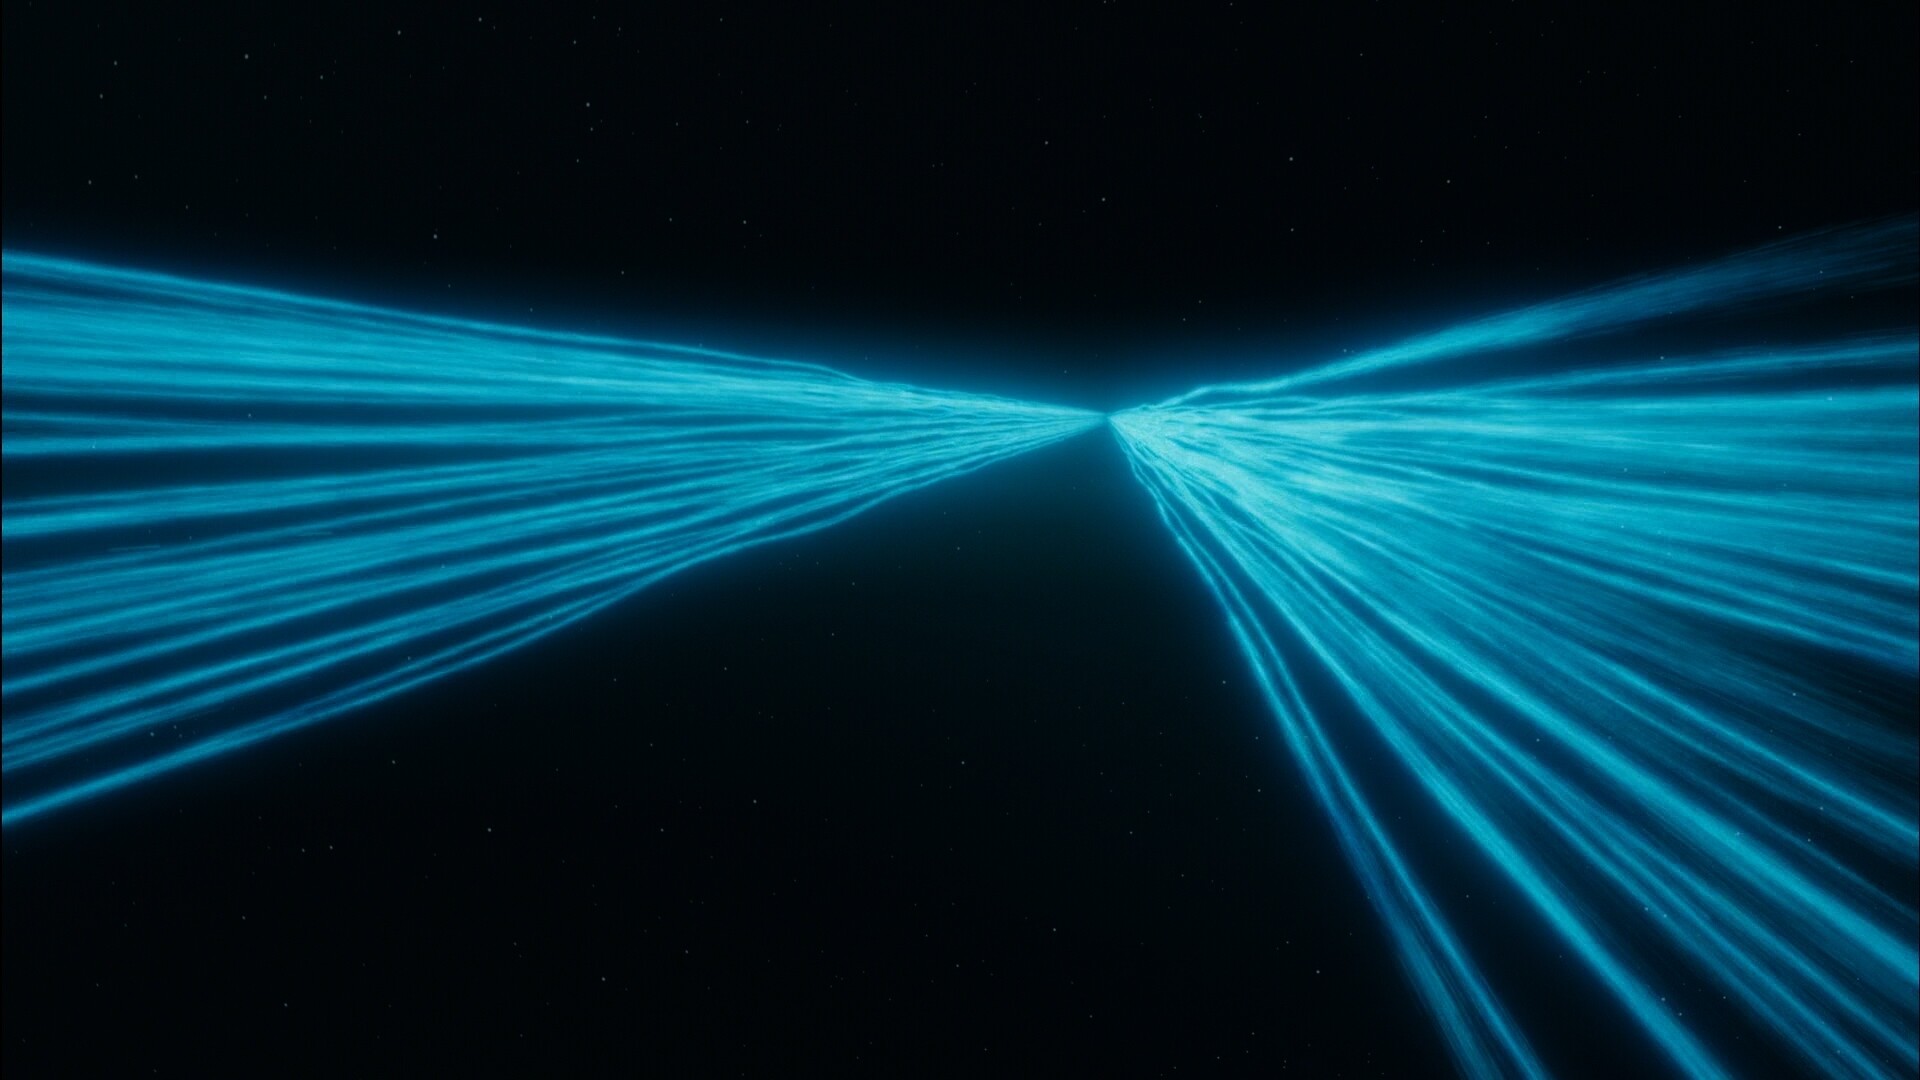
For this image, you would want to make the engine’s emissive shaders very bright and use a glare node in the compositor. I also see some defocussed lens imperfections or dirt.
For this, I imagine it’s a very long mesh tunnel with transparent glowing textures on it. Either the ship and camera are travelling inside of it quickly or the texture is animated.
Of course, I was just talking about this particular reboot. Trust me, I’ve seen them all, and I have them all, unfortunately in those horrible looking Blu-ray sets with so much DNR they all look like wax figures. And Wrath of Khan in the director’s cut that looks well.
And nothing wrong with that look, in any case you could say it’s even more realistic than the JJ movies. But it’s a matter of taste, and in this case I don’t think there’s bad taste or good taste. I happen to love the JJ look, anamorphic flares and all. I didn’t share the opinion of everybody else that the first movie had too much flares. To me they looked great. Those people that say the JJ movies have too many flares should watch BSG Blood & Chrome, where they basically bought Video Copilot’s Optical Flares and said “Let’s go crazy!!!”, so there’s lines and lines and more lines of anamorphic flares and it looks awful.
This is where I got mine from, amazing modeler in Austria, who did the model back in 2010, then refreshed back in 2023, and it loads great in Blender, with some exceptions, but if you end up getting it, let me know and I’ll tell you what things don’t load well: https://www.alex3d.at (his security certificate expired a few days ago, so you may have to add an exception to go into the site)
Thanks for the tips. I’m going to try them out and see how it looks. I already tried lots of different things to get the light positions as close as possible to the movie’s, but I know there’s no chance I’m going to get them perfectly aligned, especially when it’s different 3D programs, renderers, etc.
Sorry what are pbr materials?
Thanks for the tip, I wish I had the time for that, but my goal is a different career, and honestly my fascination with Blender lately has taken too much time away from that. I just want to get to a point where I can get this project to a point where I can set it to render in other machines at like 8192 samples so it takes some time to render but it’s going to look good, even if not perfect. I’m already amazed at how well it looks. I had done this in Modo 701 in 2013, and it took three weeks to render across 5 PCs, at less than 720p. Now I’m doing overnight renders of the same thing in Blender at 1080p in 2048 samples, and after some compositing and film grain, it looks much better than what I did back then.
Thanks for the video, I’ll watch it now.
Interesting take on it, I wouldn’t have thought of that.
Actually what I’m doing with that is I’m keyframing the “exhaust” lights, the two big balls in the back of the nacelles from 100 Watts to like 100,000 before warp, kind of like in that scene. That and the red emitter in the back of the saucer. That goes from normal to excessive in 50 frames, and then it takes off.
As for the lens dirt (which funny enough are hexagons in the 2009 movie but round in Into Darkness, I followed a tutorial by a guy who shows how to do it in the Fusion part of Davinci Resolve, and it came up pretty nicely.
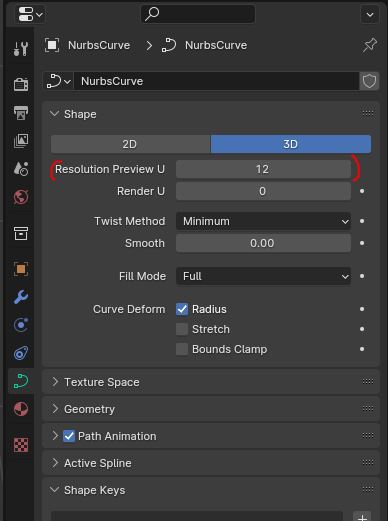
I’m having a weird problem with the nurbs path that the ship follows as a warp path. As I commented yesterday, as absurd as it is, the ship goes into a warp taking a curve path. It’s ridiculous, and yet I can see why they did it: because it looks cool, like they did with so many other things. So rather than do what’s real, especially since when it comes to warp travel it is more fiction than science (I love it when Captain Pike tells Sulu if he checked the inertial dampeners, as if such things were to prevent every single person in that ship to be plastered against the back of the ship into an unrecognizable pool of blood and guts as soon as the ship takes off from zero to warp in less than a second), I’ll do it the way the movie shows it, mixing the 2009 and 2013 looks (in ID the camera starts shaking as the ship gets ready for warp).
So I did a nurbs path, which as you know creates a round path as soon as you move the vertices around, so it’s not a bunch of straight segments, but a curve that takes into account all the points.
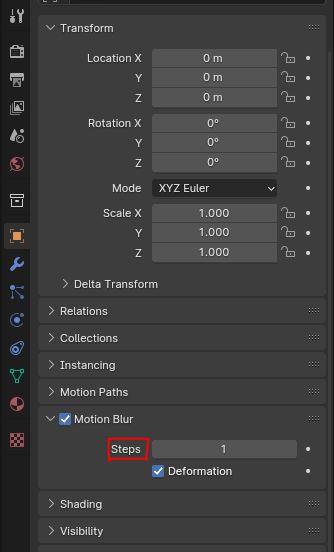
However, when I rendered the ship going into warp, for which I set the motion blur to 20, and I could see the path of the ship, I noticed that the motion it had taken was segmented, like it had not gone along the curve set by the vertices, but going straight from vertex to vertex. Kinda sounds to me there is a setting somewhere that I haven’t set, am I right?
Yes, the “motion blur steps”. It’s not set by default because it’s rarely needed and would just take performance for no reason, but you have a case for it here. You can find it there, per object:
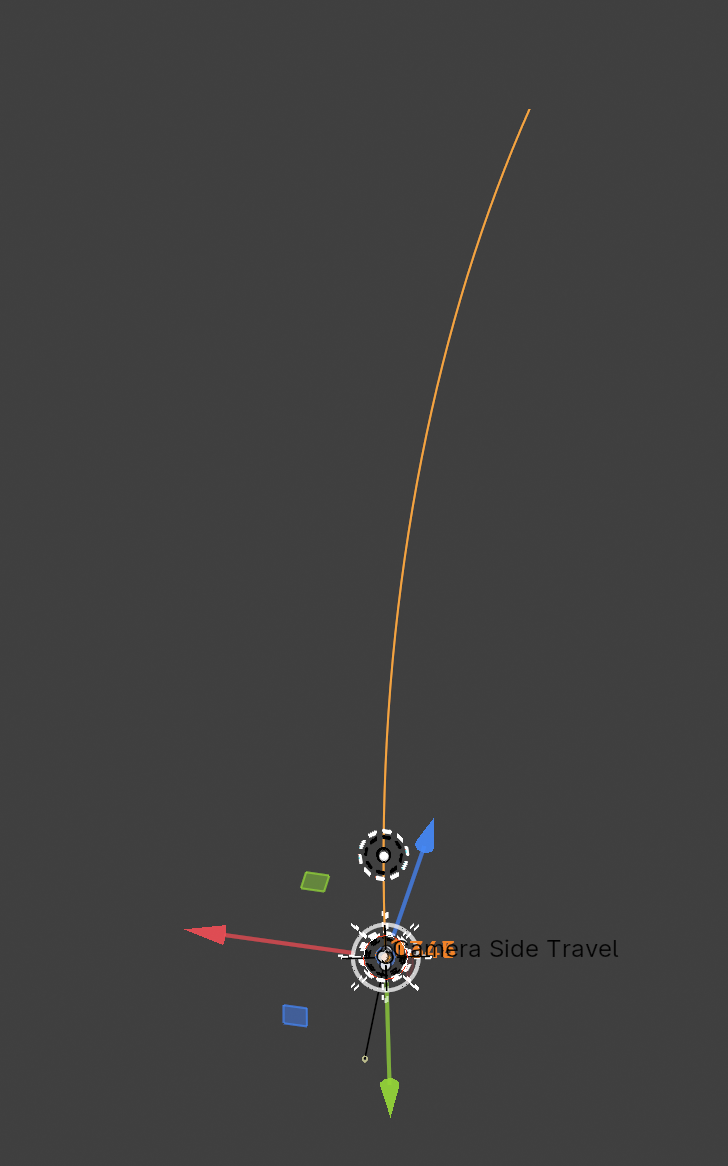
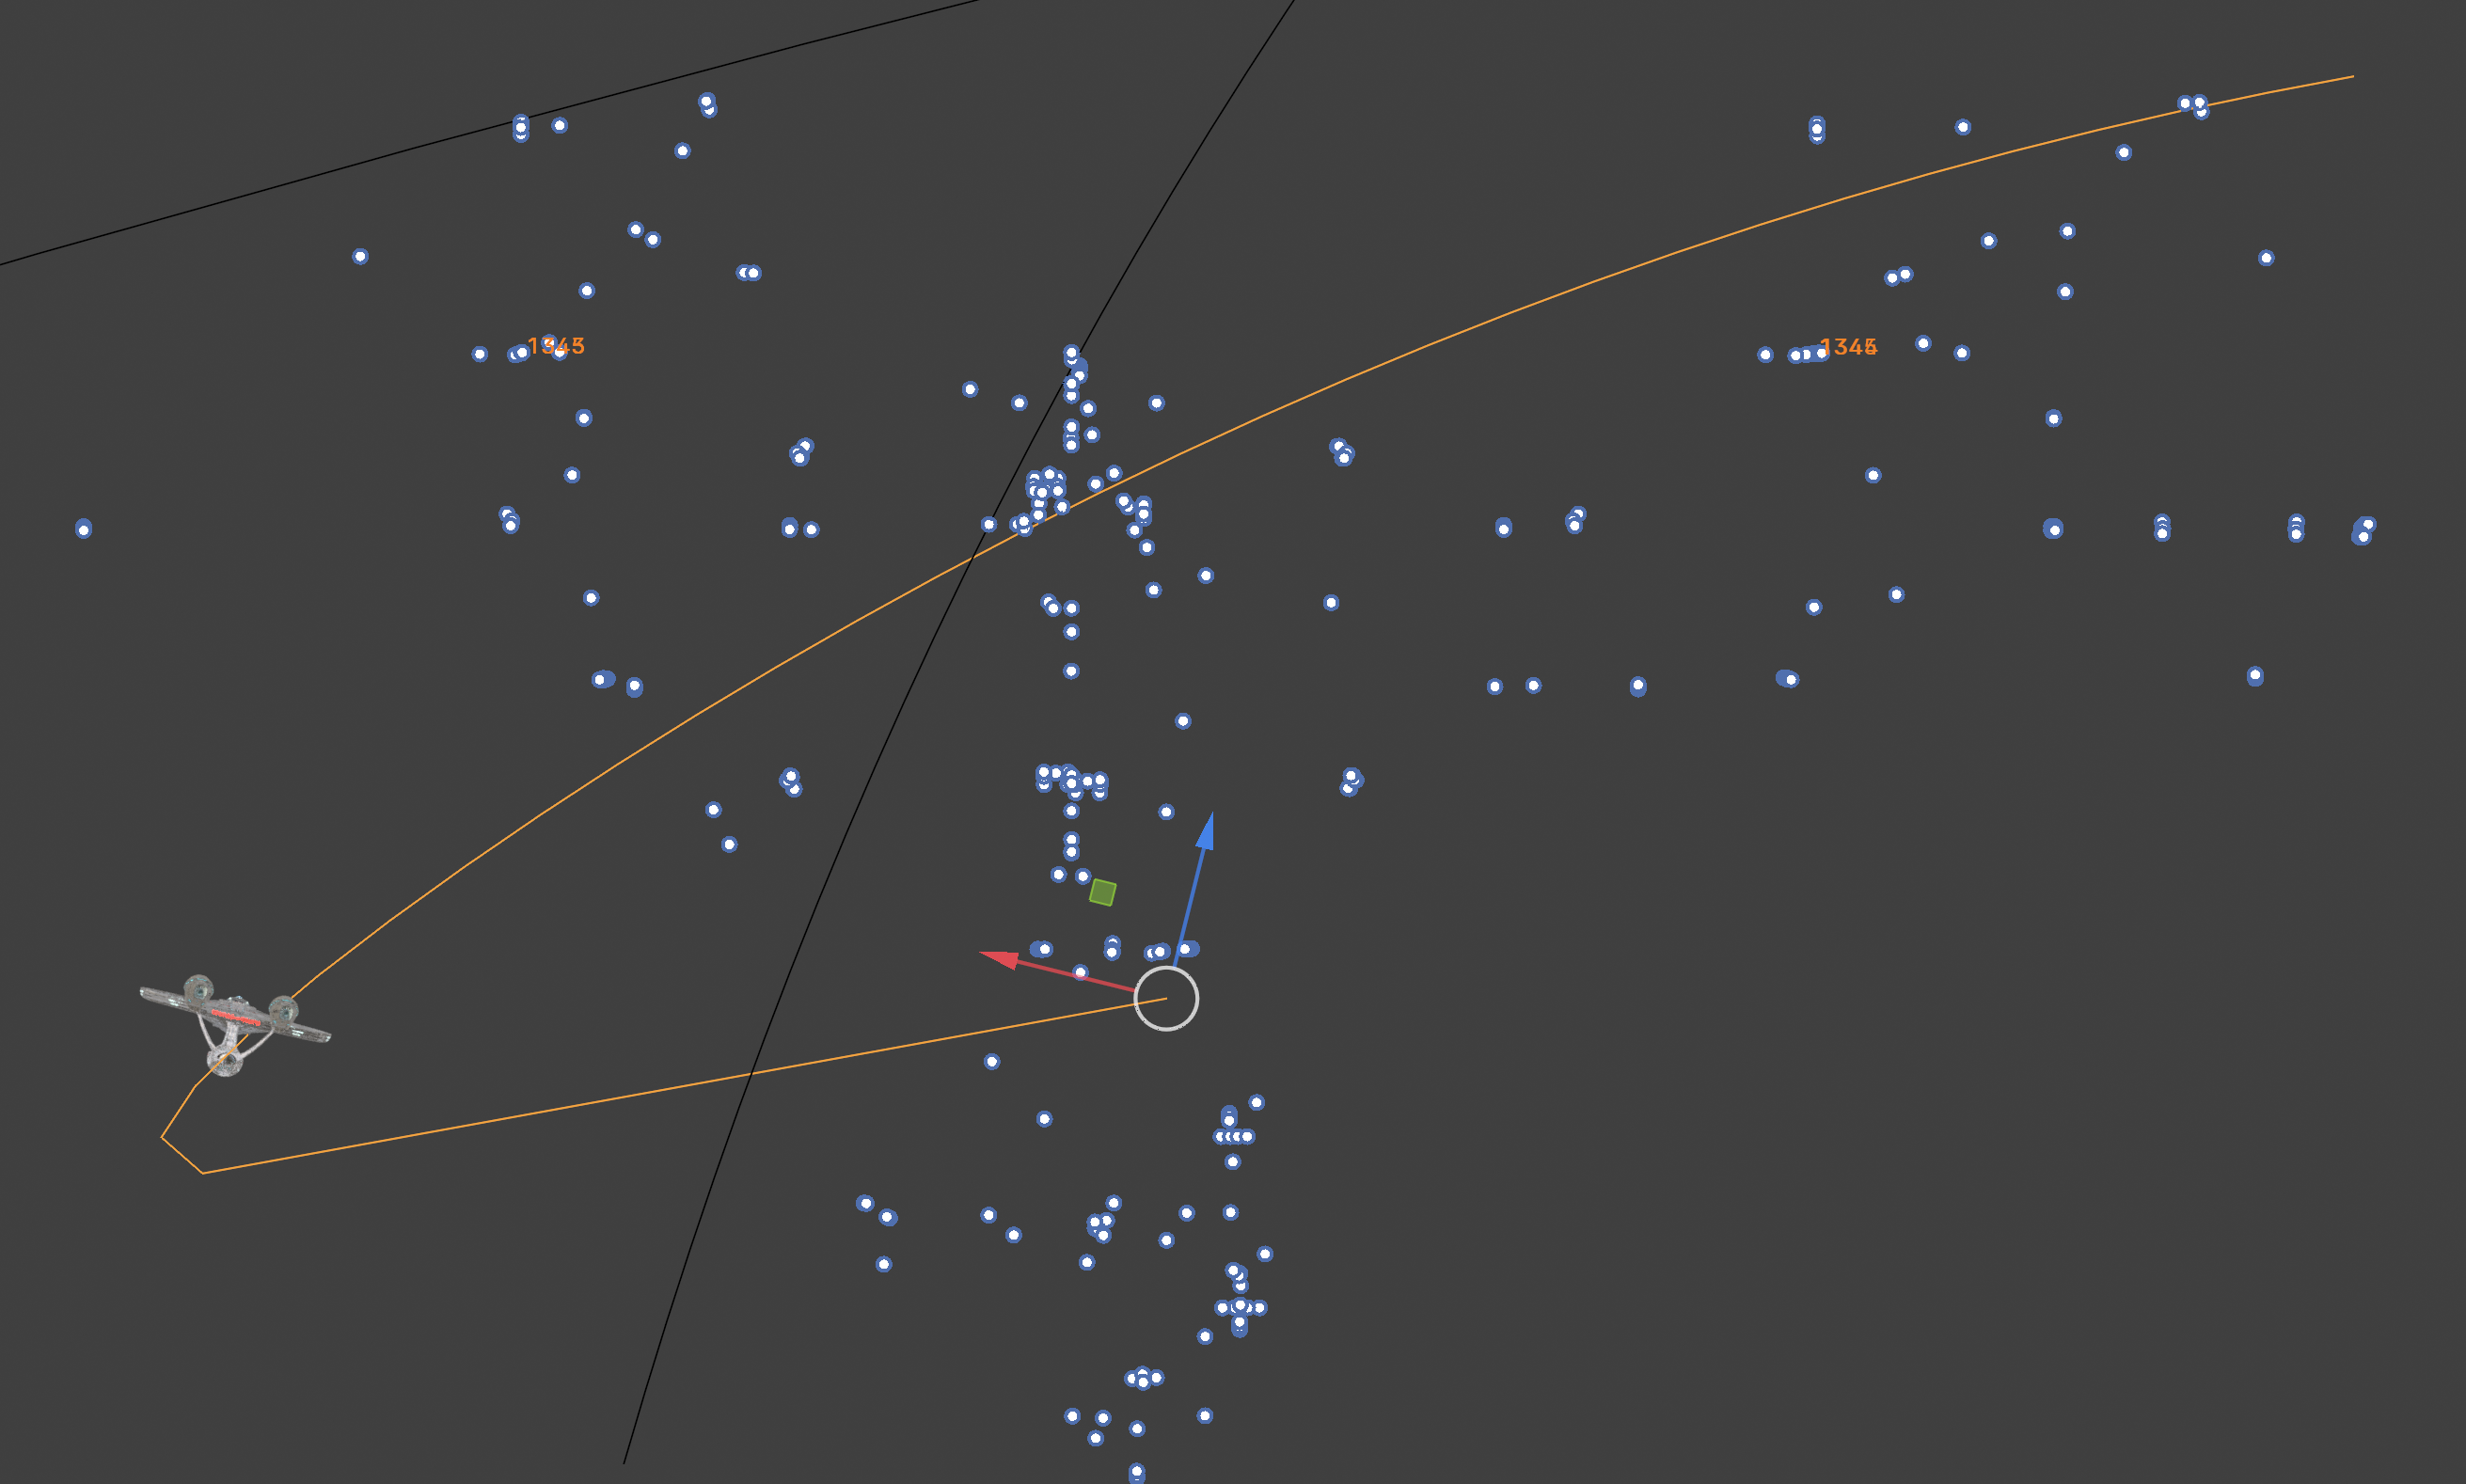
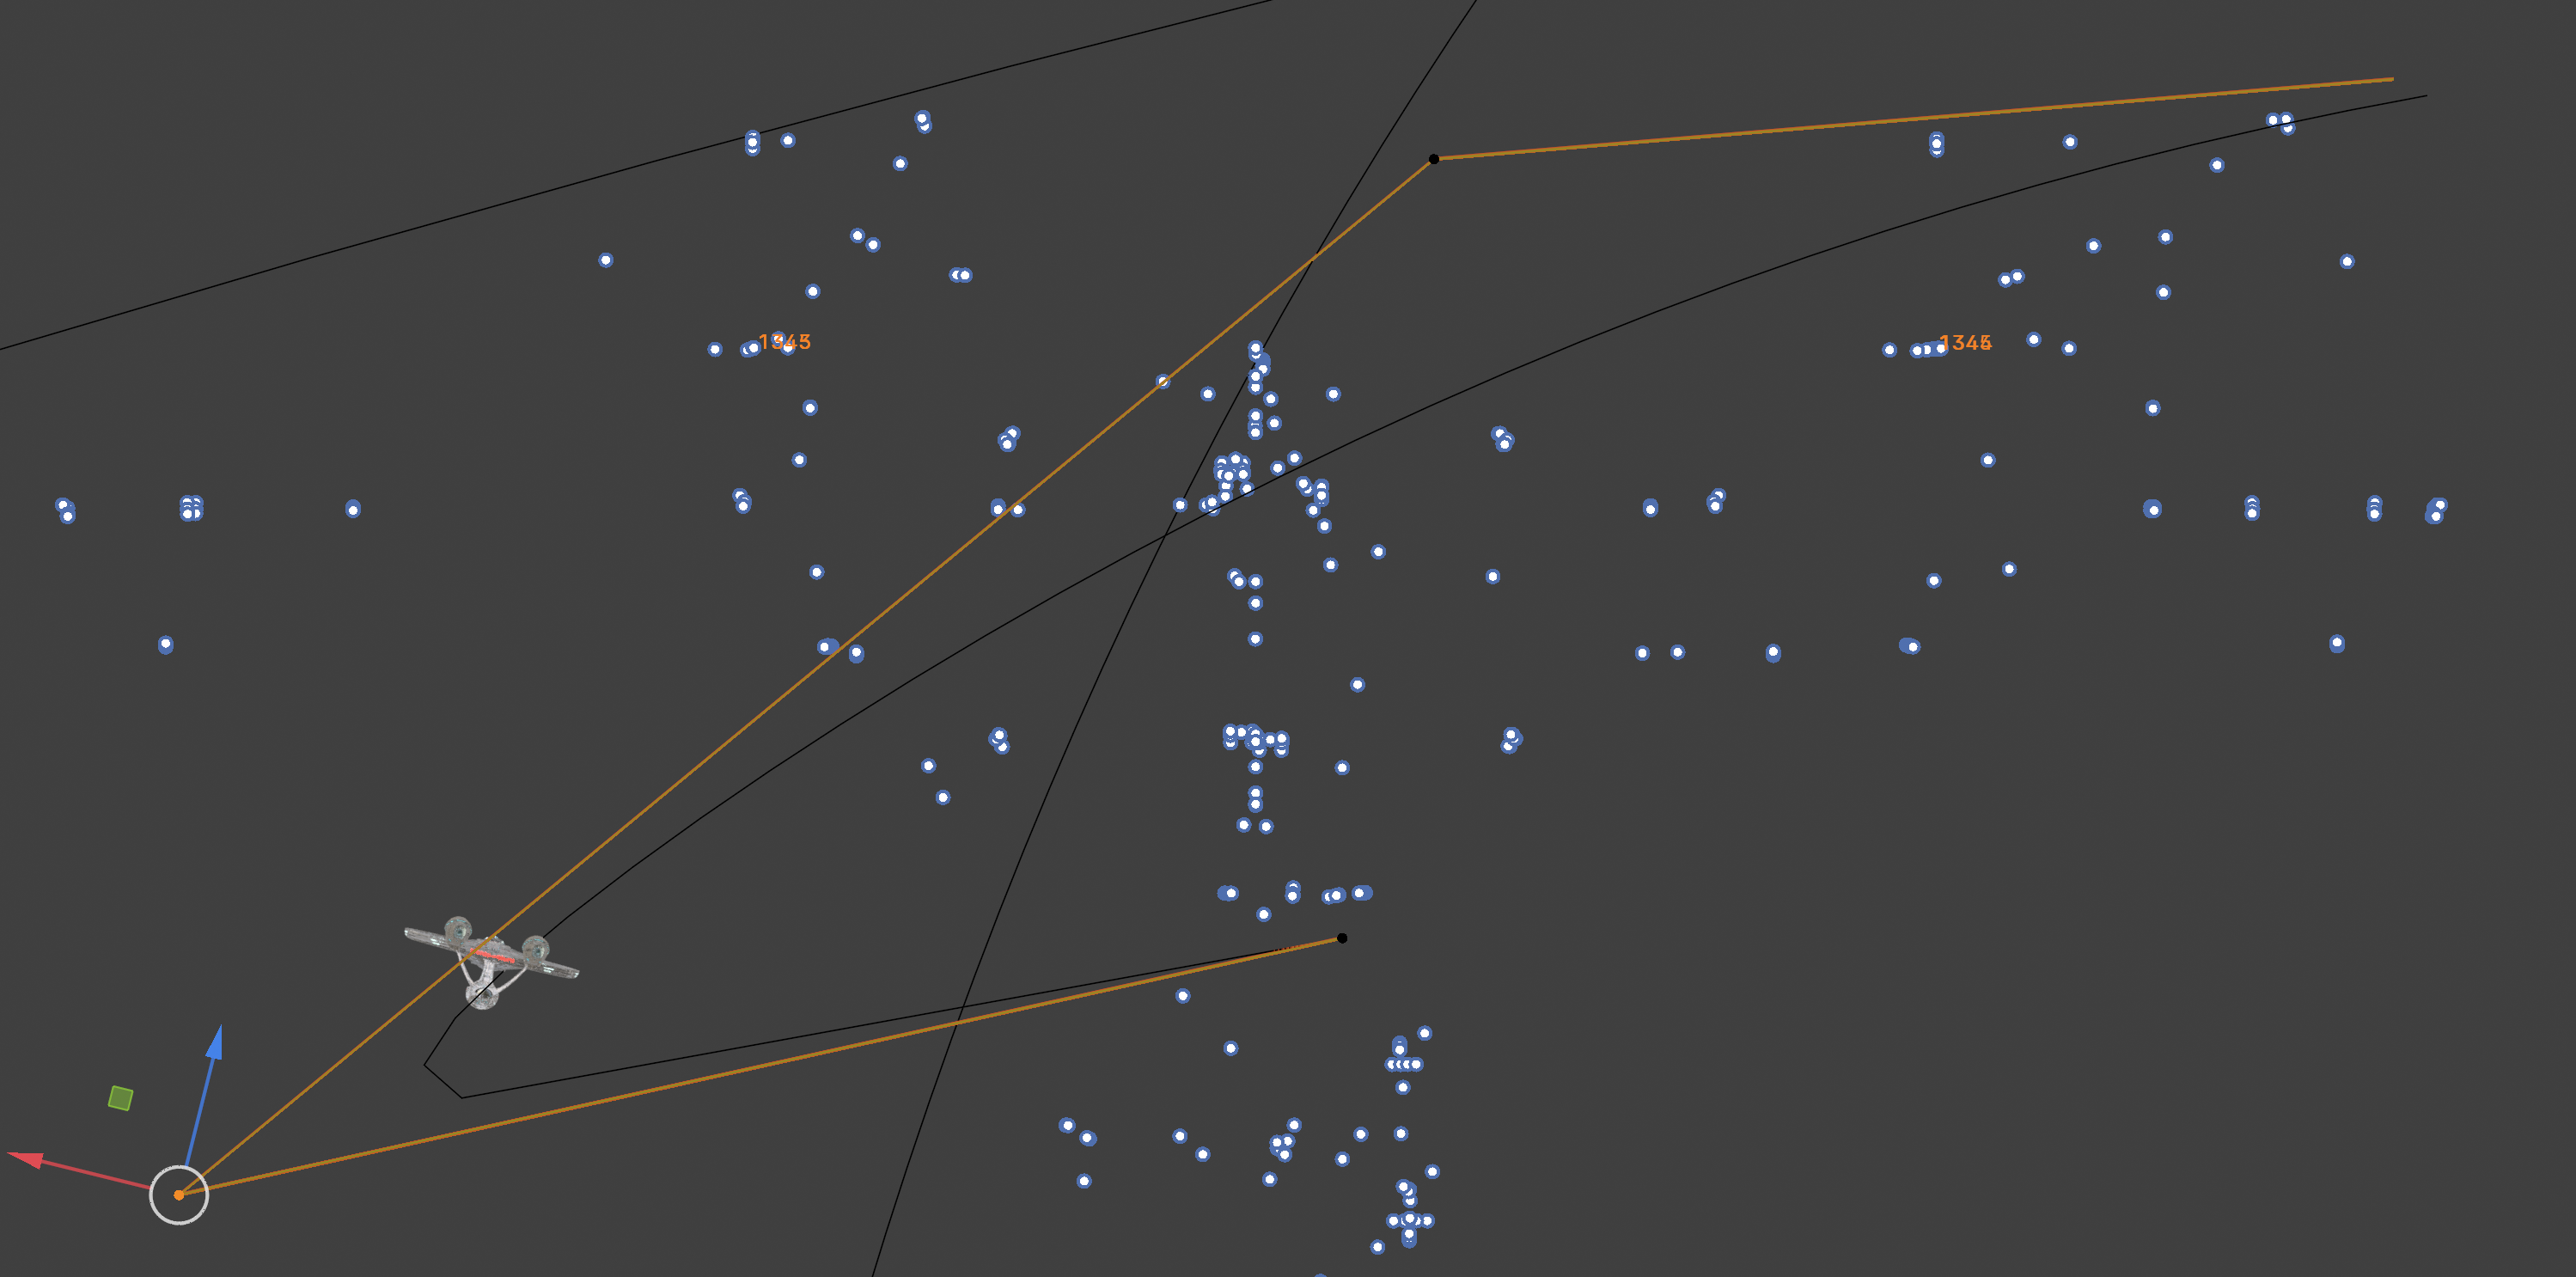
So you can see that there is a curved path, but at one point the angle is so sharp that it creates a straight segment. Now, if I go into edit mode, this is what I see:
So you can tell that from the point of view of the camera, even if this is a rather smooth path, it sees that vertex as so far away, that it seems like it’s too much, and it can’t draw a sharp curve, instead I guess you could say, cuts corners
But what it draws on the viewport doesn’t have to be perfect obviously, as long as the object set the in the constraint follows the path as curved. The weird thing is that it doesn’t. It seems to go straight one segment, then straight for that short second segment we see in the viewport, and then after that it goes in a curved motion.
This would be easy to miss if I wasn’t using motion blur (the one in the camera settings) to create the illusion of the warp trail like in the movie. But I see it even when I move the playhead back and forth in the viewport without being in render mode.
Still, just in case I did try the suggestion, setting that motion blur to 7 steps, which seems to be the maximum. And it’s exactly the same result.
So I think the next step I’m going to try will be a bezier curve. I tried that the other day, but I was having some weird behavior and I couldn’t move some of the vertices, so I gave up.
Yes sir!! Thank you so much. I had to increase it all the way to 60 to get a smooth curve, but it is perfectly round now.
Now, at the risk of abusing your generous advice (but I will make sure I credit everyone who helped when I post this on YouTube), I have three more questions:
I’m using a 16k HDRI map from a website I downloaded, and it’s very decent quality, but it seems to me like the stars are too big, plus it has the Earth and I would like a space background with just stars. So here’s what I thought about doing. I want to create a sphere substantially larger than the ship, I don’t know if 50 times, 100, 200, whatever seems right. And then create a particle modifier that will distribute all the particles at random all around the sphere but inside. I gave this a try but my lack of knowledge stopped me from getting anywhere. However, if I find the right tutorials to do this, is it a viable option? Or will it slow render times to oblivion? And is it something that is fairly easy to learn, or will it take me a week?
I would like to try render passes and compositing them. But it’s been too long since I did anything like that, so in your opinions, what specific passes should I render for this, and when I composite them, what’s the order and the blending modes I should use for each? I kind of remember it was a lot of different passes and each of them had a different blending mode, or at least there were many different ones. Is it worth to take the extra time to do render passes? I mean, will I see a difference if I composite them correctly, or not so much?
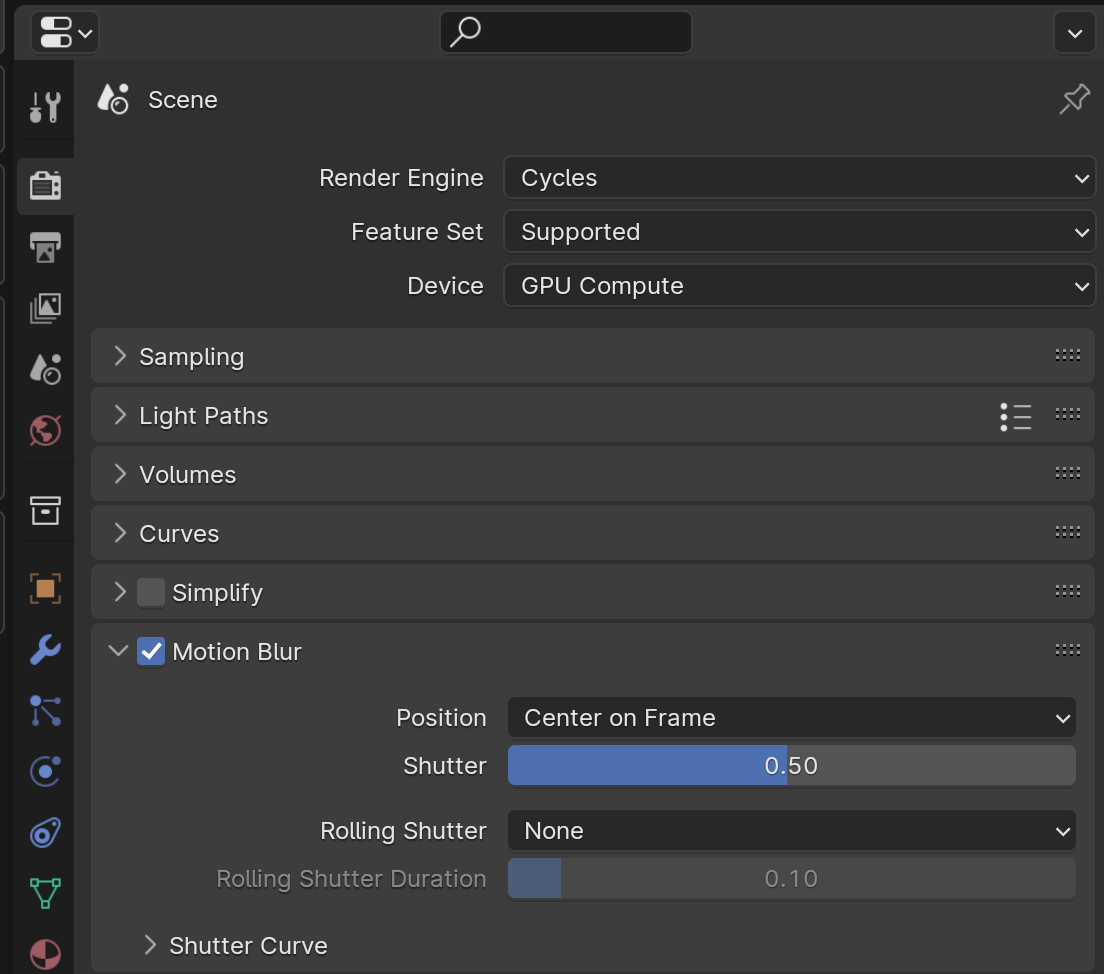
Motion blur (the main one that is usually 0.5 and is located in the render panel) cannot be keyframed, right? I don’t mind rendering frames 1 to 800 with 0.5, and then render the rest at 10, but it would be easier if I just keyframed it.
Lensflares, not sure what I thought of that, have to rewatch it, not disturbed by it, but perhaps…a little less, but otherwise a nice effect.
Battlestar blood and chrome, yeah…I didn´t like that, too over processed.
Not sure if our fellow mate on the Lightwave platform “kelly myers” was in on that.
He was part of the VFX team for the Galactica series before that, and there it wasn´t as much as in blood and chrome.
To additionally enhance the “shine” on the pbr material on a mesh, you could use anisotrophy, and also …a high sheen effect, but it´s a balance.
Further more, spec, rougness maps may also do the trick, but for setting that up for starships, I dunno.
It would work, but you might need an absolutely massive sphere. In space, it needs to be big enough that you don’t see the stars move no matter what. Or, you could generate your own HDRI. Blender is capable of rendering a 360 HDRI, you just need to have the scene modeled, have the right camera settings and you can generate the file yourself.
If you composite them correctly, they will give the exact same result as a plain render.
Render passes are most useful in big productions, where everything is subject to change and lots of tweaks will be made in compositing. They were especially useful many years ago, when renderers couldn’t generate a realtime preview and didn’t have realistic shading, so compositing artists would have to re-adjust every aspect of the materials and lighting in post production.
For a single artist working with a modern renderer, they aren’t nearly as useful.
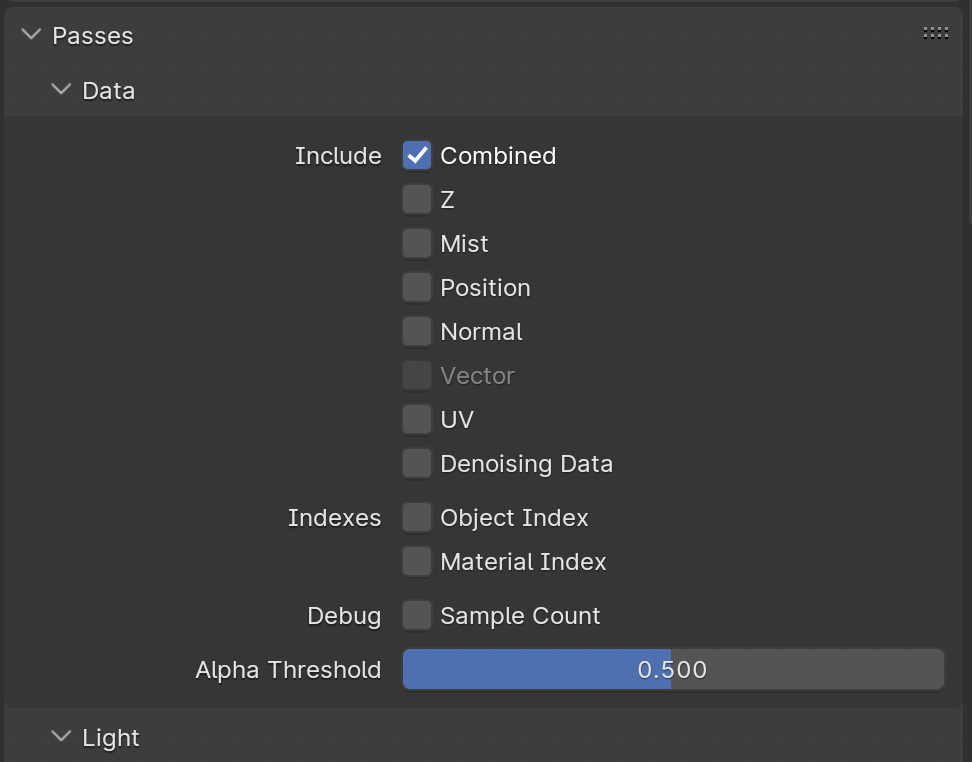
There is a similar kind of compositing trick you could do, though. When you do your final render, deactivate the compositor and set the output format to “EXR multilayer”. This will output image files that contain the full data that would usually be sent to the compositor (full dynamic range, all render layers you had activated). You can then create a new .blend file, import those EXR files into the compositor and do all the post processing effects (glare, lens distortion, etc.) as a separate step. This will allow you to separate the compositing from the rendering, which will make it more forgiving and easier to redo should you need it.
This is very interesting. So besides choosing OpenEXR multilayer, is there anything I have to do to output all the layers? Like in the ViewLayer Passes section:
I remember doing render passes in Modo, and there were a lot of different things that you could output as passes, each with its own file name, and the names are like the shaders in Blender, such as diffuse, normal, specular, etc. But in Blender I just see these, and I know Z is the Z depth pass, but I’m not sure why there would be a pass for position or UV, so I’m kind of confused.
Well, I’m using Cycles GPU for this. But as far as I can tell, there’s no keyframe option for it like other parameters. I looked it up in the manual and couldn’t find it. Just to be clear we’re talking about the same motion blur, this is the one I’m referring to:
")
")
")