I’ve added the preview release 0.5.11 to gumroad, blender market seems to have some site issues right now, will update there ASAP.
added Normal Flatten tool
used to fix shading issues, especially for ngons, that should be flat
has angle threshold value and presets
only boundary faces angled below the threshold are taken into account
boundary faces separated by a sharp edge are also ignored
has “clear existing normals” toggle, which is as if the the Normal Clear tool were to be run before running Normal Flatten
added Normal Straighten tool
used to fix angular shading on straight sections of Fuse/Bevel/Bridge surfaces
its effect is less noticable than Normal Flatten, but its something hat can be done in the pursuit of normal perfection
added Normal Clear tool
does not remove split normal data completely like Blender’ss customdata_custom_splitnormals_clear() operator does
instead works on the selection only
improved handling of an issue in Unfuse
it was on display in the 30 min demo
I’ve attempted to integrate the Normal fixes into the Fuse tool, but the complexity of it spiraled out of control quickly. It looks like it’s not worth the effort either, because as soon as you modifiy geometry in proximity, even just doing a chamfer, the normals need to be fixed again anyway.
So, its probably best to use these tools at the end to finalize a model. This avoids re-doing it constantly while modeling.
I’ll see if I can automate the Normal Flatten and Normal Straighten tools. Maybe I can get it to a point where all you do is run a single command, without the need to do any face selections.
Please see the videos about for how to use the Normal tools specifically. It’s basically just
select faces that should appear flat and run Normal Flatten
select straight fuse/bevel/bridge sections and run Normal Straighten
You can use the Flatten tool on very low polygon geometry, In that case you’ll need to increase the angle threshold to 60+ degrees.
Abacadabra, simsalabim! Thanks to normal-flatten, -straight and -clear tools I found the courage to use smooth shading again. Always had so much issues with smooth shading that I prefered flat-shading and having a bit more geometry. Thanks for the update.
I try both ways of instal (zip and unzip in script map) But i still get this error??
Traceback (most recent call last):
File “C:\Users\Gebruiker\AppData\Roaming\Blender Foundation\Blender\2.79\scripts\addons\MESHmachine\operators\fuse.py”, line 119, in execute
ret = get_2_rails(bm, mg, verts, faces, self.reverse, debug=debug)
File “C:\Users\Gebruiker\AppData\Roaming\Blender Foundation\Blender\2.79\scripts\addons\MESHmachine\utils\core.py”, line 73, in get_2_rails
c1 = corners[0]
IndexError: list index out of range
Added Stashes (states of an object at a user set time)
Create Stash
from active
from other(s) to active
View Stashes
you can also retrieve stashes
Clear Stashes
individual or all
Transfer Stashes
from other to active
there’s a persistent HUD for stashes (top of the screen)
shows stashes count and invalid stashes count
added NormalTrasnfer tool
transfers normals from a stash
stash normals can be flipped from the tool’s modal using F
the stash can also be smoothed if you have stashed an unsmoothed obj, using S in the modal, this has no ui representation yet, as I’m not sure what to display
added Symmetrize tool
it’s Blender’s symmetrize op, with the added ability to mirror custom normals
default keymaps are Alt + X, Alt + Y and Alt + Y
change in prefs
default directions is + to - for X and Z, and - to + for Y
change in prefs (unfold the keymap)
when symmetrizing meshes with custom normals, Symmetrize will creates a pre-symmetrize stash
this is because of the clear center seam Transfer option, you may want to use
you probably want to regularly clean out those stashes if they accumulate
although you don’t have to, a good strategy is probably to leave all the normal manipulation and transferig to the end, just remember to stash you model before you mess up the surfaces and you will be good
MESHmachine menu:
loops and normal tools have been put in sub menus
stash tools are available from edit and object mode
change mouse_wrap to hopefully fix a bug, that I can’t reproduce
Note, that the Symmetrize default keymaps overlap with the ones from Hardops. You may want to change that if you prefer using the Hardops Symmetrize. I’m not actually sure what it does different(or in addition) to Blenders’s Symmetrize, other than the HUD. Sharpes and BWeights are mirrored fine, with the default as well.
In any case, if you don’t use MESHmachine’s normal tools, you don’t need the Symmetrize tool either and could remove its keymaps from the MM prefs.
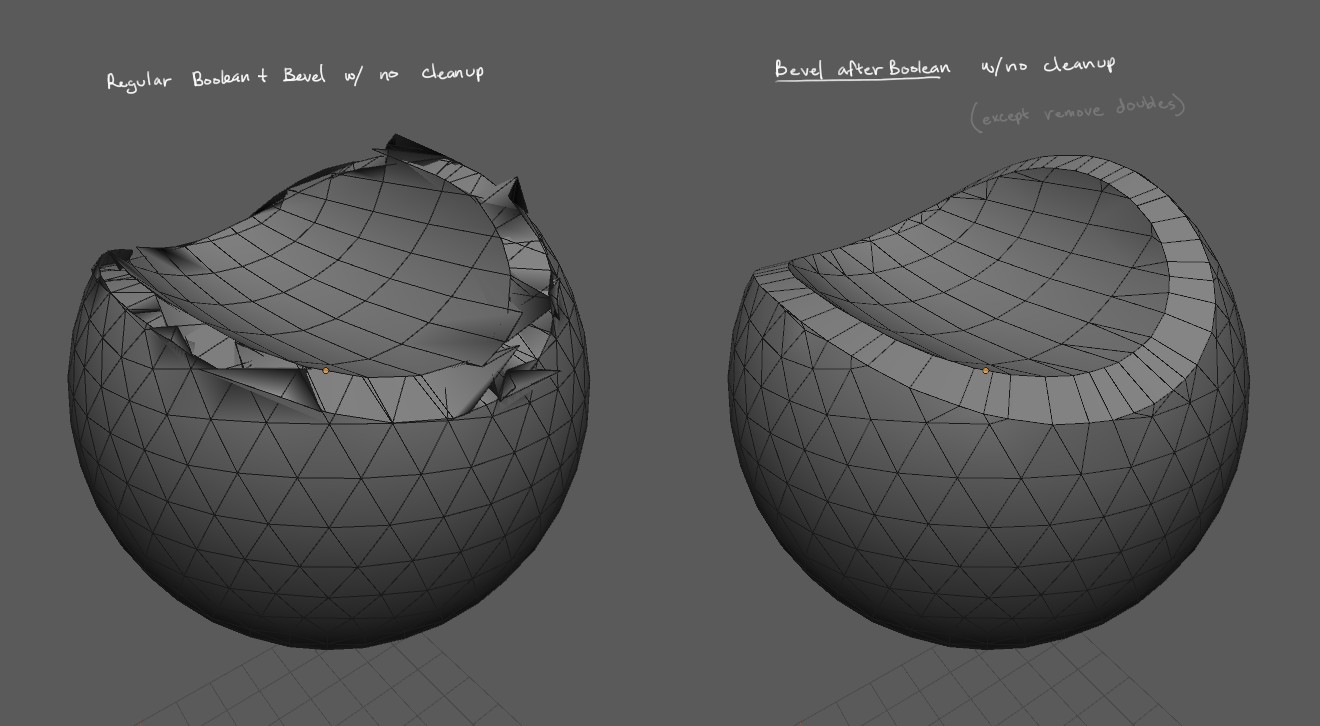
You guys may be interested to know that this addon pairs extremely well with Bevel After Boolean. The way BAB generates boolean intersections results in clean chamfers and smooth curves which are difficult to get normally, even with proper cleaning before beveling.
BAB can be unreliable (especially on objects with sharp edges and simple topology) so it’s not a perfect replacement for regular boolean + chamfers, but in boolean ops that would normally generate tons of trash that is very difficult to clean up, BAB handles it easily.
Notably, in instances where BAB fails it is usually impossible to clean up because it uses dense bevels and normal corrections can’t be reapplied after editing, but since MM can turn a chamfer into a bevel and back, BAB can be used with much simpler geometry making the addon more usable and stashes can be used to fix normals after geometry cleanup. So the two addons compliment each other quite well.
forces rails to not be aligned with existing loop edges
add Conform tool
shrink wrap with stash as target
conform selection to stash object
NOTE: unlike the DataTransfer (in NormalTransfer), ShrinkWrap does not work in local space
that means if you move your object, after a stash was created, you need to retrieve the stash and re-stash it for it be usable for the Conform tool
add Chamfer tool
per side loop slide toggle
2 face methods:
REBUILD with the optional Merge Perimeter prop
REPLACE with the Reach prop
the methods are different ways of dealing with geometry outside of the chamfer, which the chamfer may overlap depending on the width
REBUILD should be used if the chamfer doesnt or only minimally overlaps
REPLACE can be used if the chamfer overlaps a lot
add Offset tool
similar to Chamfer, but offsets an edge in the chosen direction
add Boolean Cleanup tool
used to fix verts of an edge loop in place based on connected edges on the selected side
merge the other verts based on a threshold
can be used on cyclic and non-cyclic edge selections
add LoopTools modal wrappers for Circle and Relax
only availble the LoopTools addon is activated
Symmetrize()
fix exception when fix center seam is turned on, but there aren’t any center verts
add version string to registration terminal output
NOTE
Chamfer and Offset are supposed to by used on cyclic edge selections
you may use them on non-cyclic selections as well, but this will create non-monifold geometry (open edges)
Chamfer should not be seen as a general purpose chamfer, use Blenders bevel tool if you can, use MM’s Chamfer if Blenders bevel tool misbehaves and chamfering will result in overlapping geo
if you want to fillet an edge after a boolean, you should use the Boolean Cleanup, then you can use the Offset tool followed by Blender bevel tool, or you can directly use MM’s Chamfer tool, followed by Fuse. You can also use Offset after the Chamfer tool, if you want to have some space and a nice loop around things.
I would also recommend to use the Conform tool after you chamfer,
if you are working on relatively low res geometry, it might be useful to create a stash with a higher subdivision, if you want to use Conform
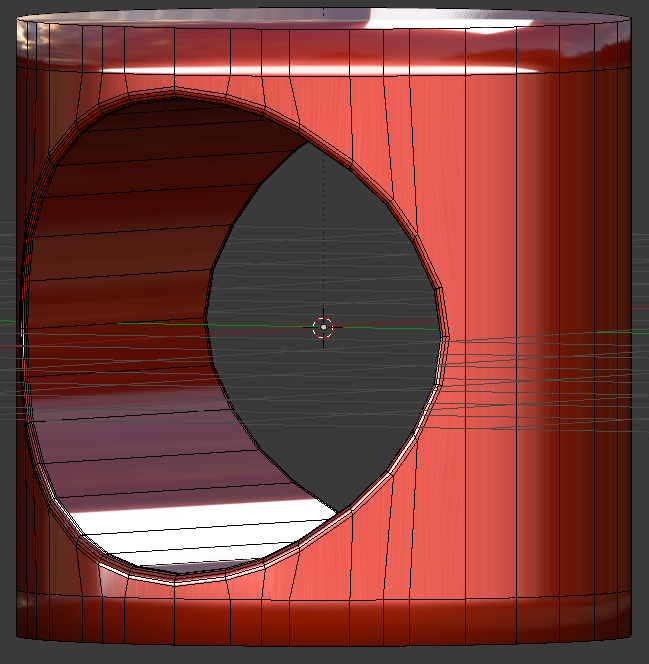
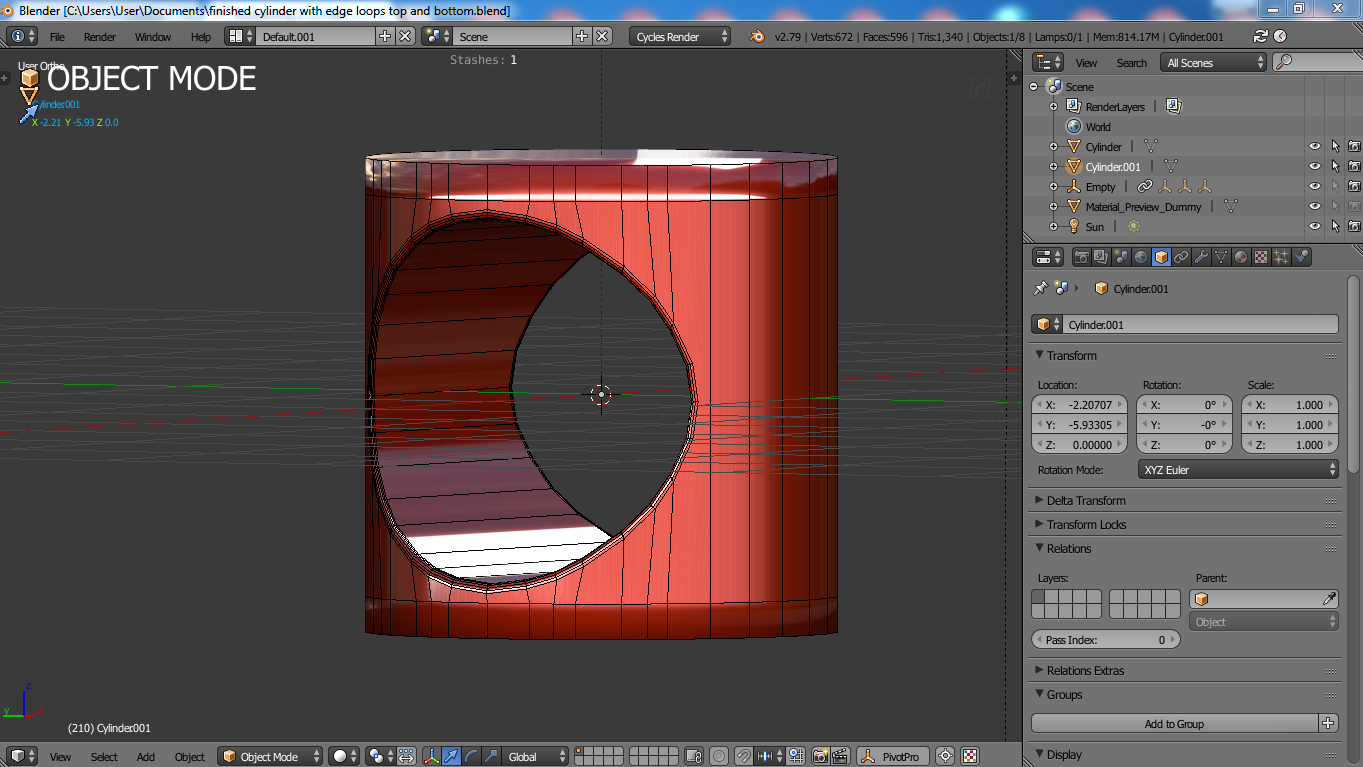
…and knife cut inner boolean vertices up and down front of cylinder and then dissolved edges on the top and bottom of the cylinder. Next time I will try it without the loop cuts top and bottom.
Lots of magical tools now in the addon.
The video is a bit quick for me, therefore an update in the documentation is welcome. (Once you’re finished with all that magical stuff).
Or instead of a long video where you repeat the same fast, maybe you could consider to make one where you show it once but slow.
Just suggestions, but keep going on what you’re doing. It’s amazing.
The whole point of the preview releases is to get the tools out as fast as possible. This comes at the cost of not updating docs, but doing the changelogs and video clips as a bad replacement.
This means frequent updates, and the tool evolving at a nice pace.
The alternative, is much less frequent releases, me having to spend time on getting docs ready instead of developing while I’m “in the flow”. Much less project activity. More waiting by users. A single release with far more tool updates all at once, which then will be forgotten about quickly.
That said, I will get started on 0.6 docs now and end the 0.5.x preview release cycle.
The video is in real time. Some(all?) of my previous ones may have been in 2x speed, by accident.
Thanks,
It’s all ok.
I just thought that you would consider, when making a video next time, you could make one with few steps but slower. So it’s more clear what you are doing. Same effort for you but more effective. (For me, I don’t know about others). I cannot see what you are clicking on/at. The menu’s shown are a few milliseconds. The video is 20 minutes long. If it’s not for giving an impression of the worklow, which I understand but to show what the features are, I even didn’t get that from the video.
Thank for all,
I watched your video a lot of times,
but i cannot figure out your select linked faces of desired sharp edges.
Even on 25% youtube speed …
I cannot repeat this …