Hi !
I’m creating a dino model that I want to include in a game (modding). I went with this workflow: base mesh, sculpting, retopology, UV unwrapping, baking normals, texturing, rigging.
The thing is, my sculpt is 9 million faces (which my computer barely handles) and I can’t get clean details like well defined scales, rough skin, folds … I feel like the results I want it impossible to get with this workflow.
Is there a way to sculpt high level details without crashing my computer ? Do I have to do it in another way ?
Any help is appreciated, but keep in mind that I’m not an expert so explain it simple.
Thanks !
Are you using the multi-resolution modifier or just a huge polycount mesh?
Maybe you can split your mesh in parts and assemble later.
Can you share any screenshot or .blend file?
If your basemesh sculpting topology isn’t as close to evenly spaced quads as possible then your higher levels will subdivide unevenly. 9 million should be plenty to capture tertiary details. However, for high frequency detailing you should combine a tiling detail map in-engine and paint a mask if necessary. You can also use mirrored UVs on extremities to save valuable texture space. A dinosaur is a very large in-game asset so using unique 0-1 texturing is always going to lose res. This is why you have to have a solid understanding of game asset authoring ‘tricks’.
Your output normal map res will also play a big part. For instance, a 2K map will capture a maximum of 4 million points. A 4K map will capture 16 million…etc. Then you have to factor in your texture sheet usage, which may only utilise 60% of 0-1, so you lose res here too.
Your best bet for a large ‘hero’ character asset like this is to sculpt up to secondary forms and larger, less detailed, tertiary, and then use the high frequency tiled map I mentioned above. This is simply the nature of large, unique 0-1 assets.
I use the multires modifier.
If I split the mesh then, how does it work for the retopo ? Also for baking the normal map ?
I can share screen shot, what do you want to see in them ? The modifiers and the poly count ? I think the blend file would be too heavy …
“If your basemesh sculpting topology isn’t as close to evenly spaced quads as possible then your higher levels will subdivide unevenly. 9 million should be plenty to capture tertiary details.” => Ok, I will check that.
“However, for high frequency detailing you should combine a tiling detail map in-engine and paint a mask if necessary.” My understanding of Blender doesn’t allow me to understand what you say …
“Your best bet for a large ‘hero’ character asset like this is to sculpt up to secondary forms and larger, less detailed, tertiary, and then use the high frequency tiled map I mentioned above. This is simply the nature of large, unique 0-1 assets.” So only sculpt the shape and apply a map latter in the process ? How do I create such map ?
If you are already too far in you could use the simplify brush on less detailed parts.
You’ll have to turn dyntopo on. The simplify brush uses the detail size set there (technically you van also give more detail with it).
Look at the video on this page at about 1:00:44 for as an example: https://cgcookie.com/live_streams/sculpting-a-spooky-gravestone-with-blender
Sorry, my post above assumed you had experience with game dev, but I see you’re only modding. What engine are you authoring the asset for?
The detail normal map is a high frequency tiling texture that you would blend with your baked normal map within the game engine material. This allows you to achieve the effect of higher fidelity on lower res maps, and is a common technique for large assets(like your dinosaur) that suffer from loss of detail due to decreased texel density on the map, which is basically the 0-1 space of your UVs, so the more space your UVs get, the more pixels(or texels) they get, and the higher the resolution in the game.
Here is a video that explains the concept:
There are a few different ways. You could simply sculpt the generic scales onto a flat, square plane(so that it tiles) and bake that to a map. Then you would paint a mask map to place this texture so that this tiling texture only appears on areas where you want it. Then you would use this map as a mask to blend your baked normal map from the dinosaur, and your baked tiling map you sculpted.
You could also use an older hack method of converting a photo to a tiling normal map. There are some free tools to do it, and more powerful and modern methods like Substance Alchemist.
The other way(the best way) would be to do this directly in a program like Substance Painter. Here you have very powerful tools and fine control. This is by far the superior method and gives the truest capture of your normal details. There is also Quixel for this. It now has 3D painting tools and is free(with a UE4 account)
Yes, you would be sculpting what are called primary and secondary forms(affecting silhouette) and capturing the high frequency - tertiary details - in the map. Also, by doing this, you would only be sculpting on a sub-100K polys mesh.
This all might sound a bit convoluted, but that’s game dev there is a lot to learn.
I’m still confused about the mask map tho. Once I have my dino sculpt and after retopo and UV unwrapping, I bake the normal map. I then create the tilling maps I need for the textures.
If I understand corectly, I need to paint a mask so I can put the tilling textures where I want. So in the end I have a all-in-all alpha map ? (same with other maps)
hello i got a question too…how the hell in blender can i properly sculpt a character model with multires, but necessarily split it up in separate objects (to save performance for sculpting) like for example for a human body: the head (or part of it like the face and neck, back of the head/scalp for example),1 half torso,2 half torso, 1 arm, 2 arm, and etc…i have notice that for detailing the separate head for example, you need a damn ultra high poly count (like from 80 to 150 million vertices just the head, but this is a average number, so is not accurate here), since the skin and all details of it are so fu**** tiny to sculpt… so then how can i get no boundary issues for example (since you cant sculpt in multiple meshes at the time when doing a stroke then this is a problem you know) because you are not sculpting continuously along the other meshes, but separate from the other meshes instead, so you dont match up the stroke or details in the multires in the boundaries… so is there a workaround for this?
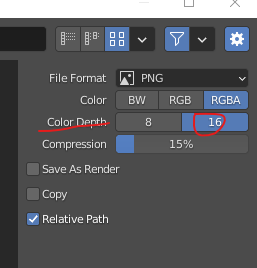
hello also another tip, use UDIMS if you can, thats gonna give extra detail to the textures, specially the normal map,and save the image you get from the bake in exr format, 16 bits with 32 bit float this is for storing a good quality normal map and have more color (in this case bump/normal information) information in the image file, so the more uv islands you have stacked in one uv map, the more is gonna lose detail your textures, so is better if you have much as stacked islands in separated groups (uv islands, but in this case udims), but also dont forget about the texel density!!
Uh, no, you don’t need 80 or 150 million verts for a head. Let’s just for the sake of argument take 90 million verts → 30 million triangles. Skin surface area of an adult male (whole body) is about 2 square meters. This means that even for the whole body, assuming even subdivision, 30 million triangles would mean 0.0000000(6) square meters per triangle. That’s 0.066 square millimeters, you’re into hundreds of microns already.
If you just take the head, that’s, say, about 8% of the total surface area, with 30 million triangles you’ll get detail of 0.005 square millimeters. That’s tens of microns (comparable to hair thickness). So unless you intend to sculpt individual hair follicles, it’s way, way overkill.
at least to sculpt the pore detail as well besides the skin pattern, and other details like scratches, scars, and etc which is what mostly this professional character artist does https://www.artstation.com/hossein_diba....also do you know any good procedural but realistic to use skin node setup which you can bake to make alphas, around the internet for sculpting random skin patterns? because using just a few alphas i dont think its does the job very well to me, it would look too tiled…
Pores that you can actually see (as in, we humans can see on one another) are 10-100 times larger than the detail you’d get out of 30 million tris for a head And then you need to ask yourself how much of those details you will actually see, taking the actual display resolution into account. I mean, ok, if you’re making a kiss-Brad-Pitt simulator you may want the 150 million after all But realistically though?..
As for procedurals, I don’t know of any, never had a need of those.
Again, this isn’t the case. It depends on the fidelity required. Closeup film quality character, then yes - unless using a displacement painting workflow like Mari/texturingxyz, but the most important thing is from my post above regarding baking displacement/normals from geometry:
a 2K map will capture maximum 4 million points, a 4K map will capture 16 million points, etc. So, if you were trying to capture 100 million points to a 4K map, it would max out at 16 million and the rest of the detail would be lost.
We’re confusing workflows here a bit though. OP is authoring for UE4 so the workflow is different.
yeah that’s what i mean in the other post as well, he is gonna lose detail if the island are way too smaller to store enough pixels (more pixels = more detail) to get a really good normal map, usually up to 4k-16k is ideal but also pretty heavier texture files…
The mask map could simply be a black and white map that you paint onto the dinosaur, with white areas showing detail and black areas no detail. Then you would use that map to mask/blend between your 2 normal maps in UE4 material.
You’re wrong here. Baking 100s of millions of points to UDIMs(as per my formula above) will capture that fidelity in the displacement map. This can be seen in high res, close up renders.
 And then you need to ask yourself how much of those details you will actually see, taking the actual display resolution into account. I mean, ok, if you’re making a kiss-Brad-Pitt simulator you may want the 150 million after all
  But realistically though?..

 , but just enough to get hyper realism that i love from that character artist in their sculpts.