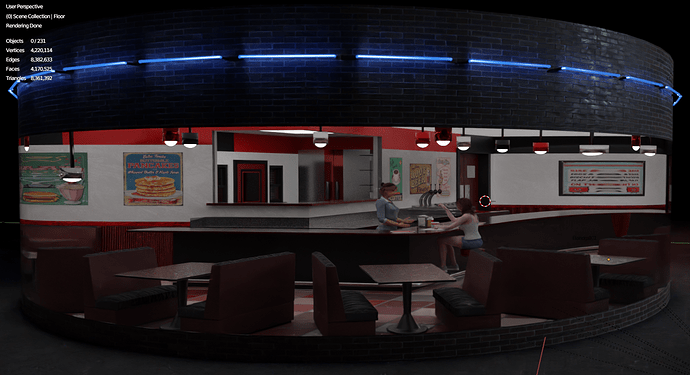
My 1st Blender Project Mother's Cafe

Ok, I have to learn the multi quote thing on this board LOL.

I understand what you mean with the square/triangle thing… I have a house or two that I have done before the diner… the walls were large rectangles, so when exported and triangulated, yes, it was cut into 3 triangles to make that large rectangle and the texture did not match up. I have been adding some mesh to the larger areas to try to accommodate more square and less triangle. Or more uniformed triangles I mean.

The light thing… here is my problem with this… so I set up all those lights, right?.. I export to bring into Iclone and they were not there when importing. So, once in Iclone I had to re-light all those fixtures. I was thinking the emission would allow for the hanging lights to glow a little when imported and I just set the room lights for the scene. Is that an incorrect way to do this?

So I am going to end up making two complete sets it seems. One that is scaled for my toons as I was planning a scene or two in here… and I am going to make another scaled to regular human size, change the neon sign and package it as content. I want to learn to do that especially.

As I search for things in the marketplace(s) that I need for a scene, I keep thinking that my stuff is looking as good (if not better in some cases) than other things being offered. I really do enjoy the creation process, I have been looking to get out of graphic design for something different. Tried a few things but nothing gave me the satisfaction that design did. This does. :smiley: I like the animation but not sure I have patience for anything other than shorts. Plus, I get ideas for things but that is where it ends. Ideas… The complete story never comes. Or at least anything interesting or production worthy. LOL

Thank you for all the advice you have given me. That is really nice of you to take the time to help. :+1:

1 Like

This is great! Good job. I love it. Thank you for sharing. I wish one day my creations can look as good as this.

1 Like

Not sure what it looks like on desktop, since I mostly use my phone to log in, but to quote someone you just select the text you want to quote. Slightly below the usual menu that pops up giving you the option to Copy, Share, Select All, etc., there should be another button or option labeled: " Quote (it might be a bit difficult to see, since the Blender Artists site is dark gray.)

This is actually an interesting problem you’ve got here. I wouldn’t say what you’re doing is “incorrect”, but I feel like it’d be better to light your scene by using whatever the IClone equivalent of Blender’s lights happens to be. Thing about emissions and emissive surfaces is, most real-time rendering engines don’t actually calculate light from them (as far as I know.) For example, if you lit your entire cafe using emission materials in Cycles, then you suddenly decided to render in Eevee, you’d find your cafe is completely dark in the render. There are ways around this, such as baking indirect light bounces, but the best way to get your cafe lit the same way as in Cycles would be to add in Point and Area lamps…which sorta makes having emissions for the lights redundant. Now, I don’t know what rendering engine IClone uses, but if it’s a real-time one then you might have this problem.

What I’d suggest is you use whatever lamps and lights you want, and light your scene in Blender. Then try to match that as best you can in IClone. It may be tedious, but it has two bonuses: One is you practice re-creating the light in a scene from reference (your original Blender lighting), and two-- because you’re forced to redo the lights, you get to experiment with how your scene is lit. You already know what works, and you have an end result in mind, but maybe with some tweaking you discover a better intensity/value for your overhead lights, one that you wouldn’t have discovered if you hadn’t done the lighting again. Or you realize that you could safely halve the total number of light/lamp objects in the scene without sacrificing the brightness by making a few tweaks to the remaining lights. If you’re planning on selling your scene, or offering it as a reward on Patreon or something, this little extra bit of experimentation and refinement can make a huge difference.

Either way, try googling if there’s a method of importing Blender lights into IClone first. :sweat_smile::sweat_smile::rofl::rofl:

Having fun while doing this really is the most important thing, even more than learning new skills or refining existing talents. If you don’t enjoy what you’re doing, whatever you make is going to be soulless and that’s not great for you. Or anyone, now that I think of it. :sweat_smile::joy: So I’m glad you’re enjoying the experience and the process.

Based on the style of this particular scene, though, I’d encourage you to learn more about PBR materials and how to make them. Even if you prefer a more toony or stylized form of texturing, knowing what’s realistic and why it’s relistic will be invaluable when capturing a stylized version of reality in your art. :slightly_smiling_face:

I can relate to this 1,000%. :rofl::rofl: It’s been over 2 weeks since I released my last personal animation project, and I’ve been working on fixes, tweaks, and adding extra stuff (including an actual hand-to-hand fight scene.) Thing is, all the extra stuff I’ve added could’ve been done in like…five days. Possibly even less. :sweat_smile: I’ve just been playing Resident Evil and learning Substance Painter instead of actually working on the animation.

No problem, I’m glad you found it useful. :slightly_smiling_face:

1 Like

I think this is amazing for a first project, in fact it’s amazing for a 100th project.
I think if you put a couple of characters (less cartoon) in the window it could have a real “Nighthawks” by Edward Hopper feel to it (one of my favourite paintings in the world.
Thanks for sharing - love it

Martyn - Thank You! :slight_smile:


Ulan - Good idea seeing if there is a way to export lighting… Having to go in and set all new lights was not something I was looking forward to LOL. I am not sure their default render system but I do have the iray plugin… WAY TOO SLOW!!!

I have spent the past two days re-organizing my files for this project along with converting to human size props… It looks better… I ended up changing the diner counter seating… Stools a little taller, foot rail… rounded corner and not a 90 degree angle. Damn! Now I have to change the one for the toons… LOL.

Substance designer… Adobe right? I see a post or two about that here… too bad it’s rent ware… :frowning: They have that rent-ware where I work… however they have certain items blocked at the corporate level. WHAT!!! I cannot install any of the 3D or animation software from adobe. Oh well… I’ll stick with the free stuff or things I can buy outright… upgrade as needed. Blender seems like it can do all that stuff… but like plugins… it might make it easier.

UG, today is my monday. Need coffee.


Mcrobbn - Thank you… “Nighthawks” was in the back of my head when I made this… It’s been a while since I had seen that piece and I was WAY off… LOL. I added booths… ooops. Where that may have been in my head, my main goal was the curved glass/wall and seeing if I could do it. I’m not 100% happy with it but it will do.

:slight_smile: Cool to know it was in the back of your mind as there is definitely a feel of the picture there.

Same here. We have full Adobe subscription including Stock, but Substance apps are still another package. If they had just put it into the full subscription, Substance would be THE 3D-Texturing app by now. I really don’t understand this decision. Greedy, maybe, but not really long term. But their marketing/customer care is questionable anyway

1 Like

I agree Kaustik… Customer Care seems to be non-existent anymore. I see it mostly in these “Marketplaces” that are spawned from the software itself. Once they have your money… good luck getting it back. Eh… it’s everywhere… except where I work… I’m good at my job LMAO.

I don’t do rent ware, I find a free equivalent. I have not used Adobe personally since CS6 in 2008/9. Dropped windows too until recent. I have an older HD video camera and where I can get the video off the tape in Linux, Vegas Video does it better. LOL. Then bought the Reallusion suite so… kinda stuck back on windows for my main machine.

As I get better at Blender and learn all that it can do… Cross platform… Free… (except all the damn plugins I have purchased LMAO)… I may just use this… who knows. Iclone makes animating and creating characters really easy, and I have about 7k invested there :nauseated_face:… (saving for full body mocap gear…) I may be with them until they go rentware :smiley: And if they do change to rent ware… they say the copies we have will continue to work so… since they do what I need, I can be happy with what I have.

1 Like

Yeah, both Substance Designer and Substance Painter (along with a few other Substance products I can’t recall) are owned by Adobe. And from what I hear, Adobe really really likes money…:smile::smile::stuck_out_tongue_closed_eyes: There’s a free trial version of Substance Painter that I’m planning to use, though. (My guess is the trial lasts for 30 days, and I have a few untextured models lined up so I plan on maximizing those 30 free days.)

In terms of getting realistic-looking textures and effects in a few quick and easy steps, I don’t know if there’s really a choice between Blender and Substance Painter. Using Blender’s nodes to create effects like edge wear and damage takes quite a bit of work to get good-looking results (at least for me), and you end up with a complex node tree that often times isn’t easy to tweak. Even if you label effects and nodes as you go along in Blender, it’s still not as streamlined and easy a process to create textures compared to Substance. I don’t want to fork over cash to Adobe (because I don’t really have any to fork over :sweat_smile:), but the convenience and apparent ease of use has me considering saving up for the software. Besides, I read somewhere that they’re bringing back perpetual licenses for Substance, so that might be worth it…

I’ve had Armor Paint recommended to me more than a couple of times. It looks like a promising alternative to Substance Painter, and seems to be a “pay once, use forever”-type deal. From what I’ve been told, there’s supposed to be a free version or a test version at armorpaint.org but the Download page contains a panel where you can buy the software on Gumroad. Can’t seem to find the free version…

No idea if this helps with anything or at all but Quixel Mixer is actually free to use and quite handy.

Quixel Mixer
image

This looks interesting… Thanks. I like that it runs on Linux… My laptop is Linux so I can use it there too. I have never used a painter program… groovy, another thing to learn LMAO… I have seen substance designer and to me that looks like the node system in blender for the most part.

Adobe seems to suck in other software to their collection… Dreamweaver/Fireworks use to be Macromedia, I still have my original disks LOL. Substance Painter/Designer use to be owned by another company not too long ago. They’re becoming the Amazon of the design world. :rofl: :joy:

It would be nice if they go back to perpetual licensing… I would buy the suite again.

1 Like

That too looks interesting… seems to be competition for Substance Painter from some of the brief searching I have done…

" When comparing Substance Designer vs Quixel Mixer, the Slant community recommends Quixel Mixer for most people. In the question**“What are the best 3D texture painting softwares?”** Quixel Mixer is ranked 9th while Substance Designer is ranked 14th. The most important reason people chose Quixel Mixer is:"

Of course there were so many ads on that page could not find the rest LOL…

Thanks for the link… I may try that too. I am a sucker for software… I love to get and play with new things.

I tried to software myself and it’s quite handy, I did however got used to substance painter so I cannot comment that much on quixel mixer … for me it was only a “get it and play around with it” type of interaction but offers quite a lot for a free software coming from quixel.
Happy to help!

Ok, this is cool… check out the distortion of the interior from the curved glass. I just noticed this LMAO.

I wonder if Iclone will give this same effect. :thinking:

How thick is the pane of glass? Whenever you have a glass object like a window or something, it needs two sides (think a Cube as opposed to a Plane. In the former there’s two faces giving the cube thickness, while the latter is a 2D object.) Otherwise Blender will make everything on the other side of the glass look like it’s in a fishbowl :sweat_smile::joy::joy:

I’m gonna say not thick at all… It was an archipack wall that had the mesh cut to make the shape of the window and then glass texture added. Although I think I took the back part of that section out. I kinda like it LOL… not sure it does the same from the inside.

Texturing is killing me!!! I took the day off yesterday to work this out and still no further ahead. The Booths textured fine, I can live with them… Other things not so much.

#1. This came out ok… not much detail… 3 items joined… colors came out in the proper spots but not as nice as #2 - the original procedural plus the smudge pack images. Not as nice as the booths came out.

Then we have #3… Hell, I have no clue to what is going on here. Started as a plane, extruded, then converted to mesh… had to mark seems for the UV Unwrap to work… but this simple rectangle will not hold the colors properly. The bright red strip near the waitress should be side trim, not a top trim.

I have no clue how to make image textures from the walls. When I try to unwrap the uv, all the bricks on the outside change direction. I think the Archipack plugin keeps a lot of the shape as it needs to be. Problem is, I need to texture the inside walls so they have images and are not procedural.

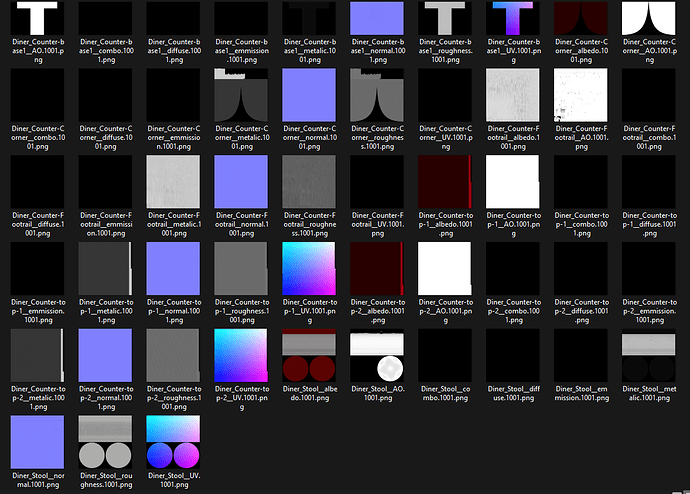
I am using Bake Wrangler to make all my textures…

Pretty simple…

A. pick source
B. pick target
C. set image types… diffuse, AO, roughness etc…
D. Set path, file name and extension… hit bake.

And next thing you know, you have a group of images then you just link them to the object and done.


This folder shows the 2 counter tops, 1 corner top, 2 counter bases, the foot rail and the stool. (They are done 1 at a time… I made it sound like it did all that in one pass. Ooops)

The stool looks good, the benches look good… the rest looks flat and crappy.

Any suggestions?

Roughness maps. loads of subtle roughness maps. I think it has been pointed out in the thread already, don’t know what your answer exactly was, but you’ll need some scratches and smudges for sure, just to break up the gradients coming from lighting etc.

start here

https://www.artstation.com/marketplace/p/3yAy/free-surface-imperfections-pack

1 Like

If you’re really dissatisfied with your texturing, I’d suggest either watching beginner tutorials online (because going back to the basics often helps), or gathering more reference images for the surface you’re trying to replicate. Texturing is just one of those areas where you can save a lot of time by looking up videos and reference, instead of “doing it by feel”.

Um…a Plane is already considered mesh (I think), so maybe the extra “convert to mesh” step did something that led to undesireable results? In any case, try checking the list of materials assigned to #3. Go to Edit mode and use Face Selection. Check if maybe the red side trim got assigned to a top face by mistake instead of the side. Also, one thing that might be messing around with your shading are the normals of your objects. There should be a tick box under the overlays(?) dropdown menu labeled Face Orientation. Everything in your viewport should turn either red or blue; the former color means an object’s normals are facing the wrong way, and the latter means they’re facing the right way. To flip normals, select the object you want, got to Edit mode, select all the mesh by pressing A, then press Shift+N. If that doesn’t flip the faces, Ctrl+Shift+N ought to do it.

I have purchased a plugin to help with smudges… “SMUDGR Pro”. Adds, dust, smudges, scratches, water drops… it’s pretty easy to use however the trick is in the adjustments. I know what they do, I know what changes what… but I am not sure on when to use 1k, 2k, 4k. I am currently using 2k in the texturing and in the baking process. Is that too high?

KAUSTIK - Should those be linked as color or alpha? It auto links as color. Also, when baking, should I bump up the samples in Bake Wrangler? I have them set to 1 as the demo video has shown except for the AO which is set to 32 for more detail. May I need to do that with the roughness as well. The AO is also set to the Red channel, should I do that with Roughness too?

Ulan - I found my problem. I’m a Belnder noob LOL. After I bake the texture into images, I have 6-7 different texture images generated for each… I use, “ctrl-shift-t” to add these images to the “Principled BSDF”. Even though I am selecting all the images, not all are being added, only 4. Adding the other images and linking them to the principled bsdf looks much better and closer to the procedural texture. I was staring at that the whole time not even thinking there were images missing :crazy_face: I also noticed that because I am keeping two files, one for baking, then one for the baked images and export… that I need to make sure that if I change the mesh in one, I need to duplicate the same in the other. Rookie mistake. Duh! :rofl:

Back on track now. :+1: Oh, one other question… Is it better to texture before adding mesh or after? For example, A large plane rectangle… as mentioned before, I need to triangulate when I export of another program… so in order to avoid an ugly triangular pattern, I have to add mesh to avoid that. It seems that when I have to mark seems for the UV for baking… more mesh takes longer to process. Both the UV and the bake.