My First Toon style characters

Haha i’m sorry but yes i did know most of that :stuck_out_tongue: The part about scaling the cheeks i hadn’t thought about before though :stuck_out_tongue: that was a nice tip :slight_smile:

But does that really work for you? on the eyes i mean.
I use that method to set the vertices where they need to be, but once i leave edit mode it’s almost as if the shape key doesn’t think about how the vertices got there, but lets each one take the shortest path possible to get to it’s destination. So it doesn’t think about how it needs to move itself out in the middle of it’s motion to stay above the eye.
Maybe i have a setting turned on somewhere from my Nooby days that’s made that happen or something : P

You sir are a genius. :stuck_out_tongue:

I suppose that you are right in that it’s time for me to play with texturing the clothes :stuck_out_tongue: Texturing has just always scared me… Finding a good way to unwrap things is difficult sometimes, and then when i move it over to photoshop or something it’s always hard to remember what section is what part of the clothes, and then making absolutely sure i don’t miss a bit of the edges or making sure that things line up from one side of a seam to the other perfectly. It feels like a daunting task to me x:

You caught me on the rigify :wink: i was messing with that some lately but i’m completely new to IK rigs so i thought i would watch some tutorials about if there’s special ways to set up the IK portion of rigify. I vowed to nver again Use FK only rigs after my last animation. It had 6-7 characters in it moving all off FK rigs and it was like a 7 minute animation. O_o"
I’m sure this CGCookie Pilot’s tutorial on rigify will do just fine :slight_smile: If not i’m sure David Ward has one or even Kent trumel since i think he was the one that made rigify? I don’t know :stuck_out_tongue:
It’ll be easy peasy either way :stuck_out_tongue:

So my progression is beginning to slow.
I think what i might need is to make a list of things i have left to do before my stage moves from making characters to actually setting up the show itself.

So… for organization’s sake :wink:
They say nothing matters unless it’s spoken or written so…

Things left to do till stage 2:

  • Try at least 3 more times to create boy and girl hair using Meshes
  • Test how hair works with soft bodies
  • Set up the IK Rigs for the male and female
  • Re make the Shapekeys for the female (Yikes O_o)
  • Fix the girl Vagrant costume
  • And polish everything up to be sure materials/bones/Objects all have appropriate names for organization.

It’s funny remembering my first post on this thread talking about how this will be easy. Really, it actually has been. I’m just driving through a time that wont be very fun. Shapekeys were fun the first time around but i am not fond of doing things twice. I’m good at weight painting… i just don’t like to do it :stuck_out_tongue_winking_eye:
and these clothes are really bumming me out. I want to try texturing the details on but i’m just so bad at texturing… I tried some pants today and… it was awful… the pants ended up on backwards with pockets in weird places and… for the amount of time it took…

I mean… i’ve messed with sewing patterns quite a bit. I mentioned earlier that my Girlfriend Draws and makes clay charms but she does much more than that and one of those is sewing. I only know how to sew because of her.

Using the same seam placement as real clothes i unwrapped it… and nothing came out right.
A smart unwrap makes it so i don’t even know what anything is or where it connects to even with my seam placement. A regular unwrap is the closest to best but still deforms the faces in weird ways, and projecting it from view seemed like it’d work but… but no… it didnt :confused:

if i could just hit unwrap and it would make it unwrap into a flat plane without turning the geometry or changing the lengths of it it should be just fine to work with :confused:
but idk…
it’s really bummin’ me <:c

Feels bad for posting a few times in a row*
but… i’m here to post an update? x: is that wrong if no one has said anything? x:

So i rigged up the Male character with rigify and he is almost all set! havin some weird problems on his arm atm since the rigify’s deformation bones seem to have a joint in the for arm? probably for a smooth rotation purposes when the hand is twisted, but the automatic weights for that are really giving him an Indian burn. O_o

I had trouble when rigging him up that my shape keys suddenly exploded. I found that it was just his shirt exploding on each shape key and Modron gave me a nice tip on one of my threads that the W -> Shape propagate function will make every selected verticie stay exactly where it is across all shape keys. So i was able to finally get that problem out of the way and i can now rig him with working shape keys for the facial expressions ^-^

It was a tough time but…

It’s all good now ; )


So we have 1 character rigged. Gatta clean up just a few of the shape keys now (much better than remaking every single one.)
Then make some more hair (Its hard to look at this character and think that he is just a basis and not a character himself and that his hair and clothes should be able to change without feeling like i have messed up a character. when really… all i’m doing is finalizing another one.

I’m feelin like i like the hair on the female now when i look at the image where you can’t see the top of the hair so i’ll fix up that little bit of it and then also make a few wigs for her too. She still needs shapekeys and a rig as well and still the new clothes.
Havn’t gotten much done lately what with the exploding shirt incident.

Gatta say again that i absolutely love that suggestion on gradient eyes. : ) the eyes have quickly become one of my favorite parts. : )

I didn’t know about the shape propagation in “W” and that’s going to be a problem I hit soon. Thank you. :slight_smile: Forearm: It’s wacky because there’s two bones in real life that twist over each other. Just ask your elbow! I’m going to loosen up the strength in mine to avoid that Indian Burn which is a perfect description. When your arms are at your side and your elbow is bent, palms down, the bones are crossed top over bottom; when you put your palms up, they uncross (I think 90% sure on that). That info comes in handy for character arm tattoos, watches, long sleeve shirts, etc but the auto weighting is really strong!

I see threads! They’re all nice and straightly tailored too! I know that can take some time. There’s a “buzz” on the image above from pixelation where the detail recorded is less than the detail presented - newscasters aren’t supposed to wear shirts with fine stripes for that reason. Where one recorded pixel can’t represent three shades, it just picks one to show and when the subject moves, the pixel flashes and buzzes on TV no fault of the pixel. The pixel represents the next shade before the first is represented by the next pixel. For newscasters, the solution is larger stripes; for us, larger thread textures sacrificing realistic thread count for better representation.

That gradient on the eye is really working too! Well executed and worth a wink! :wink:

Oh, and post all you want! It’s WIP!

You have… No idea how excited i am right now. O_o

For my new WIP update, i wanted to actually test if i can take this base rig i have made and make another working character based off of it.
And soo… I tested it by creating an old game character of myself. The same game i met My Girlfriend that is. I wanted to make this character for a few reasons.

  1. In the show he will actually be a character. In the story line described as “The Hero’s journey” one of the things the hero of the story needs for the story to work is some sort of source of help that no one else possesses. Such as someone having a fairy or a talking animal that helps them from time to time.

And in this story this character is the main character’s source of help. In a way this character is actually ‘me’ talking to my own characters. He will often be accompanied by My Girlfriend’s character Nilla within cities most of the time just sitting around in different places. They won’t hold weapons and their clothes will be more like this rather than armor to keep people unsure about what job class they are and kind of separate them from the people who are actually living in that world instead of these strange beings that come and go and don’t live in that world. But people will have to just deduce that, it wont be explained :stuck_out_tongue:

In the game i wore this set of clothes which was a bit rare to come by and a bit of a mixture of a few things so i was pretty much the only person with this look. I think i saw one other guy with it and it bugged me so much >_> He wore an awful cape with it though so technically i was still original : P
I was a bit iconic in certain places of the game. People recognized me because of my originality :slight_smile: i love that in games.
And i just loved the look anyway.

And so here he is,

This is Razdrigz! but you can just call him Raz :stuck_out_tongue:


The rig works perfectly with the new clothes and honestly automatic weights almost captured the new clothes perfectly :slight_smile:
i just had to adjust for the indian burn and the boots were wrong and i had to redo those. :slight_smile:


And here you can see him with the rig working a bit, i just have to adjust that pinky, don’t know what’s going on there :stuck_out_tongue:
And then i wonder if i want the hood to have that Sub-Surf modifier or if the other one looks better.

And then lastly i have to figure out how to attach his cape O_o
i mean… i want the top of it to be parented to his neck somehow, and i don’t know if i should try a cloth simulator or if i want to try and make some sort of rig for it.
can you parent an armature to another armature? O_o

and this,

“I see threads! They’re all nice and straightly tailored too! I know that can take some time. There’s a “buzz” on the image above from pixelation where the detail recorded is less than the detail presented - newscasters aren’t supposed to wear shirts with fine stripes for that reason. Where one recorded pixel can’t represent three shades, it just picks one to show and when the subject moves, the pixel flashes and buzzes on TV no fault of the pixel. The pixel represents the next shade before the first is represented by the next pixel. For newscasters, the solution is larger stripes; for us, larger thread textures sacrificing realistic thread count for better representation.”

That is really good information! it’s like i kind of new about it, but i would have never thought about it in this line of work :stuck_out_tongue_winking_eye:
So it’s helpful to be reminded of that :stuck_out_tongue:

[edit Again] :stuck_out_tongue:

Turns out that cloth pinning works with his hair too! This…no… Today… was a good day :slight_smile:

Well made my first real walk cycle and i’m learning how to use the action editor and i hope to look at the NLA editor again.
I think i should pop in my Animation fundamentals DVD i got last Christmas lol.

Here’s the walk cycle i started with but i don’t think that it’s very good. it looks a bit too energetic or more like a light skip.
So i probably need to find some more in depth tutorials on walk cycles. The one i saw was very simple.

And then a few days ago i had finally done that hair test with the cloth simulator and pinning :slight_smile:
you might be interested in seeing that. And this was the actual the first rendered animation of my characters :slight_smile:
I think the pinning was a bit tight so i lightened it up a bit afterwards but it still needs some tweaking :stuck_out_tongue:

lol funny… i still need to make that face rig so i don’t have to mess with shape key values.

I’ve kind of lost track of the steps i need to complete to get the project started.
So once again i’m making a little list of what needs to be done : P

I need to make the face rig, i need to rig the female character.
Give the female character better clothes (And perhaps work on Raz’s Gf since Raz’z character Model seems to have become more advance that the main character i was using x:

I think i’m actually confused because of the lack of things i have left to do O_o maybe i feel like i’m forgetting something.

Should i be setting up an action library?

Then i think i just have to make the different characters and start setting up the towns :slight_smile:

You are seriously cruising through this! I’m so fussy and moving so slowly but I am happy to report that I’ve made a female character. She’s unrigged as of yet and her hair is in a bun, like I mentioned but I don’t even have a walk cycle to my credit yet with the first guy. But I hope one day our characters can pass some shout-outs to each other across their respective animations!

On the subject of the

next characters becoming more advanced than the first ones:
Yup! :slight_smile: I actually wonder if after four characters, we both won’t want to run back and re-tool our first because they’ll be so simple next to the new ones. Oh well, such is learning!

Raz here is pretty nice. Easy to look at, a pleasure to watch. I’d request that where his Upper Arm motion shows geometry underneath, if that could get smoothed out. The cape is responding really nicely and your hoodie solution so far is totally cool - I do wonder if it doesn’t need its own Vertext Shape Keys for fully on, halfway down and fully down and they just key in the morphs for animation with his hands? That’s probably what you did already?

Raz’s eyes roll really freely in a freaky kind of way - when I watch animations, the biggest difference between new animations and experienced studios is a “snap” in motions. Newer studios let limbs and eyes wander more slowly to the next pose. Older studios seem to control this with Node editors to replace the default keys with accelerated or decelerated ramps in and out of keys making characters more awake and decisive in their movements. The default is Smooth, you’re probably onto this right now with the NLA, but put some sharpness to the keys for eye rolling.

You’re only on page 2 of the WIP! It’s awesome how spongy your brain is. Keep it up. It’s so great to see.

Action Library: Wait. You noted that newer generations are more advanced - that will apply to the animations too. Don’t lock in the early mis-steps on the models that become smoother unless the Animation Library is easy to upgrade across all meshes. Even then, my girl already outweighs the first guy in terms of mesh detail, so a more advanced pose would affect him in peculiar ways because he just doesn’t have the geometry to match. You and I are still sorting out our construction styles.

That background… Great! Did you make that? I’m totally looking forward to a town scene from you.

Wow! you are right o:
That is a very encouraging thought that i went from a grey blob to have 3 almost fully working characters in 27 posts O_o and some of the posts were just updates and not questions.

You are seriously cruising through this! I’m so fussy and moving so slowly but I am happy to report that I’ve made a female character. She’s unrigged as of yet and her hair is in a bun, like I mentioned but I don’t even have a walk cycle to my credit yet with the first guy. But I hope one day our characters can pass some shout-outs to each other across their respective animations!

I still don’t think you should worry about that :wink: I feel like i may have a bit of an advantage due to that i’m making cartoonish characters :slight_smile:

You have to rig it up before you can make an anything cycle and i can tell you i hated about every minute of rigging the character lol. I’m glad that i know how to do weight painting with quite a fair avenue of accuracy but i still have to drudge through that step of the process :stuck_out_tongue:
Which is probably why the female character is without a rig at the moment.

Do you have a WIP or other thread about your new character? or are you continuing it on that cloth thread?

Raz here is pretty nice. Easy to look at, a pleasure to watch. I’d request that where his Upper Arm motion shows geometry underneath, if that could get smoothed out. The cape is responding really nicely and your hoodie solution so far is totally cool - I do wonder if it doesn’t need its own Vertex Shape Keys for fully on, halfway down and fully down and they just key in the morphs for animation with his hands? That’s probably what you did already?

Yeah i could probably add a few more mask modifiers in. Cause technically i shouldn’t really have any geometry under sleeves cause that will just be bad news no matter what :stuck_out_tongue: it takes alot of skill to make arms in sleeves that don’t stick out and being able to do that correctly isn’t too useful if you can save alot of time with a mask modifier anyway :stuck_out_tongue:
I wish i could make folders in the modifier tab to organize all the masks.

The hood was done with a series of shape keys actually :stuck_out_tongue: it was another one of those two step shapekeys like you would find having to use on eyelids. Although i could probably edit it a bit more or even add a 3rd key so that it can get a little more compact and bend fold up more.

Raz’s eyes roll really freely in a freaky kind of way - when I watch animations, the biggest difference between new animations and experienced studios is a “snap” in motions. Newer studios let limbs and eyes wander more slowly to the next pose. Older studios seem to control this with Node editors to replace the default keys with accelerated or decelerated ramps in and out of keys making characters more awake and decisive in their movements. The default is Smooth, you’re probably onto this right now with the NLA, but put some sharpness to the keys for eye rolling.

I remembered hearing that tip in a similar way in the DVD CGCookie did on Animation fundamentals with that add on that builds a character. I had tried to go along with that tip by making the eye movements quick and often move them even quicker while the eye is blinking.
I know at the end of that test i tried to have his eyes roll out of the blink like he was dizzy but it didn’t look right because before the render i had no idea how fast his head was actually shaking.

And now that you’ve mentioned it and i look back on it, i suppose the eye movements could almost just be a literal snap between a single frame? I keep telling myself i need to get that DVD back out xD

I havn’t moved onto messing with the NLA editor just yet, i had some company over the past day or two.
I know that they cover that in the DVD aswell.

Action Library: Wait. You noted that newer generations are more advanced - that will apply to the animations too.

That was something i was wondering actually. Not necessarily in terms of mesh detail but how similar the bone structures have to be. Such as if i append a Action to a project with multiple characters, would a female rig accept an action made by the male rig? or should i make them and able them separately?
I guess in a way i wasn’t being overly serious about making an action library rather than just having fun doing animations for a little bit xD It’s so exciting to take your character and actually see them move :slight_smile:
I tried to make an animation of Raz stretching and sadly i had to be continuously stretching to know each motion. lol stretching didnt feel so good after that. But i guess what i’m trying to say is that i’m just tinkering with it to learn how it works. Before now i didn’t know you could save actions or that even an action editor existed in Blender ._. and it’s really cool that you can even append actions :slight_smile: it’s good to know what it can do before i start using it for serious stuff :slight_smile:

The background? sadly i did not :frowning:
That was an in game image from the game my game character Raz came from. I didn’t have the game anymore so i had to grab one off google images lol. He was standing in the way of some people sitting on the ground :stuck_out_tongue:
But that image was taken on the outskirts of one of my favorite cities in the game. It is an absolutely beautiful city with brick and wood buildings, stone sidewalks, a giant chapel looking building at it’s square. And if you headed north of the city near the north of the island where the cliffs were there were some smaller neighborhood looking houses, a river, and these platforms that stuck out from the cliffs at points that looked almost like mini runways for the flying vehicles in the game :stuck_out_tongue: I definitely want to include a city like that in the show along with some other ones that i think of myself or get inspiration from elsewhere :stuck_out_tongue:

I can’t wait to try my hand at modeling a city :stuck_out_tongue:
i don’t even know where to start :stuck_out_tongue:

So i think truly what is slowing me down right now is the face rigs and the shape keys for the female.

I started another characters based of of Raz’s character. I revised the outfits for the male starters in the show. (The people who start in training for their fighting job class)
I think a few may be varied depending on if the people are from that small town or not.

But for the town the little ceremony will take place in it should look about like this.


I’ve kept a list of names i heard or thought of for months now in preparation for when i made this project. And i can just never choose names. This is the main character of half of the show (You can watch the show from either his perspective or one other guy’s perspective.) This character is destined to be one of the elites of the Knight job status where as the other, the same for a Blade class which is trained in speed,agility, and dual wielded weapons. So you have this difference in a character who has alot of power, defense, and Lp and can attack and tank multiple targets at once with slow attack speed where as the Blade has little defense incredible speed and accuracy, lower LP, but in the right situations can drop a monster higher than his level in under 10 seconds.

There are a few more classes than that.

but anyway out off my huge list of names i had made over time I think i’ll be naming this guy Kaze for now?
i have so many names it’s hard to choose what sounds good :frowning:

so i think before i go any further making any more characters i have to make the face rig. Would be a nightmare working on all of this on just influence bars alone.

[Edit]

Oh! and also i found a video on youtube that showed an amazing way to make polygon hair.

You take a cube and subdivie smooth it twice and place it over the head and give it a general shape of the head almost as if you were going to sculpt another one. Then under the object panel view wireframe and transparency and give it a material with full transparency. So all you can see is the wireframe of it. Then with Face snapping enabled you can place your strands of hair ontop of it and it will be about on the head but still move around it like hair :slight_smile:
Then when you are done you can do some general shaping afterwards :stuck_out_tongue:

Per our PM’s about fingers and bending, I made a mistake in saying it was all auto weights. Attached is the experiment of super, super basic finger geometry (pictured far-left) Subsurf’d 2 for appearances later (pictured second group from left). Two loops at knuckles, pushed to three and each bone was painted to fade at a weight of 50% (green stripes pictured on the index finger).

The big test was ONE set of bones for four fingers. I got the Index finger to bend to my liking, then duped three more fingers, sized them and connected their verts. The weights did not carry over - they’re all 100% weight at the verts (pictured all red with no green from the same bone). That’s certainly correctable but interesting to note. The geometry is still basic there, just pictured Subsurf’d 2.

These are hand potentials for external characters whose rigging could just be a bone in the hip, elbow or who require little to no motion. One bone for all fingers was a fun discovery. That bone armature was best near the skin at the knuckles (X-Ray pictured far-left).

Finally, my own index finger - the rig Copy Rotation constraint has an influence that I feel shouldn’t be left at 1.0 for each following finger joint. My own Index Finger limits influence nearly 50% or .5 in Copy Rotation influence terms to the last joint! My single finger bone is at .75 Your finger may vary. :slight_smile: I think this kind of detail would add loads of watchability to any character main or otherwise as they grasp swords, guns, bottles or scratch their heads. It’s distracting to me to watch a hand that seems totally robotic with each joint bending 90-degrees simultaneously.

Hopefully some useful information for faster character creation!

Attachments


Sometimes i wish the forums wouldn’t tell me there’s nothing new on a post when there’s new stuff lol.

You really have been looking into this in great detail! there’s alot of helpful information there and nice tests.
Looks like you have quite a hand for texturing too :wink: (Accidental pun)

All this certainly has left me paying a bit more attention to my hands lately.
There really is alot of creases on the fingers that make alot of areas bend, stretch, bulge, and recede with every movement. It’s fantastically annoying when it comes to our job of replicating it.

Your talk about one bone controlling all fingers Brings me back to some games i use to play as a kid where characters would always have a fist for everything or of there was movement in the hands it was more like a glove.

But you know what i’m thinking. With your hand there and the hand that i have on my model, the very last knuckle on the finger somehow seems off. it seems like the last segment is really small. but after closer examination of my own hand… That sounds really odd. (I won a for fun contest at school once in drama class of who could look the most bored by sitting there entertaining myself by looking into the finer details of my own hand)

If i take my right hand and hold it infront of me with my palm pointed towards my left, and point with my index finger towards my left…

Looking at that last joint on my finger, it almost looks like the creases on the underside of my finger do not line up with the ones on the top. Which makes it so that the top of the finger looks like the last segment is short, but on the underside it looks longer. The midle joint seems a bit off too. but i’m not exactly sure as to what purpose this is.

I’ll go ahead and make an update. Not much has happened since i have been sick lately.

However i happily finished a facial rig with custom bone shapes on Raz :slight_smile:
And i then found that there seems to be parenting issues… Which personally i’m just laughing at that sentence cause anyone else i know to tell about this problem could think i’m talking about something completely different xD

so i wanted to pose the face with the new rig and i found that his eyes are popping out on head movement again.

So there is an eye… Which has a lattice affecting it.
The eye is a child of a non deforming eye bone that is the child of the head bone of the rig.
The eye has IK constraints set up so that the tail of the bone will always point towards another non deforming bone which is the Look at target.

There is a second eye. Also with a lattice affecting it. That didn’t care about how the other eye was following the Eye bone. And this one has a copy rotation on it.

I’m looking at the weight paint on the eyes as they may also be attached to the rig themselves causing some sort of double transforms somewhere.

But no matter what i do, something is bugging out, falling in, stretching, disappearing, or following at the wrong speed.

And the best part is is that both eyes also do different things wrong at the same time. They never do the same thing wrong together or do one thing right.

so… this is fun… lol.

==============Edit=================

You know what i both love and hate about Blender?

It can look like 10 things go wrong all at once. When really only 1 or two things are wrong. And they are often the simplest things you would never expect.

The eyes were bugging out or falling in, stretching, somehow half exploding (ew), or completely disappearing as the head moved about.

The origin of the eyes were slightly off making them pivot wrong inside of the lattice. x:
And the 2nd eye was always different because it’s normals were facing the wrong way. x:

The project is now back in motion :slight_smile:
Man i hope that i can append my face rig to other characters lol.

Well it’s been a wee bit since i had a visual update.
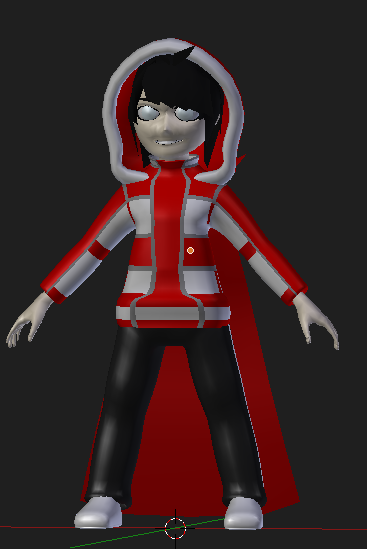
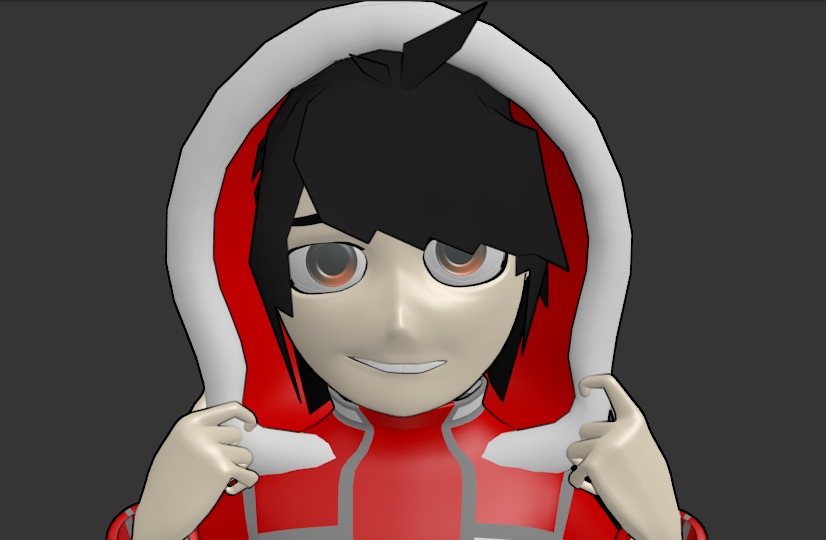
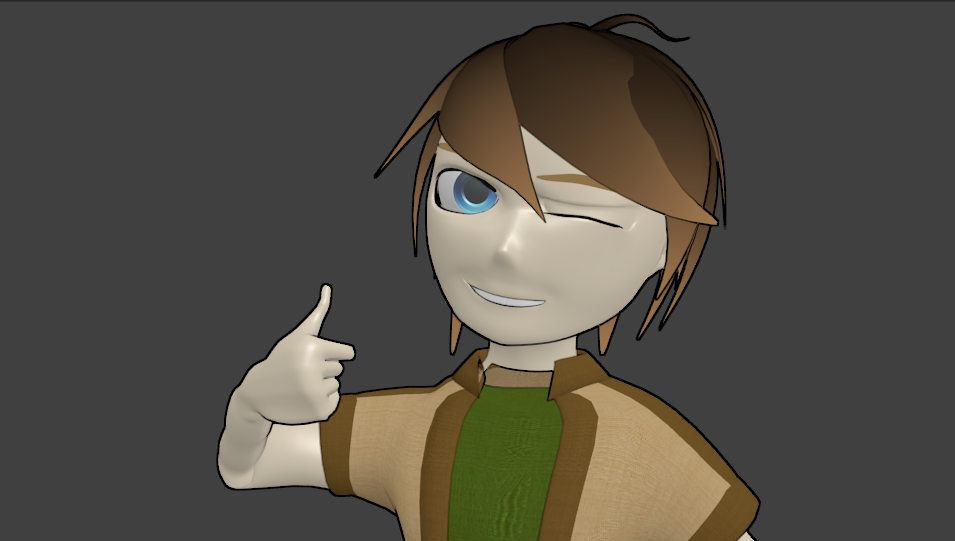
As far as Copying the face rig to another character goes, i’m not sure you can. But through the critical thinking, reasoning, and logic that Blender teaches you i came up with another idea. I took all the components off of “Kaze” that were different from the base mesh such as his hair and clothes. I Named them all appropriately and appended them to Raz’s file and deleted all the details from Raz that made him something other than the base mesh and added Kaze’s objects to him.
Really hope i find a better name than Kaze though… it’s not fitting as much as it was a week or two ago.

Anyway with that accomplished it would seem i have 2 completed characters now.

I learned that with texture painting, you can go to vertex paint mode and paint directly on the model so i gave texturing another go, and with this way it was certainly more fun and easy but i can definitely see that i’m not very good at it by attempting to make the Lvl 1 sword all the starters will use which is just a wooden sword.


I liked the tape on the handle though lol.

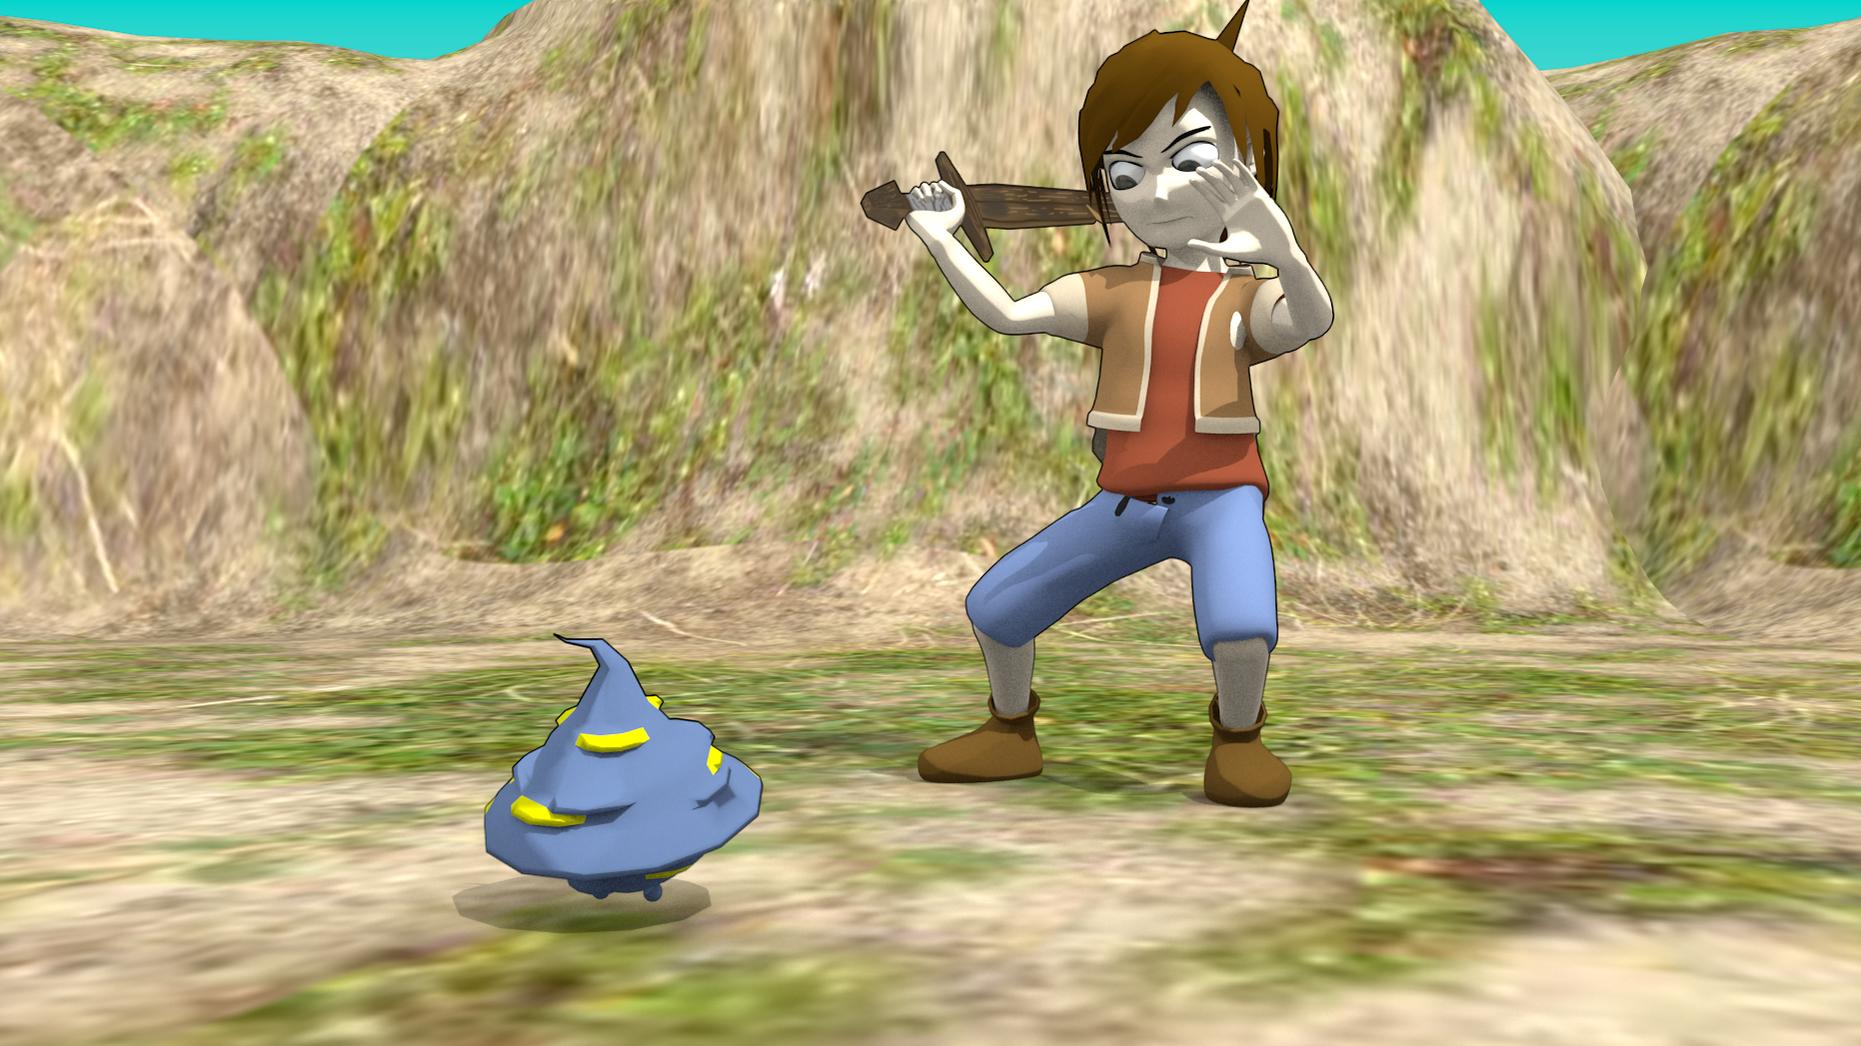
Then i gave it to Kaze and put him in a little fighting pose! :smiley:


as the 2nd image there rendered, i wasn’t expecting greatness, however i felt an overcoming sensation of “Wow.”

I mean… I did that. x:
Alot of work went into making something like this come together.

I don’t know. People can compliment you and you can feel good but sometimes you really just gatta step back for a moment and feel some personal pride about your work. :slight_smile:

That image is nothing to be boastful about though.
The ground was thrown in quickly just so that they weren’t floating through space.
I have trouble with lighting so i lately i find myself resorting to the easy way of flipping on Ambient occlusion or environment lighting. I feel bad cause i don’t even know what they are or do but they make lighting so easy x:

What surprises me a little bit… is that i havn’t mentioned a word this entire time about the monsters.

About 2-3 weeks before i even seriously started this project, i created some little monsters for “if i did this but i probably wont” sake.
Look at me though! i did do it! :smiley:

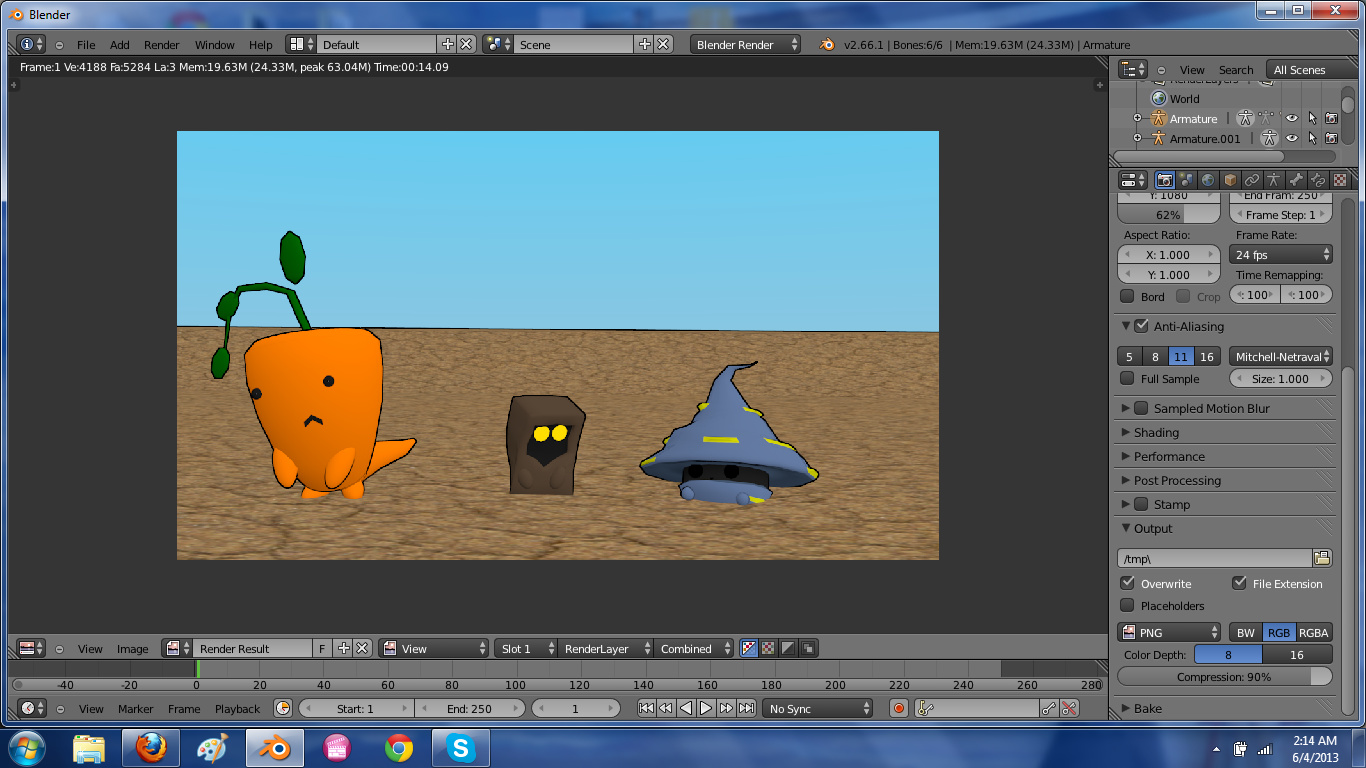
I only had 3 monsters for the starter area created out of the 10 or so that there will be. The one in that image is the Shrump which is the level 1-2 (Small and normal) monster :slight_smile: Shrump being a mixture of Shroom and Shrimp. Sometimes simple names like that don’t sound creative, but if you look back at Gen 1 of pokemon, their names were often made with dumb little things like that aswell :slight_smile:


On the left there is Kerrat lvl 3-4 as a carrot like Rat (an idea by my Girlfriend :slight_smile: ), and in the middle the name is still being decided but is currently a Baddie lvl 9-10. the idea for the shrump came from paradoilia on one of my walls at home and the Baddie was an idea created after watching a starwars video created by thousands of people each doing anything they wanted to recreate the first movie 10 seconds at a time. Somewhere in there i saw one of the Jawa’s represented as a paper bag and i connected that with one of the enemies in spyro the dragon who was round and tall with a similar face that would take your egg and run away with it leaving you chasing him. SO the baddie is kind of a mash up of the two.

The monsters will most often have attributes about them that make it more difficult to fight. such as “You have to hit them to hurt them but they also do ________” kind of thing.

Shrumps hide their body in their ground among other mushrooms to hide themselves but will pop out if touched or hit. They might attack or might run away.

The kerrat happens to have about the same ability which doesn’t happen often but the circumstances of where they live compared to the surrounding area of monsters isn’t perfect for training rather than just the most ideal.

And i explained the Baddies already that they take your stuff and run away with it and try to hide it. However they will team up if needed.

I have a few more monsters planned already but not created.

Anyway, just some neat info that i never got to share
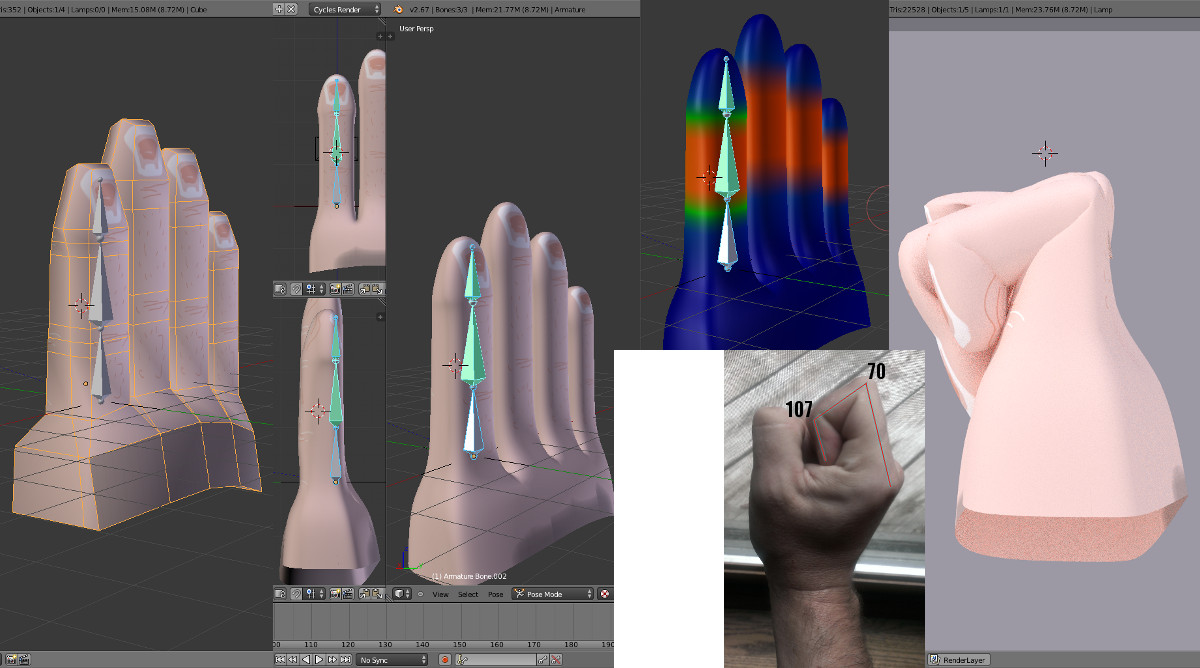
 :slight_smile:

Have you looked at this character design? It may help you develop better shading style for a 2D look.

Honestly i havn’t taken the time to mess with blendswap yet so i don’t exactly know how to use it, but by the picture…
I guess you could say that’s about where i wish i could be when it comes to this stuff. The edges look more drawn and i saw in the comments of that something about a freestyle option but i couldn’t find it in my blender s:

I could probably learn things by looking at models like that if i download them but i certainly want to be the person who knows how to make that, rather than someone who just uses models made by other people. Which is why i havn’t been on blendswap before :stuck_out_tongue:

Are they free to download? i mean. it says to log in to download but, all i do is make an account and people can download stuff like that?

daveleitz’s tip is a good one; Cherrypie’s work in that link is uncommonly good! The Vimeo tests show how insanely good that very model is in fact. I’ve participated on Blendswap (it’s all free) and downloaded some good models with rigs but since I don’t know enough about rigs themselves, dissection isn’t easy. Definitely check it out though!

Congrats on your fighting scene! It’s nice to have a snapshot of your characters and see their personalities in freeze frame. It already looks like your character and creatures hopped off a video game, so that’s pretty cool! I like Kerrat - why is he so sad?

If you’re still looking for more control over the Freestyle, update to the latest Blender (which I’ve only crashed once) since some of its new powers might include some better power in Freestyle and then watch one of those tutorials you’re so good at finding. I’m wrestling with Material Nodes and render times in Cycles so I can’t join you on that front but I’d like to see you tweak things to your liking.

As HelloHiHola pointed out, Blendswap is free up to a certain bandwidth. You can pay for more bandwidth, or just wait for it to reset periodically. I certainly don’t mean you should copy someone else’s work, but you may learn things about character geometry, materials, etc., that you can then apply to your own work.

I havn’t made an update in a while. Honestly i’ve been feeling a bit depressed about my progress. I’ve taken some lazy routes in these character creations and i wish i havn’t. I really honestly want to make this something great and so i’ve been pretty hard on myself about it.

But for the update today i just want to make a statement.

I watched a video just a little bit ago about the success story of one of my favorite people. He’s Gavin Free if you’ve heard of him. Just a Guy on the internet and his success isn’t wealth but just happiness.

So i listened to him and the person who hired him talk about his story for about 2 hours and it was very inspiring and moving to me.

So i’m going to take it as encouragement. And to tell myself that i have to keep going, i can’t get discouraged, i can’t let other’s get me down, and that i will do my very best.

because at the heart of it all, if i keep trying the worst thing that can happen is that i will only get better.

At the very beginning of this thread i mentioned something called RWBY made by RoosterTeeth which is a 3D animated Anime like webseries being created by Monty Outum (spelling might be off)

I would like to just point out something else i have found as far as 3D anime goes.
I found a picture a while back i really liked and today i figured out what it was, sadly it wasn’t an Anime like i wanted it to be, but it’s a Game. the 3D models in it look incredible and i really wish i could “Get on their level” T^T…

Things i’m seeing in this that i wonder about are the drawn on features of the faces… which i assume are texture drivers that i never learned to do and i feel like it may be a bit late to try them since my 3D head is created to have eye sockets. I don’t know much Japanese but the lip sync doesn’t appear to be overly spot on which makes me feel better about my face rig cause i’ve been very worried about how much mouth movement i can accomplish when it comes to talking. I guess i’ll have to test that sometime soon.

The hair is also polygons and… it almost makes me angry that it’s like i can never know how to make hair like that. I’ve looked all over for people making Polygon hair and whenever i find one i like it’s like there’s no way i would be allowed to find out how they did it. And i wouldn’t exactly say it’s easy enough to just look at and try and recreate it. … So… it’s frustrating… :c

I noticed a lack of drawn edges on the characters, which is neat.

And i noticed some neat little comic like or anime like features such as the shocking buzz of the earbud or the little sweat drops on the facial expressions.

I really want to feel encouraged by this to try and become better but i wish i wouldn’t feel so jealous >_>

Your sentiment always strikes with me; not sure why and I’m not sure it matters much ‘why.’ The sense of defeat is temporary thankfully, just like the sense of victory sometimes, but pick from it some ONE thing you’d most like to change about the current assets you have. The hair? The lines 2D edge? Sprites (those little lightning bolts, etc)?

You may have to tear down and rebuild a little and then, with a heavy sigh, remember your current signature which has that glimmer of hope which is why most of us are still going.

Create a scratch project based around what you’d most like to change - a scene that you can mess up and not regret - your current assets at a coffee shop or something. Do it soup to nuts, plot dialog, blocking, time of day, interior. You once told me, 10 seconds is more than enough time to convey something. My opinion about that 2D/3D anime that I see is most of the magic is in really incredible texturing going onto extremely basic geometry; that’s a beautiful baby of superior planning. Another opinion I have is from that model that daveleitz pointed us to; I think that clever texturing for hair is actually going on a triangular length of geometry, not a series of 2D planes. -> Every Pixar short has been built around an experiment of one challenge, Luxo, Jr. around light-emitting objects, the feather particles on the Blue Birds, hair fashioning/cutting on that sheep one, etc. Think in baby steps like they do.

When you think of your story, are you thinking of it in vignettes or as the epic all at once? I’ve just completed the final piece of hardware in the largest computer I’ve ever built so I can rip through Cycles Renders (96 CUDA cores current, over 3,000 in the new). Despite the big story, I’ve had to break it down into five minute pieces each with their own arcs and three and four part treatments. What that’s done is help me decide when I need a model for better hair, or for less detail far away, or for no legs since they won’t be seen or better hands if that’s what called for. Multiple versions of the primary characters will be parked in libraries based on need. I’ve found that no one model will satisfy the entire story and conceptualizing the vignettes helped me pace myself.

I like your progress so far and just don’t want to see you overwhelmed by it. Conceive a simple scene and then, just answer the needs of that current scene. After my build gets the all-clear from me, I plan to have one character just sit at a cafe answering the phone to test foley, sound levels, lip sync, animation timing, pose, expression keys and lighting and maybe even edit two cuts together. That boring scratch project should keep me busy enough! (Sorry for kind of a strange response - basically: Don’t quit now! You can do it!)