![]() Testo in Italiano
Testo in Italiano
(scusatemi per quel “d.e.i” ma Discourse non ama la grammatica italiana)
![]() English Text
English Text
![]()
Ciao a tutti,
vi mostro l’ultimo progetto personale a cui ho lavorato negli ultimi mesi (nel tempo libero ![]() ).
).
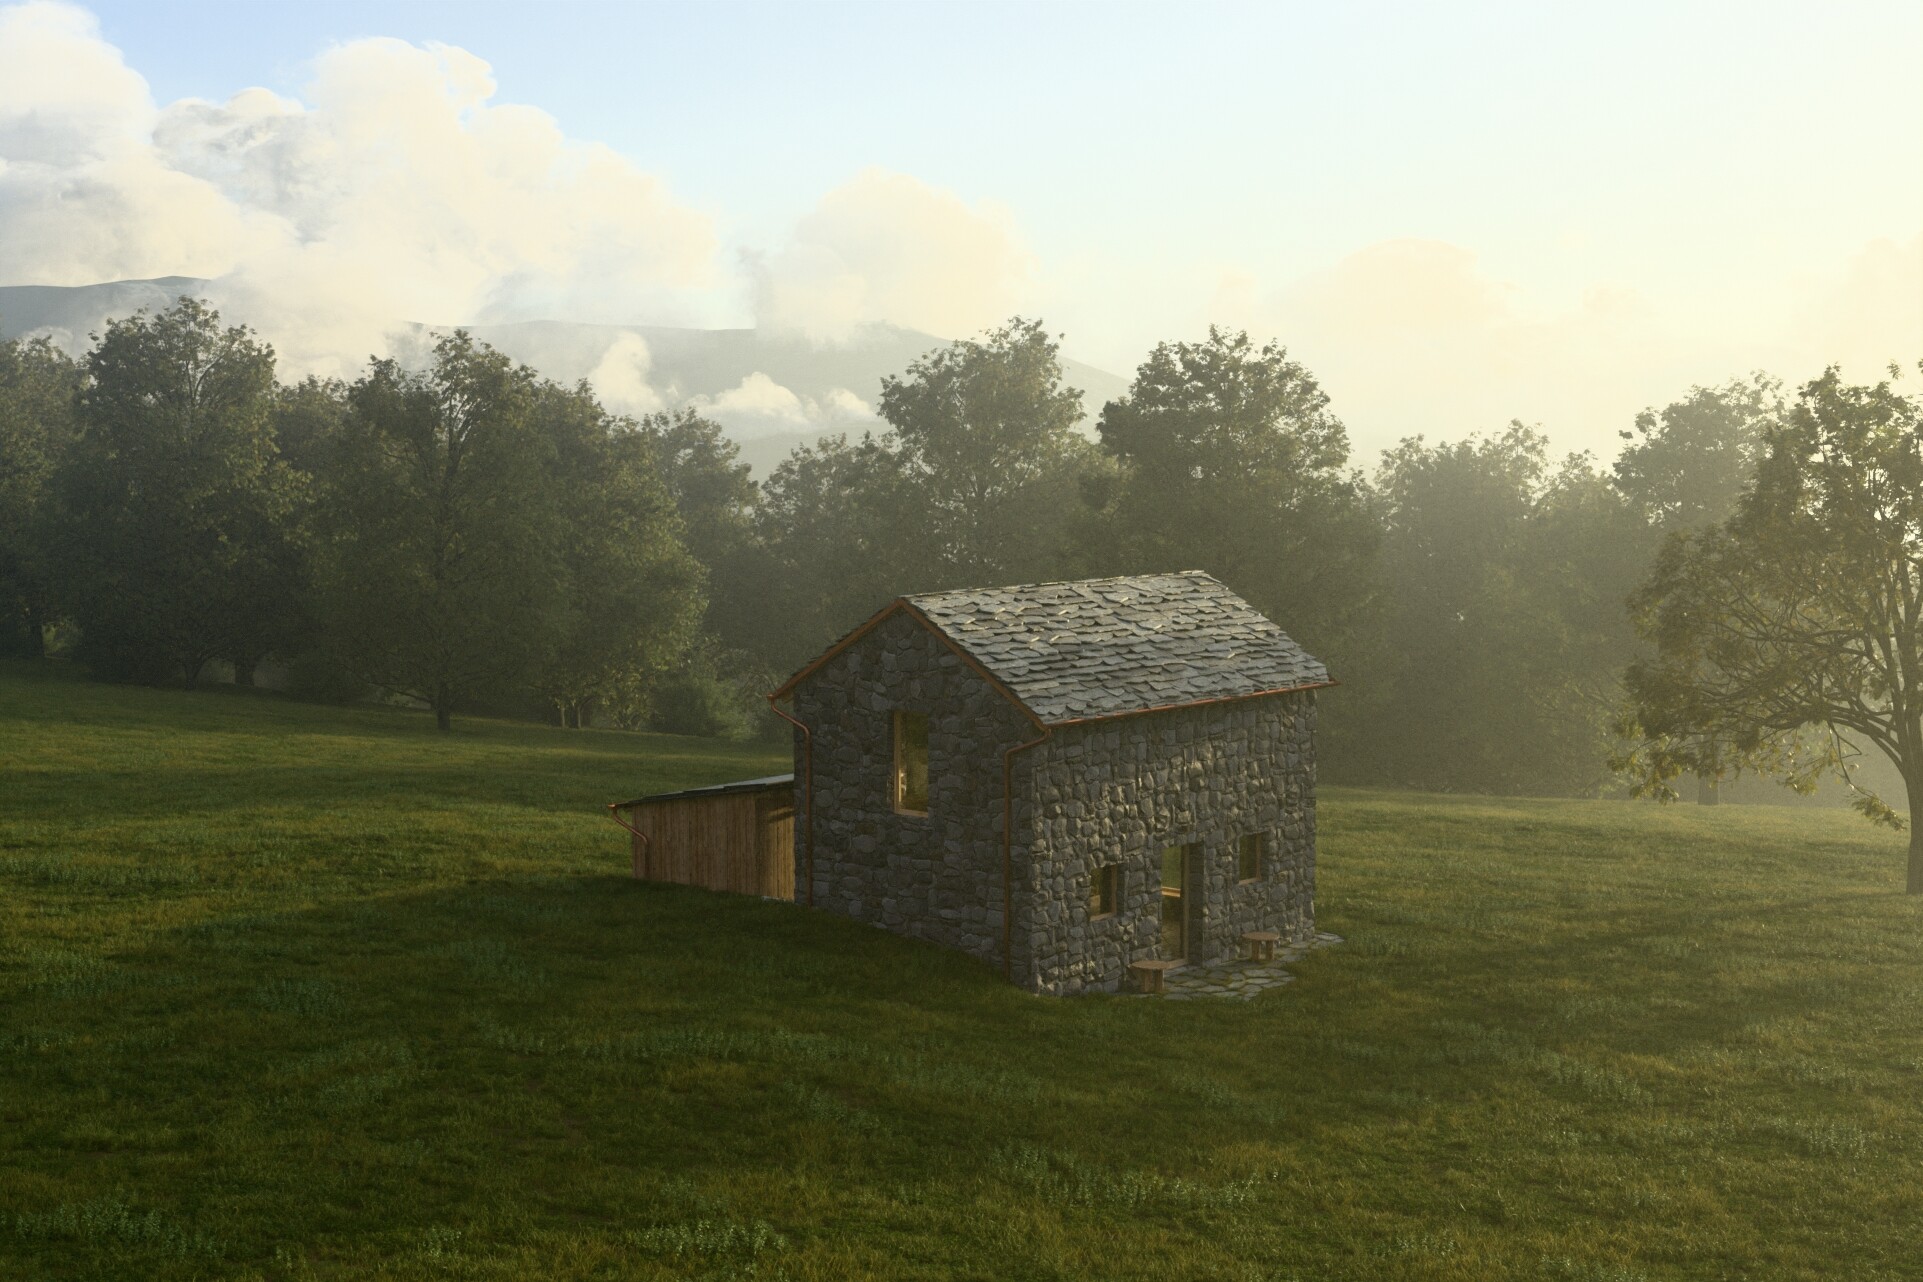
Dopo il mio precedente progetto mi è venuta voglia di cambiare tipo di abitazione e passare a qualcosa di più organico, non nelle forme quanto piuttosto nei materiali e che fosse un’abitazione relativamente piccola.
Così ho pensato ad una casa per brevi vacanze immersa in un ambiente collinare-montano…con un bosco vicino e isolata e, dopo un po’ di ricerca sui siti di progetti architettonici, ho trovato finalmente qualcosa che facesse al caso mio.
Il progetto che ho selezionato è quello del recupero di un edificio agricolo adibito ora a casetta, realizzato dallo studio di architettura Contini https://www.continiarchitettura.net/projects/recupero-edificio-agricolo-per-studio-agna-pr/ e mi è piaciuto praticamente tutto:
- la posizione geografica (Appennino Tosco-Emiliano)
- l’ambiente vicino alla casa
- l’idea di recuperare un edificio destinato al degrado e all’abbaondono, riutilizzando anche materiale esistente come le pietre per le pareti e per il tetto e parte d.e.i legni
- i materiali utilizzati
- il senso di accoglienza dato dalla semplicità degli elementi e dalle dimensioni del progetto
Così è stato facile raccontare una mini storia che accompagnasse la scoperta del progetto e le immagini che ho selezionato, hanno il pregio di poter essere riordinate secondo altri ordini temporali, raccontando una storia diversa. Questa è la mia versione, se ve ne vengono in mente altre, scrivetele pure.
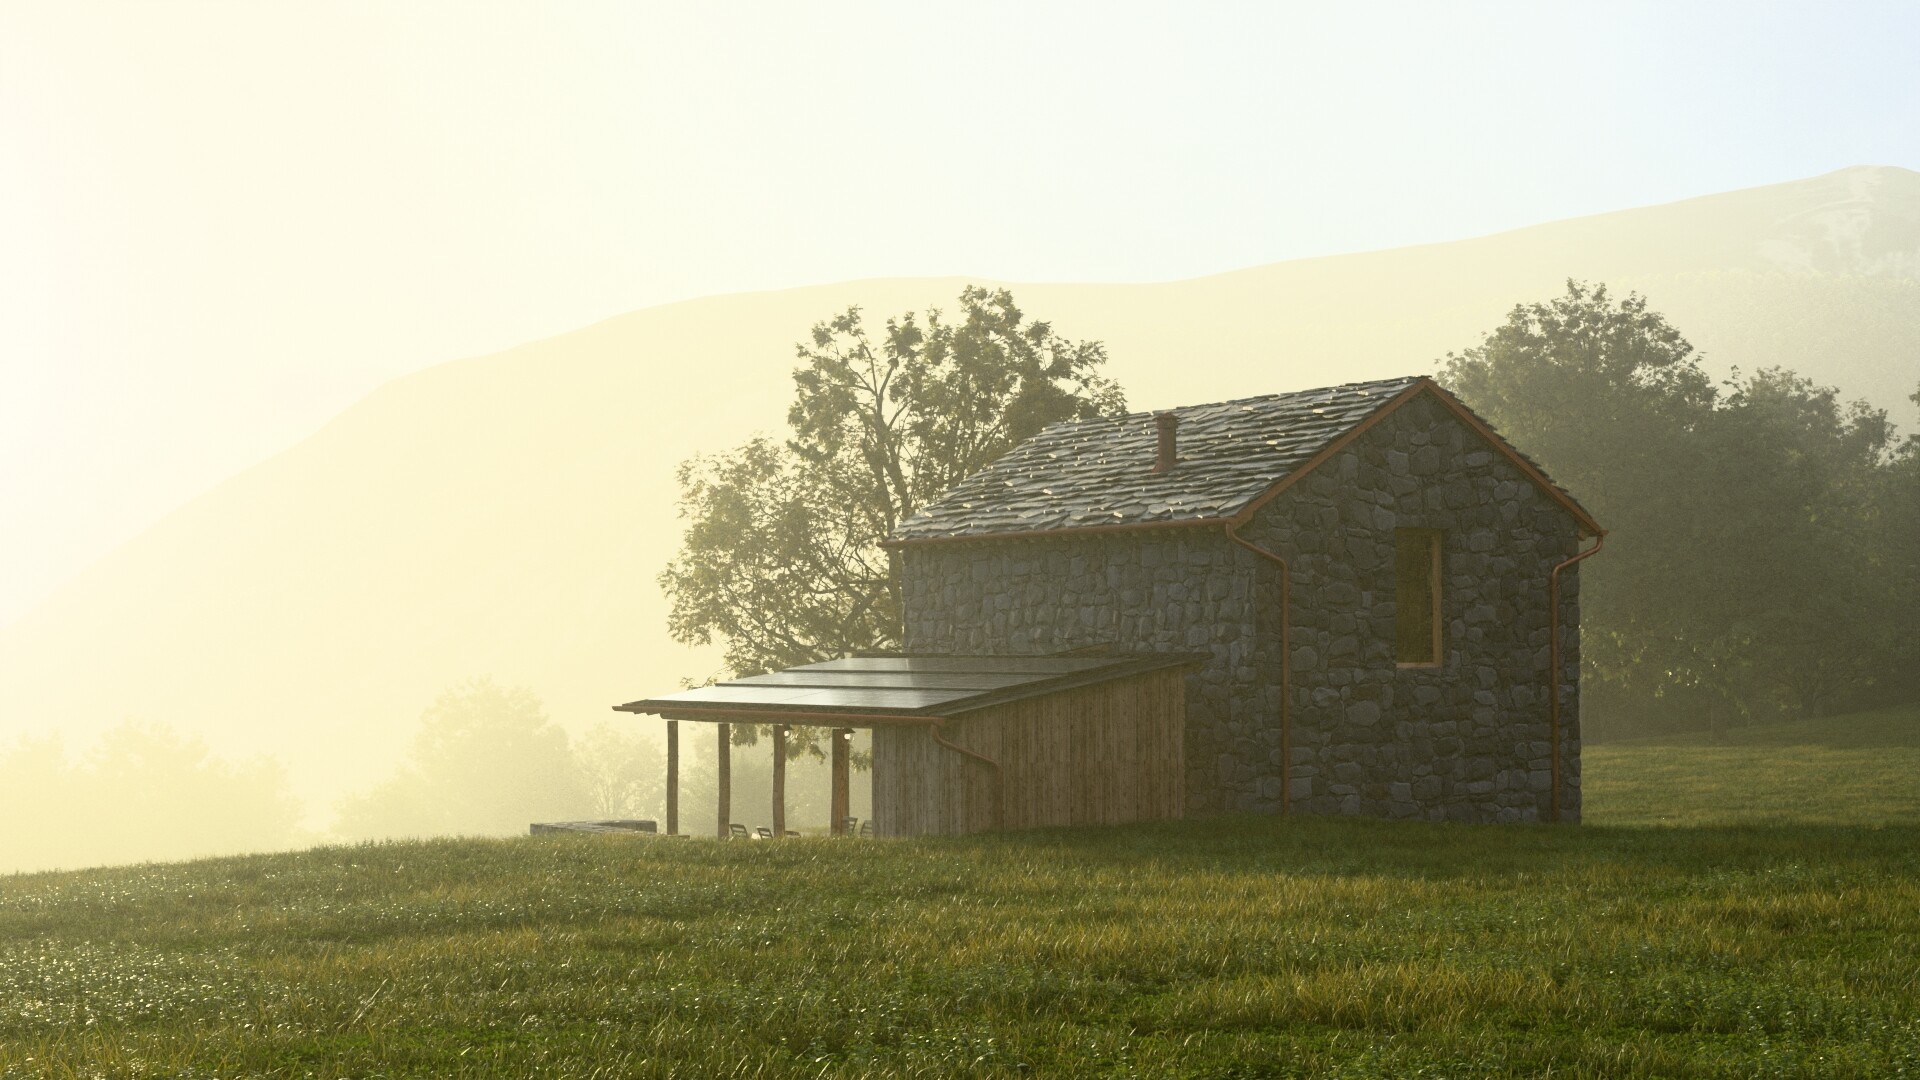
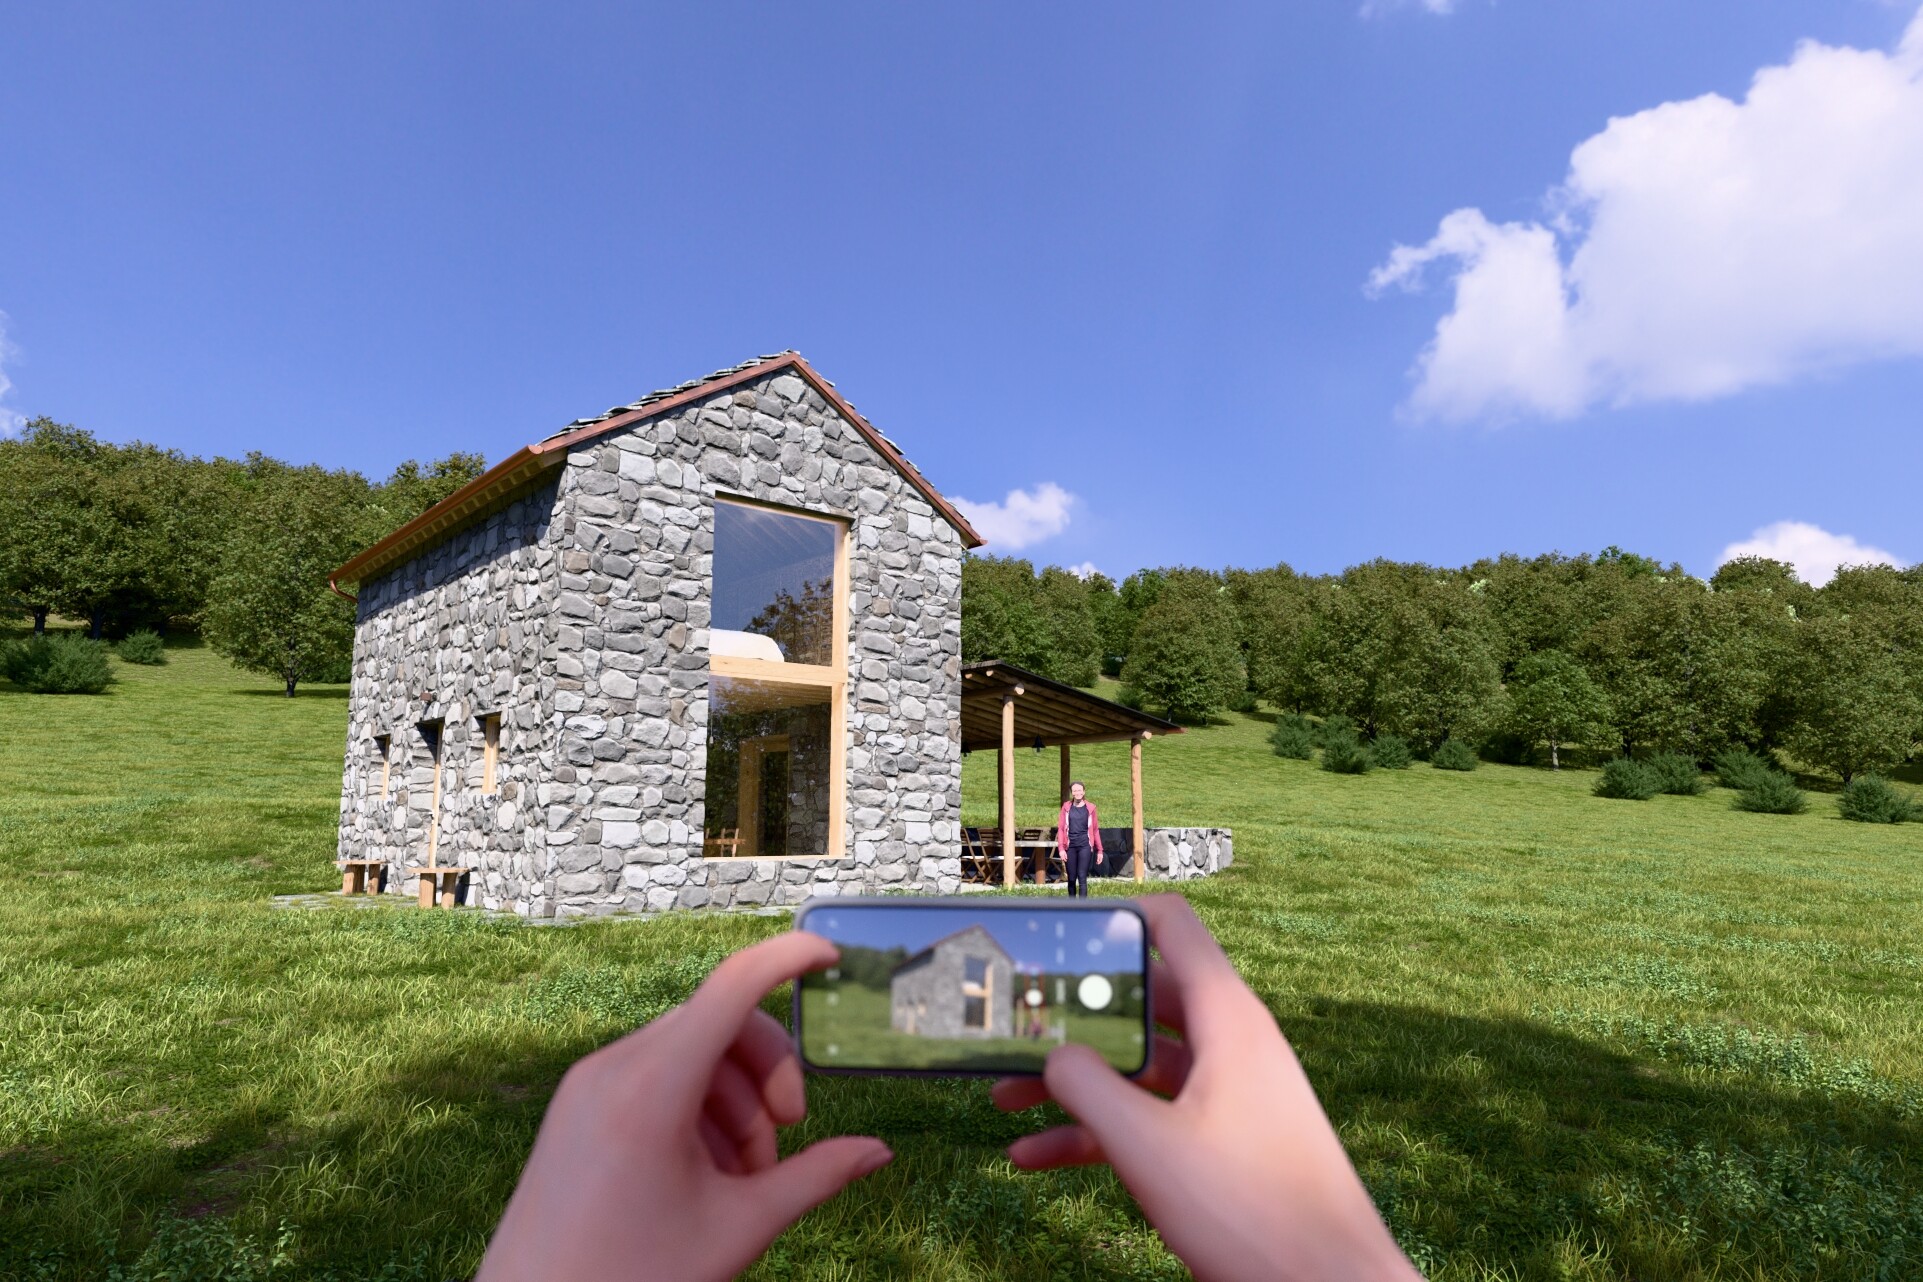
L’ARRIVO

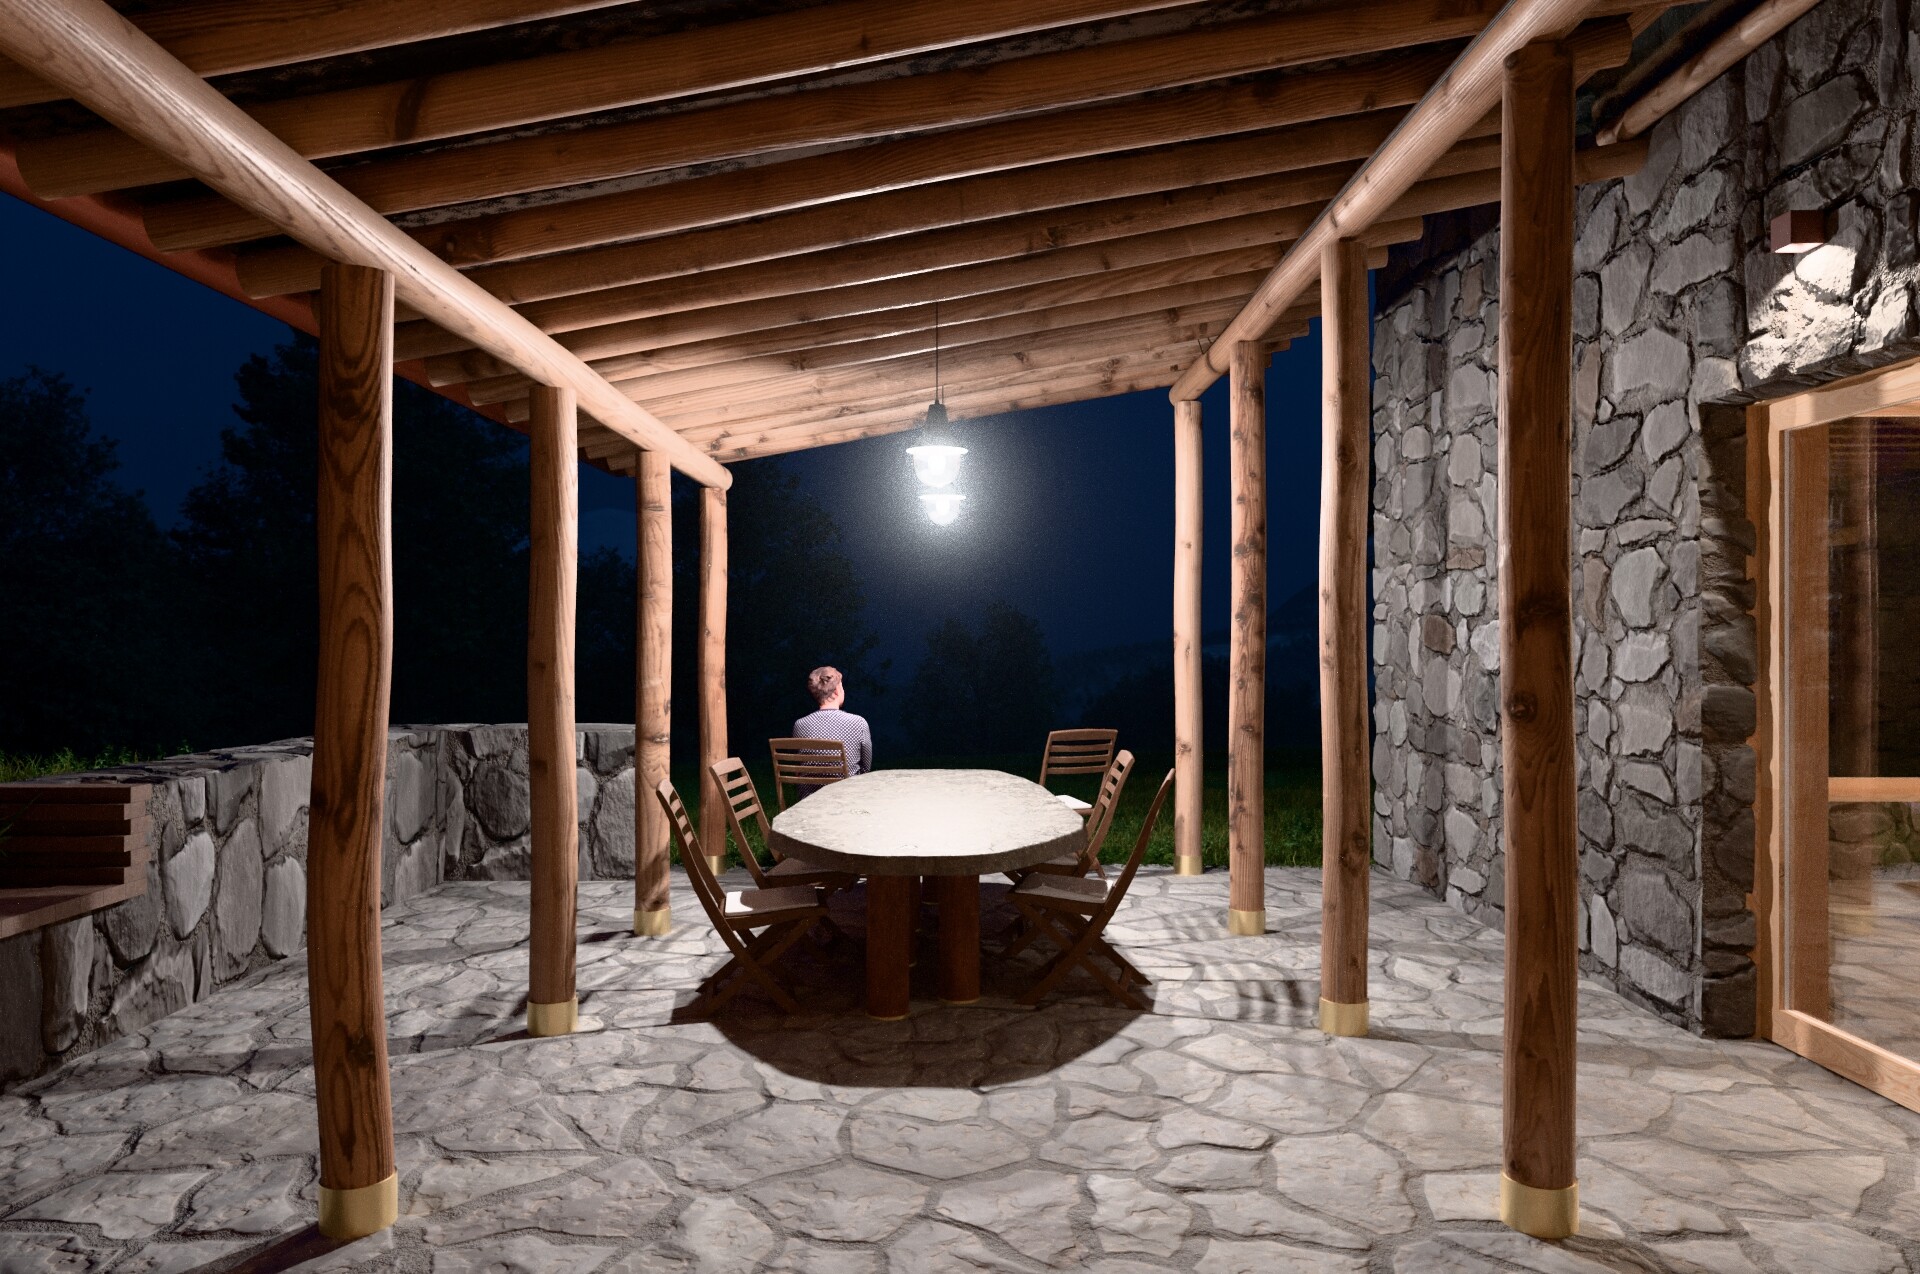

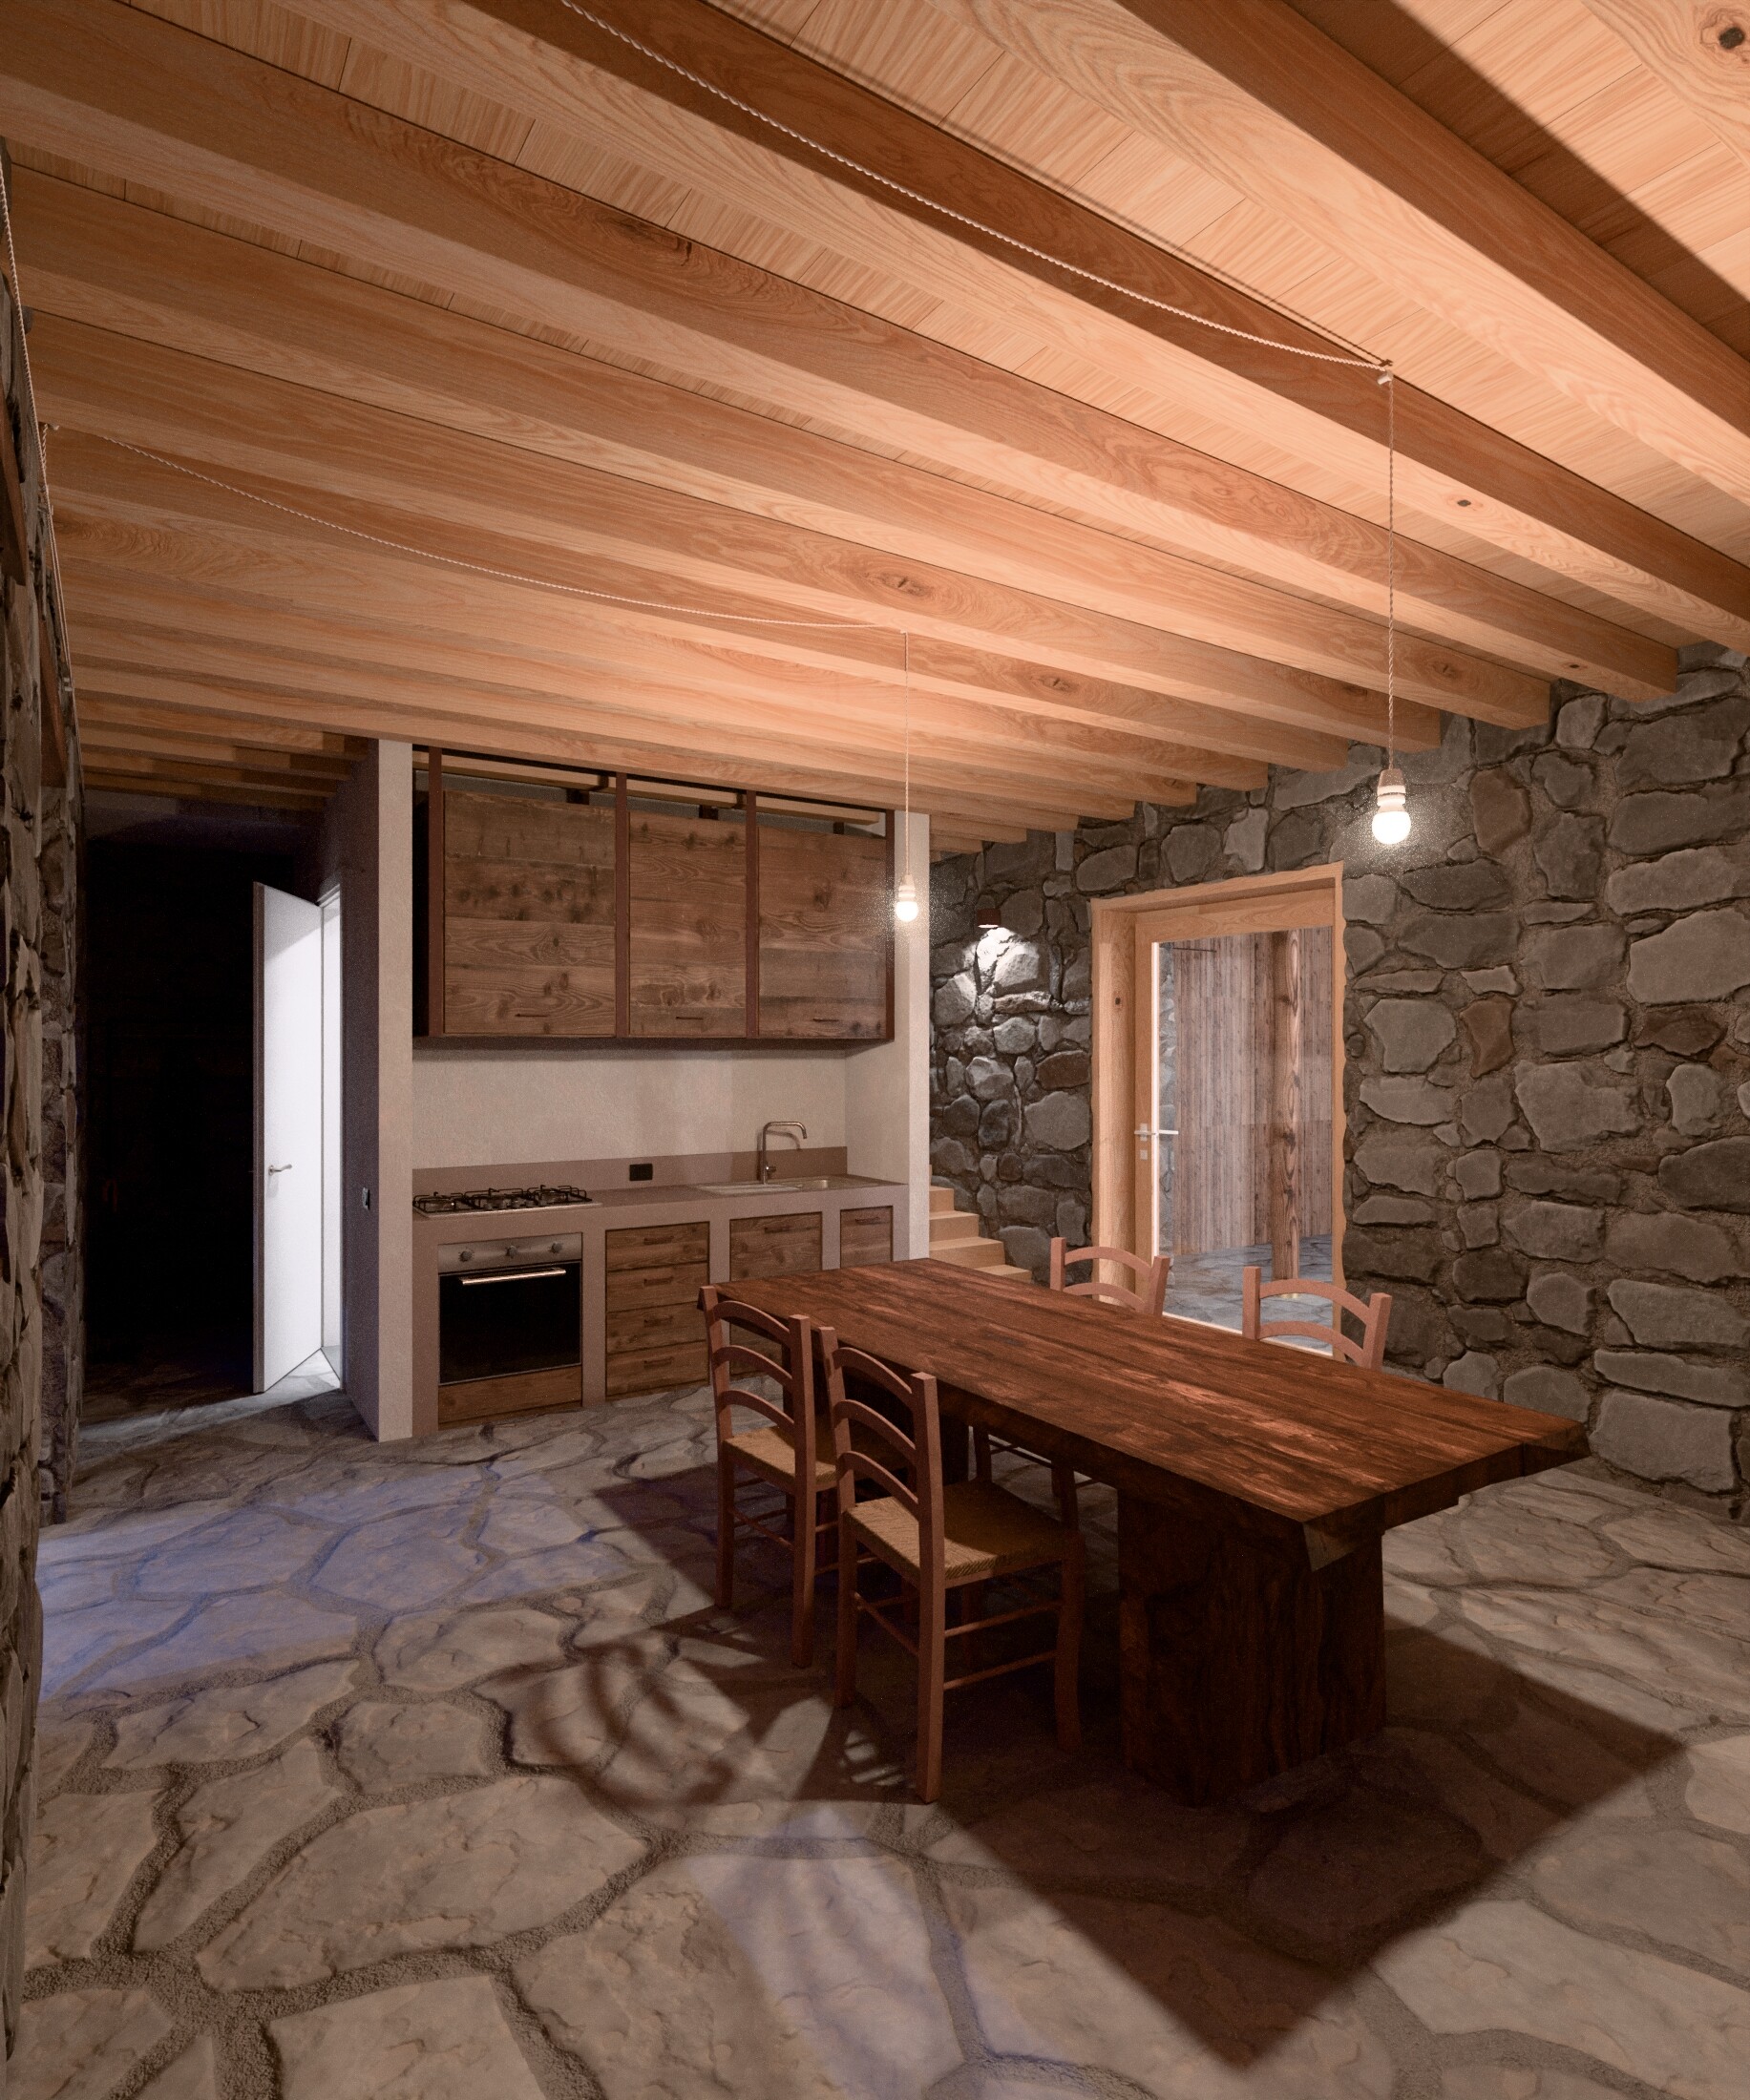
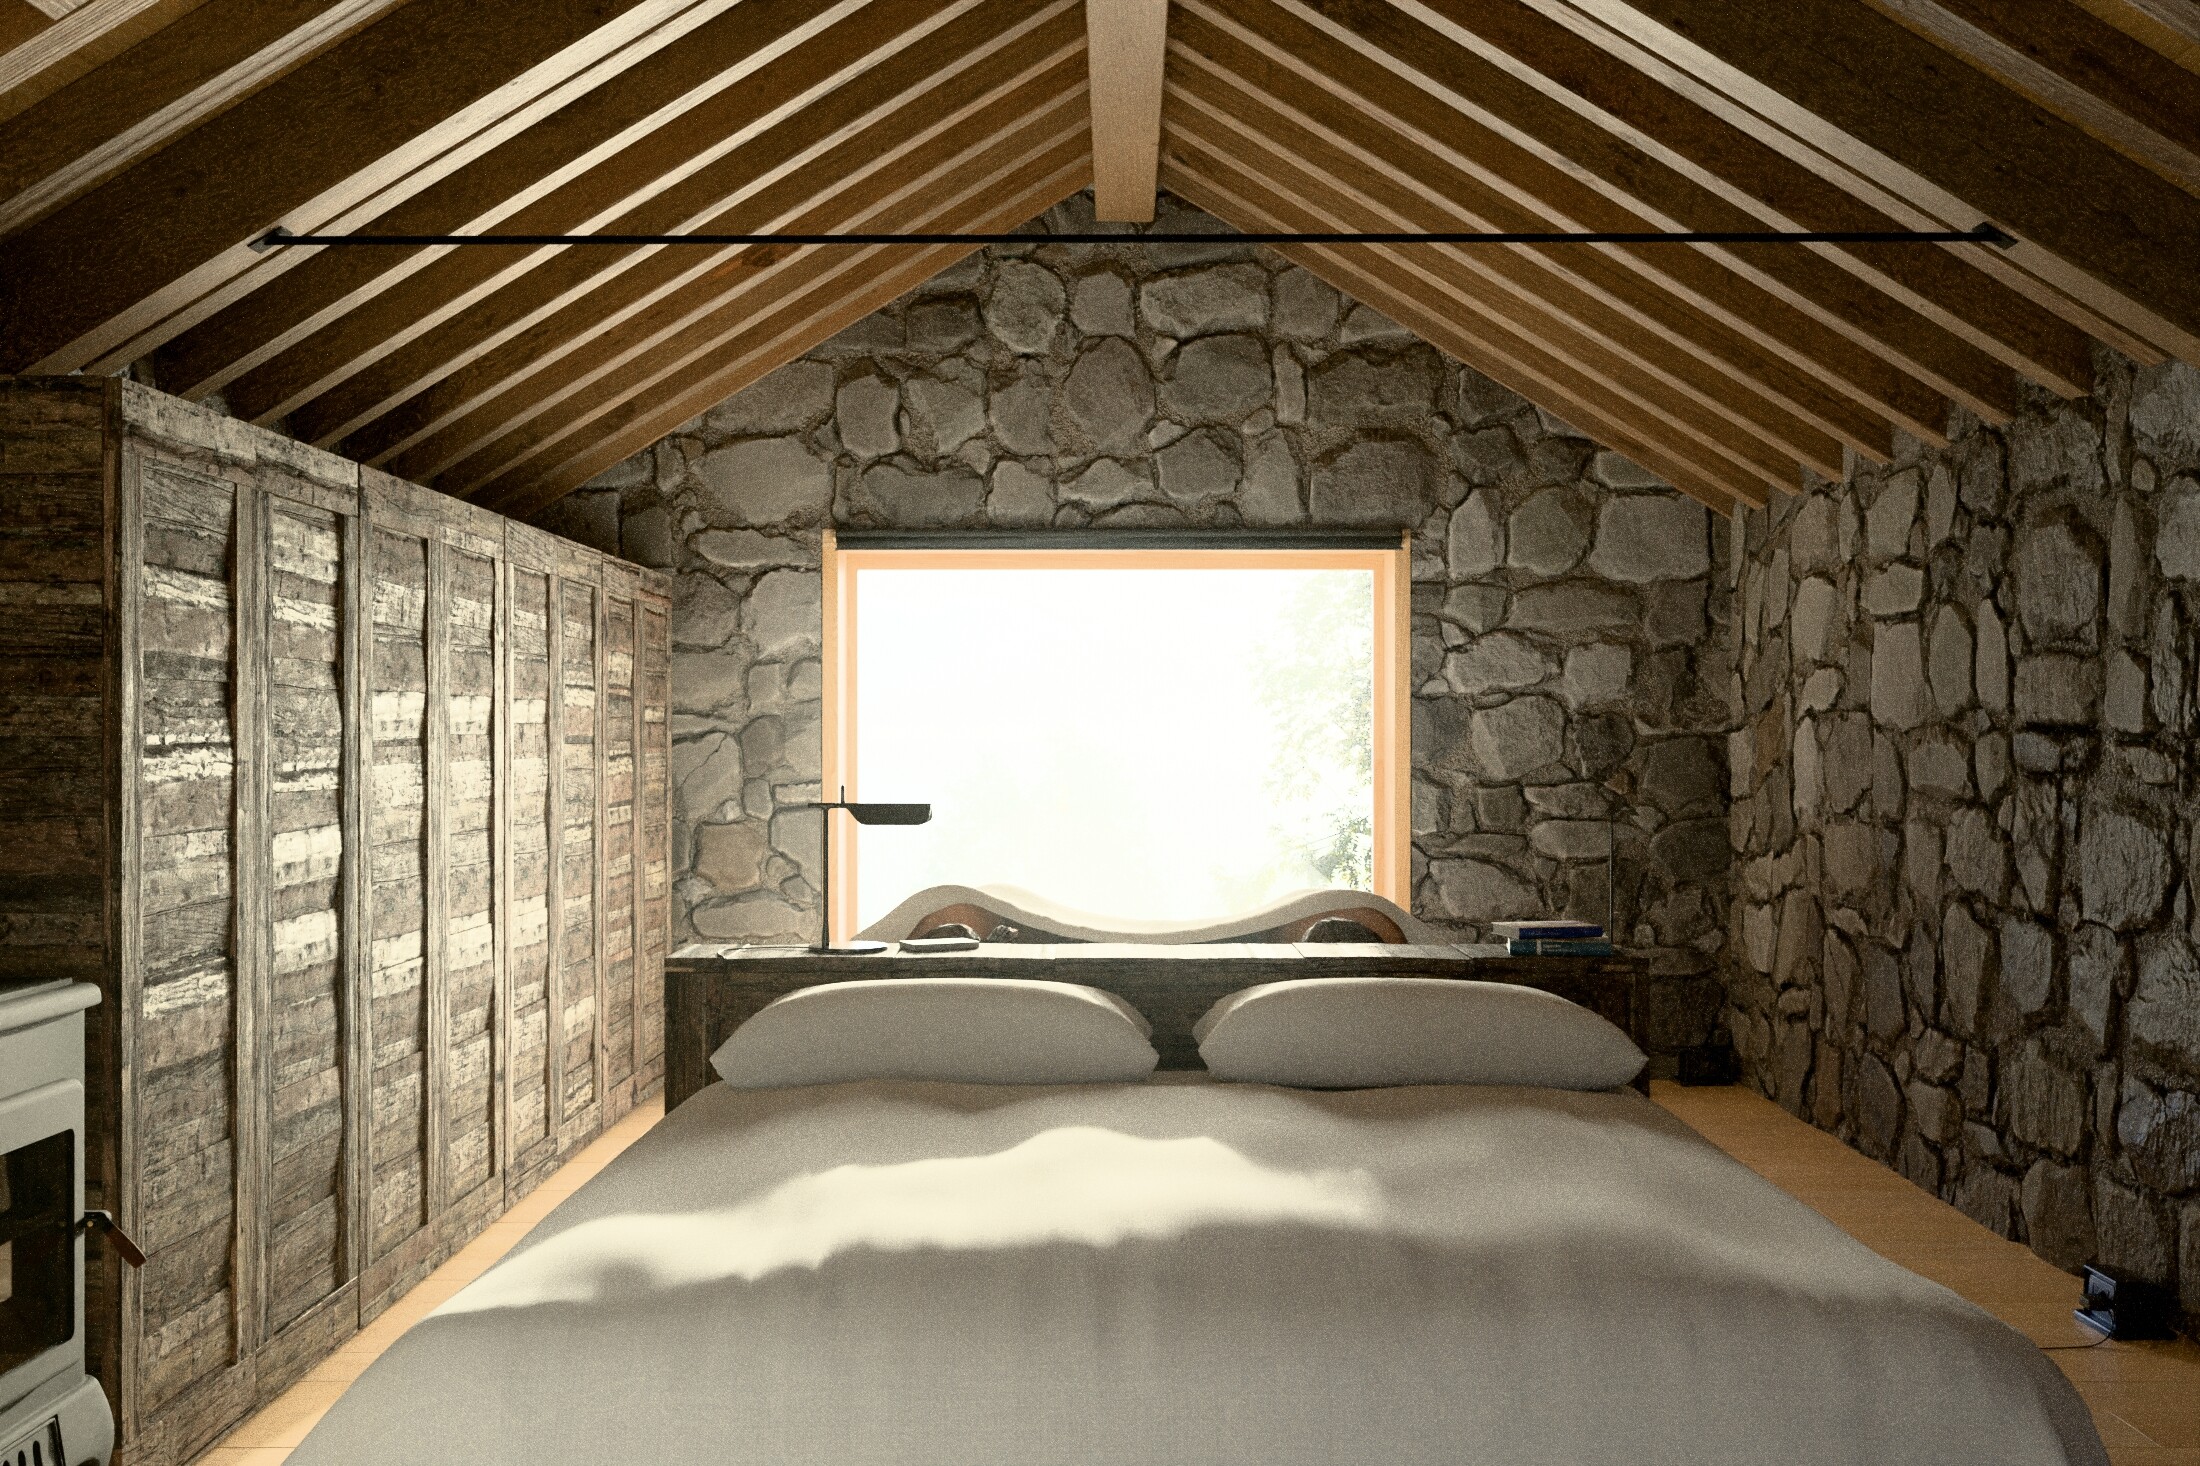
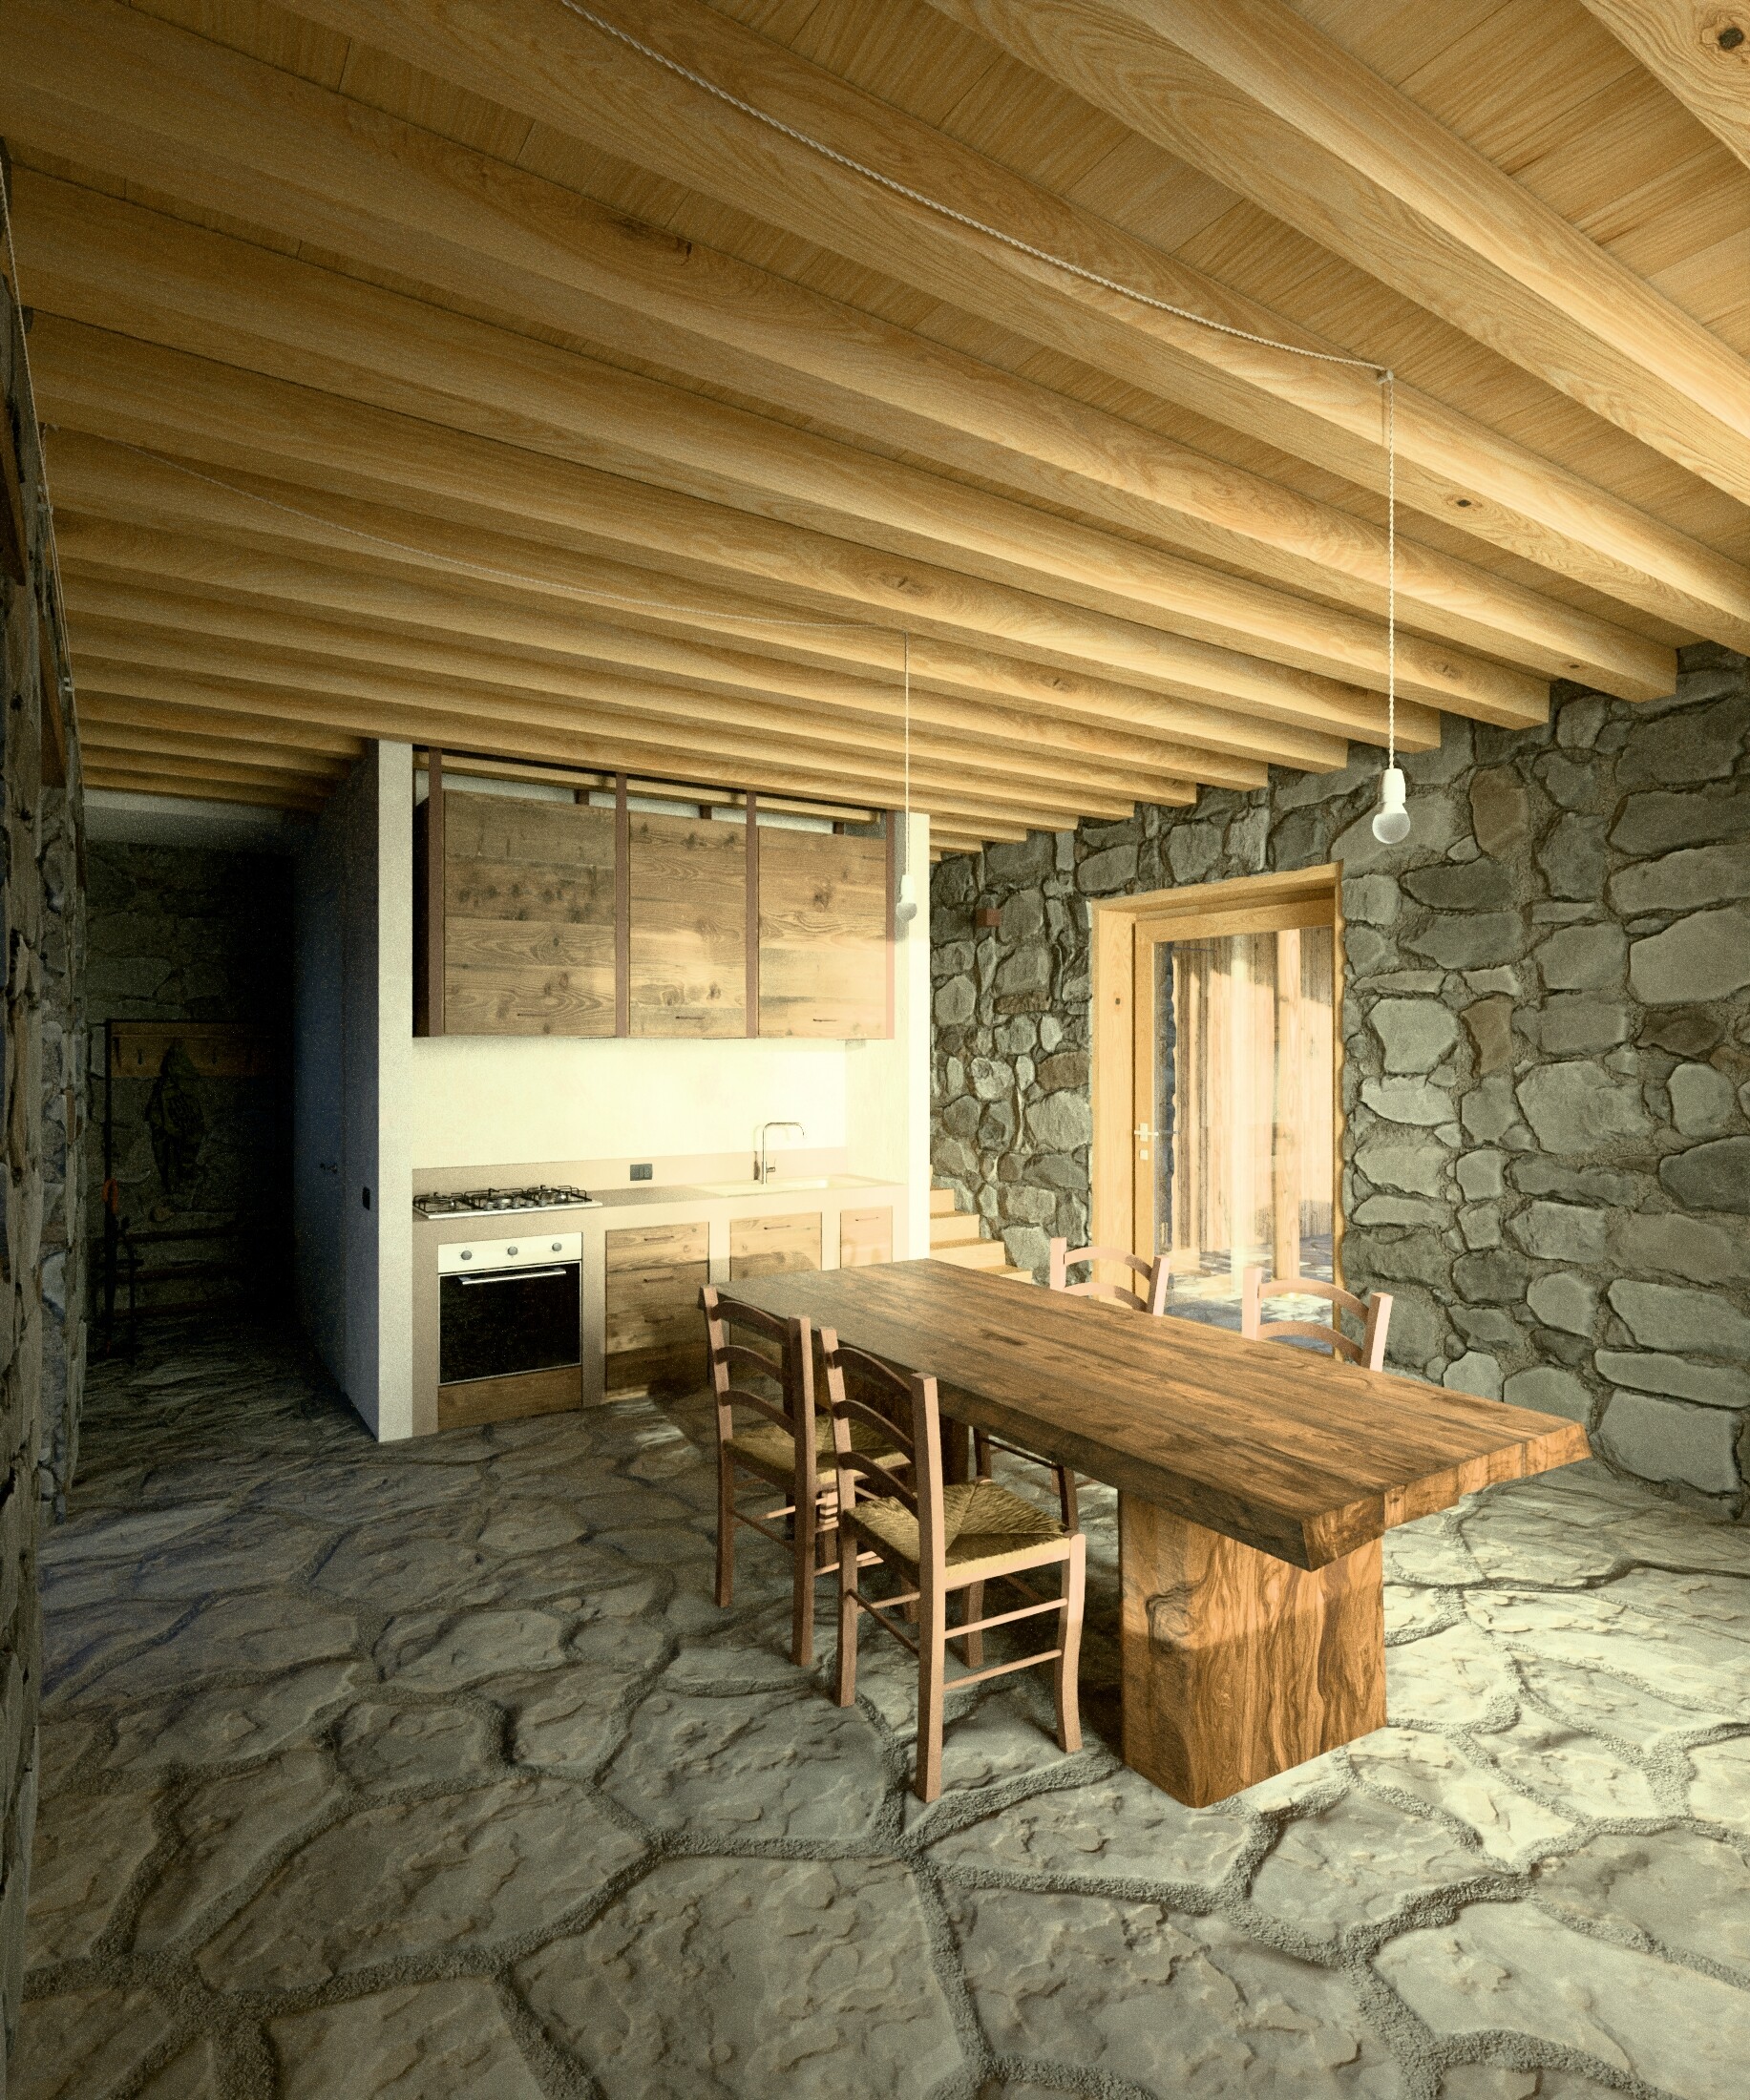
IL RIPOSO
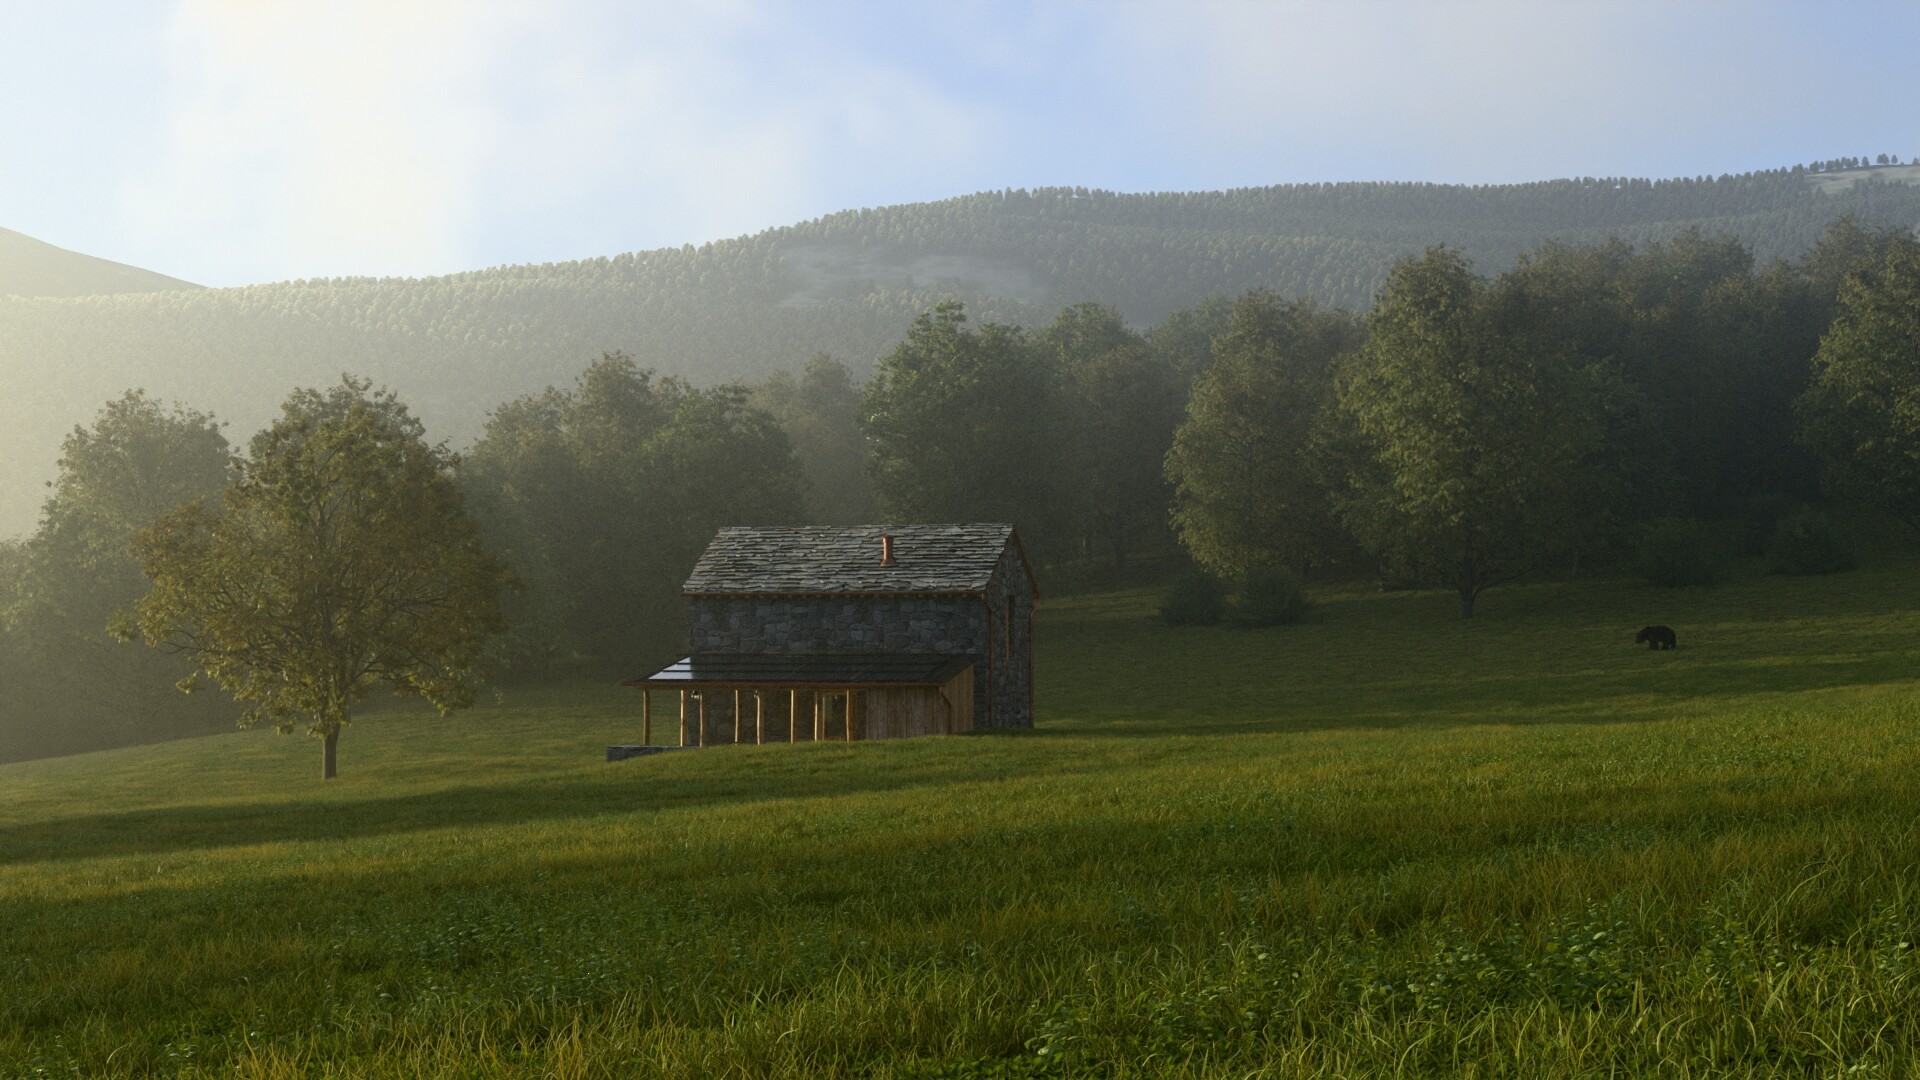
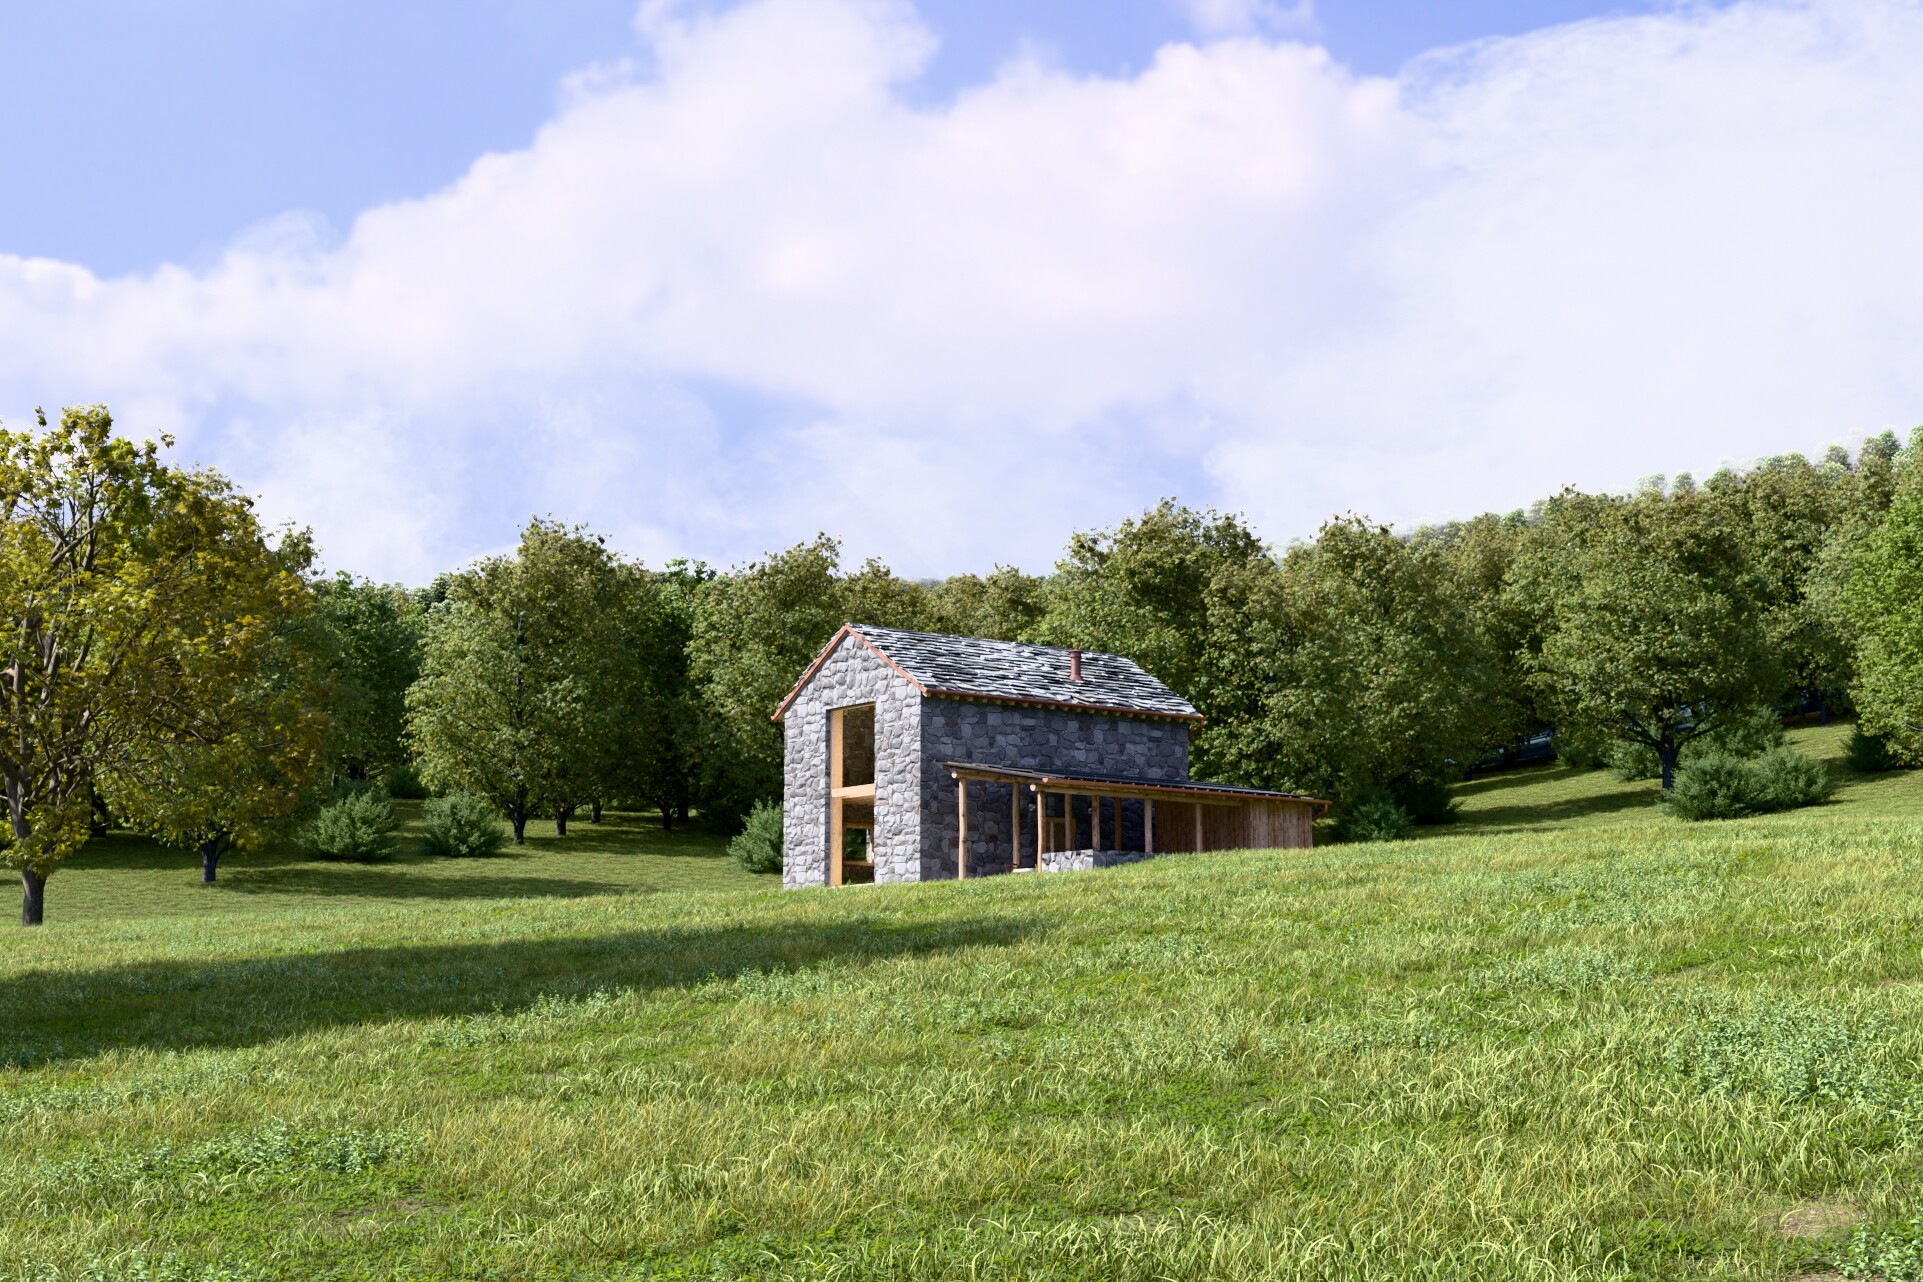
LA PASSEGGIATA

ASPETTI TECNICI
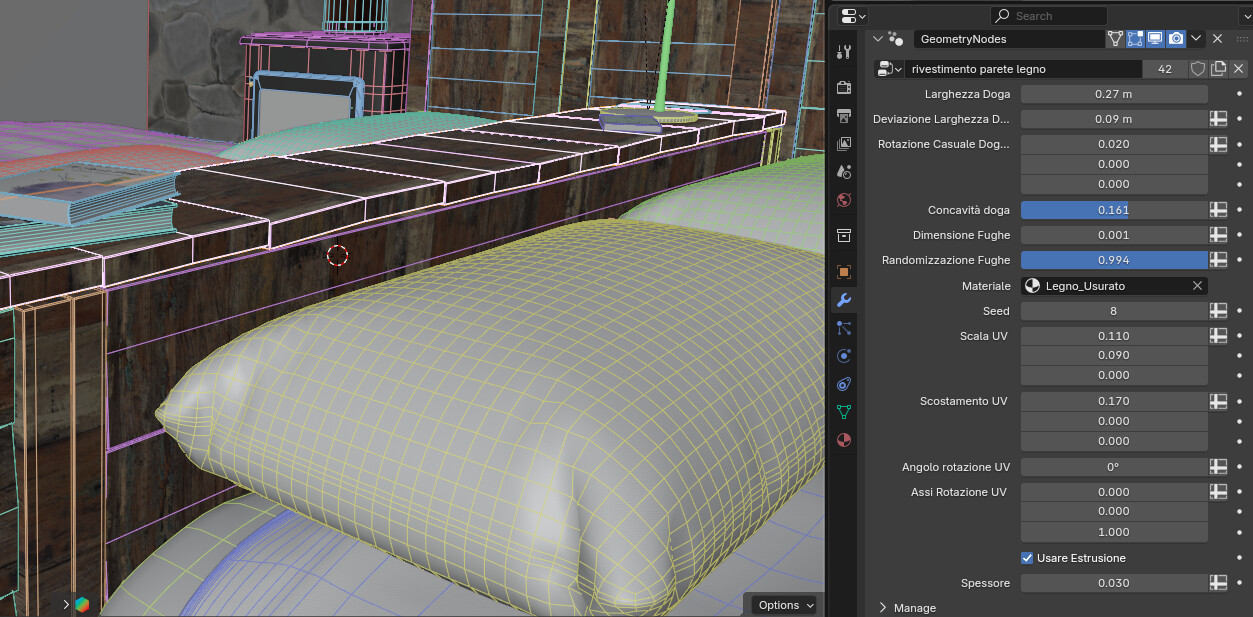
La sfida principale, scegliendo di ricreare gli stessi punti di vista delle foto, è stata sicuramente quella di realizzare le pareti e i pavimenti in roccia.
Con viste ravvicinate non era possibile utilizzare solo delle semplici texture con normal map e modellare delle vere e proprie pietre sarebbe stato un processo troppo lento e molto frustrante. Ho pensato quindi ad una via di mezzo, realizzando delle texture dedicate da applicare a geometrie semplici lasciando poi alla suddivisione adattiva e al displacement il compito di aggiungere dettagli geometrici.
Per quanto riguarda la modellazione del tetto ho utilizzato i geometry nodes per creare delle distribuzioni lineari di modelli di pietre realizzate da me, che ho moltiplicato, variato e sovrapposto per ricreare il tetto a scandole.
Cercando di imparare nuove funzionalità di Blender, questa volta ho puntato sulla nebbia ambientale per ricreare quell’ambientazione tipica di un mattino di fine Agosto tra le colline, con quella nebbiolina che circonda tutto e sulla renderizzazione di oggetti volumetrici per avere delle nuvole illuminate coerentemente con i diversi orari.
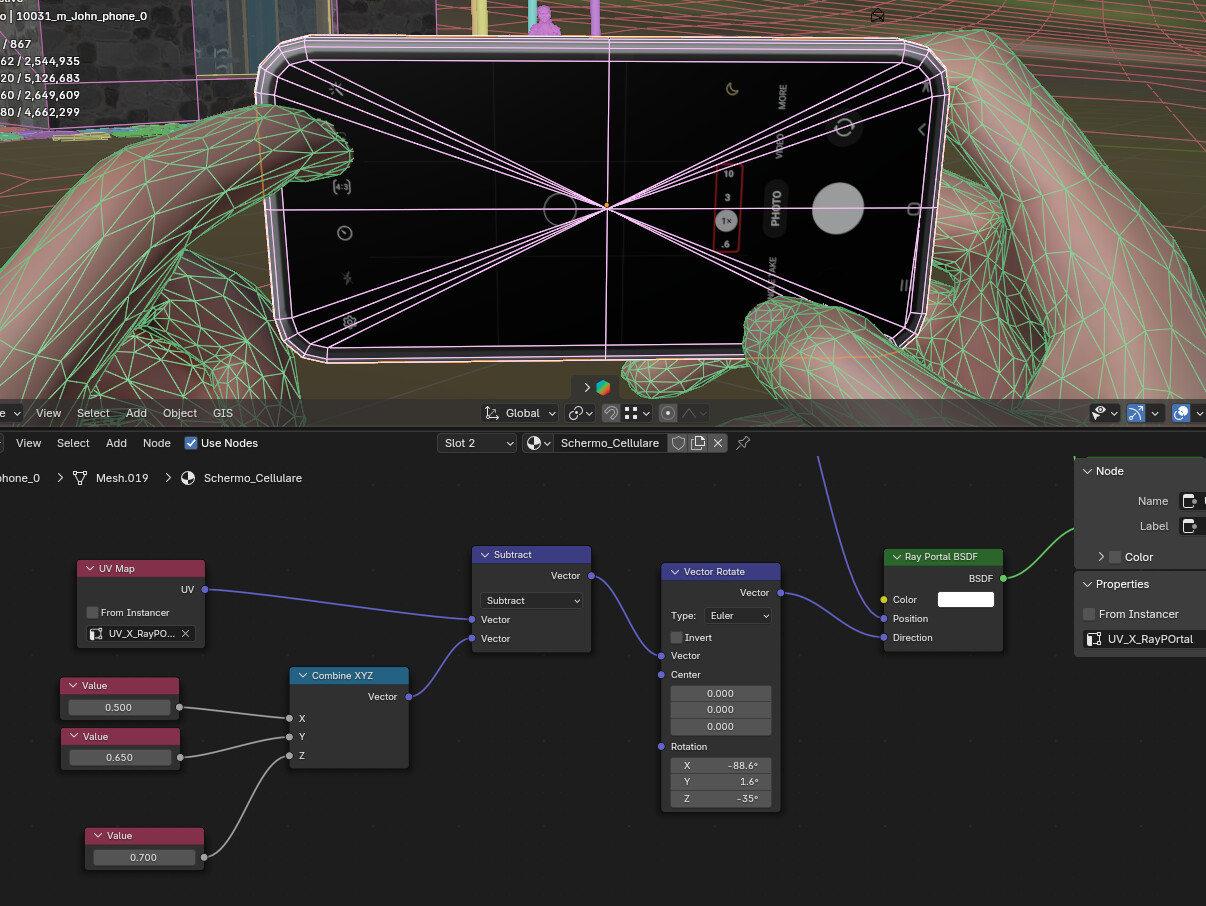
Una cosa che mi ha divertito è stato anche utilizzare il ray portal shader per simulare quello che lo smartphone stava inquadrando. Non lo avevo mai usato e quando ho pensato a quell’immagine, immediatamente ne ho approfittato per capire come funzionava.
Anche in questo progetto ho potuto verificare quanto utili siano i geometry nodes. L'armadio della camera da letto è realizzato mischiando modellazione tradizionale e un geometry nodes per le pannellature irregolari. Lo stesso geometry nodes è stato usato per la struttura d.e.i letti matrimoniali.

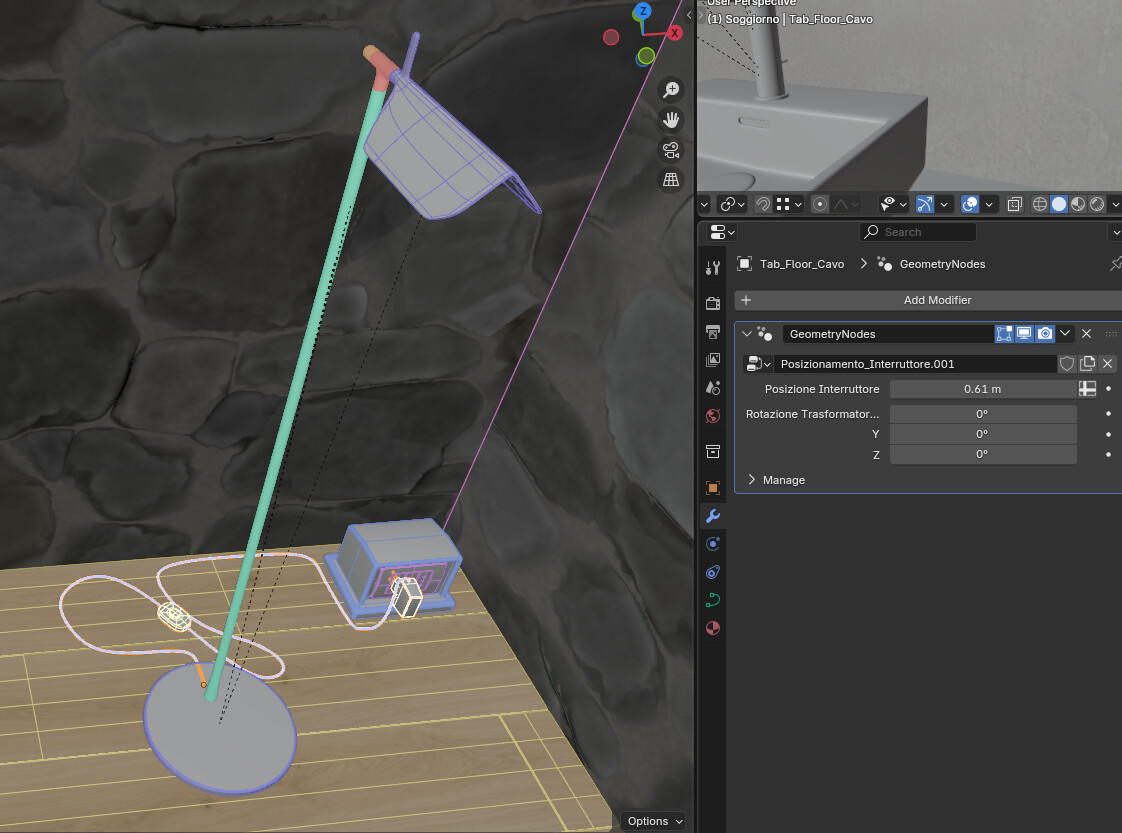
Un geometry nodes mi aiuta anche per adattare i modelli di lampade che ho inserito nella camera da letto. Tramite geometry nodes posso decidere a che distanza mettere l’interruttore di accensione della lampada e orientare il trasformatore rispetto alla presa elettrica.
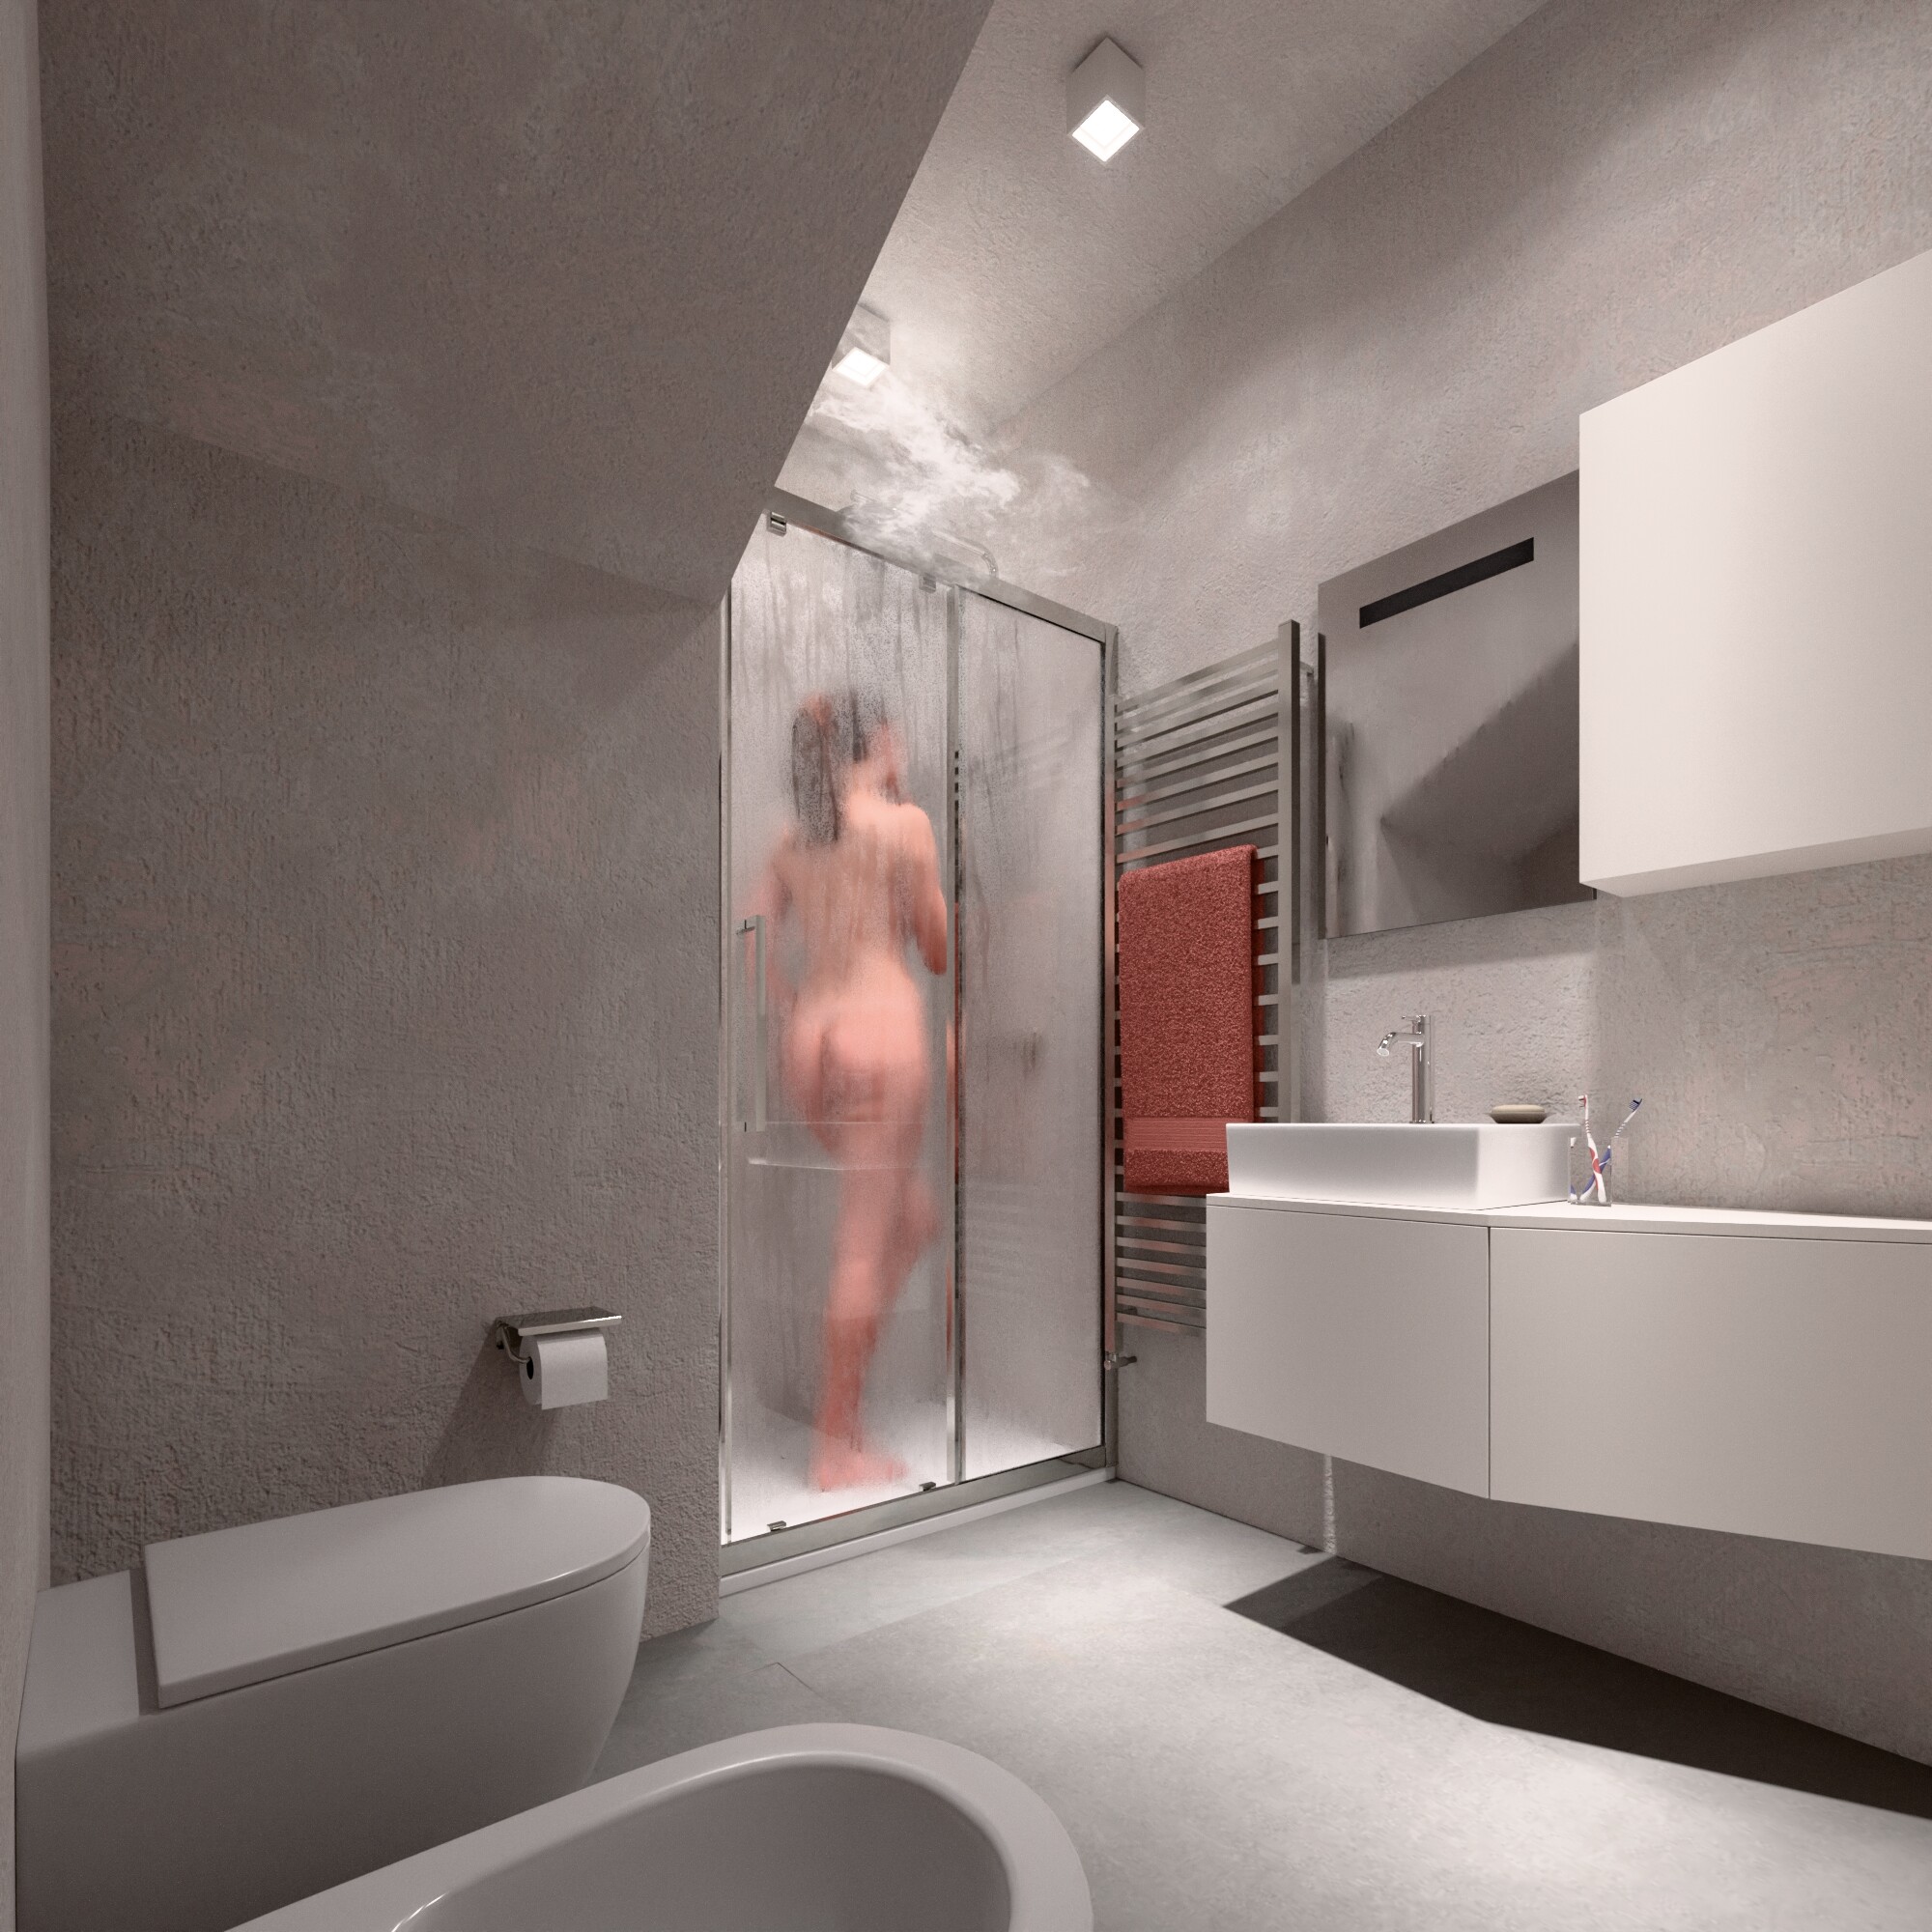
Un altro aspetto che non mi era mai capitato di dover realizzare è stato rappresentare la condensa e le superfici bagnate di un bagno quando una persona si sta facendo una doccia. La condensa sui vetri della doccia mi aiutava anche a rendere pubblicabile l'immagine :) e per non deviare troppo l'attenzione dal soggetto architettonico... :)
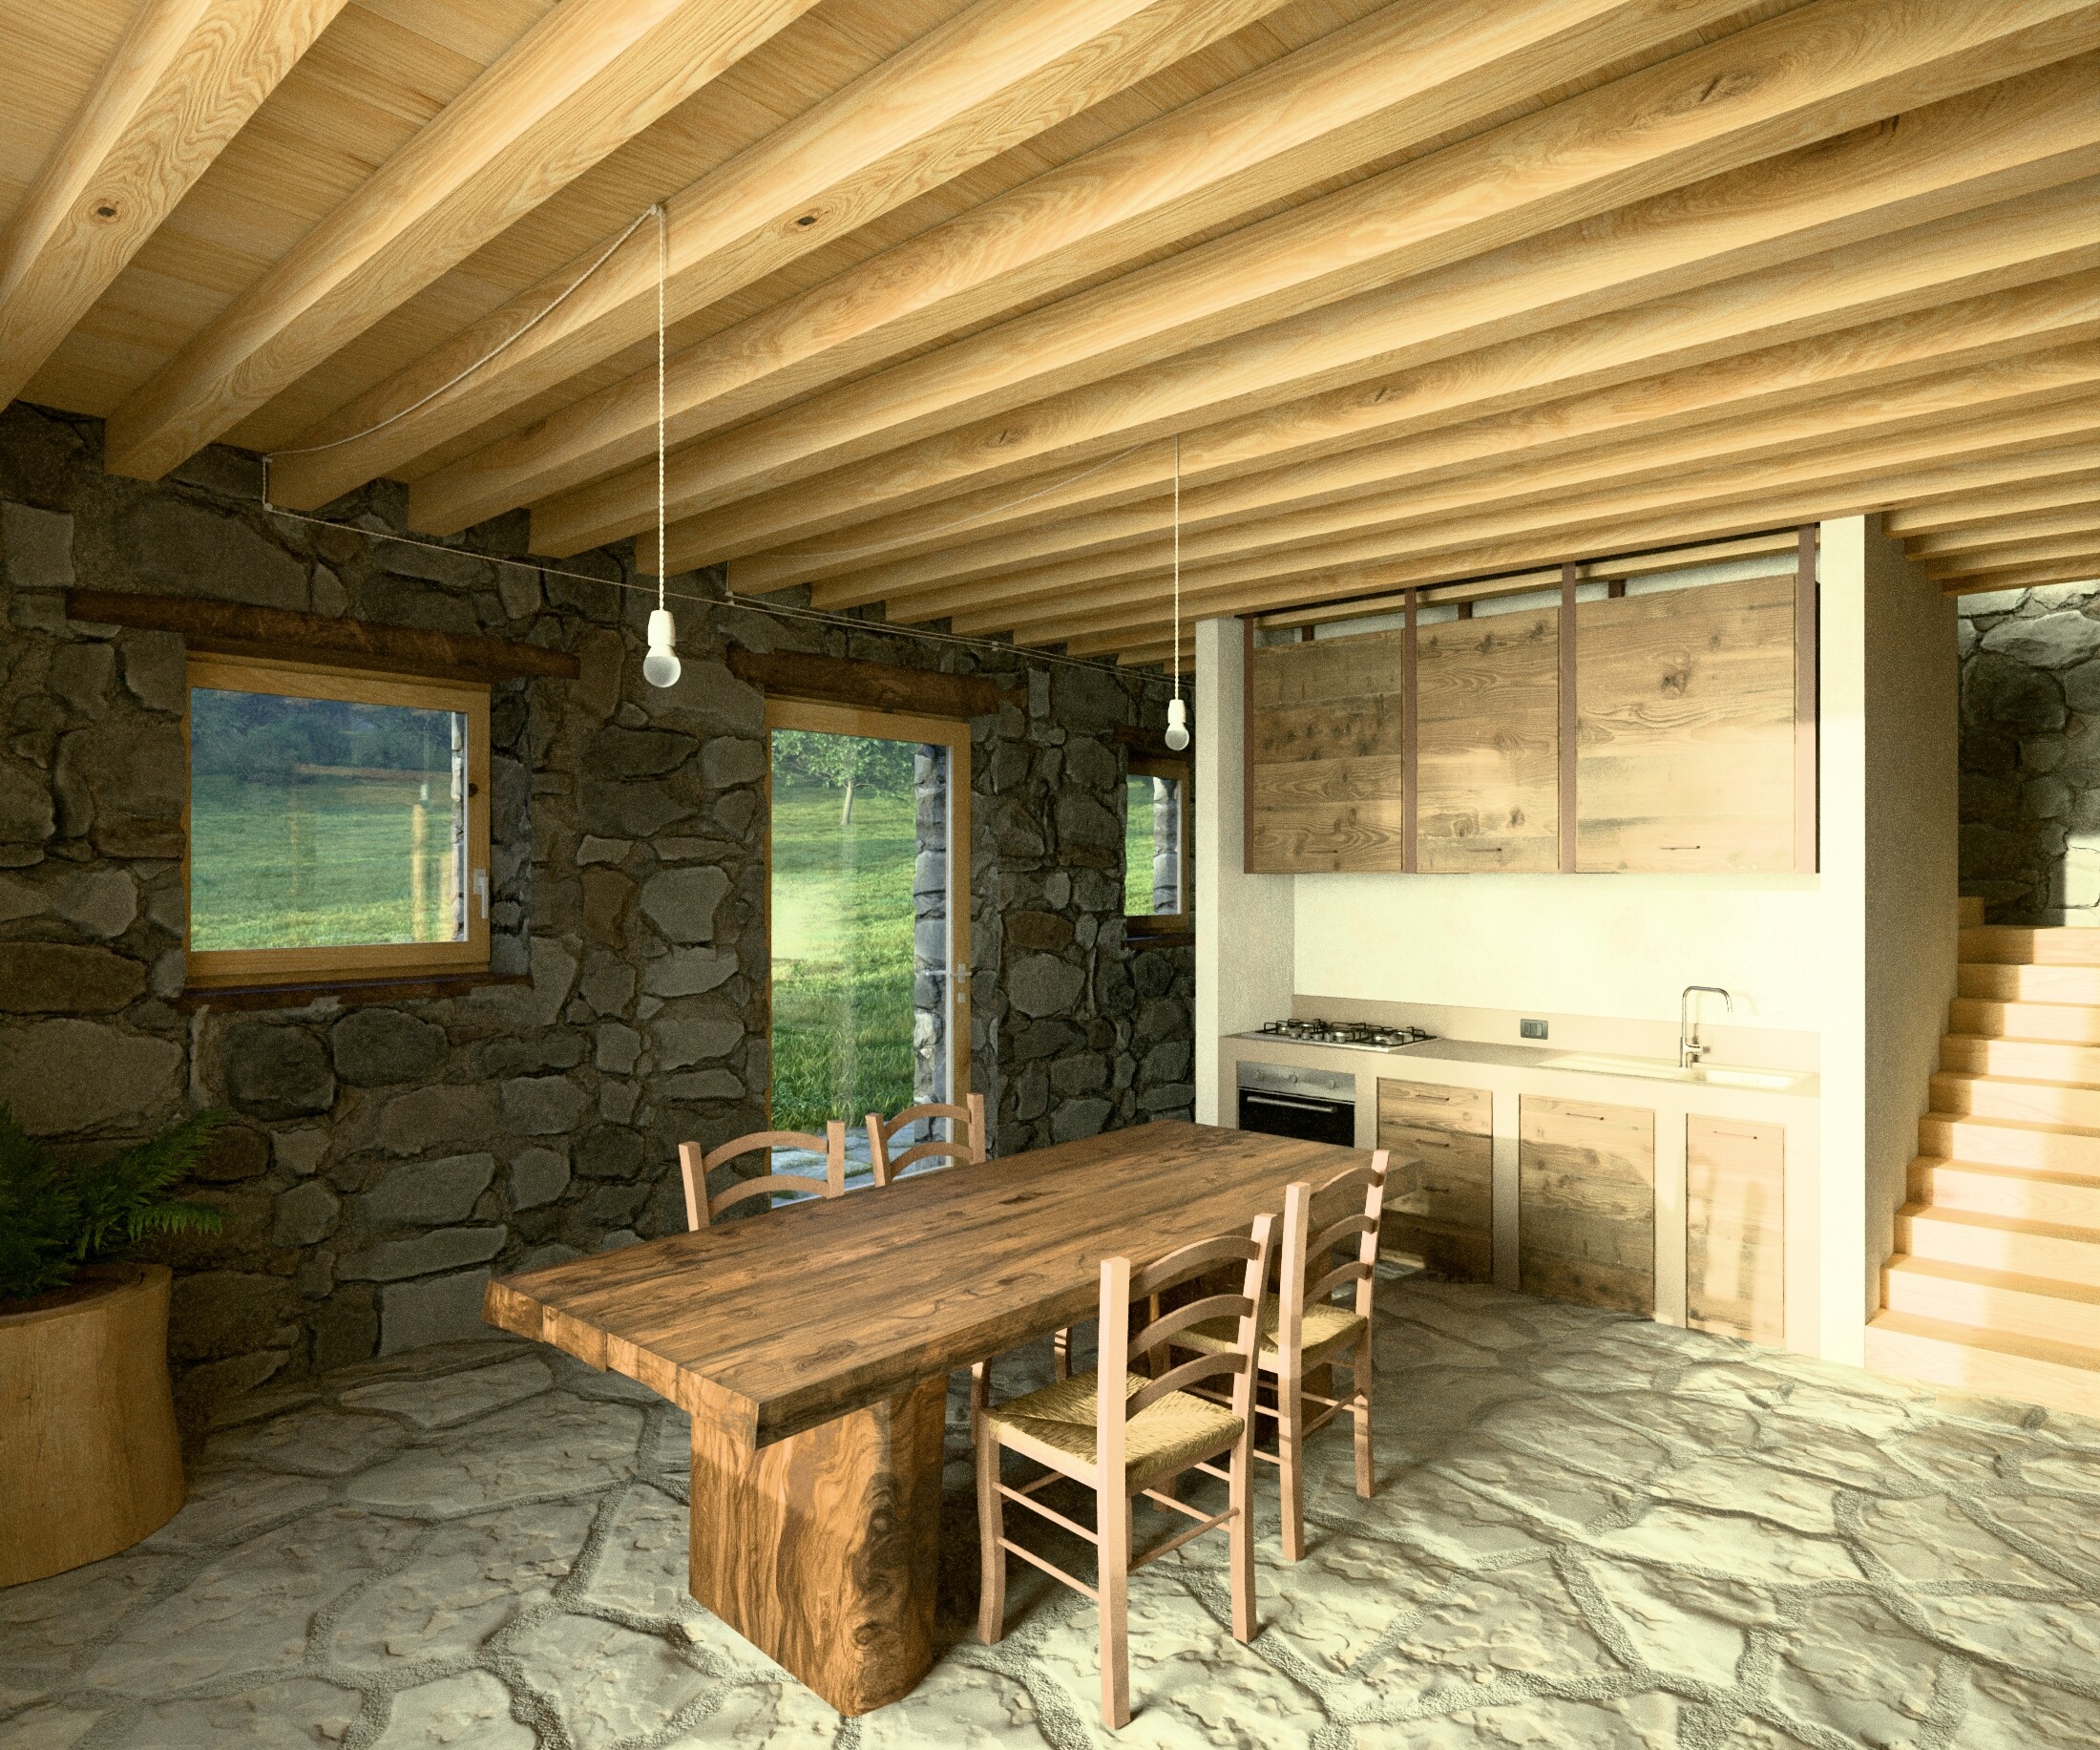
Il legno del tavolo del soggiorno è totalmente procedurale ed è basato su questo tutorial
Rispetto al progetto originale ho dovuto ipotizzare la disposizione della cucina, gli elementi del bagno e i corpi illuminanti delle scale e dell'esterno, essendo totalmente o parzialmente assenti nelle foto del progetto reale. Spero di aver colto lo spirito del progetto anche cercando di mantenere un certo grado di fattibilità e plausibilità.
Come modelli non realizzati da me ci sono elementi presi da BlenderKit (ombrello chiuso, tazza, spazzolini da denti e saponetta), vegetazione di Poligoniq, modelli umani di 3d People, alcune texture prese da AmbientCG e le nuvole volumetriche sono quelle gratuite fornite da Embergen.
Gli addon che ho usato sono gli inseparabili Photographer e GeoScatter.
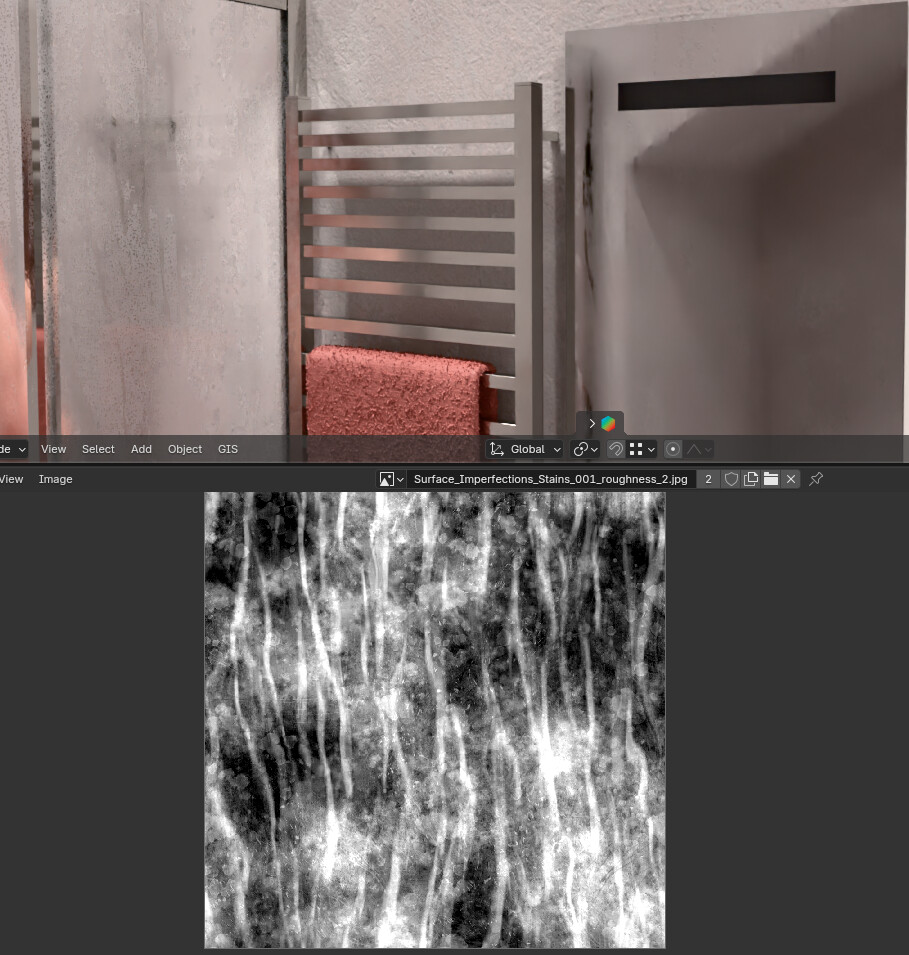
Per la realizzazione delle texture delle pareti e d.e.i pavimenti in roccia ho usato MaterialMaker, prendendo spunto e modificando il materiale https://www.materialmaker.org/material?id=1097 presente nella libreria online del programma.
ALCUNE INFORMAZIONI TECNICHE
Tempo di rendering da 6 a meno di 22 minuti (quella del bagno), 9 minuti circa il tempo medio
Occupazione Ram: meno 10Gb
Occupazione VRam: circa 7Gb
Specifiche del PC: AMD Ryzen 9 7900X, 64Gb, RTX4080
Sistema Operativo: KDE Neon
Programmi usati: Blender, GIMP, MaterialMaker, PureRef
![]()
Hi everyone,
I’m showing my latest persona project I’ve worked on on the latest month (during my spare time ![]() ).
).
After my previous project I feel like changing type of architectural project choosing something more organic, not as shapes but as materials and it should be a relative small house.
So I’ve thought to an house used for a quick holiday, in a green hills-mountain environment…isolated with woods near the house and, after websurfing on architectural projects websites, I’ve finally found something that fitted well my wishes.
The project I’ve selected is a recovery of a rural building transformed as a cottage, this project was made by Contini architectural studio https://www.continiarchitettura.com/projects/cottage-restoration-agna-pr/ and I immediately loved everything of it:
- geographical position (Appennino Tosco-Emiliano, mountain area between Parma and LaSpezia)
- the environment surrounding the house
- the idea to recover a building destined to decay and dereliction, reusing existing materials like the stones for walls and roof and some wooden parts
- the kind of materials used
- the cozy sensation given by simplicity and the small house dimensions
So it was easy to create a quick story that could go along with the project discovery and the images I’ve selected have the merit that they could be reordered based on another timelines, describing a different story.
This is mine, if you’ll think to something different, please share it.
THE ARRIVAL
THE SLEEP
THE WALK
MAKING OF
From the start I’ve choosen to redo the same pictures point of views and this leads to the main challenge: recreate the stone walls and floorings.
As stone walls are visible near the camera I’ve immediately decided that simple textures with normal maps weren’t enough and try to model 3d models of the stones to build the building will be too slow and frustrating.
So I’ve thought to stay in the middle, create dedicated textures sets and assign them to simple geometries and leave the adaptive subdivision and displacement the task to add geometrical details.
About the roof modelling, I’ve used geometry nodes to create different rows of 3d models stones made by me, then I’ve duplicated, changed and overlapped them to create the shingles roof.
As I try to learn something new using Blender for a new project, this time I’ve set my focus on the environmental fog recreating that tipical italian end-of-August morning setting among the hills, with that misty weather that surrounds everything and rendering volumes to get the right lighting on clouds on the different times.
A thing I’ve enjoyed it was the ray portal shader, useful to simulate what’s the smartphone camera shooting. I’ve never used before and when I’ve designed that image, I’ve immediately taken advantage to figure out how it works.
Also in this project I was be able to verify how much useful are geometry nodes. The wardrobe in the bedroom is made blending traditional 3d modelling and geometry nodes for the irregular panels. The same geometry nodes was used for the double-beds structures.
A geometry nodes helps me to adapt the light fixtures I’ve added into the bedroom. Through the geometry nodes I can set the distance of the light switch and orient the transformer in regard to the power socket.
Another point I've never done before it was to portray the condensation and the wet surfaces in a bathroom while a person is taking a shower. Condensation on the glass panels of the shower box helped me to make the image publishable :) and to not divert to much the observer's attention... :)
The wood of table in the living is totally procedural and it’s based on this tutorial .
Compared to the original project I had to imagine the kitchen layout, the furniture elements of the bathroom and the light fixtures of the stairs and on the external, as they're totally or partially missing in the pictures of the real project. I hope I've seized the soul of the project seeking to maintain a certain level of feasibility and plausibility.
As 3d models not made by me there are some elements from BlenderKit (closed umbrella, mug, toothbrushes and soap), vegetation by Poligoniq, humans models by 3dPeople, some textures from AmbientCG and the volume clouds are the free ones provided by Embergen
As addons I’ve used the inseparable Photographer and GeoScatter.
To realize the walls and florrings texures I’ve used MaterialMaker, taken inspiration and modifying the material https://www.materialmaker.org/material?id=1097 available in the online library of the software.
SOME TECHINICAL DATA
Rendertime from 6 to less 22 minutes (bathroom image), about 9 minutes the mean time
Ram usage: less then 10Gb
Vram usage: about 7Gb
PC specs: AMD Ryzen 9 7900X, 64Gb, RTX4080
OS: KDE Neon
Softwares used: Blender, GIMP, MaterialMaker, PureRef