I’m sorry you’re not feeling well. :sympathy:. Hope whatever is wrong passes soon.
Both “in themselves” and “by themselves” are correct in this context.
I’m sorry you’re not feeling well. :sympathy:. Hope whatever is wrong passes soon.
Both “in themselves” and “by themselves” are correct in this context.
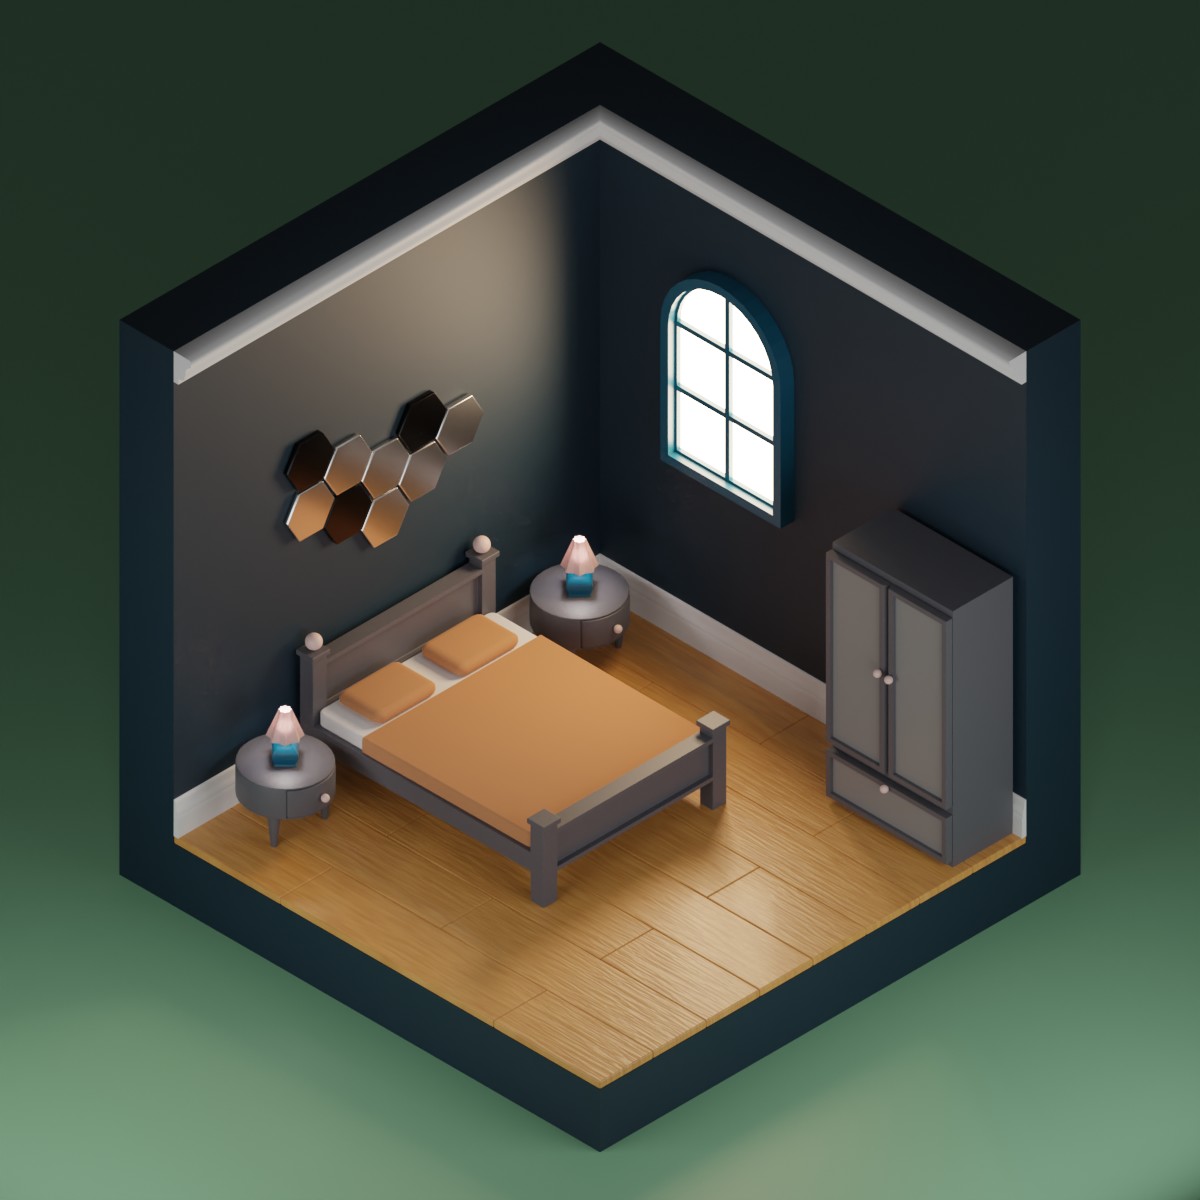
2022-06-22 Isometric Bedroom
The next episode of Karim Joseph’s Curve Encyclopedia is about using curves for particle systems and I decided to wait with that.
Instead I finally did what I had been eager to try: make one of those little isometric dioramas.
I followed this tutorial by Left Brain CGArt: https://www.youtube.com/watch?v=b3hI38dAaI0
It’s a good tutorial, though it is considerably faster than Grant’s are. But I was fine with this at that point. He speaks clearly, has thought through the process, doesn’t ramble, displays screen cast keys, has subtitles, and keeps a small copy of what he is modeling on-screen. That’s as good as it gets. It’s too bad he has only a couple of other tutorials.
I don’t have many notes, because I didn’t have many difficulties and none of this was new; this was all stuff I had already done in one or another form. It was relaxing to feel basically in control and rarely confused.
One issue I had right at the start, when making the floor boards at 2:51 he says to make loopcuts until you have 7 segments, but he means 7 loopcuts, which makes 8 segments of the floorplane. If one does as I did and just listens while doing, one ends up with a floor that goes beyond the right wall. It didn’t hurt me to have to do it over, twice even (practice is good), but it was a bit confusing depending on how one interprets “segments”.
That method to make the floor boards is something to remember; it’s really neat.
I made lots of small changes just because I could – different bed frame, created the blanket and pillows differently, used radial arrays for the night stand legs, made the baseboard with a curve extracted from the wall and a profile curve, ditto for the ceiling moulding (ah, those curve lessons paid off right away), gave the floor a procedural wood-like texture, made a different window…
I’m pretty happy with how this came out.
Music: East Asian folk fusion that I found through @Rigoletto in the long-running thread What are you listening to? – I quite like it.
It looks so cozy! Maybe do a nighttime version? I’d like to see a nighttime version. ![]() With the lamps glowing and some moonlight coming through the window.
With the lamps glowing and some moonlight coming through the window.
If I could just whip that up quickly, sure thing. ![]()
But, I don’t know how to do that yet. I can light outdoor scenes with a sorta kinda moon lit feeling (not particularly well, but I’ve done it with the old man & monster scene and with the cupcake island one (y’all haven’t seen that one yet)). Here I’d have to do a bunch of things differently. I’d have to put up invisible walls to isolate the room from the outdoors, and then have only moonlight come in from the outside. I guess that’s what portal lights are for; never used one. Plus the little lamps on the nightstands aren’t very strong (on purpose); I wonder whether one can see anything with that if the HDRI and area lighting went away, and how much I could turn them up before it looks bad. Might need volumetric lighting to make it look good. This is basically archviz and cinematic territory.
I’ll give it a quick try, watch some archviz night lighting videos since I am stuck on what I wanted to do today anyway and could use a break. Good excuse!
2022-06-24 Modular Plant Creation with Modifiers
yojigraphics on YT (Julien Deville): https://www.youtube.com/watch?v=JoW1XWi4Lw0
Good tutorial. Instructor has a French accent, but he’s fluent in English, makes few mistakes, and I can handle much heavier accents (it’s just that somebody on BA complained about this specific instructor, and both his accent and his ability to express himself, but I can’t say that I had any problem).
Quite the contrary, this is a better than average tutorial. He had screencast keys on. He explained step by step what he was doing, and – importantly – why he was doing it.
I did this at the time because I was working on another isometric diorama, and wanted a hanging plant for it. He does 3 plants altogether, but uses the same system for them – you make a stem, then a leaf, put an array on that, Object Offset to an empty which sits at the root of the stem. Then the empty controls the leaf distribution around and along the stem and the scale. He then makes a curve and assigns it to a Curve modifier on both the stem and the leaf. It’s quite versatile because you can vary the size, density, and distribution of the leaves.
He made his plant standing, I made mine hanging.
This is not particularly low poly; 68k tris. I have a solidify modifier on the leaves which isn’t really necessary, and the leaves themselves don’t need as many tris as they got either. I didn’t really try, but it’s on my list of things to do in order to learn better control of my polygon budget.
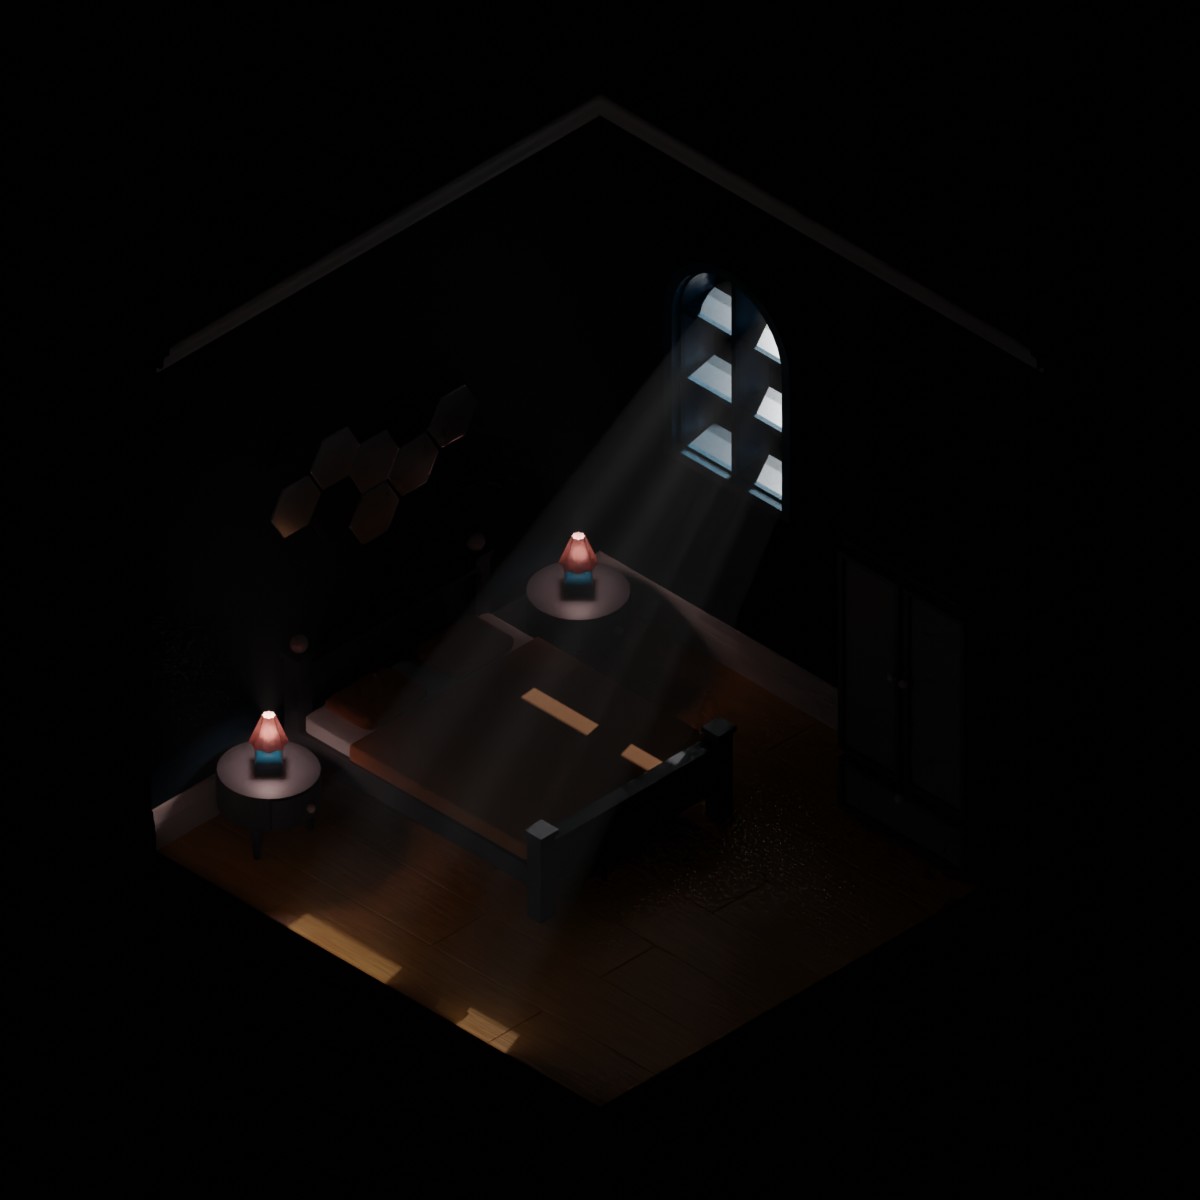
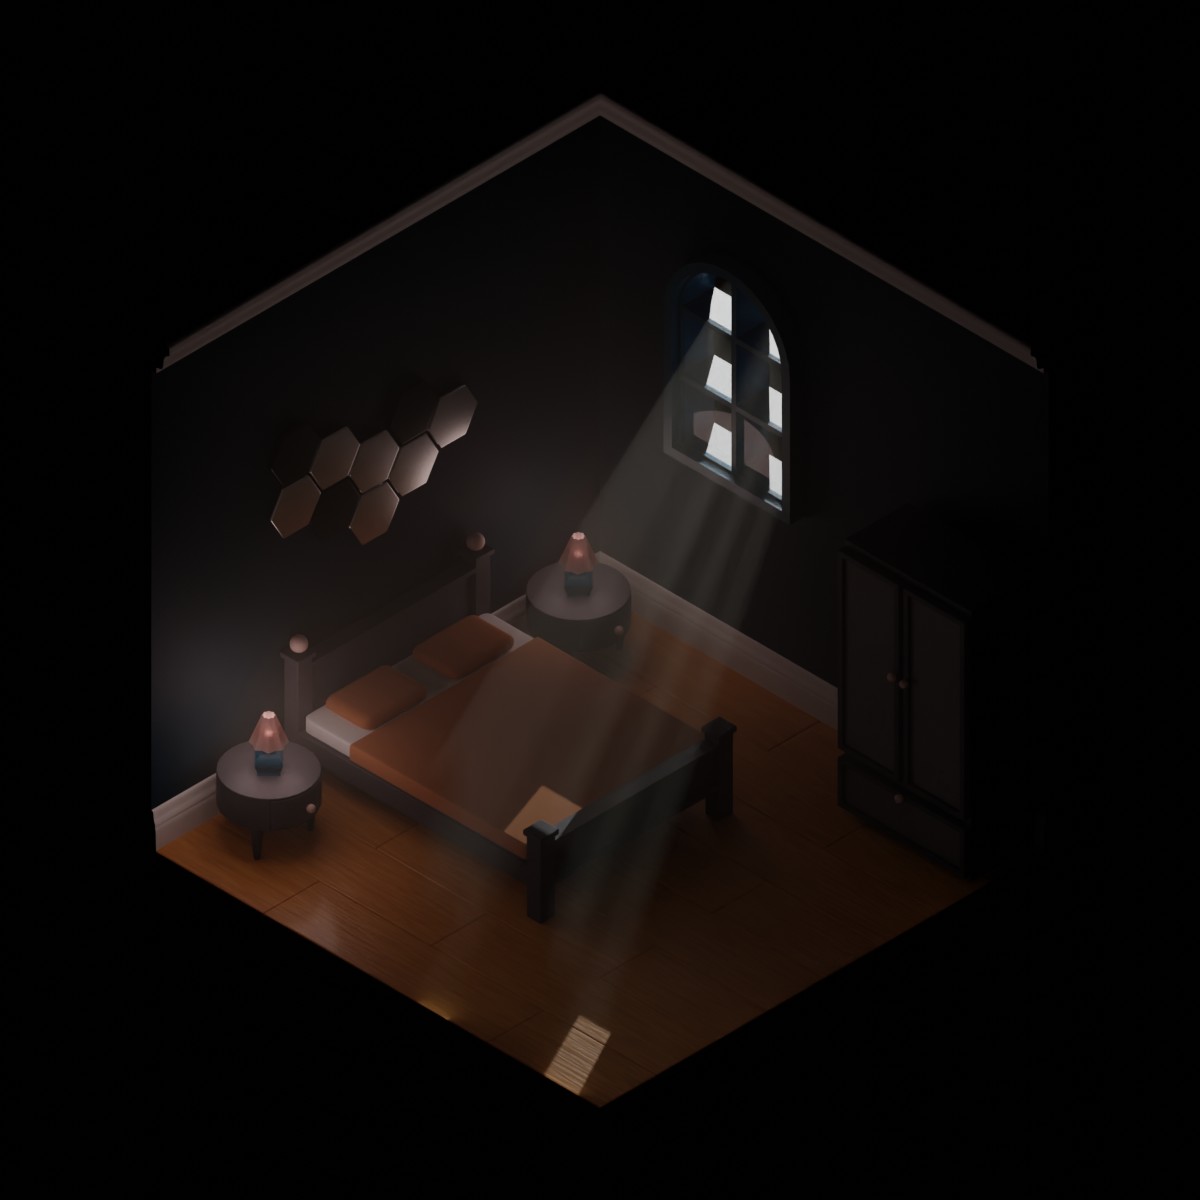
2022-10-04 Isometric Bedroom at Night
I’m not putting this off until its date comes properly around, because hey, it was a request. ![]()
So this was pretty much as complicated as I had thought, only it took even longer because I went down into a maze of twisty little passages, all alike (of course). “Lighting is hard” sez Barbie, before diving back into Calculus. I started watching some archviz lighting tutorials, but they were all too involved (alas Grant does no archviz). Winging it, as I know, does not always save time. But instead of learning to do it right, I can produce a lot of failure in the same amount of time! Yay, me!
First I had to change some geometry because the window was entirely fake; it simply had an emitter on the windowpanes, and no connection to the outside. I made the window punch all the way through (I should have kept the original boolean; these days I keep everything, but Knife Project is my friend in any case), changed the window panes to glass (special glass shader from the fine manual to keep the noise down).
Then I built a larger, surrounding cube for the room with one side removed, and set up a portal light in front of the window – portal lights take the environment lighting and pipe it through whatever openings you’ve left. It’s really quite spiffy, but it didn’t work well for my purpose because too much light from the HDRI still got inside the surround and it just didn’t look good all around.
So I thought to create light barriers directly around the cube. I knew this sort of thing could be done in general (I’d also recently seen Lillya do it in Blender). But it took me a while to figure out how to make them invisible to the camera, but still blocking all outside light except for what came through the window. It’s actually incredibly easy: Object Data Properties → Visibility → Ray Visibility → Camera. Tip: 8 year old posts on StackExchange will have an answer, but not necessarily the best answer.
I had done fog for the Old Man & Monster scene, so I figured I could derive how to do volumetric lighting from that. So I made a cube with a volume shader for the dust required for godrays, and played with the density. Made it fairly low (0.7), kept the colour light. That worked! Not first time though – I forgot that the Principled Volume needs to be hooked to Volume on the Material output, not to Surface as most other shader nodes. If your object with the volume shader is pitch black, that’s the problem.
Took the portal light off and replaced it with an area light. That wasn’t as controllable as I wanted and so I changed it to a spot light. Tracked it to an empty where I wanted the godrays to go. That worked too.
I had still way too much light in my room, and in the end I just took the HDRI off and made the background black. Now I had way too little light in my room. ![]()
Thus began the fiddling. I gave the dust a low emission, but that just made all of it glow (which is what it should do, really). I tried a very low-powered area light on the ceiling. Nope; that lit all of the dust. I put emission on the walls – that just looked so very wrong. I increased the intensity and radius of the nightstand lamps. That gave enough light to vaguely see much of the room, but it no longer looked like they were small table lamps. In the end I faked it by putting actual balls inside as lightbulbs, with an emission shader, so they would light up the table like before, but the room would still be brighter. I don’t even want to know what this looks like in Eevee, this is all in Cycles.
As the room got brighter, the godrays became less pronounced. So I increased the wattage of the “moon” spotlight. I moved its position and changed its beam. Lots of fiddling back and forth. Still not done, really. There are reflections in the window I don’t like and the lighting on the nightstands is still not right.
But, this is it. I got to move on for now. It’s not particularly “cozy”; I think for that I’d need more real light sources, more indirect ones, play more with the colours of the lighting as well, and I’ll think about that for future projects. But it’s an interior night scene, and I learned a bunch of stuff.
So stoked you actually did it ![]() And a lot of good info in your descriptions that, as always, helps one to understand and learn it along the way.
And a lot of good info in your descriptions that, as always, helps one to understand and learn it along the way.
It looks really good, I really like the dust/volume. Only thing, as you mentioned, would be some colors of the lights, but that could be quickly made in post, too.
I didn’t even think about tracking a light to an empty, would help me in my scene, too. Thank you!
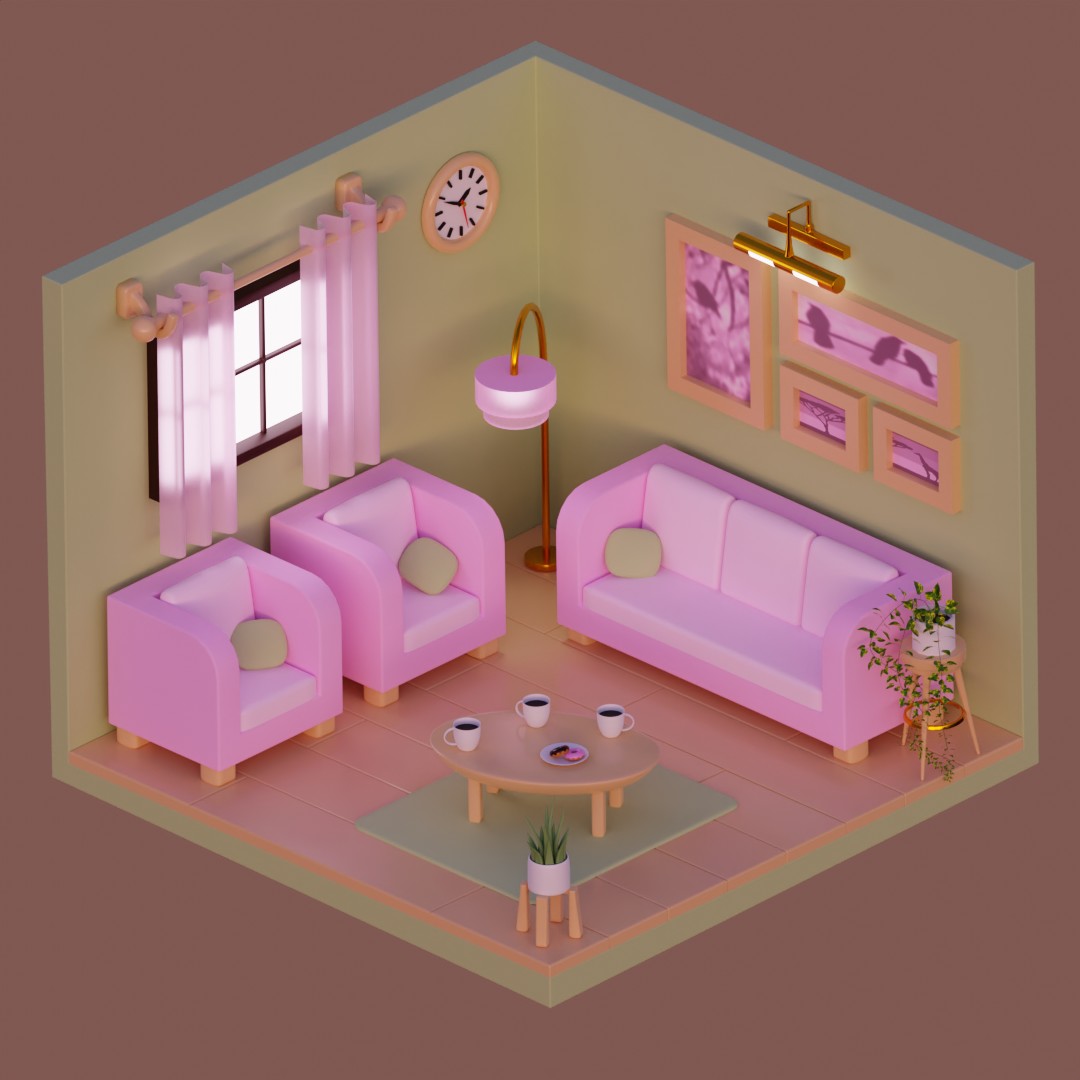
2022-06-27 Isometric Living Room

by 3D Greenhorn (showing the video thumbnail so you can see the original)
Robovoice. He has a whole series of those little rooms. These aren’t bad tutorials, despite the robovoice. He has screencast keys and uses annotations to point at areas of the interface where he’s changing things. It’s mildly confused what it’s target audience is – it starts out for people who don’t even know how to navigate, but moves quickly past that, likely much too quickly for actual beginners. And at 60 minutes for 3 parts, it’s too long for beginners as well. But it’s actually easier than the donut, and you repeat operations more often even if he doesn’t teach as well as Grant. And if you’re not a beginner, then this is no problem anyway.
Could it get any more cute? Probably; it lacks cute creatures, but I am starting to develop hives. ![]()
I did a bunch of stuff differently from the instructor. The only thing I had slight difficulties with were the curtains – the holes in the top. Looking back I don’t even understand why I had trouble making reinforcement rings; it’s clear to me now how to make those, but at the time I just didn’t manage it well because everything was at an angle (I booleaned the holes themselves with a cylinder duped and separated from the curtain rod, scaled up a bit). I know you can’t even see them, but I wanted to know how to do it better.
Blender just froze again (ie crashed). It does this too much for my taste, 1-2 times a day, but I’ve been too lazy to start looking for the cause. I don’t have big scenes; this is probably the biggest one, but it’s still under 500k tris, and it dies with much smaller scenes too while it’s done ok with 15mil tris. Oh well, I should get off my duff. Part of why I am not bothering is because I’ll order my new computer any day now, as soon as I make up my mind whether I want to build it myself with the precise parts I want, or make some compromise and order something pre-built. Decision paralysis.
Anyway, not much to say about this; it was mostly good practice of a lot of techniques. I do like putting these dioramas together; it’s nice to have a little scene at the end.
Music: Genesis (more Peter Gabriel than Phil Collins)
May I look if there’s any 6 legs table of a floating lamp there? ![]()
![]()
![]()
![]() Just kidding. It’s cute.
Just kidding. It’s cute.
:chortle:. I gotta say, I saved that one image we were all making fun of and was wondering how to best translate it into 3D while keeping the errors intact. It could be a little Eschereque.
This looks already so much better than the last room, especially the materials and lighting. Everything looks so soft and inviting ![]()
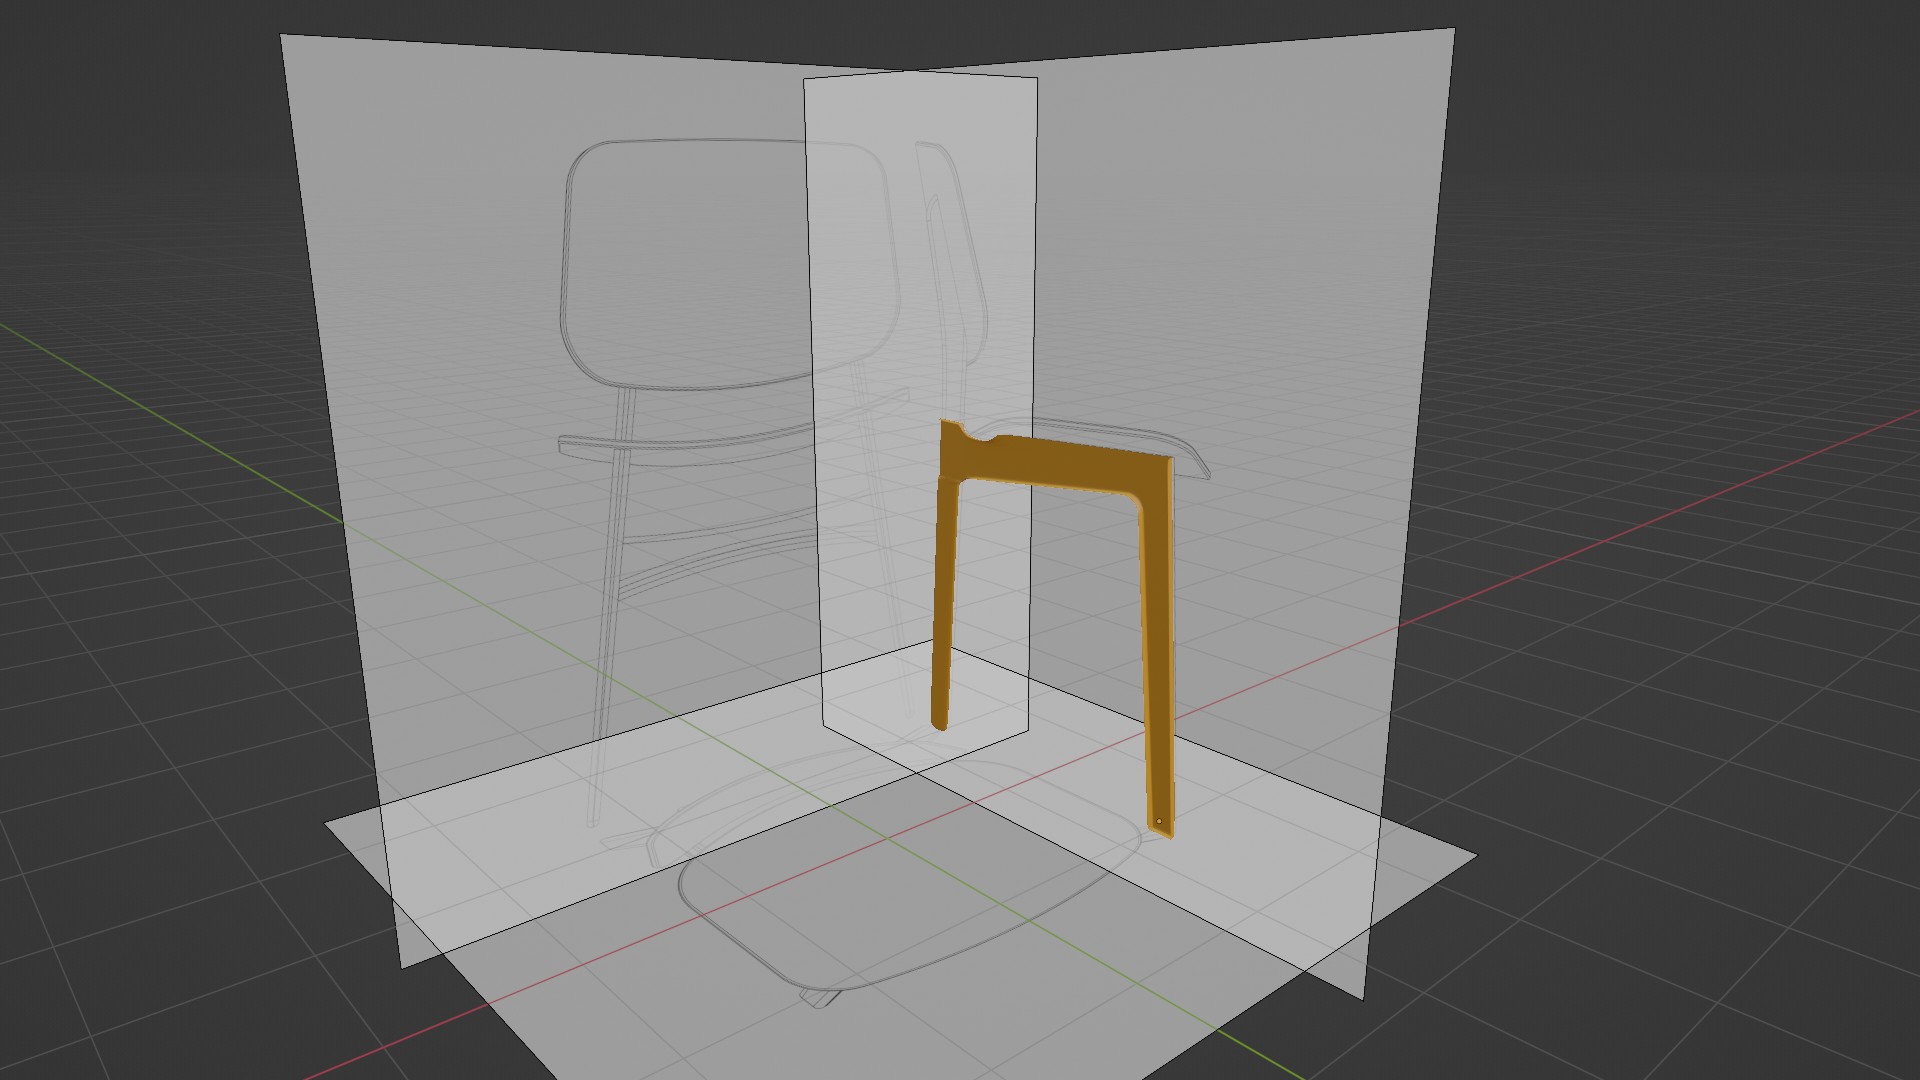
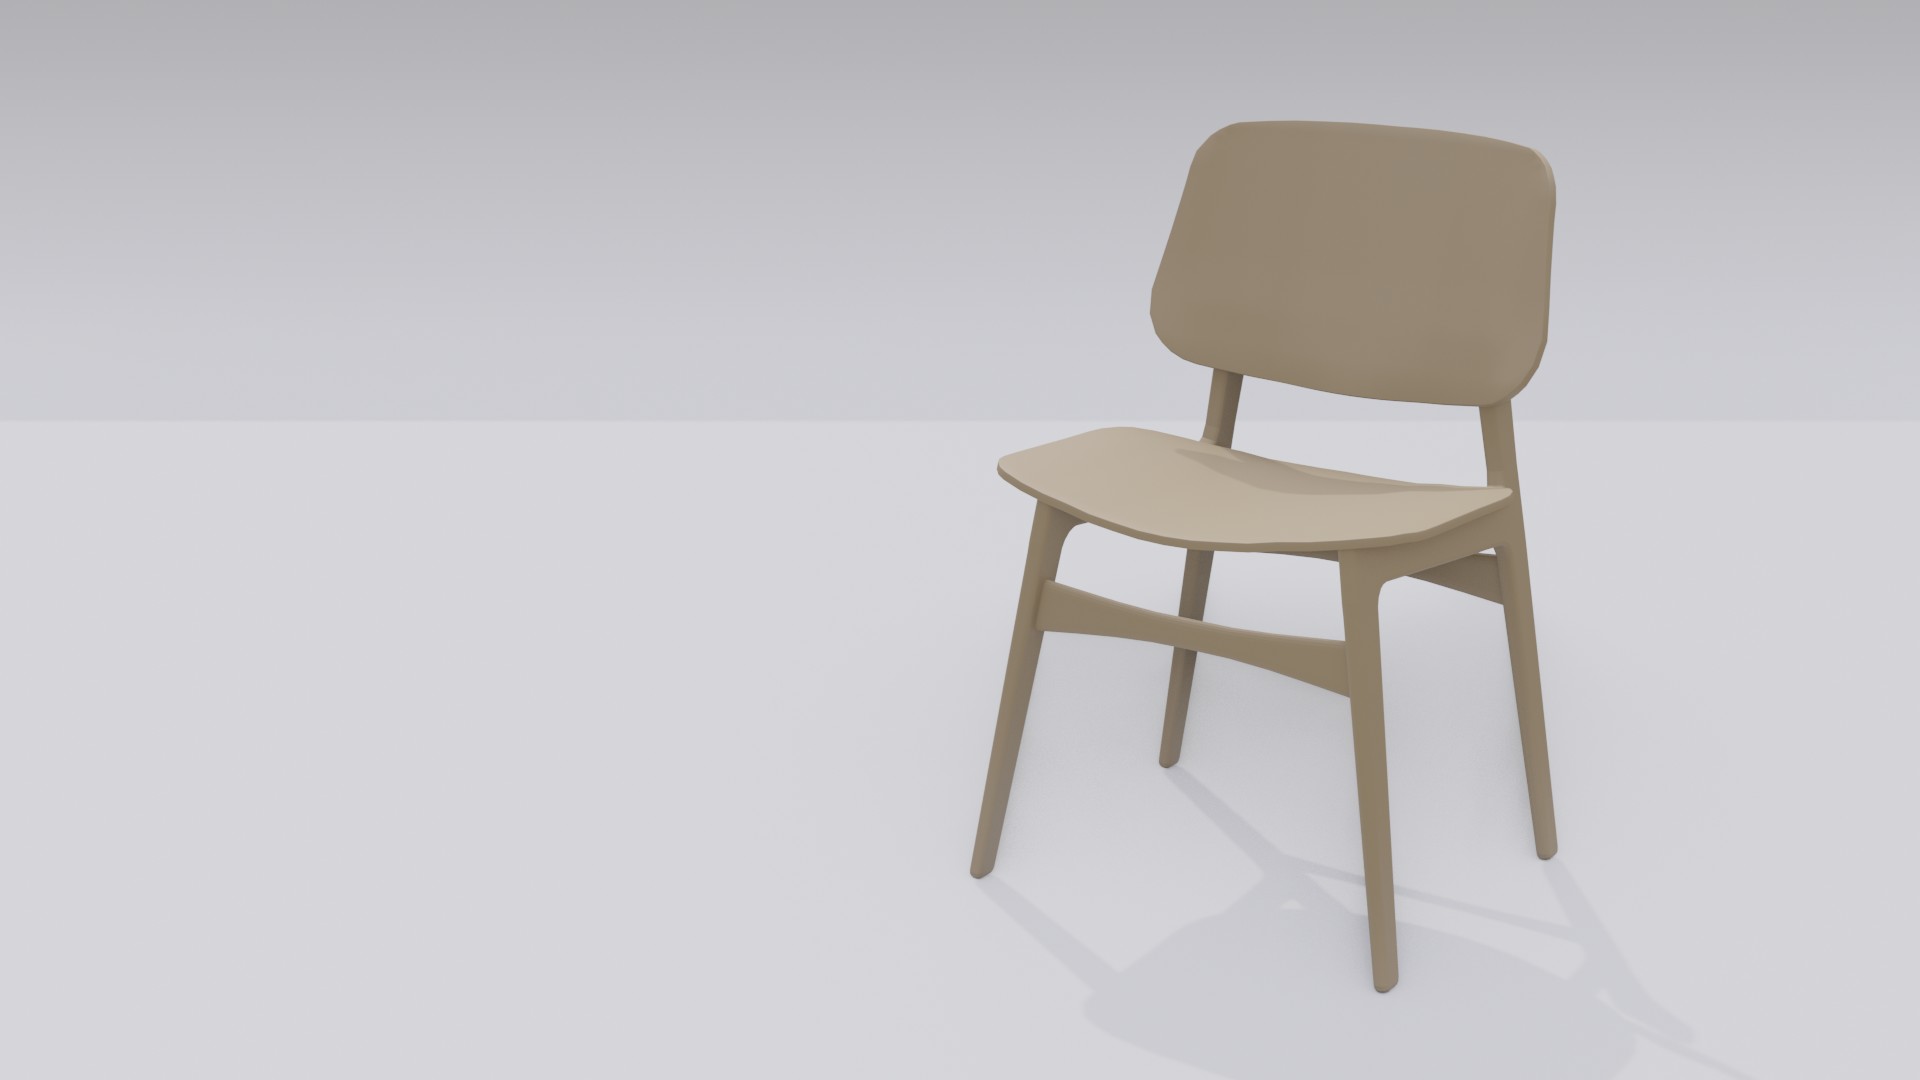
2022-06-28 Søborg Chair
Blender Guru (Andrew Price): https://www.youtube.com/playlist?list=PLGxQHIZUvoZvJEXRP3v0UPZNrwHpZYSgn
Chair designed by Børge Mogensen.
I wonder idly about the legality of all this designer furniture that fills a variety of 3D model websites. Modeling it for myself isn’t a problem, nor is showing it here (it’s probably fair use for educational purposes), but putting it up for sale? Hm. It’s not an actual copy of the object, but it is a derivative. Or so it feels.
But everybody does it, and those sites seem not to care. That’s decidedly odd in this litigious society. I don’t necessarily want to discuss this here since it’s way outside the purpose of the Sketchbook; I’m just wondering and think if I ever put up 3D models for sale, and they’re based on real-life objects that might be copyrighted or trademarked or patented, I need to do some research into the legality.
Really what I am doing is avoiding talking about this failure. Yeah, here I was, trying Blender Guru again, eh? (Something else I definitely do not want to discuss; we’ve been there and done that.) It’s not even his fault, it’s all mine this time.
Subdivision surface modeling and I did not get on from the first. I had trouble enough dealing with Blender being more “wing it” than CAD, but turning a basic, nice-looking outline of an object into an ugly blob is much worse. It scares something in my brain, and all my moxie just skitters away. So with the chair we started outlining the legs, and while I wasn’t really happy about not beveling the corners, I put up with it. But then he turned the whole thing into a blob. :ack:. The whole process is just so counter-intuitive to me. Lots of loop cuts to put the edges back in that were there in the first place. I found polygon modeling ever so much more simpatico where I could start rough and square and then refine and round things off and finally bevel; I felt I had much less control over the subdivision surface.
And then somehow I managed to delete the backside of my mesh without noticing until it was too late to undo. I was just frustrated and resistant by then, and decided to stop. I don’t usually give up so soon. With the donut I had good reason; I had messed up the mesh and didn’t know how to fix it. With the chair, I could have fixed it and continued, but I was just a whiny little twat going “I don’t wanna”.
Sad.
After moping I went for a walk, which is always good when I am in a pissy mood. And when I got back, I did the chair via polygon modeling. That wasn’t the purpose of the exercise at all, and I thought it quite ridiculous, but it made me feel better. It’s a nice chair, it deserved better.
The solution to the basic problem seems the same as the last time – this was too much all at once, I need to start smaller. Grant Abbitt has a short series on hard surface modeling, and I’d do that before returning to the chair. But I wasn’t that sanguine about it, I needed to stop feeling so resistant to this form of modeling.
Music: Jethro Tull.
Intrigued because every other day it would seem, I happen to see this particular thread linked on the mainpage alongside your distinctive forum nick so decided to have a peek for myself. Hmm…for barely over two months playing around in Blender, you’ve figured out and completed quite an array of content than I’d expect too see from most novices, starting out.
So my 2 cents - comparable with anything deemed worthy enough to spend time and a shitton of effort learning, ‘mistakes’ can and will continue to happen as I presume you’re well aware of plus it’s really where as artists we tend to learn from the most. I mean even after…bugger me how time flys, 18yrs there abouts doing this digital stuff, I still find myself cocking things up occasionally.
Anyway, since my specialty is hard surface (…mostly mechanical) a couple of resources I’ve referenced in recent years, although slightly advanced but nonetheless insights into sub division polygonal workflows among others, may I think prove useful.
100% agree with this.
I also dislike AP’s teaching style.
https://www.youtube.com/c/Arrimus3D/videos
This guy is great for subD, hardsurface, and lots of tips. Not only Blender, other apps too, but mostly its his approach to things…
Great music choice, 10/10.
I share your frustrations with subdiv modeling- even though I personally am better at subdiv than bevel, I would prefer to be better at bevel.
Towards your legality argument- you can sell pretty much anything on the Internet until you get a C&D letter. Heck, all those “make a Disney style character in Blender” videos on YouTube are only safe from takedown because Disney’s lawyers don’t care to put in the effort to take them down. A shocking amount of stuff monetized online is, technically, illegal, but most of the time, the IP owners look the other way. Oftentimes, they see it as free advertising for themselves
My secret forum name is Verbose PostsALot. ![]()
Thanks for the kind words! Yeah, I know failure is an integral part of the learning process – that’s why I decided to include my mistakes here, so other beginners can see that it’s just the way things go, and that it gets better in part because of the failures, if one thinks about them and learns from them. It doesn’t bother me overall, it’s just in the moment that frustration can get the better of me.
18 years, eh!? Wow. Also thanks for the links; I’m sitting on FrankPolygon’s page right now. That’s precisely the sort of thing I like; the same object with different treatments, and how that affects it, and really thorough explanations.
You guys have already made me feel better (I tend to get a little depressive echo when I make one of those “total failure” posts). And it’s always good to check out new resources (though in this case it’s really not Andrew’s fault – you’ll see in the next few days, I even had trouble with Grant, and I ![]() Grant).
Grant).
I’ve seen something of Arrimus’s before, but am not subscribed. Will bookmark. Thanks!
I became a big fan of the bevel modifier the moment I learned about bevel weights. Before that I painstakingly beveled each edge that needed it manually. Well, actually I am back to that for subd stuff, to create easy equidistant support loops.
Yeah, but if everybody else jumped off a bridge, would you too?
Sure. Since there’s already a huge pile of people, I can just step on the pile. (No, this is not mine, but I wish it were.)
Note that I didn’t say I can sell pretty much anything on the Internet, I said you can ![]()
Lol, alot better what I’ve been called pretty much unprint - typeable ![]()