This is very wise. Add-ons are powerful, they prevent you from having to do things the hard way, but when you’re learning, they are absolutely nothing but distractions. Once you do feel confident with the vanilla mechanics, I have a list of indispensable free add-ons I think everyone should have I’ll share with you, you have no say in the matter ![]()
2 Likes
I actually bought Node Preview soon after you kind people identified it for me, but that doesn’t change any functionality. I’ll be looking forward to your and others’ recommended add-ons at some point; no worries about having to force them on me. ![]() I also keep a list of things I feel I could really use down the road. That thread where people list their favourites, I track that one.
I also keep a list of things I feel I could really use down the road. That thread where people list their favourites, I track that one.
But I want to get through my base curriculum first – then I’ll also have a better idea in what I am going to specialize first, and can budget accordingly.
2 Likes
2022-07-10 Hard Surface Modeling: Super Simple Shapes
Josh Gambrell: https://www.youtube.com/watch?v=A7AVXpi3hFc&list=PLLnvxH5YKLoIdntMT32edhbTIYG9JMTar&index=4
I didn’t have much time that day, so I picked a short tutorial off his vanilla hard surface playlist and “had some fun”.
I mean, not really, of course. But I wasn’t as uncomfortable as I had been with the space ship, maybe because Josh actually gave some direction about how to invent cool-looking gadget stuff if you’re not a mechanical engineer. I appreciated the acknowledgment that people with an engineering mindset might not really want to happily wing it.
While it wasn’t exactly fun, I was at least not frozen with choice paralysis. I did do various things differently from him, most notably I borrowed geometry to do that grey grip thing at the end. The topology was messy at the end (no more so than before, but it affected the shading), and I had no time to investigate whether I had done something wrong, and how I could fix it. So I just remeshed the main body, which now has a gross number of tris (Jedi Spock ![]() would be upset).
would be upset).
Yeah, I should’ve gone back to this, but I couldn’t be arsed. I just moved on to wait and see what I could learn about fixing issues like that.

Music: I was in a weird mood today and couldn’t settle on anything to listen to. YT recommended Florence + The Machine: Dance Fever. I know the band which plays an interesting mix of indie art rock with soul influences, but not the album. I really like the lead singer’s voice, so that seemed like an acceptable recommendation. Lucky twice in a row, what is the world coming to.
6 Likes
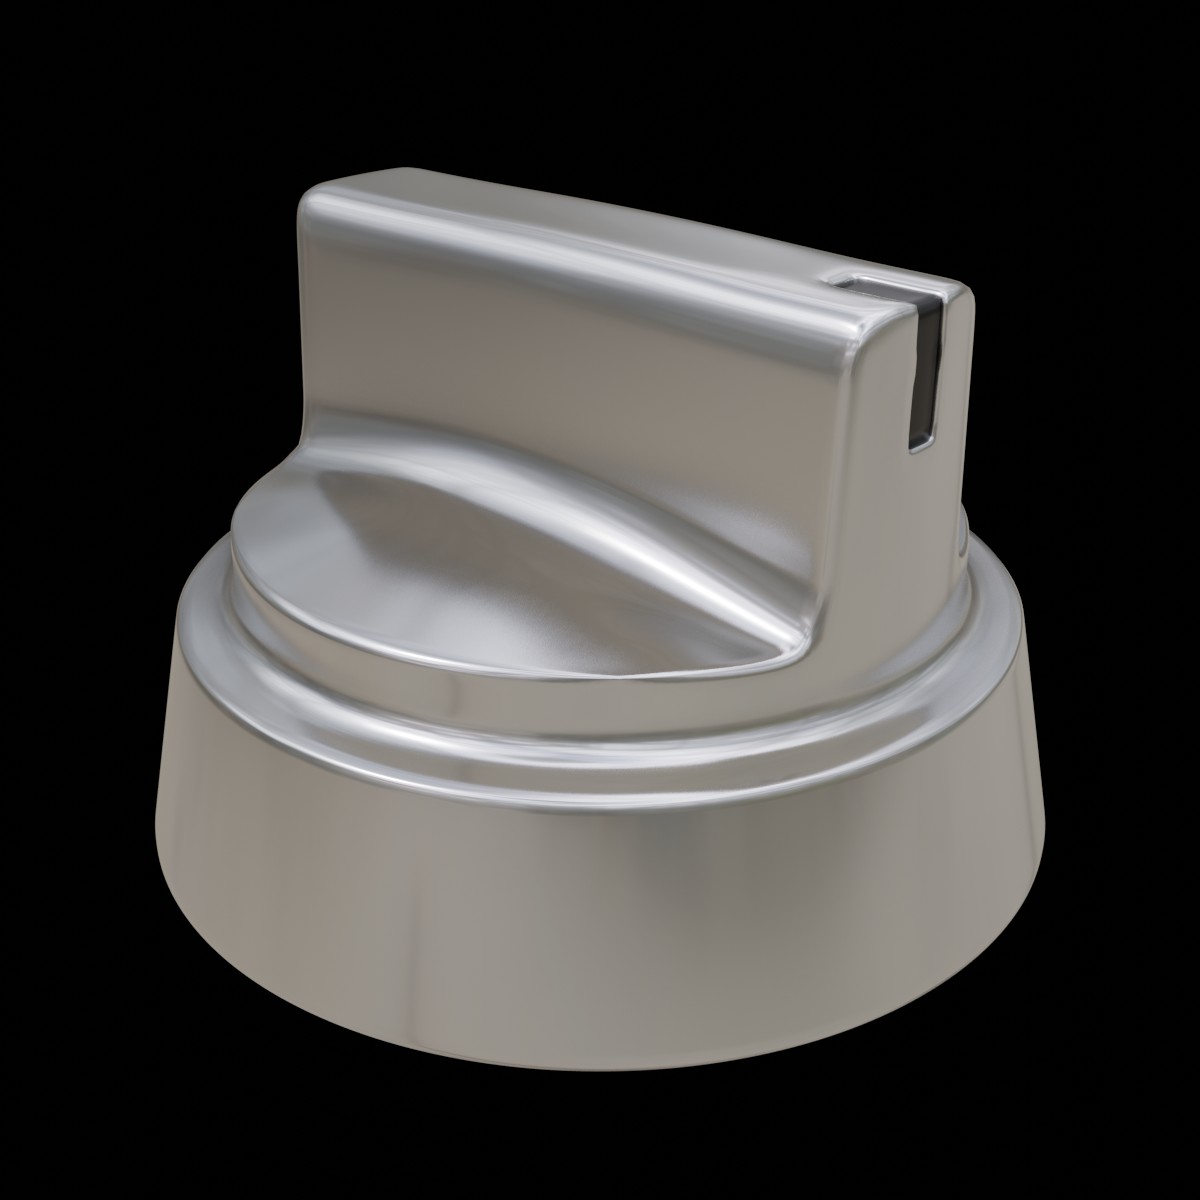
2022-07-11 Hard Surface Modeling: Oven Knob
Arrimus 3D: https://www.youtube.com/watch?v=b_0TVMO0AQs
After finishing with Grant’s basic hard surface exercise, I spent a fair amount cruising around looking at other instructors. He himself recommended several channels, both paid and free. For the time being I decided to stick with free. I’m not opposed to paying but I will always reserve that for instructors I’ve first given a “test flight” and who’re definitely a cut above the rest, and it also depends on whether I feel the free courses are not teaching me enough. I am generally more likely to pay either for a comprehensive introductory course, or courses that home in on relatively small, specialized subjects.
Josh Gambrell I already checked out, so it was on to Arrimus3D. He does a lot of 3DS Max tutorials but has a fair number of Blender ones as well. For this particular exercise he has both, and so I could compare them to see whether I could handle the 3DS Max version on my own (that would expand my choice of tutorials by quite a bit).
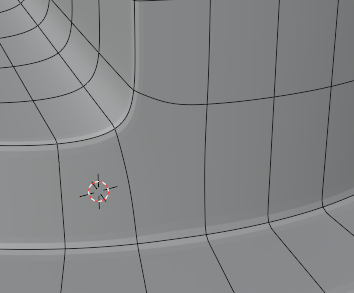
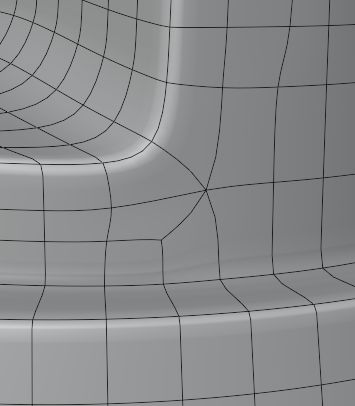
So, Arrimus. More methodical than Josh Gambrell, with more directed explanations of the why and wherefore. I had already known that proximity loops sharpen edges, but I had a real a-ha moment when Arrimus showed how the Subdivision modifier can be guided by judiciously placed loops, like around the vertical part of the knob:

This isn’t a good illustration, so I’m not even gonna upload the subdivided knobs, but that selected loopcut of the left knob pulls the subdivision more straight downward than it goes when it’s not there. Let me add a better example to show this more clearly:

The one on the left only has top edges creased to 40 and the bottom to 90, the one on the right has no creases but those two control loops. See how the shape is more controlled?
This was an easy exercise, but I learned disproportionately much from it.

Total aside: could Autodesk product logos get any more personality-free? They redesign them every few years, which is already dumb but possibly understandable because the last redesign sucked. But they just keep getting more and more bland. The most recent one is just abysmally dull:
Music: Adrian von Ziegler, mix. He’s a Swiss composer who combines a lot of different genres into his instrumental pieces.
8 Likes
Nice knob!
And yeah, as much simplistic logos are a thing now, a lot of brands to me seem so unrecognizable. But damn, autodesk wins again I suppose. When you think about it, logos do matter ![]()
![]()
3 Likes
This 5 edged point is annoying me though.
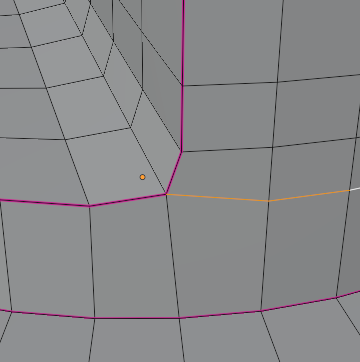
If I delete those selected edges the problem goes away but then the object is not all-quads
3 Likes
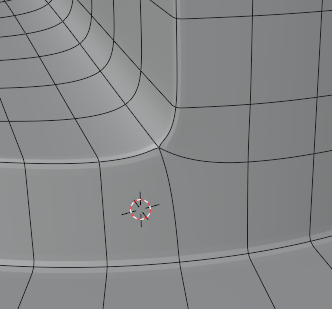
Yeah, that pole annoyed me too, but I couldn’t at the time see a way to move it, and it wasn’t causing any noticeable shading issues at normal camera distance. I’m sure that why Arrimus left it like this. I’ve since figured out how to “move” a pole, albeit clumsily when it starts out on an edge (I really should practice this more):
I like your solution better though, and ngons aren’t really a problem per se in hard surface modeling.
3 Likes
5-poles are fine, honestly, they’re essentially unavoidable and they don’t affect shading. They do disrupt edge flow, but in context like this, exact placement doesn’t matter much.
In character work, the placement of 5-poles matters a lot, they can completely ruin animation topology or make it work depending on placement. Funky stuff.
(Sorry if you already know this, I’m never quite sure which of my thoughts to comment here since you’re a few months ahead)
2 Likes
Poles can affect shading when they’re on an edge because they will pinch. I mean, it does here, if you get real close up. And while nobody would get this close up to an oven knob, I can easily conceive of situations in which one might get this close up to an edge. So whenever they affect curvature, being able to move poles matters. It’s probably even better to plan ahead so you won’t get any in those places, but I’m not at that point even now.
You can basically assume that if it has to do with character modeling (and rigging and animation), I don’t know it, beyond disconnected bits and pieces that I picked up generally and from reading your and Billie’s and Omen’s Sketchbooks. I have poly-modeled a single (anthropomorphized bunny) character and while I actually finished it, had so many problems that I realized I was right to put it late in the curriculum and I shouldn’t jump the gun.
2 Likes
2022-07-12 Hard Surface Modeling: Shampoo Bottle
Arrimus3D: https://www.youtube.com/watch?v=d9zwls6cUiI
So this is a 3DS Max tutorial. No problem starting out, but things soon came to a screeching halt because he used so-called face and edge constraints to rotate the edge loop for making the cap – that was pretty spiffy, I must say. But I drew a blank as to whether one can even do that with Blender. However, I knew two ways to create that cap, one with a boolean (I learned slicing from Josh, after all), and just by cutting a new loop with the knife.
I made a copy of the bottle and did the knife first. That worked fine, not as elegant as the 3DS Max operation, but whatever works. I mostly ignored the tutorial from then on out because I knew how to progress, and I suddenly was made aware that I had to hurry to help my partner with something. So this was really rushed, and isn’t everything I wanted to do – the cap needs to be more intricate, with an opening at the top, and ideally it should be translucent and the bottle itself should have a spout going up.
Not exactly lazy, but… I did a little UV mapping, super sloppy (projected from view), and then I had to go.


It was a little distracting to see the 3DS Max stuff on the screen, and have to translate on the fly, but until he got to something unfamiliar, it was actually quite doable. Now, this was a very simple object; we’d see how this would go with something more complex. I was a little thrilled that I could do it. I’ve never worked with 3DS Max; Maya would be a little more familiar (we used to write plugins for Maya, and my partner worked on the API before that). Why didn’t I learn 3D modeling when I had free access to Maya? Good question. I was a workoholic and had too many other irons in the fire, hobby-wise.
Music: Sibelius, Symphonies 1 & 2, London Symphony Orchestra under Anthony Collins, 1952-53
6 Likes
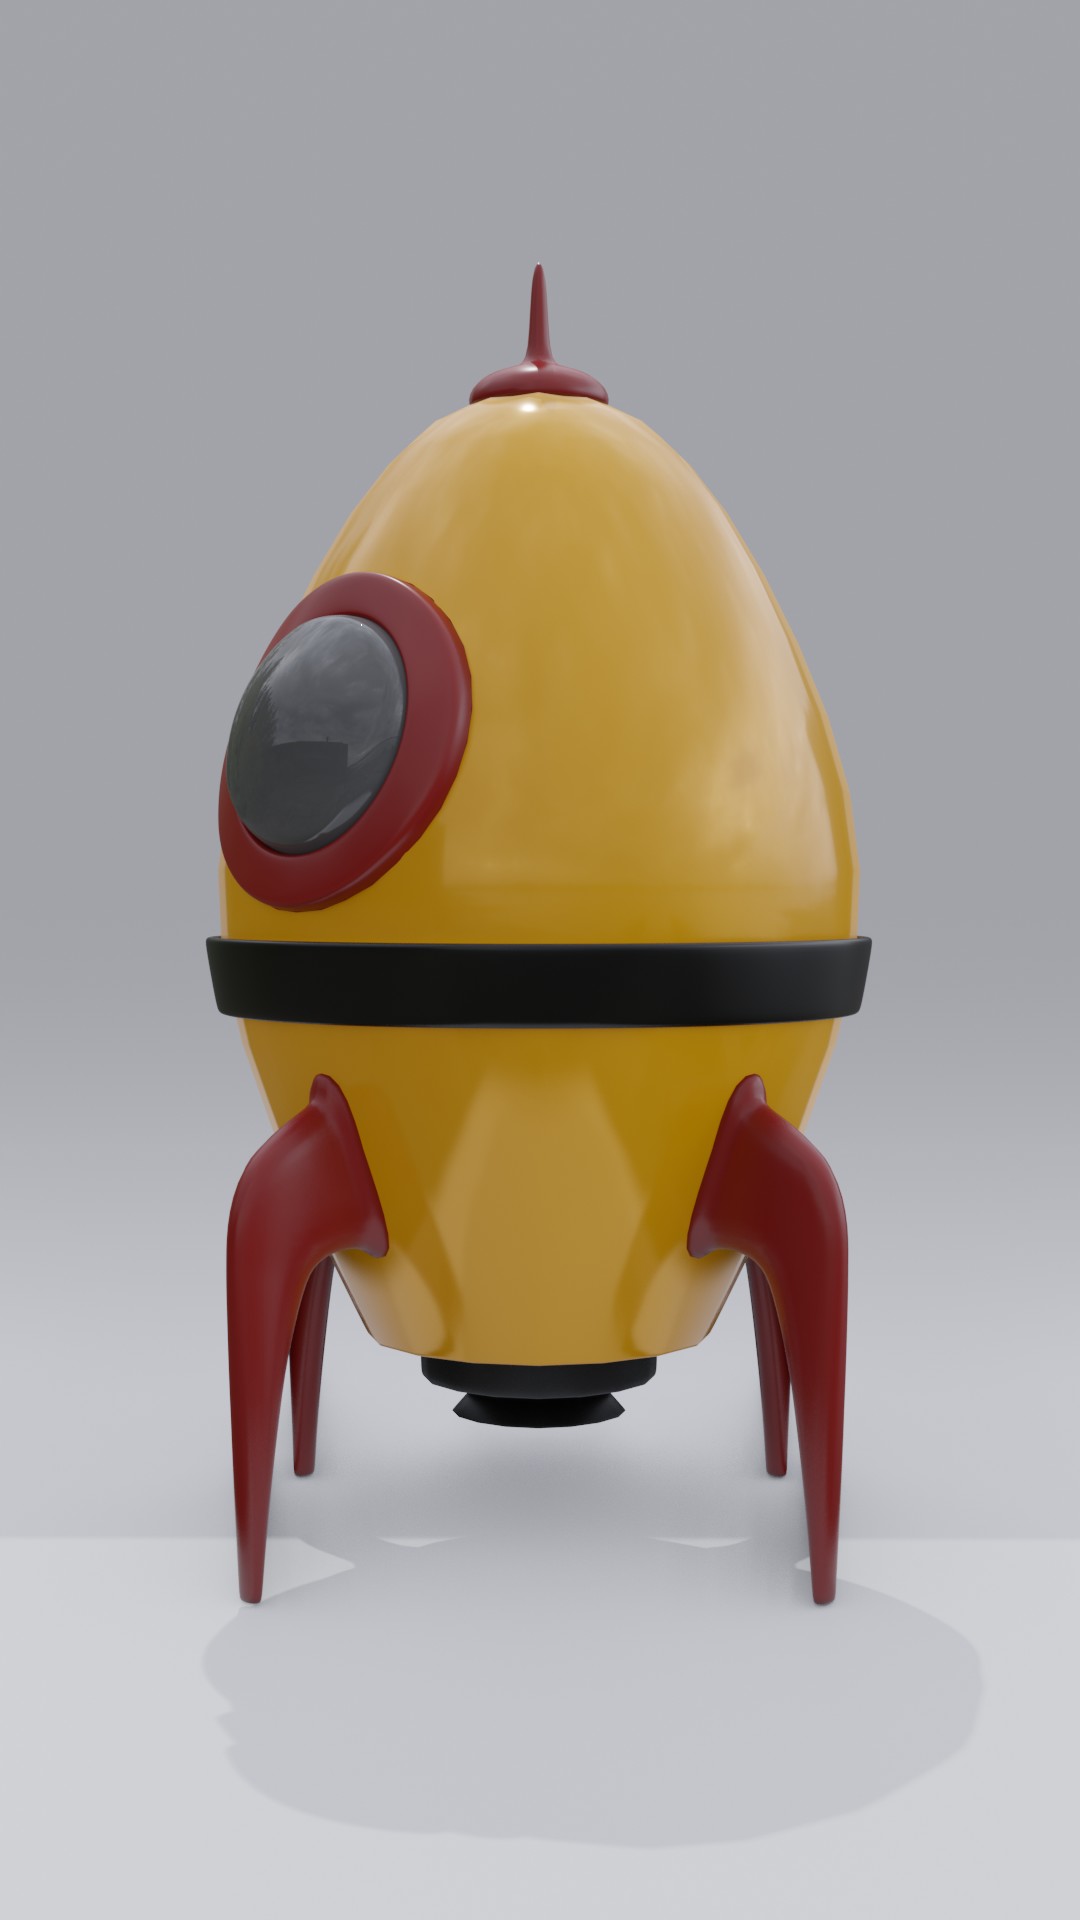
2022-07-13 Hard Surface Modeling: Cartoon Rocket
Grant Abbitt: https://www.youtube.com/playlist?list=PLn3ukorJv4vsRaEZZ8vBaEPotUFR6KSMK
I saw this in passing in my recommendations and it was not part of the Get Good at Blender hard surface exercises, but it fit my mood for the day. Also, a “real thing”. ![]()
I was getting pretty comfortable with subdivision, but it helps of course if the actual model is sort of reminiscent of a blob, so the initial blobbiness of the subdivision isn’t as disconcerting as it is, for example, with an elegant, minimalist Scandinavian chair.
I mostly did my own thing here; whenever Grant created a new object, I’d instead borrow geometry from what already existed – this is one of my favourite things to do to fit things well together while neither complicating the original mesh with trying to extrude everything from it, nor having to completely reshape a new object. I’m also tending towards starting out with planes rather than cubes, because with planes it doesn’t matter that I am prone to forgetting that I switched out of xray mode, and then miss selecting the backfacing vertices. It’s easy enough to extrude the plane after the basic shaping.
New thing I learned: Shrinkwrap modifier for the rim of the “porthole” (is it called that on space-going vehicles? They do often borrow nautical terminology, but I don’t know). That was kind of complicated because we did it twice – first to glom the original circle to the hull, apply, then do it again so the scaled extrusion that creates the rim also sticks. I think? My notes are a bit sparse here. That scaling and then projecting onto a curved surface, oy, that takes some practice because one has to guesstimate how it’ll look, and even thickness is kind of difficult to achieve. Grant is fine with eyeballing everything, but my inner engineer wants more precision.

Grant made his bubble from a sphere, I made my life complicated by experimenting with extrusion from a copy of the rim, proportional editing and finally casting to get a shape that’s not spherical but nicely rounded anyway. I am wondering whether I shouldn’t use the hook modifier instead of proportional editing because then I can paint the influence. It’d probably be too slow, but it’d be more precise. I should maybe instead hide geometry I don’t want to affect. Hiding in Blender is not very good, but there’s an add-on.
Pretty clean topology all around.
Oops, forgot the music: Once on This Island, Original Broadway Cast. One of the two musicals I actually saw on Broadway. Loved it to bits; the production was aesthetically magical. Always thought it was underappreciated, but I see it had a revival in 2017 and won a Tony for it; well deserved.
9 Likes
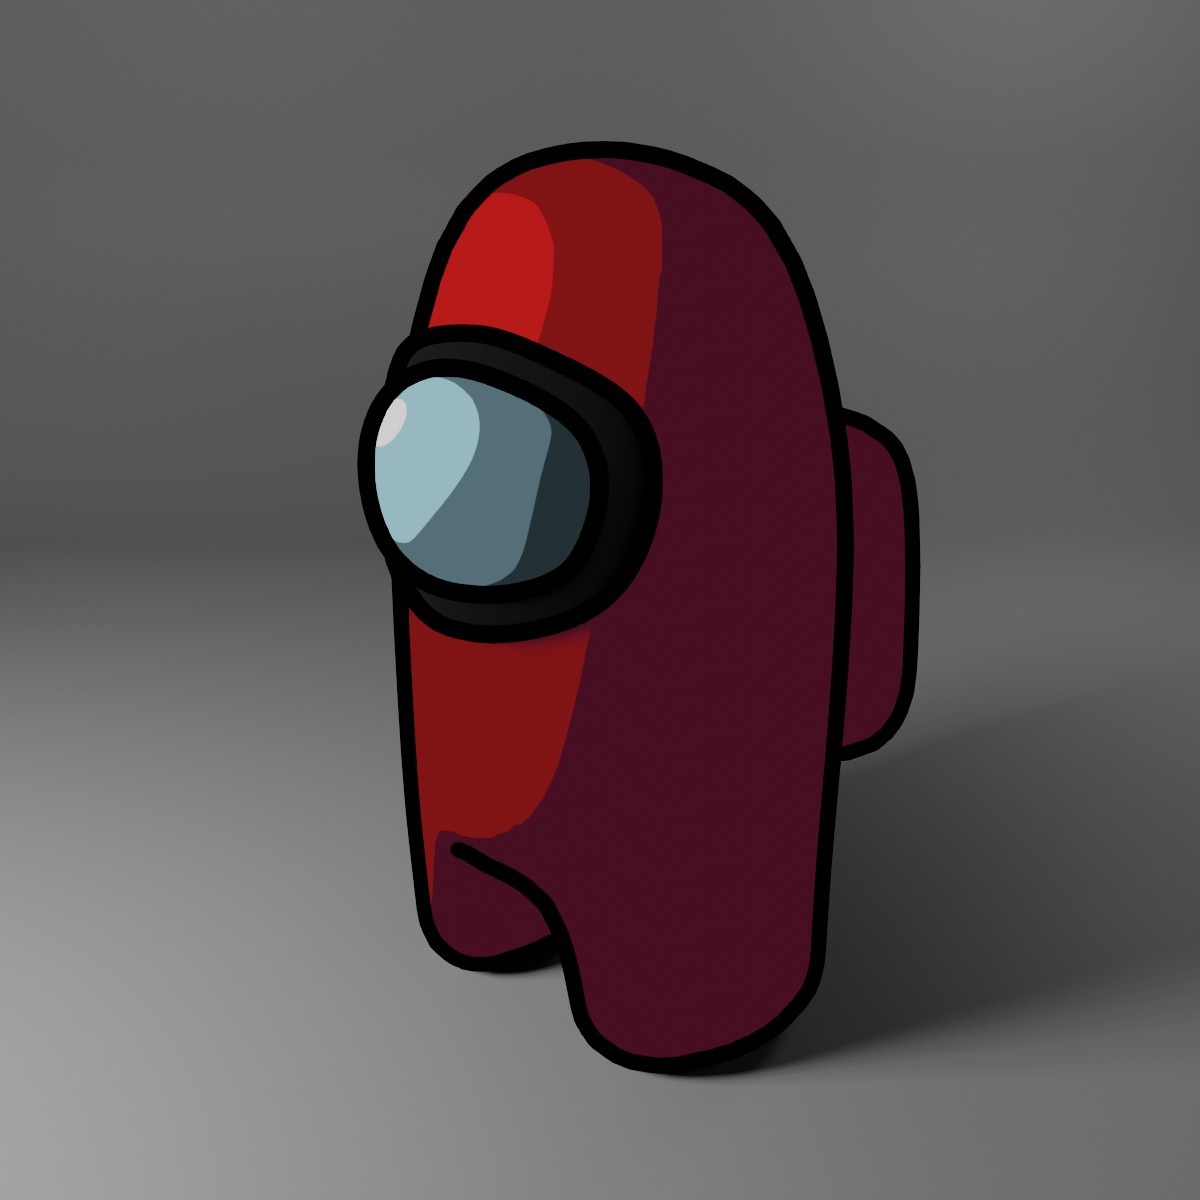
2022-07-14 Hard Surface Modeling is Among Us
The cartoon rocket reminded me of something, and later that day it came to me, and I decided to make it my homework:

Used that Shrinkwrap trick I learned from Grant.
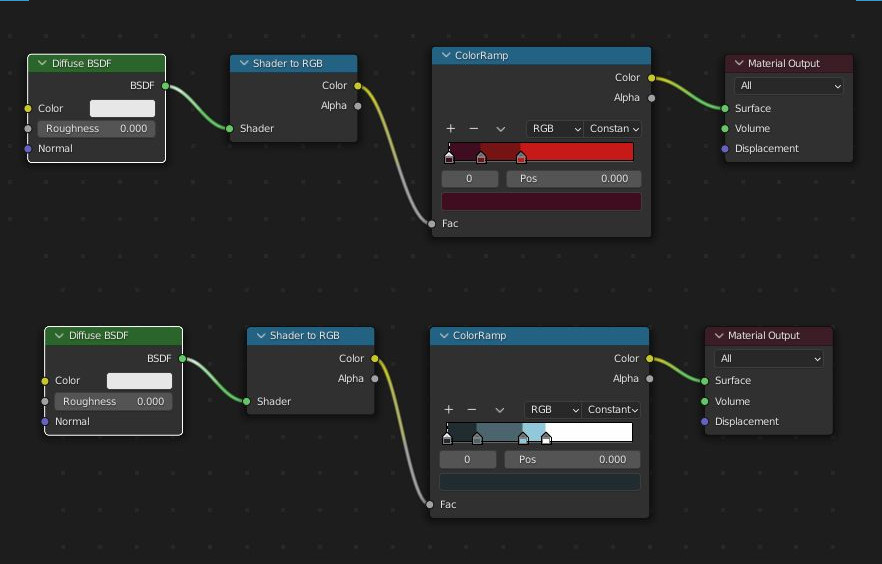
Goofing around, I thought why not try to make my first NPR shader, super simple:
(Are you cringing, Joseph? I am sorry.)
And while I was at it, surely outlines were not beyond me? I tried Freestyle in the Render Properties first, and that worked fine in general, but was interrupted around the face bubble and I didn’t know how to fix that. How else could I get outlines? There was a Line Art Modifier, I thought, I had seen art where people said they used it. But I couldn’t find it.
Hm. Oh. That had to be a GreasePencil thing. Now, GP was something I hadn’t touched at all yet, and wasn’t planning on any time soon. Would I be able to convert my model to GP? I wasn’t gonna go down that road. But I got the outline fever now so I went to the fine manual for help. And while it was as usual leaving me wanting more information, like whether this all applied just to GP objects, I decided to just try it. It was ridiculously easy; I just had to add a GP Collection Line Art object, and the picker allowed me to pick the collection with my 3D model as is, no conversion necessary. And voilà, outlines! Made them a little thicker, done.
But the shading wasn’t really great – for one, I had gradients between colours, even though my interpolation in the colour ramp was set to constant. For another, the overall look of the shading on the model wasn’t very pretty, kinda random.
So I zapped my entire standard setup of HDRI and synced sun, and created point lights – one key light to shape the shading, and two fill lights to light up the back and the right side a little. I’m quite happy with this for a first try.
9 Likes
Truth be told, this is the basis for most basic NPR shading. No cringing here ![]() however, a couple things that could take this to the next level: one, changing the blue/white shader to a Glossy would give a more dynamic highlight. And two - mix the normal texture coordinates with a smooth Voronoi using MixRGB set to soft light to get less rigidly precise shadows and more of an organic feel.
however, a couple things that could take this to the next level: one, changing the blue/white shader to a Glossy would give a more dynamic highlight. And two - mix the normal texture coordinates with a smooth Voronoi using MixRGB set to soft light to get less rigidly precise shadows and more of an organic feel.
The easiest way to fix this is to turn Ambient Occlusion off, which will allow you to use an HDRI + Sun if you want. Nothing wrong with your lighting setup though ![]()
I of course have lots more to say about all this but I’ll restrain myself for now ![]()
3 Likes
[gradients between colours]
Oh. Of course. That didn’t even occur to me. Thanks! Good to know, even though I actually prefer the greater control I have with this lighting.
[next level]
I like the more dynamic highlight. And that shadow softening is something to remember, I don’t think I’d come up with that on my own.
By all means, let it all out if you have time. I have not done anything in NPR shading since then, and it’s not scheduled til later, but it really interests me.
2 Likes
You can use it for softening, or if you plug it in before the color ramp, you can use it to make the edge between shadow and base less mechanical while maintaining the sharp contrast, which is what I usually do ![]() either way works.
either way works.
Another thing you’ll often encounter is three different lights of different colors- pure red, green, and blue, used to drive individual masks (see below)
The really interesting thing about NPR shading- at least this type- is that pretty much everything goes into the same color ramp eventually. The interest and complexity comes not from textures but from shading boundaries.
Let me make that more concrete. Everything that goes into this kind of shading can be expressed as a black and white mask before any color is added. In your case, you could toss in some Greater Than nodes to see the boundaries you’ve defined with a Color ramp.
Those masks might be used to add lines (see my sketchbook), add or remove shadows, distinguish boundaries, or do even wilder things (my general purpose shader has a channel just for determining the strength of detail on hair highlights)- but everything is done in black and white before color is ever added. Another great example is this: Cel-Shading Character Studio Progress (0.1.0 milestone available for beta testing) - #5 by joseph
(That project is on hiatus due to some ethical concerns I have about using someone’s else research for my own work)
I’m self promoting a bit, I apologize, this is my niche, so I have a lot of examples ready to go ![]()
3 Likes
I hadn’t consciously internalized that, but yes, that’s true. I think I need to do some studying of principles.
Actually the whole black-n-white masking ties in nicely with today’s entry. If I ever get around to posting it; today’s been busy with all sorts of unexpected stuff and I am tired, so it might have to wait.
You can call it self-promotion, I call it cross-fertilization. ![]()
2 Likes
2022-07-15 Texture Coordinate Math revisited
I took a little break from hard surface modeling because I got annoyed at the next tutorial I had lined up. Whenever I feel like a break, I do something with materials, it seems. So I decided to take that more seriously and become more methodical about it instead of just adding bits and pieces of procedural knowledge at random, which I don’t usually write about here.
Sam Bowman has a fantastic series on procedural nodes, and he explains texture coordinate systems at the start, something everyone who uses textures should understand, even if they don’t care to ever make procedural textures but just want to use PBR. https://www.youtube.com/watch?v=Uvc2P911rZk&list=PLEPLtrfjLBXjNObTIyYO8PEVtHtXFwsF9&index=1 – I found the series back when I started with materials, and I mentioned it then in passing, but didn’t dive very far into it, and never posted about it in specific.
I won’t go into all the detail here because detail is pretty much everything the first tutorial is about, and you get much more out of actually trying it than reading about me doing so. It helps to remember some math from high school. It’s pretty cool to see old, familiar formulas come to graphic life with just a few nodes. This was so much more boring in school. ![]()
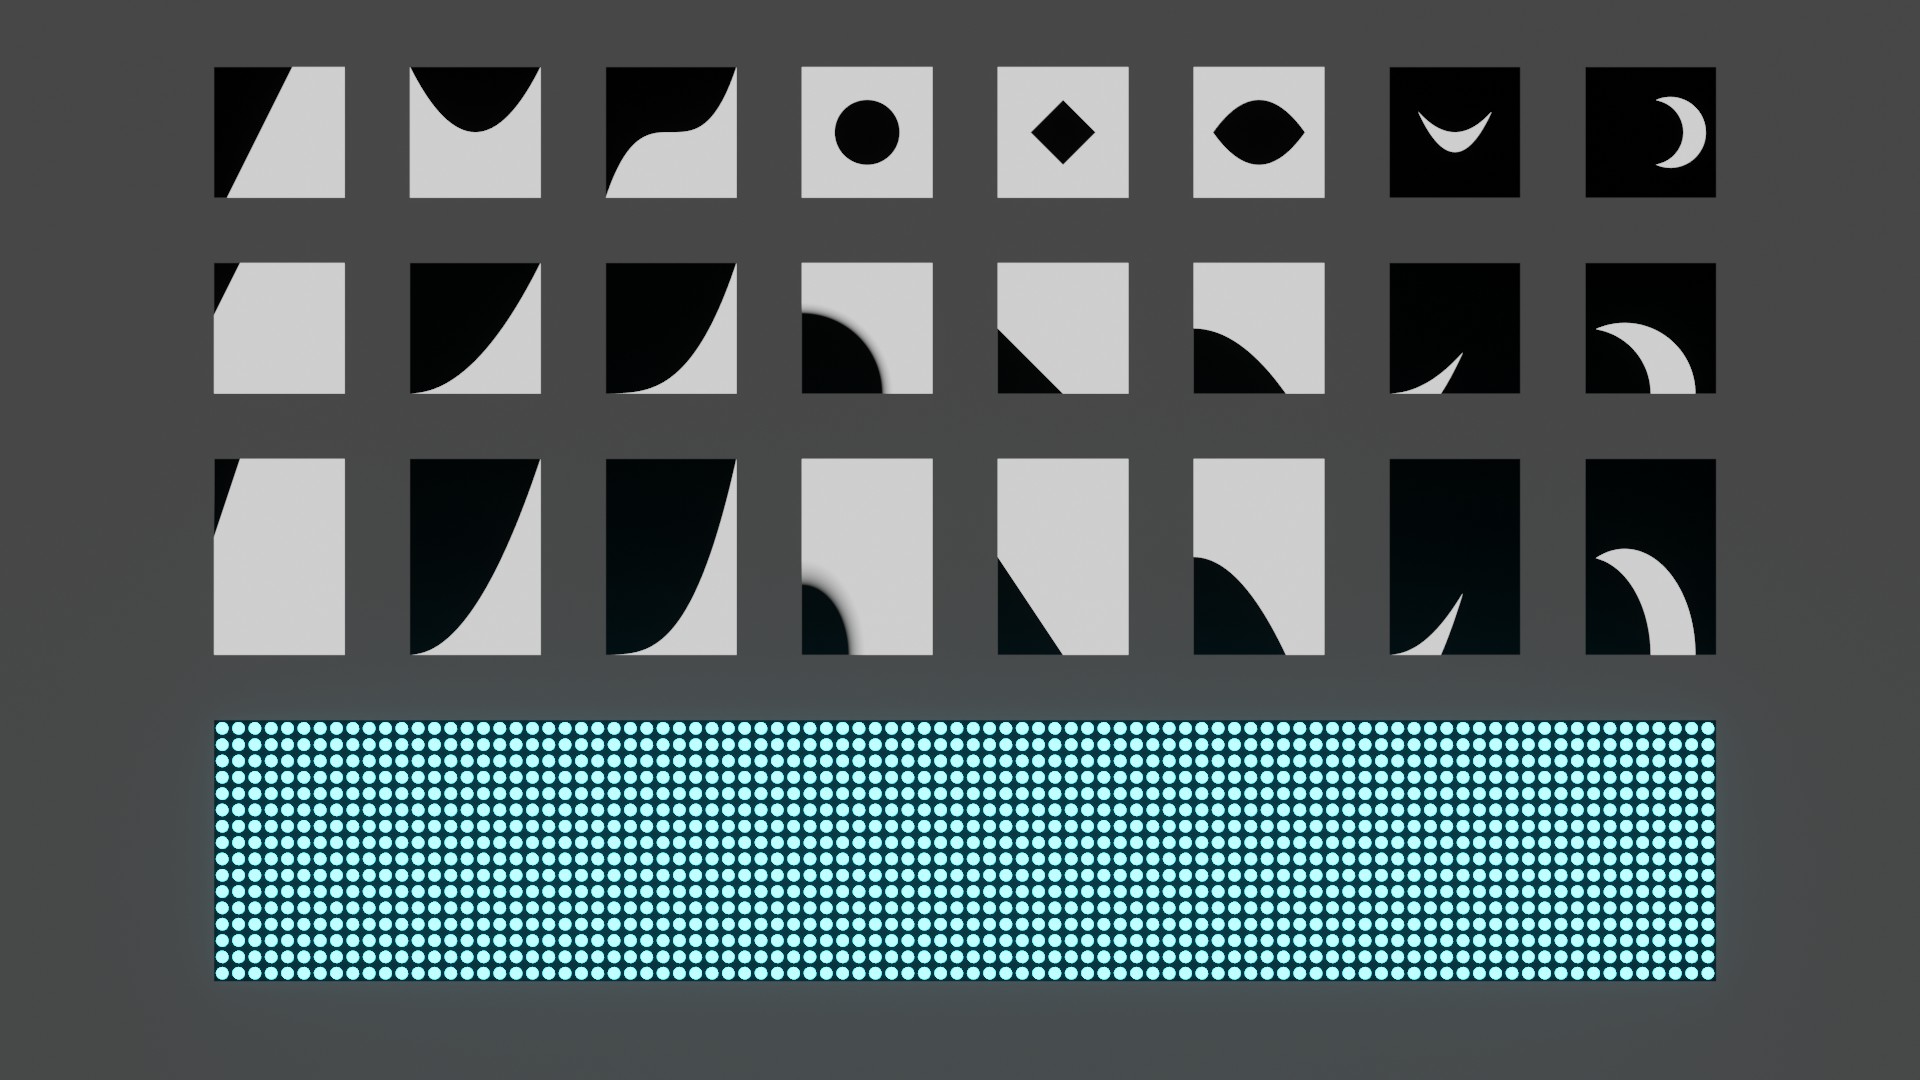
The top 3 rows are object, UV, and generated coordinates. Object mapping coordinates have 0,0 at the origin, generated coordinates have them at the 0,0 position of the bounding box of the mesh, and UV coordinates have them at 0,0 of the active UV map. I made the planes for the generated coordinates a little larger so one can see the differences between it and UV, which would otherwise be the same for a standard plane.
One interesting thing about object coordinates is that one can assign an empty in the texture coordinate node and then moving the empty will move the object’s origin for the purpose of texturing.
The first 4 columns are straight-forward formulas: y=2x, y=x^2, y=x^3, r=sqrt(x^2 + y^2), the next 4 are combinations of various things, the last 2 use intersects in addition.
The bottom uses a circle mask tiled on a plane as the factor for mixing two shaders .
Music: Contemporary Classical Guitar (https://music.youtube.com/watch?v=PTlHZJl0fYU&list=RDCLAK5uy_nSOL68i5YjTpuaCX0BlTL1pMzg2uAmmq0)
5 Likes
2022-07-17 Hard Surface Modeling: SciFi Drone
Ponte Ryuurui, who is together with Josh Gambrell Blender Bros: https://youtu.be/7zHdeVwYZ0Q
“Easy hard surface modeling in Blender using a single cube” – uh huh, a single cube and several commercial add-ons which he doesn’t mention explicitly in the lead-in to this tutorial, marked as BEGINNERS. The description lists a cactus load of add-ons he recommends, but doesn’t mention explicitly which he uses here. Maybe he doesn’t even know.
Fortunately I was kinda prepared because I already know all these guys use add-ons, and I was hoping I could manage even without – still, a warning would have been nice because I might not be in the mood for a stop-and-go-slow process on any given day (I wasn’t the day before). Josh Gambrell does this better.
And it was hard. Not the object itself, there was actually nothing here I didn’t know how to do. But at less than a minute into the tutorial, he sets up a conforming lattice for a cube with what looked like a single keypress, and he was off to the races, while I limped behind. The tutorial is only 20 min long, but it took me several hours in two sessions to finish this thing.
And of course it was a “thing” too. No reference concept art from which to start, and he was making it up as he went along, complete with mistakes that he then blithely undid (after I had painstakingly reproduced his three keypresses with 10 min of maneuvering in vanilla Blender). Not a tutorial I would ever recommend to beginners, that’s for sure. Or really anyone; it’s not very instructive because there are no explanations why he does this or that operation. You might get something out of seeing somebody competent wing it; I dunno. He is competent, but it feels like he has forgotten all about beginners. I should check out their latest free course, some of the bad feedback they got might have gotten through.
But I was determined. And in the end, fighting through this had a positive effect. I did eventually make myself a reference image from the thumbnail of his video, so I had a general idea of what shapes he was going for, but it was a bit too late to change the proportions and overall orientation of the “arms”. This is it:

And this is my version:
It’s largely a boolean workflow, but he wasn’t very methodical about it, or rather, no, that’s unfair. I couldn’t see the method clearly enough because I didn’t have the add-ons, which do so much automatically that one has to personally initiate in vanilla. I tried to keep the topology somewhat clean, but didn’t succeed in all cases, I got too caught up in getting things done, and I can see some shading issues now, and I know there are some overlaps when I should’ve done a union, but forgot.
At some point towards the end it became clear that he wasn’t actually gonna model all the finer details, and after rolling my eyes at that (it’s a little clickbaity), and thinking the thing felt unfinished, I just started dinking around myself. I’m not sure when it happened, but I lost my resistance of doing random stuff without much of a plan. Maybe because there was already an object and I could see where some refinement might improve it, even if there was absolutely no meaning or function to anything I did.
I actually had fun at the end. A lot of operations (like duplicating a bit of geo, separating it, and shaping it using local axes) became more fluent, because I did them repeatedly. I wanted to do more of that.
Music: Celtic New Age (Clannad, Afro Celt Sound System, Enya…)
9 Likes
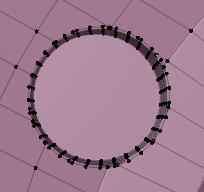
2022-07-18 Hard Surface Modeling: SciFi Wheel
Ponte Ryuurui: https://youtu.be/l1a43ntWpQY
This one is advertised as vanilla, but he does still use a couple of add-ons (MACHIN3tools, of which the basic version is free, and Powersave, also free). One can do the tutorial without those. I did download MACHIN3tools to give that a spin, and it was useful.
Ryuu really really really doesn’t like vanilla Blender, and it’s a bit unfortunate that he continues to grumble about it. This tutorial was much easier to follow than the previous one, but he still doesn’t explain why he does things. His favourite bit is “and now we do X because… reasons”. Umm, ok.
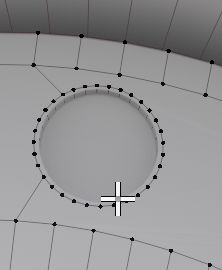
Onward. I had a reference. He didn’t wing it, for the most part. I could do everything without extra hand holding, we did several radial arrays with an empty, lots of borrowed geometry. We did run into a really crappy boolean result with which he was unhappy, and criticized himself for not preparing better, but he didn’t feel like fixing it retroactively (insert more grousing about vanilla). I am with him on this, the mess booleans can leave is pretty bad. There were 18 of these holes and bad results all over the place:
I wasn’t gonna clean those by hand either. So thought about how I could better prepare for the boolean. I deleted the whole shebang, cleaned the boolean cutter object itself, gave the boolean a clean, flat ngon to diff with, and the result needed just a few edges moved to take a nice bevel and have no shading problems.
I can see situations galore in which one can’t prepare this well though.
After that came the screws which he made from scratch and I copied from the hole cutters (it’s sort of funny; he really doesn’t think in terms of vanilla shortcuts), and a refinement to the rim, cutting some more holes to make glowy bits (he did no texturing, I decided to make them emissive).
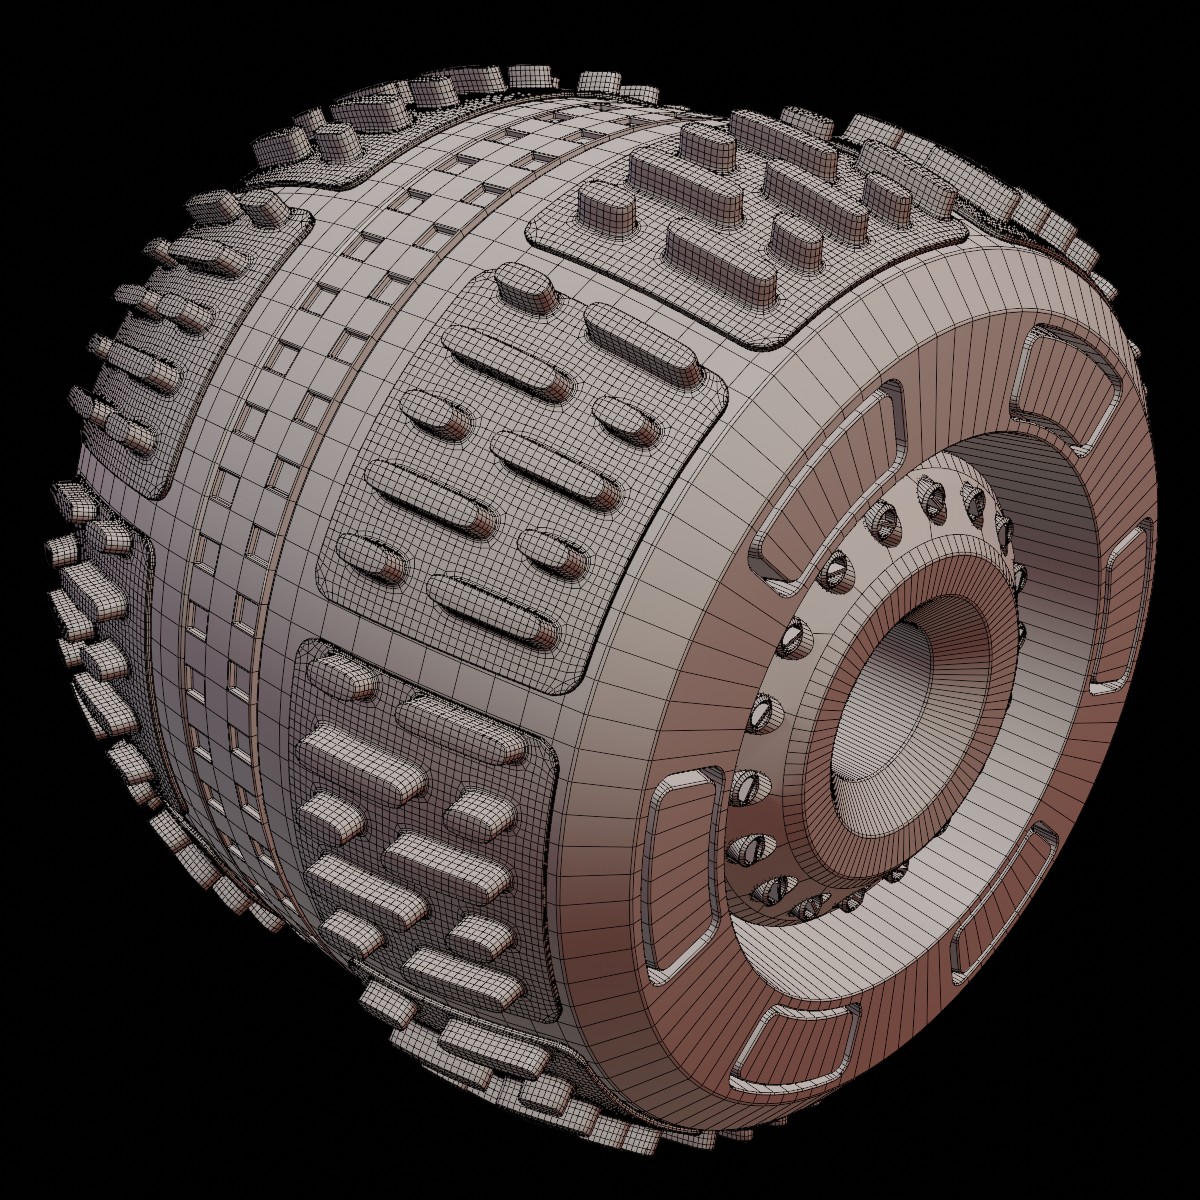
At the time I didn’t care about the polygon count since he didn’t, but this is pretty massive – not exactly a game-ready model, :snrk:.

Made all new materials, nothing complicated.
I was pretty happy with this; I didn’t have trouble following, I could make this all by myself, I knew shortcuts, and actual reasons for why we were doing what we did, I could solve a serious problem by myself, and the result looks good.
Ponte Ryuurui isn’t gonna be on my list of favourite instructors from the viewpoint of the instructional quality, but I’ll return for the next round anyway because he knows what he is doing if he’s not doing vanilla, and I like how he refines things; it feels very natural to me once I just go with the flow. I also got convinced that those add-ons he’s using are a must if one wants to do serious hard surface modeling – one can do without, yes, but the workflow is much better and the time savings are massive.
Music: Anime openings and closings. Getting me into the mood to watch some anime again, haven’t done so in a long while; don’t even know what’s recent and good. But who knows whether I’ll make the time; whenever I have some free, I basically just want to work in Blender. Obsessive. ![]()
9 Likes
2022-07-19 Hard Surface Modeling: Weighted Normals
The day before Ponte Ryuurui had used a Weighted Normal modifier during the boolean disaster, but hadn’t explained why (“because… reasons”, presumably), and I couldn’t see it making any difference.
I decided to study up on that.
Gleb Alexandrov has a tutorial: https://youtu.be/sqGFhiP-2mc
Things I learned:
- Blender doesn’t use face normals to calculate shading. They are involved in calculating vertex-per-face normals.
- Blender doesn’t use vertex normals to calculate shading.
- Blender uses split vertex (vertex-per-face) normals to calculate shading
If you Shade Smooth, it averages the Split Vertex Normals.
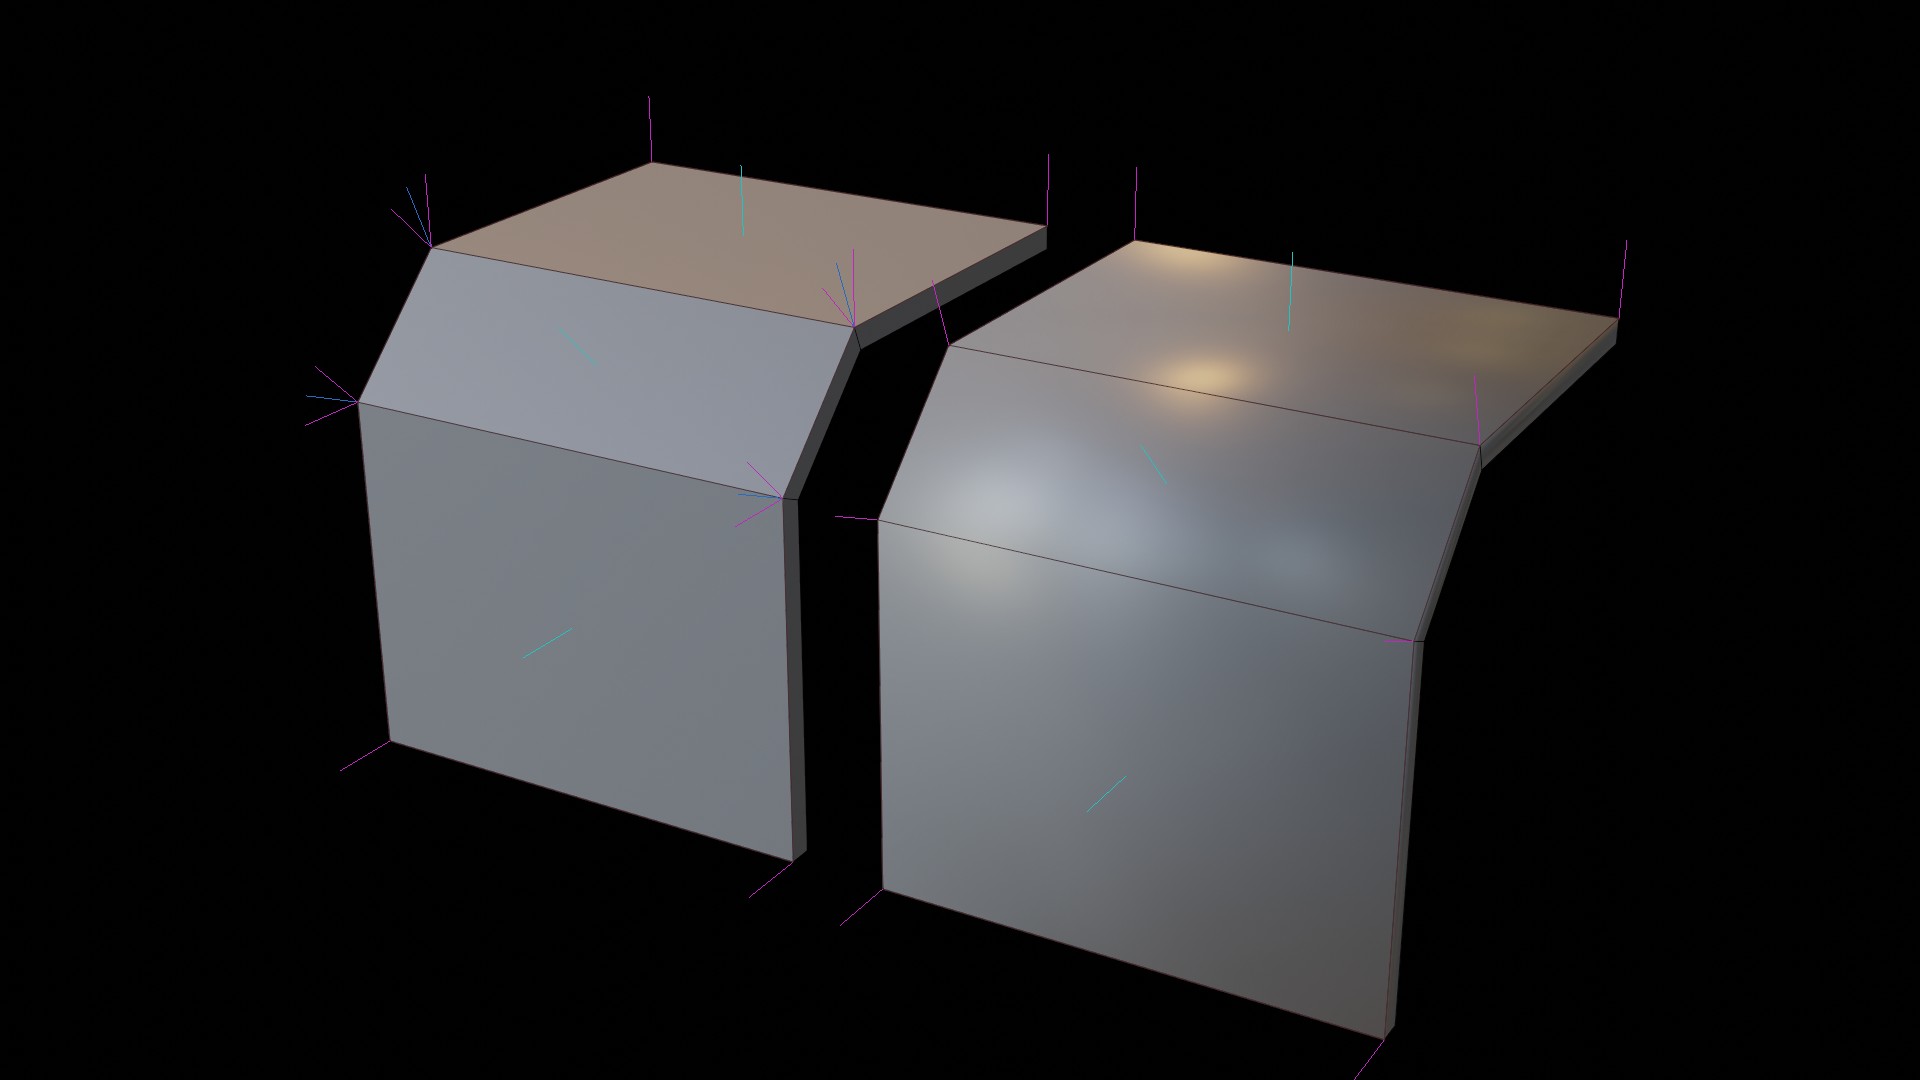
left: shaded flat, right: shaded smooth, auto-smooth off
face normals: cyan, vertex normals: blue, split vertex normals: magenta
So you can see why the top of the object when shaded smooth doesn’t actually look flat, those split vertex normals have been averaged, and the normals on the front top are not pointing straight up. Also, the size of the faces doesn’t affect this at all. It’s no wonder it doesn’t look great in most cases and needs Auto Smooth of normals applied.
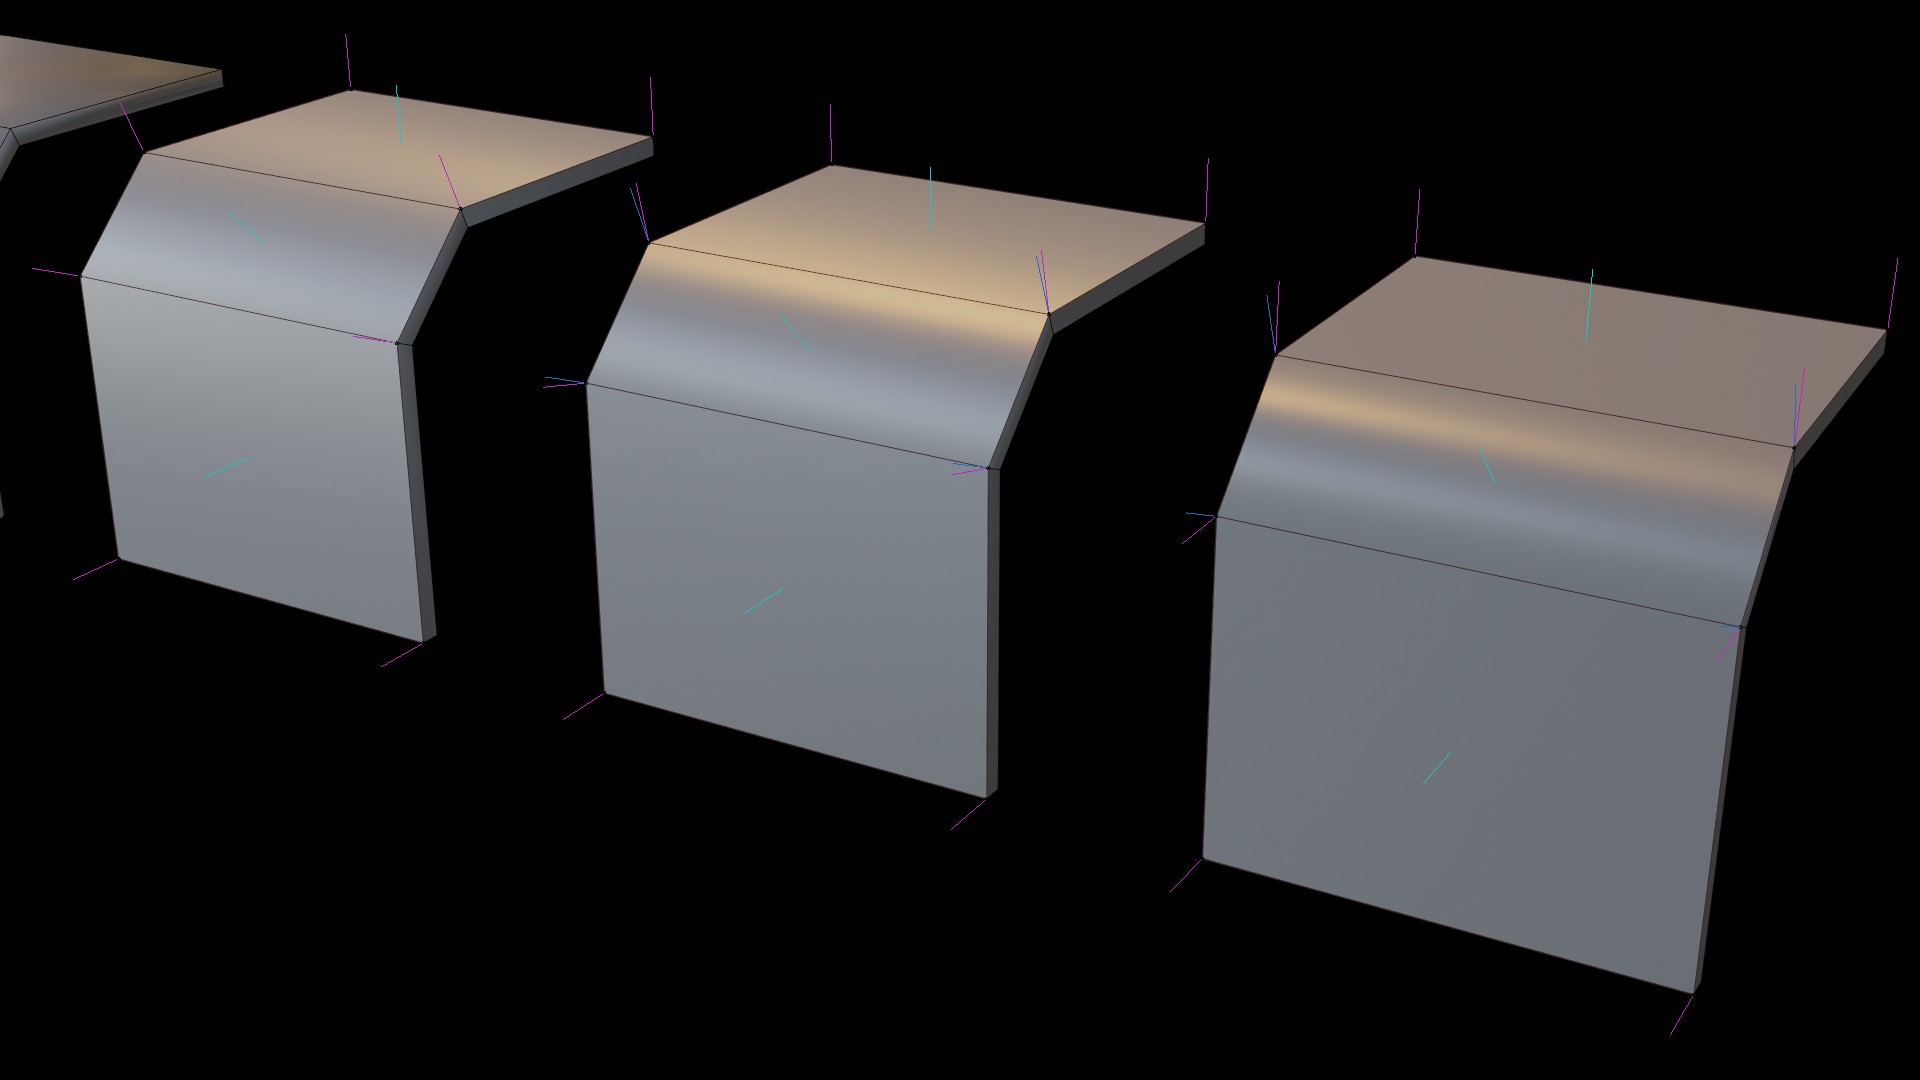
left: normals have been merged.
middle: Weighted Normals modifier with a face weight of 50
right: Weighted Normals modifier with a face weight of 100
And all of them rendered:

flat, shaded smooth, averaged normals, weighted normals 50, weighted normals 100
I played around with it for a while and compared it to Harden Normals in the Bevel modifier; they work kinda similarly, but you have more control over the Weighted Normal one. You can set the face strength too, how much it influences the shading. This all was very instructive. I can now see how you might use it in conjunction with a bevel modifier after a boolean to decide how much the bevel will affect surrounding faces. So conceivably some of the boolean disaster could have been ameliorated with that modifier.
Music: Rachmaninoff, piano and orchestra concertos
7 Likes