woooowwwwww this is next level !
1 Like
3 Likes
is any chance to buy the project file?
1 Like
Awesome !! with some polishing bits it will be perfect !
I’m thinking on the best way to share some knowledge here, sharing the blend, doing tutorials , free / payed , it’s still a bit fuzzy in my head for now, in the meantime fell free to poke me if you have question or if you try a similar experiment !
1 Like
Hello,
Congratulations on your work! I have a few questions:
- Do you start from a mesh (plan) or from curves which then become a mesh using the mesh node? I try both, but with curve, my mesh (after extrude) has strange overlap faces…
- How do you isolate the walls & roof parts, and then texture them ?
I can understand how to do it with a “procedural block construction” (like your buildings), but with a generated “face” mesh, I’m completely stuck.
Thanks a lot!
Hum,
I’m not sure to understand everything, but I’ll try to answer and we’ll see how it goes …
There are 3 possibilities  , one is to start with some basic mesh that you enhance using nodes,
something like that : https://80.lv/articles/procedural-house-production/
The second is to build something completely with nodes, like in this tutorial for houdini :

What I’ve done is more like the first tutorial, but at some point I’ve decided to generate the base mesh using node too . But it’s really a two step process, and it’s still possible to use an hand modeled basemesh or a mesh generated using nodes. It’s a kind of a third solution … or a 2.5th solution
To model the basemesh I started with a plane that is extruded, it’s what I’m talking about here :
So once you’ve got a basemesh, indeed the first step is to separate some parts to process them differently.
To do that, you can use the separate geometry node, and use a dot product to select some part of the mesh according to their normals ,
Try to play with something like this :

You can assign a material with the set material node :
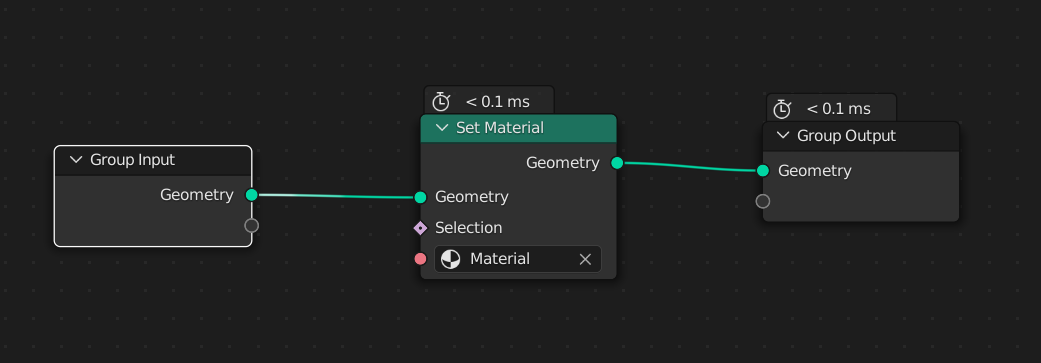
After that , most of the time I indeed used curves , like taking the roof part, do a mesh to curve and then curve to mesh and it gives a piece of the roof structure.
Hopes that help a bit and that answer your questions !
I suggest to start by doing a lot of small tests to break down every part in small chunks. Like how to instance windows on the wall, how to add tiles to the roof etc… And in a second step start to put everything together.
It can become overwhelming quickly 
8 Likes
many thanks for quick answer. I’m really appreciate your work. I’m using Blender as a part of my work with video editing. i keep learning. but at this stage i think this is little bit to hard to me to create such a complex project. but i’ll keep trying if you decide to sell the project file and will be affordable for me please let me know. It will be definitely more easy to understand when you see the node structure and you can modify it at the same time and see how it works or if you decide to release sep by step tutorial, ill be glad to follow it. anyway my friend great work I’m really impressed about your skills
Hey thanks !
yes it’s probably not the best thing to get started
maybe start by doing simple tutorials and get the basics right on very simple exercises .
From there it will be easier to start more complex projects that are generally just a big pile of simple things.
For now the project is a bit messy to be useful, you’ll probably catch a few tips by looking at it. But it would be hard to follow anyway. I’ll keep people informed if I release something being tutorial or .blend !
2 Likes
what do you mean you “project” them onto the mesh, is there a geom node for that or is it a secondary obejct?
1 Like
hey sorry that wasn’t really clear !
You can do a kind of shrinkwrap modifier using the position outiput of a geometry proximity plugged into a set position node. I think it’s also possible using a attribute transfer too.
Hope that help !
1 Like
Took me a while but i did manage to get it done with just geom nodes, instant gen too.


probably overcomplicated it lol
https://cdn.upload.systems/uploads/iacUG3xp.mp4
5 Likes
Awesome !!
This is looking really cool !
Of course, that’s the fun part !!
You can try to scale the cutters depending on which parts you cut, so for instance the inner walls stick a bit outside the main walls, that will make the shape of the boolean less obvious and feel a bit more natural…
But hey, that’s already neat ! Well done !
1 Like
Hey sozap, I’ve been following your work and it’s all incredible and really inspiring. In your video you quickly covered your process, the one thing I’m stuggling to figure out is how you isolate points on the grid you projected inside the building. You isolated the borders and merged by distance, as well as using the voronoi texture to make walls. Maybe it is a silly question but I am definitely missing something 
I’m also following your cyberpunk building, it’s looking super cool. Thanks for documenting your process and answering so many questions!
Thanks @Ohli ! I’m glad that all this inspires you !
So , the first step is to delete points that are outside a mesh, for that you have to use a raycast node,
here is a tutorial that explain the node : https://www.youtube.com/watch?v=x-NhnJM_g94
In a few words , the nodes “emit” a ray in one direction and check if it “collide” or not with another mesh.
To check if a point from a mesh “A” is inside another mesh “B” you have to use several raycasts with different directions. In my case I checked X,Y and Z directions , if all these 3 raycasts make a “hit” (meaning that it collides with the mesh “B” ) that means that the point is inside.
Depending on the complexity of the mesh you can check X,Y,Z and -X,-Y,-Z direction, or in simple cases, one direction and it’s opposite can be enough (like X and -X) .
It takes a bit of time to get used to that but it’s not that complicated and fun to play with.
For the voronoi part, it’s not that complicated either but it needs a few tweak on the result to make it really clean. The voronoi texture is set to Distance to Edges, and we delete some points based on that to keep only something that looks like the green line on my video . The tricky part is that I had to do some cleaning to get a better result, like merging some points and a few other things to get the most of the technique. Another important thing is that it works better with a dense mesh, be sure that you have enough subdivisions , you can use my video as a reference.
If all that sounds a bit complicated , maybe try the raycast on one side, then in another test try only the voronoi and finally try to add both together .
Try a bit of all that and feel free to ask questions if you’re stuck, It’s not that complicated but you probably need to be a bit comfortable with geometry nodes to find your way around these techniques.
4 Likes
Thx a lot @sozap.
I’m now able to creat tiles, but i’m still stuck with outside walls and plank generate ; each wall has it owns orientation, so i can’t just use instance on point & subdivide mesh. I try to use normal on z orientation, but it’s a fail
Any short tips ?
Thanks for the response, I think I am getting there now! I am stuck on two things though.
I have used the raycast node to delete points outside the mesh, then further deleted them based on a voronoi texture. However when I extrude them into a wall, it is no longer a grid and there are not enough subdivisions to use raycast like before.  I think the picture helps to show what I mean. Is there a way I can subdivide only the vertical lines?

Secondly you merged points on the edges of the floor and walls to remove the blocky look, I have no idea how you achieved that, could you give some insight? Being able to have a selection of the borders of a mesh seems very useful.
1 Like
Well done !!
So yes, extrude was a bit misleading… sorry … You can convert your line (made with voronoi) to a curve, then do a curve to mesh using a curve line as a profile. This profile you can subdivide it and have as much point as you need.
to select the border you can do that :

If an edge is part of only one face then it’s part of the border !
3 Likes
That makes much more sense! Works perfectly, thanks so much for the help 
1 Like
Hum cool !
I’m not sure to get exactly what you’ve done, can you post a screen capture ?
In the meantime, maybe you can understand better how I make it by looking at this, especially the second picture :
Once you can instance a grid on faces its then possible to extract parallel lines from the grid, and that’s how I got the basis for the planks. It’s the same operation that we did before to separate the roof : using dot products, but this time on edges.
But maybe you can try your own solution to get to a similar result , that’s the cool thing with procedural modeling.
You can get the orientation of an edge like this :
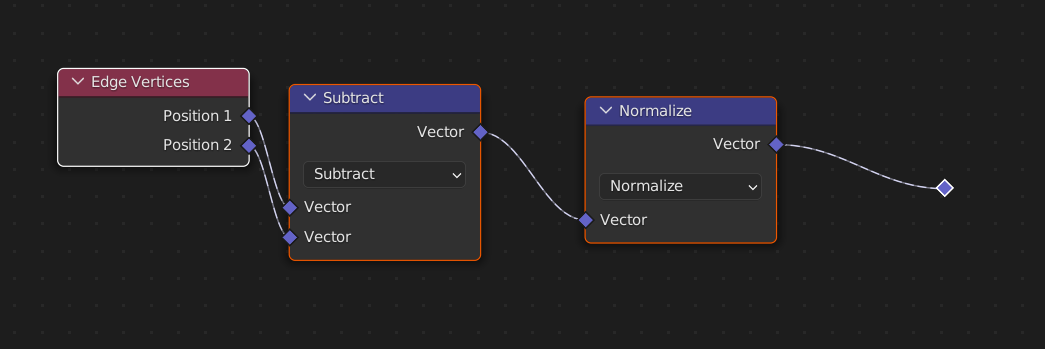
And plug that into a dot product instead of the normal input we did before.