Hum, it looks cool , what’s the issue exacly, is it the small gaps or the fact that both aren’t joined at the middle ?
It looks basically like my results at first glance ! Hum, maybe, have you tried to provide an axis on the scale node ? try 1,0,0 or 0,1,0 …
All that said, that may not be the ideal project to get started with geometry nodes, but I don’t know of far did you get with it, or if you have already some experience with prodedural modeling or scripting…
Before starting this project I’ve done a lot of small exercise to get good basis , that was easier to build more complicated things eventually.
It’s not that complex but as it’s a lot of simple things put together it can be a bit overwhelming.
Thanks for the reply.I will see how far can go with this project and if i cant continue i will try other things.The problem is that they are separate and also that they are not like one roof but 2
yes, you need to close the basemesh, because boolean works better with closed mesh.
The extrude node doesn’t work exacly like in edit mode, the basemesh don’t have a floor. you just need to join the shape before the extrusion, and use a flip face node to invert the normals. I think you don’t need a merge by distance node, but just in case, if it doesn’t work try to add it before the boolean.
Hello and welcome to blenderartists !
To be honest,I haven’t tried to export the model or to apply the modifier, I guess some work is needed to make a clean export to something like sketchfab or even to make an .obj out of it.
It’s also quite heavy in polycount.
So, it probably won’t append, but I’ll keep people informed if I release some tutorials or more material based on that project !
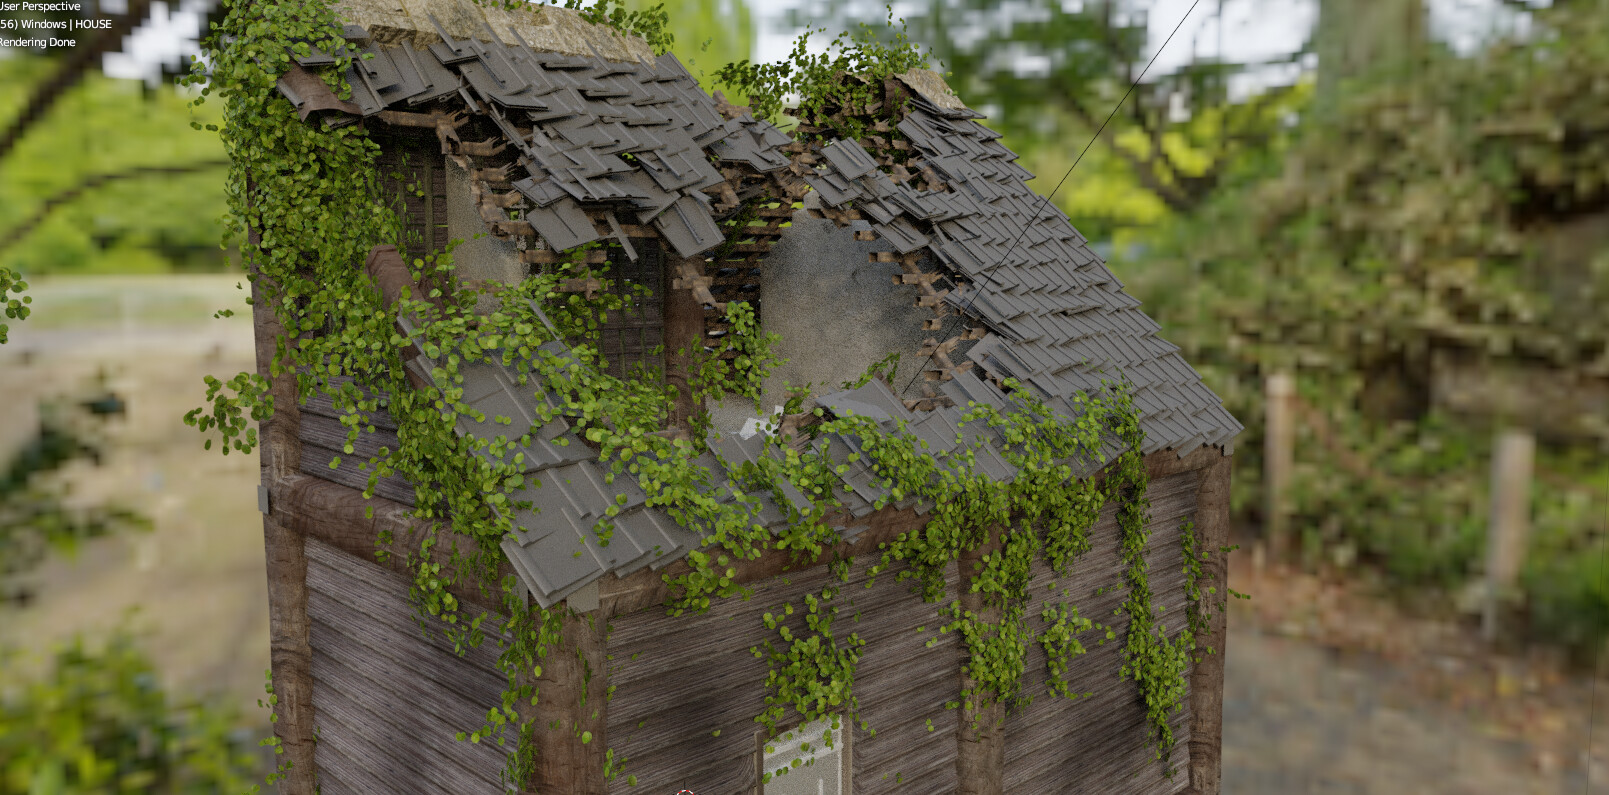
The house is progressing. I have generated a first version " annexes " with door entirely generated with nodes. Some parts will remain hand-modelled and distributed afterwards, like windows, door, tiles. It’s not very well designed yet.
I also managed to fix the UV problem: when generated with Curves, the final object, like the boards, has no UV and the texture is applied very badly. For those who need more info, check out Bradley’s tutorial: https://www.youtube.com/watch?v=_zXbPRYpi5I
I’ve started to destroy the house: while I understand how to make the holes, I can’t figure out how to make an impact effect, so that the area around the hole gets " dug ". Could you help ?
Hey ! congrats on your progress ! it’s taking good shape !
For the impact effect, well, it takes a bit of time to study references and find the right values.
One thing that worked quite well was to move everything down according to the distance from the impact : the nearer the hole, the bigger the translation. It works better with big holes, on small ones it make a bit unnatural, so the effect is also dependent on the size of the hole.
In that case every hole get the same size to avoid adding another level of complexity.
In essence it’s quite simple, you use the proximity to drive the offset of one position node.
It’s basically what’s described here :
You’ll probably need to add a bit of variation / randomness, one way for that is to add some noise to the distance that make the hole. But once again it’s all about finding the sweet spot to avoid too many objects going into each other or similar issues. Also it works a bit better if you have non linear effects : The translation in Z is more accentuated toward the center of the hole, and really subtle at the borders.
Hope that’s help a bit to get started !
Good luck and I’m looking forward what you’ll come up with !
I am trying to create some buildings from a basic flat “blueprint” which is just a couple a vertices all with z = 0
So far I have turned the mesh into a curve, resampled it with length to get the desired spacing of the modular parts and rotated them along the curve tangent. But I am havong trouble with the corner pieces, as they are not rotated as they should, because the curve tangent at those points is about 45 degrees.
Anyone have an idea on how I could get the rotations right?
PS: I also thought about using faces, as I could just use the normals of those for the rotation, but I haven’t figured out how to create only one point per face and also in the center of it.
Hello @Riki_Klein and welcome to blenderartists !
It’s really cool if you’re learning from all that and experimenting your own things !
So if it’s just the issue, you can look for the mesh to point node and use the “Face” mode, it will do just that.
For the curves tangent, my wild guess is that the tangent vector get’s averaged to the points, that’s why it fails at corners, because one point is connected to 2 edges and get an average of two different tangents. So it seems a bit more involved to solve that issue !
I struggle to find the nodes sometimes, also a bit confusing that the name of node changes if you change the type (for example on the “Boolean Math”).
I wish they would show the path/breadcrumbs when you are using the search for a node…
I am now trying to place roofs where the faces are pointing up, I tried checking the Normal Vector with an “Equal” and then plugging the result into th selection for the walls, but I can only get either walls an all faces or none at all
I’m curious about how you did it , you use a fixed size for the panels and extrude the mesh 3 times, then convert the faces to points ?
Yes, I see what do you mean, I think the names makes sense if you collapse the nodes,
I tend to do that a lot, and keep “open” only the nodes where there is a parameter that could be useful to tweak, that gives me these kinds of tree :
I do that once the nodes are working and I don’t need to get back to them anymore, but it’s a matter of personal preferences.
And yes, if I understand you correctly, when you search for “Not” you can’t find it, only “Boolean Math” will do, but if you use drag link search it work and I tend to use that a lot now.
Probably at some point devs will unify everything, because groups don’t appear in drag link search but in the search menu they do… some corners needs to be smoothed out …
I’m not sure to completely get what you’re doing, but I’m sure there is a way, sometime it can take a long time to figure out how to solve a simple problem like that, I get stuck really a lot especially at first but most of the time I always find some way, sometime a bit convoluted , but it works in the end. GN are really powerful for that !
Good luck and if you’re really stuck post a screen capture or even better a .blend with a simple case and I’ll try to have a look at it , or maybe someone else will have fun looking at it !
I don’t know how you deal with it, but I dispatch the “Destroy node” one each part separatly; that way I can add a little variation in the hole, while keeping the position of the points in common.
Did you also use a “merge by proximity” to fix it ?
Also, for the planks. They are all generated with a curve. Is it possible to add randomness in their position or to remove it? I understand how to do it with an on point instance, but not at all with a curve to mesh…
I have certainly the possibility to use a “hole generation” directly on it .