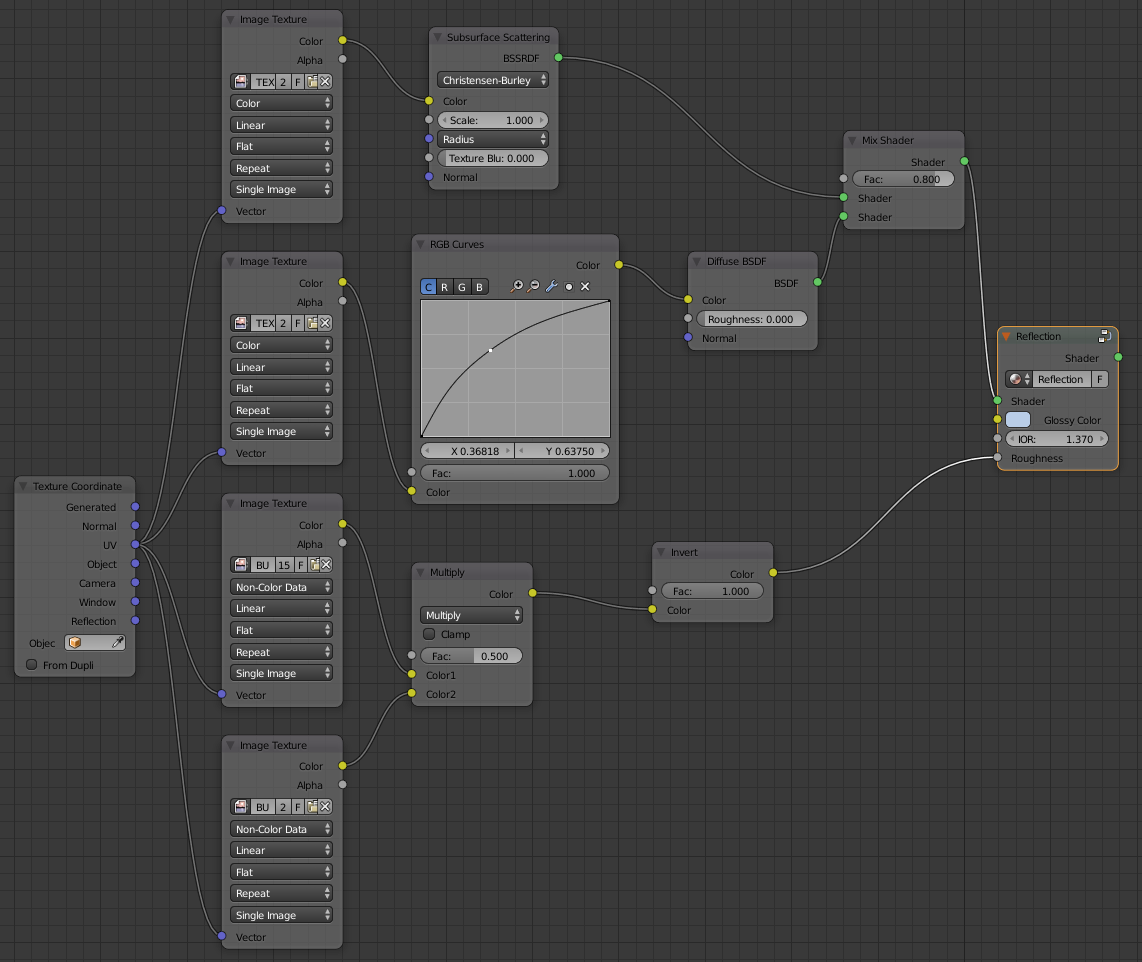
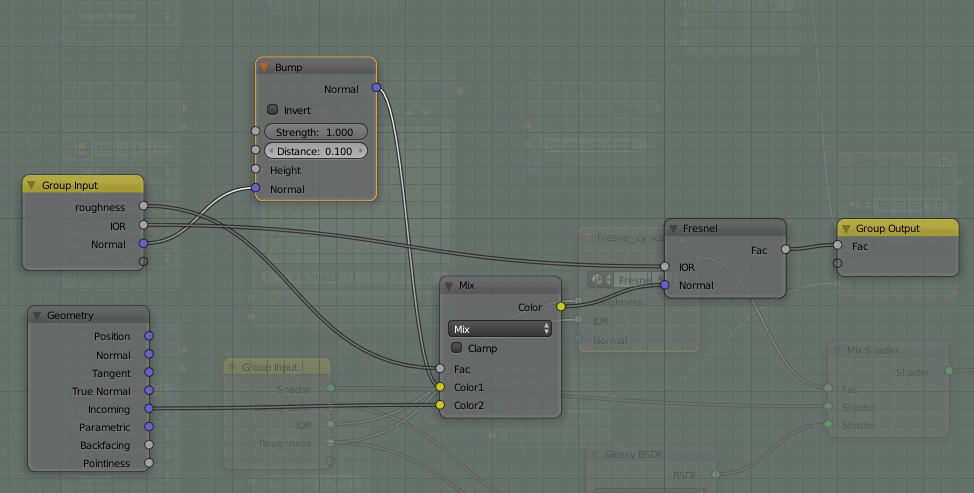
-what image do you put in Roughness? I put a combination of my two bump images.
Roughness map would be a black, grey, and white map. Black for the shiniest parts and white being the roughest parts of the mesh. It will be a mask in sorts of what is more sweaty or more dry.
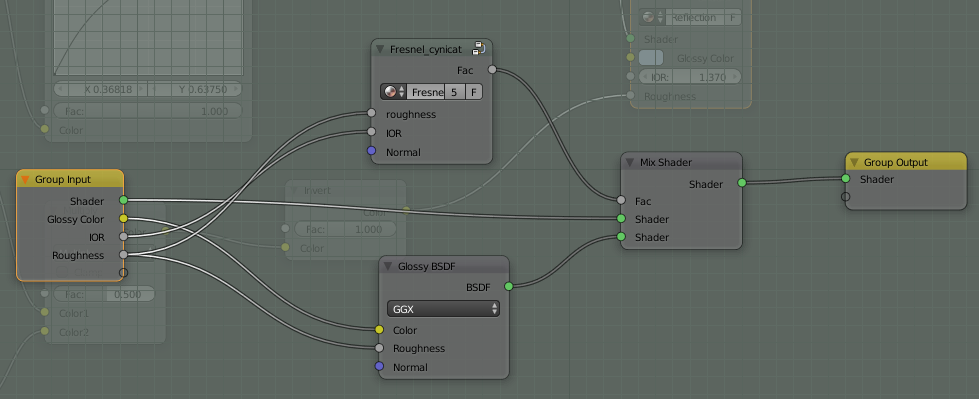
I used the cynicatpro Fresnel, it uses the normal and the incoming geometry (I don’t really understand how that works…) it is not enough?
The normal values effect the PBR fresnel directly as well as the roughness. I can’t really explain it too clear because I only half way understand it. I don’t want to mislead you in the technical side. To see what is happening I would recommend viewing your fresnel in an Emission node with and without your normals plugged in. It is that it effects how your mesh is lit and as well as how much fresnel is effected. I do recommend looking at Cynicat Pro’s Theory of PBR for a better explanation :o.
Kent Trammel from CG cookie has made a two part lesson on realistic skin shading. I suggest watching the two part lesson to get a grasp of the set up. I tweaked it so I can use the PBR system. Also tweaked the reflection node for this purpose :). Don’t worry this lesson is completely free in the CGcookie archive under Skin Shading with Cycles.
Part one will go indepth of Subsurface scattering and building a simplistic skin material for your mesh. I recommend this lesson for most people. It gives you a grasp to achieving great skin shading. This also includes how use of different maps.
Part two is even more indepth. He starts by using a Three layer skin shader… Though he goes over how to use this in a Ubershader. Main parts to understand is how maps are being used. This ubershader that was used is obsolete. Meaning it increases render time because everything is being mixed even if a slider is turned off.
Notes about Vid:
Ubershaders are now worked as if they are in separate layers. Look at Cynicat Pro’s Ubershader to view how one should look like. It is very much quicker for blender and your computer to render.
I don’t usually use the roughness maps like he did. Mainly I use the roughness maps for the specular/glossy roughness alone and not for color.
You don’t always have to have a three layer system to create realistic skin. The basic set up will give you great results without worrying about more layers. It is all in how you want to achieve it.
If you do have any more questions I will be happy to help :)!
Whoops momment. Forget about the normal node input! This is only true for normal maps. Normal maps do not work well when placed into the displacement input. Very sorry for the confusion!
@RodDavis!!! Thank you!!!
I’m just download the Kent Trammel videos, so I’m definitively try out.
About the roughness, then if I put the bump images, invert, it will use it to put the black or gray parts more glossiness, and the white part lees glossiness! awesome!
I went thru the Cynicatpro videos about Fresnel, and I end up with my setup, that just takes the normals of the incoming geometry, and control the roughness. I think I understand that, as if the more in the direction of the normal the camera it get’s, the less glossy it gets, and the more parallel of the normal the camera gets, the more glossy… or something like that.
Uff Ubershader sounds sooo complicated, I’ll dig in but I’m at a very basic node learning stage.
I was wondering that maybe you can fake the 3 layers system with just an image of the mix you probably expect, and put that in the SSS?
I rely appreciate your help!!! This skin thing is rely complicated!
Well, I think I’m done, It is time to stop haha, I can go on, but I have learn a lot, time to go to other things.
Things I can impruve a lot:
Skin shader (next one will be awesome! haha
Bump map: The micro bump need to be more like the skin micro bump and not just some small dots. The macro bump, I need to work with constant feedback, I started with the developer version of blender, that has preview in the view port but I end up doing it with the 2.77 just guessing (not a good thing).
The skin paint, it is alright but i could have put more time, and I have to chose the right colors from the start.
Hair, I’m completely frustrated with the bear, so I just put some gravity and that’s it.
I need to work into the color input in the hair, I used to methods: one is using two hair particles, and the other one is to use a image to generate the color of the hair, and paint the different colors were you want.
But any how… I had learn a lot! Thank everyone! much appreciated!
Looks awesome! Great job. You did great with the hair as well. I need to definitely learn a bit of hair shading and materials.
Oh be sure to put in the normal input of the reflection layer. You’ll need it later on. There are times that layering bump in different nodes will be best. I was just meaning to forget what I said about the normal part of my long speech. I should have said that before lol.
UPS jaja. no problem I can redo it.
I start another project, so I’ll be applying everything I learn whit this.
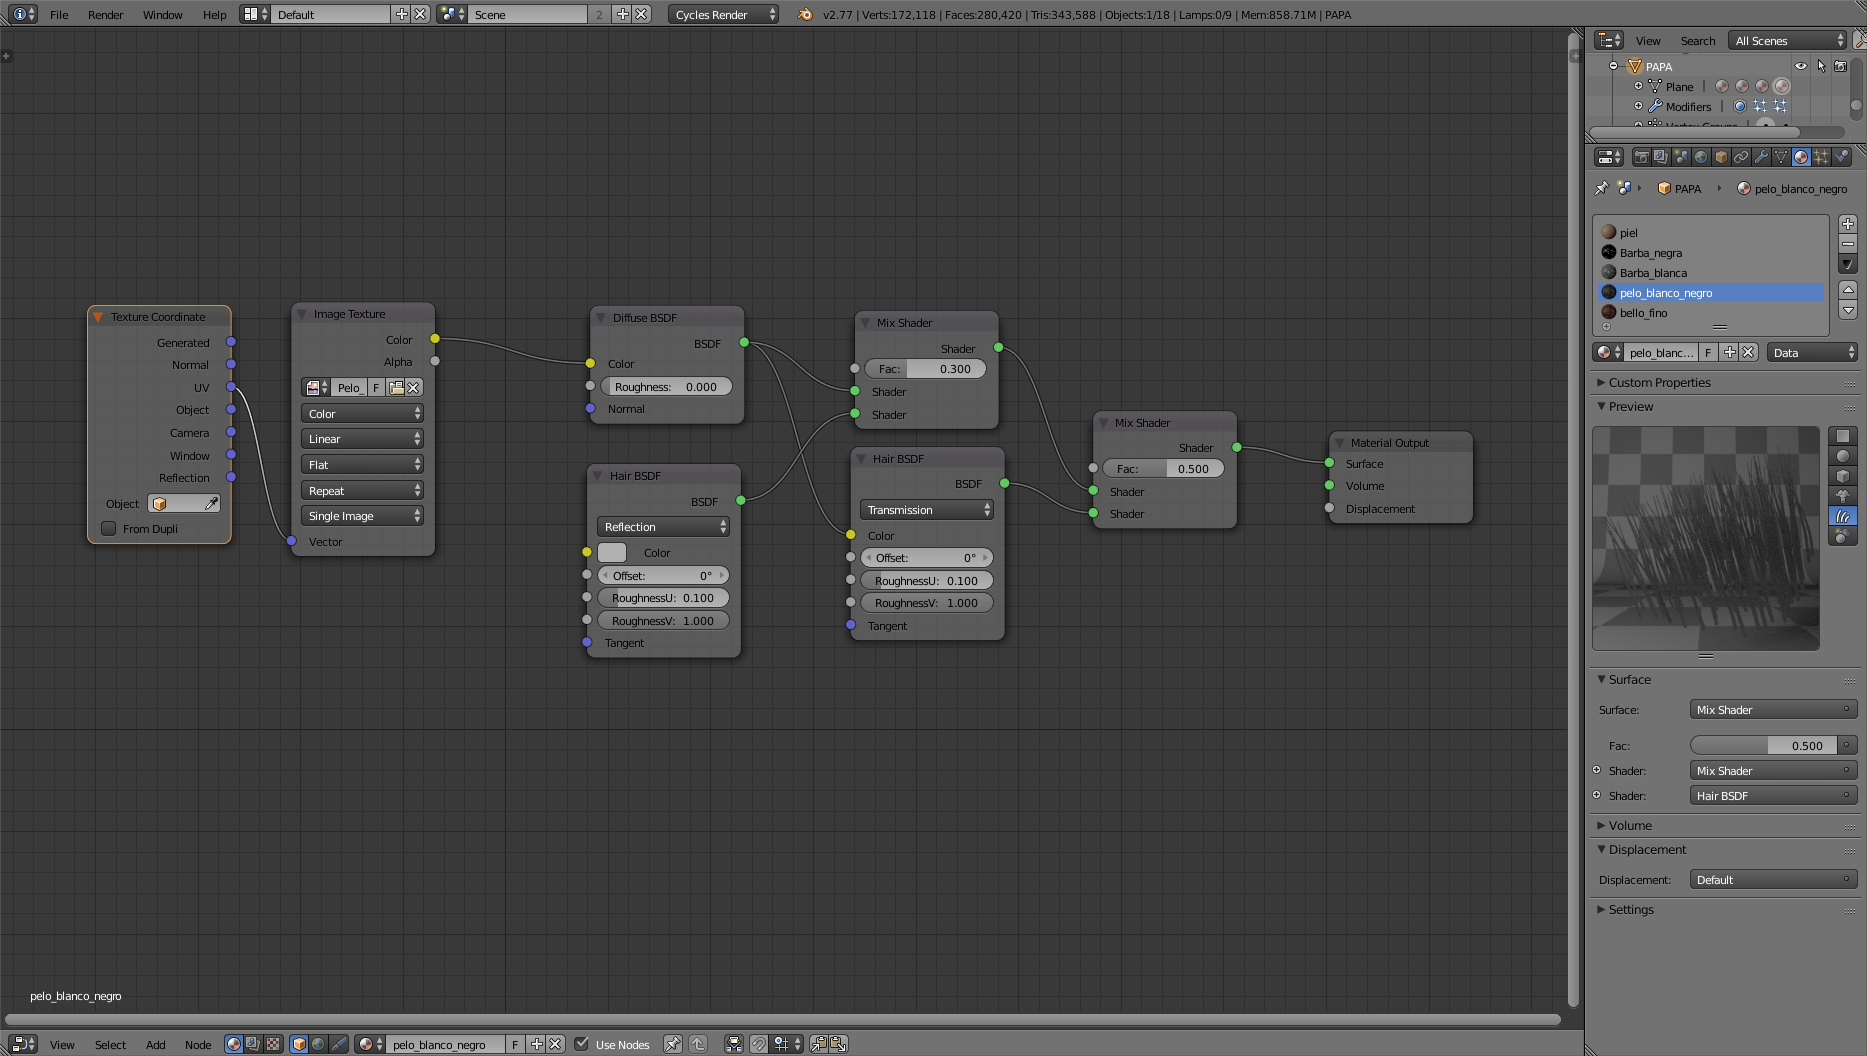
The hair of the head is pretty simple:
You make a vertex group with weight paint, where you want the hair to be. (you have to select them lather. y the hair system)
If you have UV unwrapped, (if it is an sculpt, just made a simple object under the skin and emit the hair from that) for the base color of the hair, do an image with the colors you want.
Then in the material of the hair, in the color input of the diffuse material, add the image.
The you need to hair shaders, one for the translucency, and one for the reflexion.
Something like this:
And just play whit the mix sharers, and the roughness (because I don’t know exactly what they do) But more or less, the reflection of the hair, is like the glossy. and the transmission is like the sss. (something like that) You can have a white refection but a red transmission for that hairs that go red with some light.
Also I use to hair systems, one for the big mass of hear, and one for the “crazy hair”
Just play with the children, and you can do at last (always at last) particle edit in the view-port.
It my be all wrong… haha use under your own responsibility haha.
Shaping the hair is somewhat the easy part for me… Except when dealing with thin meshes… Been working on fur and you get a lot of holes or bald spots when rigging the mesh, lol. I’ve been researching the subject of shading hair and fur for a bit. Some use the add shader for Transmission and Reflections. Then some make use of just Diffuse and Glossy. I think I may have to dive into a CGcookie tutorial about hair shading lol. Fur has been the hardest thing to get right for me.
I see that you put a shader in a color value. This doesn’t do anything in cycles. Though you can mix materials somewhat like that in blender render.
I’ll make sure to keep an eye on your next project! You’ve been doing an awesome job!
oohh now I understand why the translucency lock identical in every hair! ok, I have to put the color directly, not from the shader. I didn’t know…
I thought that using the add breaks PBR, because you can not make more light. you have to use what it caches outside.
You mention too advance staff for me… rigging… I have not touch that yet, maybe for my next project.
Well!
I couldn’t let it go…
So I restart everything.
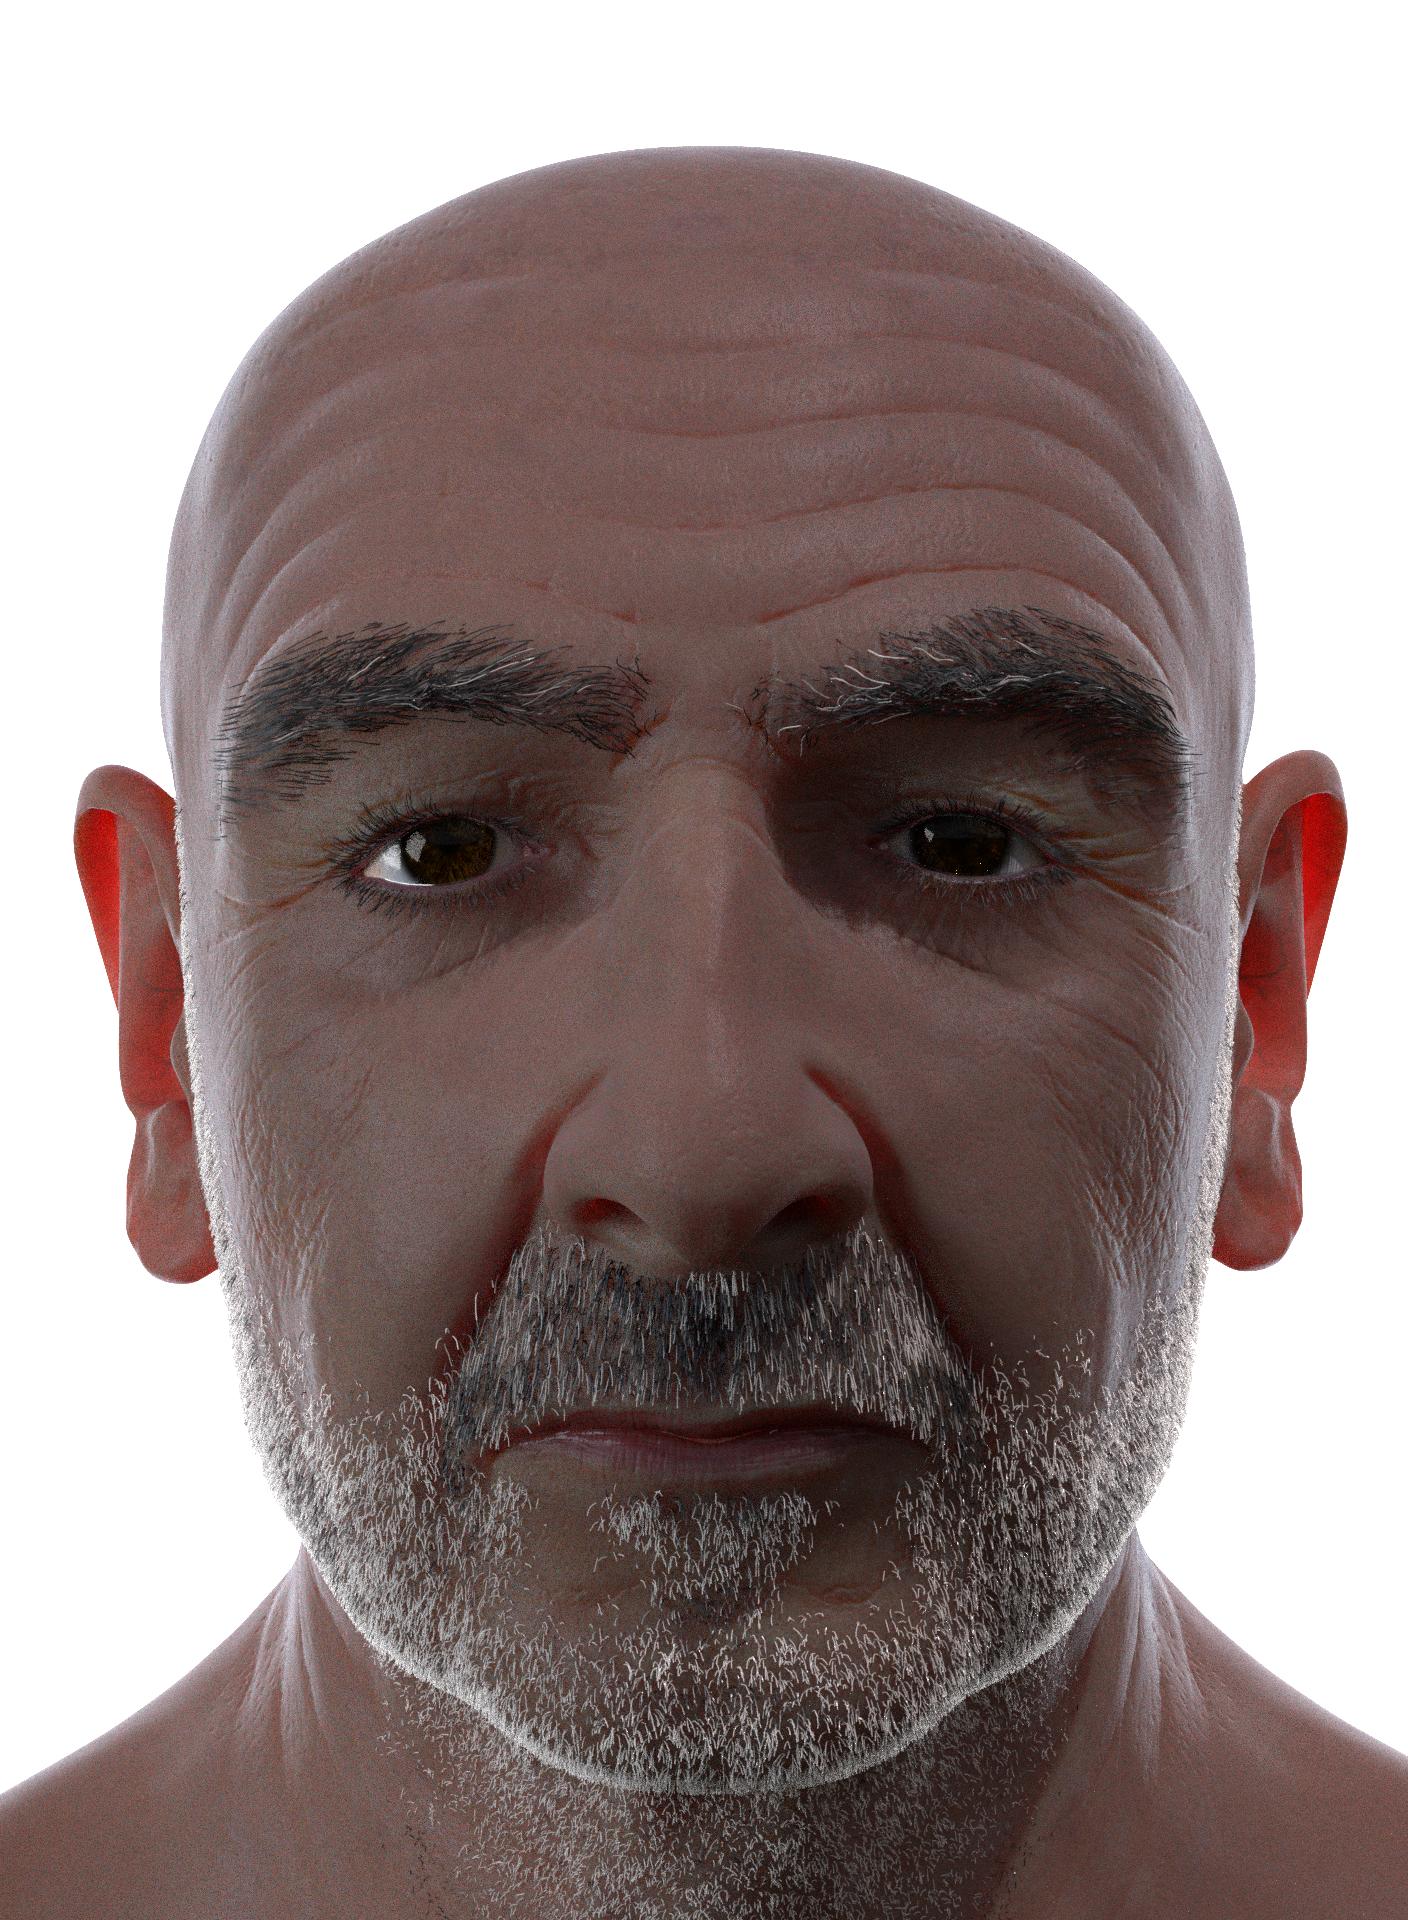
I make a multires, and then bake the displacement map, much more realistic now, I have the multires and the displacement in place, It just much better this way!
So I get rid of the diffuse for the shader of the skin, I use an sss_dermal, in the SSS color, And a sss_subdermal, for the radius, and a scale image for the scale value of the SSS shader.
And a specular image, for the roughness of the glossy. (with is making me crazy!)
Every thing is hand painted, I know is not the best, but I want to learn to paint them.
Not finish jet, and it is a bit of a mess shader. but It is much more believable now in my eyes.
I did a super long render up to 1000 samples, to see if the noise goes away sometime, and I think it goes away (not completely but composition will fix it)!!!. I put as much light as possible, it has three strong lights, two for the face: one is a point light for hard shadows, and one is a plane for soft shadows, and then a third light from behind, as a big plane that is emitting light. And on top of all that I put a nice interior HDR light environment:
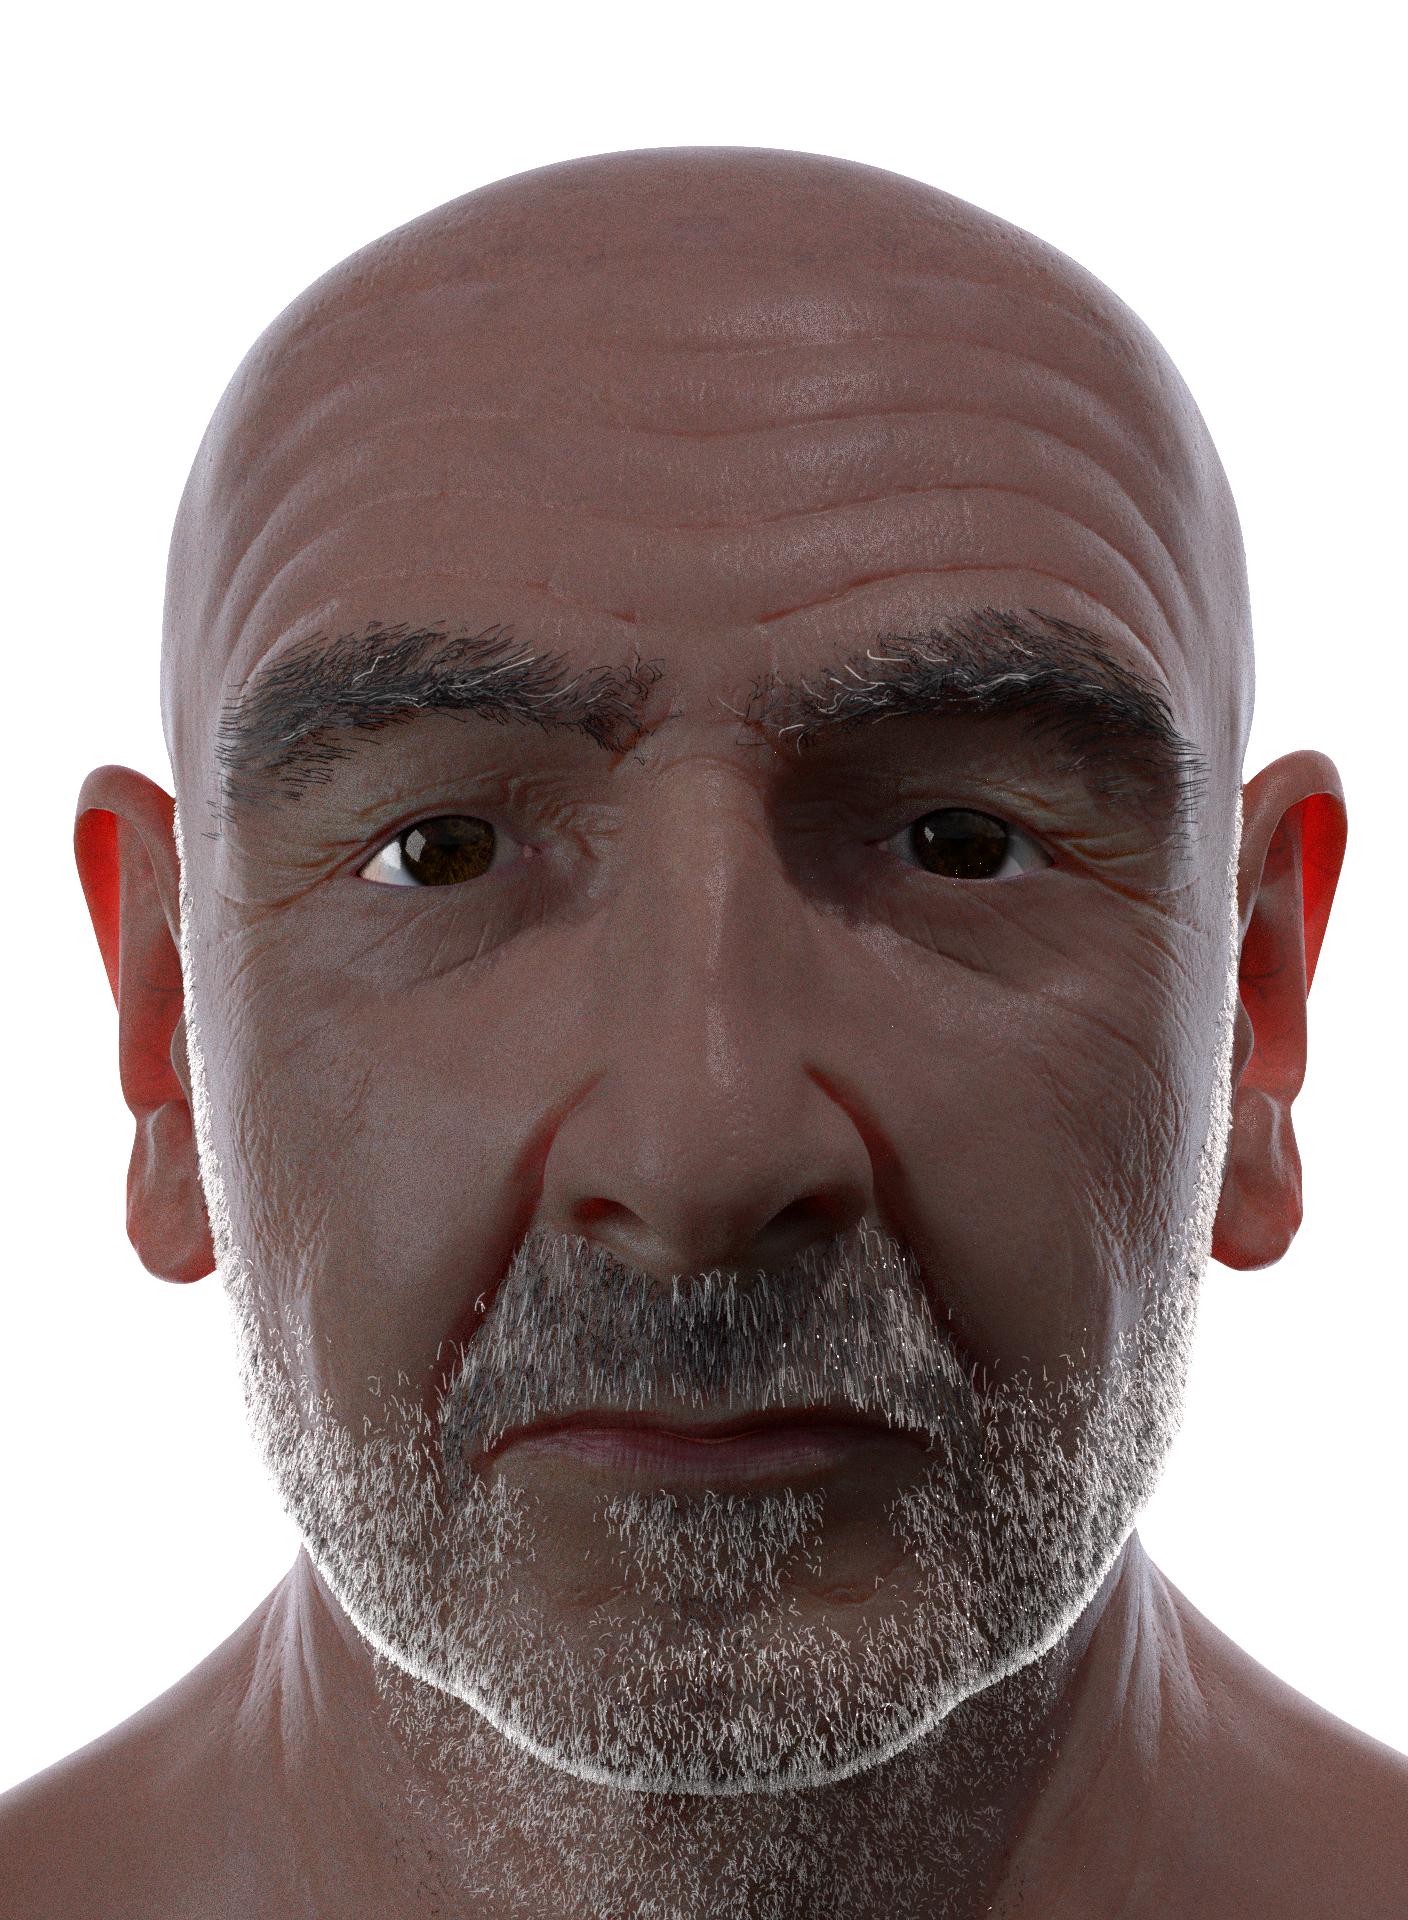
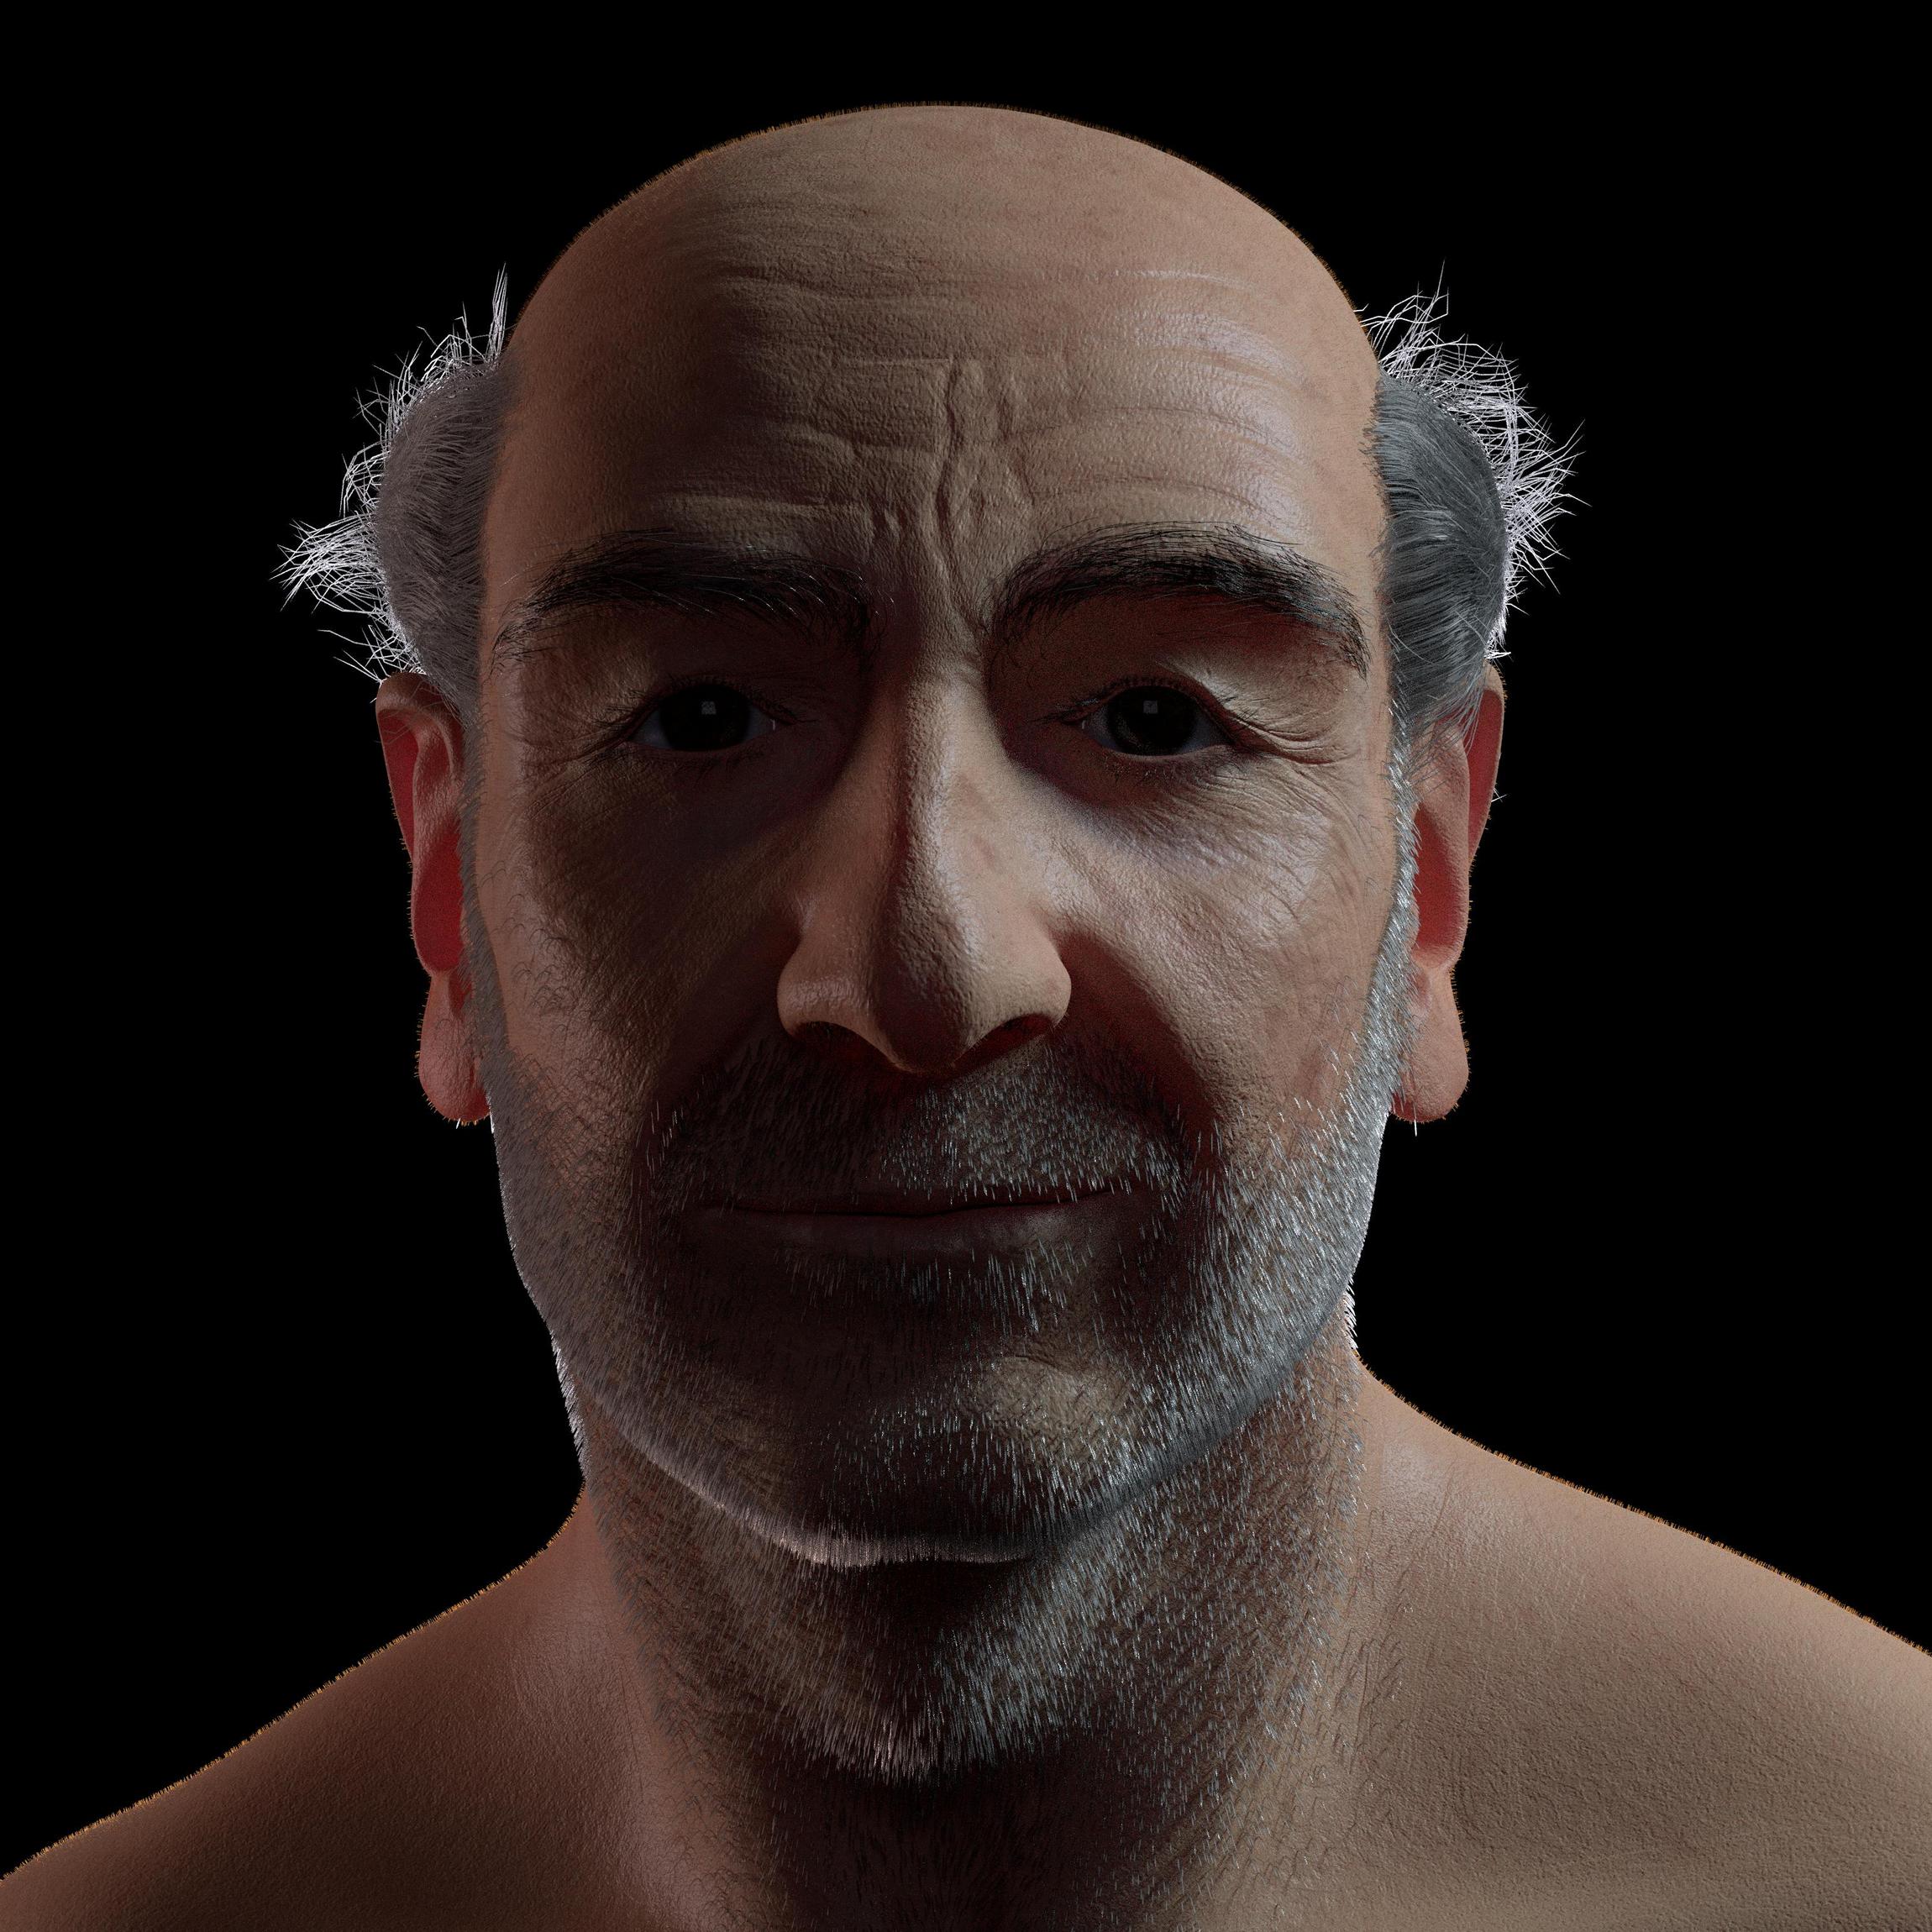
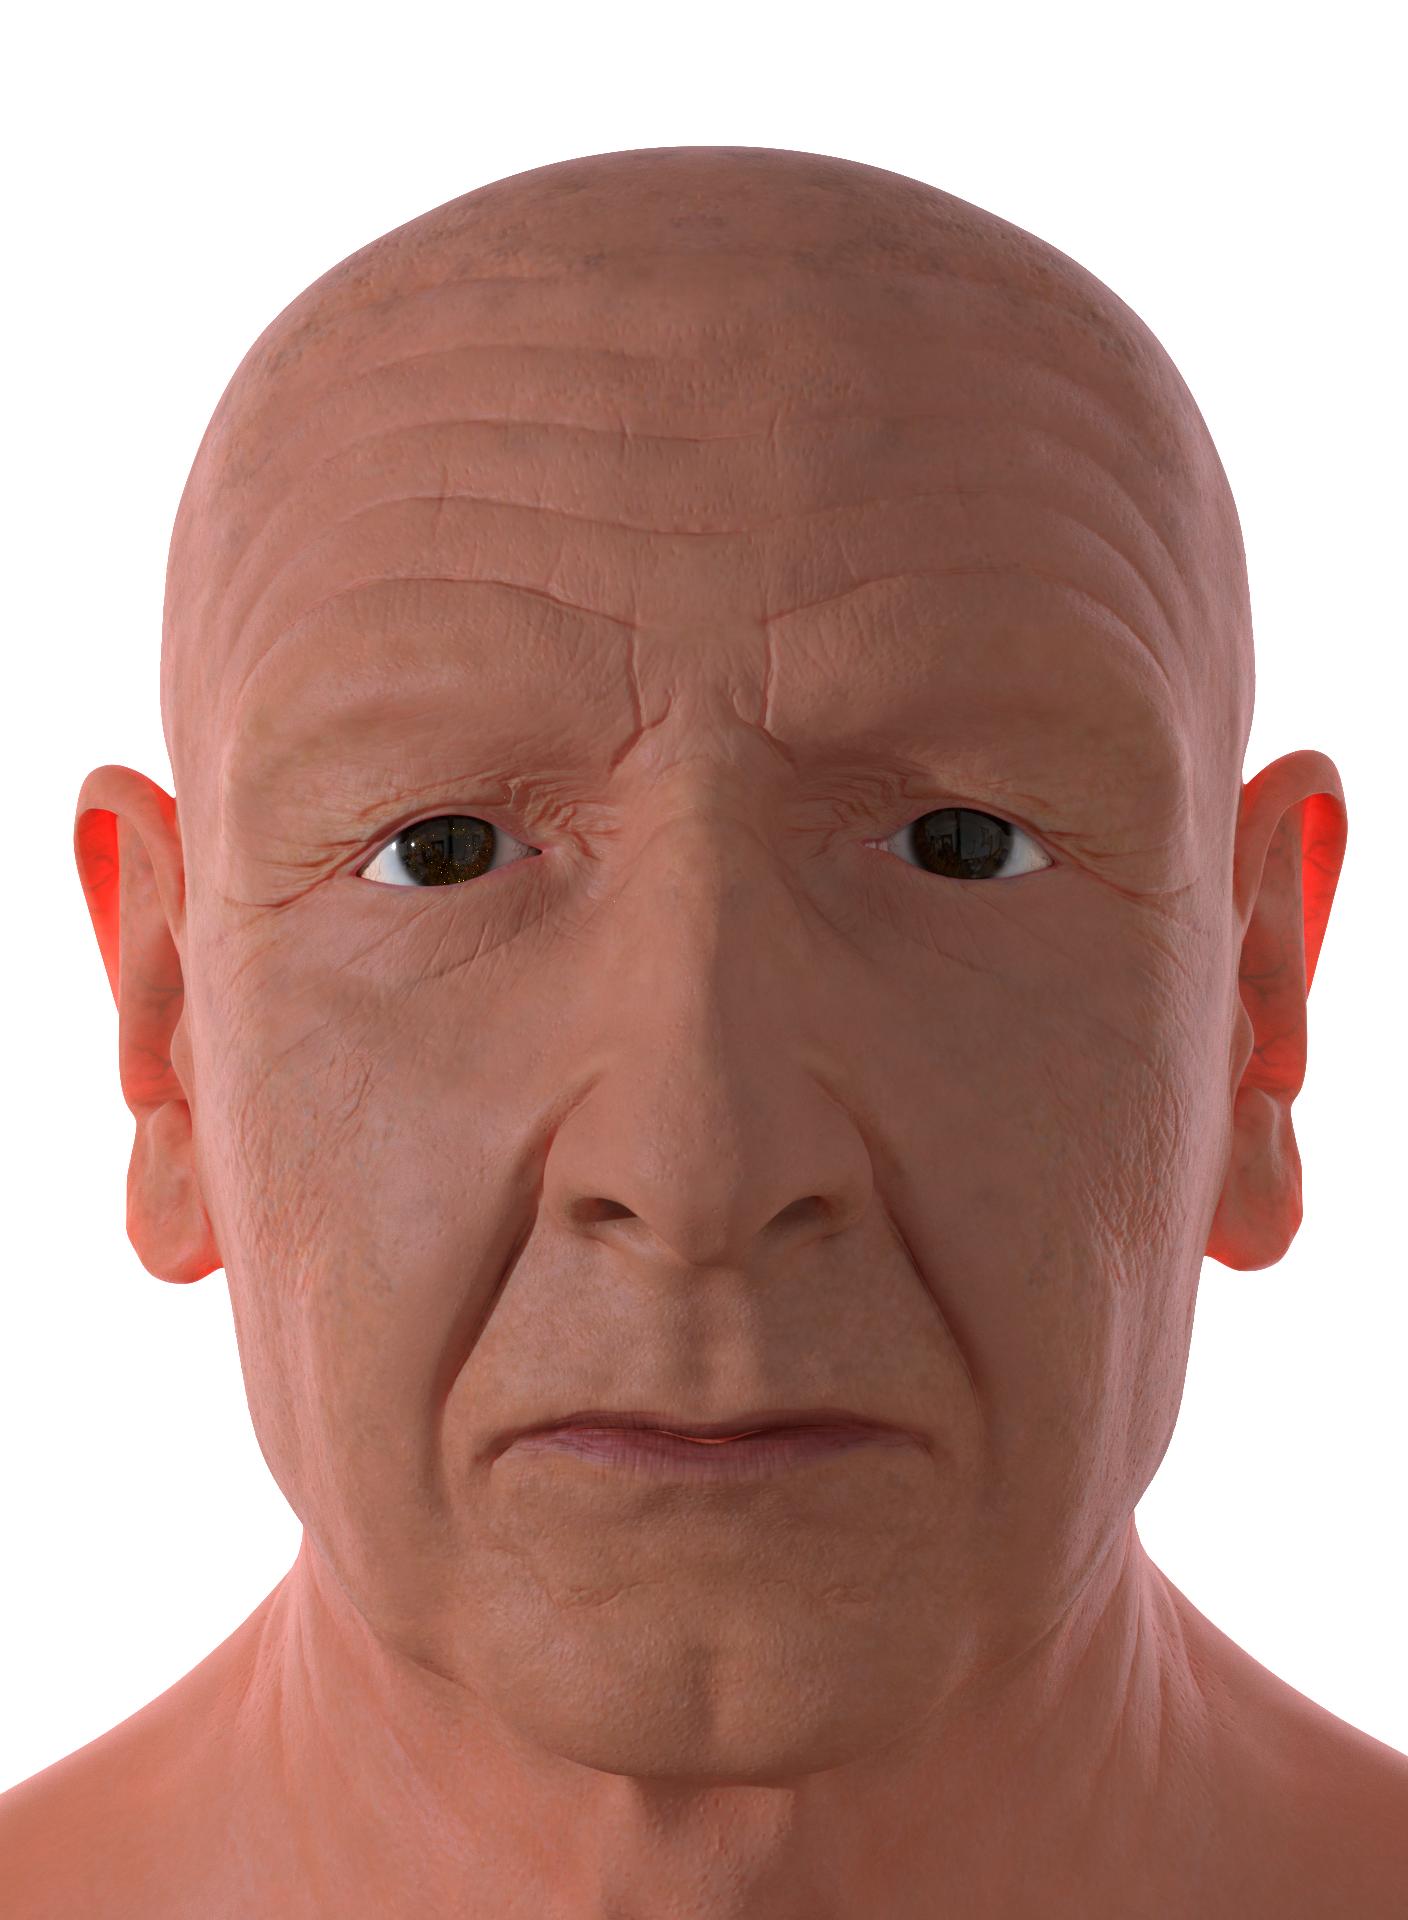
The modelling and sculpting are brilliant I think the folds of the skin are more realistic now~
The face is too symmetrical though…maybe you could add more variation to the wrinkles? And the skin colour seems a touch too orange…(though it might just be my computer screen :P)
For an older person, it seems to me the skin coloration is too homogenous and monochromatic, maybe consider some subtle (or not so subtle) variations. The nose & ears are places to start, but the entire surface could use some hint of underlying veins, fat deposits, etc. These can be nearly subliminal but lend a great deal to the quality of the shader, suggestive depth to the skin layer. Also, blemishes, moles, blotches, etc. Don’t forget the nose & ear hairs :eek: – at nearly 64 myself I know how these start to show up!
BTW, you say painting is not the best way? Absolutely not true! It is a very viable method of producing shaders. And it increases skills that can be used elsewhere. For me it’s the best way by far.
@Chebylshev! thanks! I love that you like the sculpting and the modelling, I am very proud my self, it is the very first one that I did, that really feels ok to me!
Yes, I’m still testing every thing, and I will brake symmetry eventually, but now is more important to me fixing all the nasty skin!
Hair as you see is coming back!
@Chipmasque! yes yes yes! and yes! I’m aiming for all that, but it is coming slowly to me… still learning every step of the way, I think I made progress in this render, by just tweaking the sss, the glossy and the fresnel, and the color (rgb curves) of the skin. So yes, improve the painting is on the list.
I’m glad that you think that way! I always straggle with drawing colors, so I’m not steeping down this time! Colors will be mine!!!
Last render: I fix the damn orange!!! it was horrible! it was like a dead person with a lot of makeup!!!, it was at the end a problem with the scale image of the SSS… I spend like 4 hours, looking an looking… also I did some hair, I plan to put, nose hair, ear hair, head hair (not so much) body hair (soft and sort and the strong ones)
I have to find out, how to put more wet in the lips, and in the eyelids, I had a plan but it is not working… Also the tier in the bottom eye lid (last time I try it gives me a horrible shadow!)… and finish the skin!!!
Increase the thickness of the eyelids a bit, forming a thin “shelf” between the eyeball & the edge of the lids.
Select the edge loops that form this shelf and duplicate the faces.
Apply a “clear water” shader to the duplicated faces; I use a fairly simple Transparent (100%) + Glossy (Beckman, Roughness = 0) shader. Glass can work but the IOR refraction can be problematic in some situations.
Reshape the duped faces by drawing the outer edges under the eyelid skin or behind/inside the eyeball, leaving exposed a VERY thin portion of the surface to appear exactly between the eyelid shelf and the eyeball. And I mean VERY thin – this convex surface will create an extremely bright highlight… too much and it will be teary-eyes time!
It can be difficult to make a perfectly regular “rim” around the eyeball this way, but that’s OK, as long a couple of bright watery highlights are visible:
The portrait is coming along really well! The skin, especially, looks a lot more realistic~
It’s a small thing…but the hair above his lip seems really vertical and uniform compared to the rest of his beard though…
@chebylshev, yes, the hair there it is not going like the rest, it has an image for the longiness, because my father uses more long hair there, and that is what is doing that effect, I did all from the configurations, not by hand, so no much to do there, I can go and do it by hand, but then I lose the ability to change it later…
@chipmasque, Thank you!!! I actually did something similar, but I keep getting the shadows, reading what you wrote I realize I have to thin eyelids, and to much gap to the eye, For the next modeling I’ll be much much carefully with that. So now with less gap it works very good! Thanks a lot!
Anyone knows how to change the mesh increasing it to get more definition, but not affect the UV in a way that breaks your images? or move so they don’t correspond anymore?
Where do you want the increased definition? An increased subsurf level can help in some ways, without affecting UV or shader details, and adding a Multirez level can allow for finer details in Sculpt, but those seem to be tools you know already. If you mean enhancing the sculpted detail without adding Multirez, have you tried the Flatten sculpt tool, set to Contrast? At low brush values it can give you very fine control over the enhancement of fine detail. Proceed carefully though, it can be overdone if the brush is too strong.
The eyes look very wet now, good job! May I suggest you enlarge the pupil diameter? In the lighting shown they would be much expanded, and larger pupils tend to be more appealing, friendlier.
No, I think I didn’t explain it well. if I have to change in edit mode the low poly mesh, adding vertex. How can I unwrap and maintain the uvlayout that fits almost exactly, so I can reuse the textures I paint it.
I’m changing the light all the time, to see if everything works, but for the finish lights I’ll be doing that, or maybe I can create a rig or something to do that fast.
I’m really considering ringing him… (I have to learn every thing!)
 I think the folds of the skin are more realistic now~