The problem isn’t in the shader, the problem is that transparent glass is a case that straight alpha can’t handle properly.
But towards what purpose, @J_the_Ninja ? Nothing has saddened me more than this thread regarding my profession. That personal philosophy now has to play a part in computer graphics. Regarding that which is useful or not.
All of the posts you linked to are also rife with combative debate from very intelligent people. The way that this topic has been presented to me nonchalantly by multiple parties is regretful.
No one has managed to convey it as well as you though, so I must give you kudos… But it’s enough of a violent disagreement to really make me consider a fork… or doing something else as a person (As some of the authors from the forums you’ve linked to have so vehemently suggested I do).
It’s very sad. Tools are suppose to be useful.
Can you demonstrate the problem and the way it should look like once its fixed?
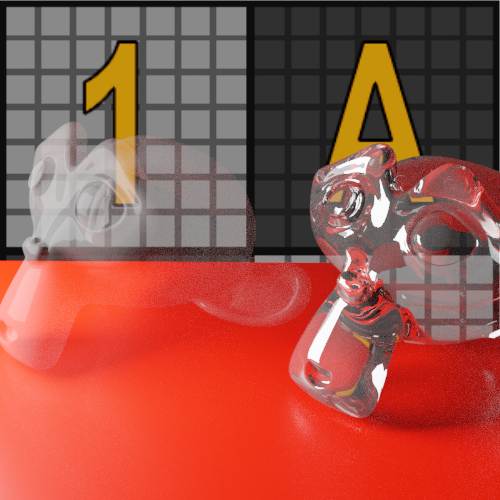
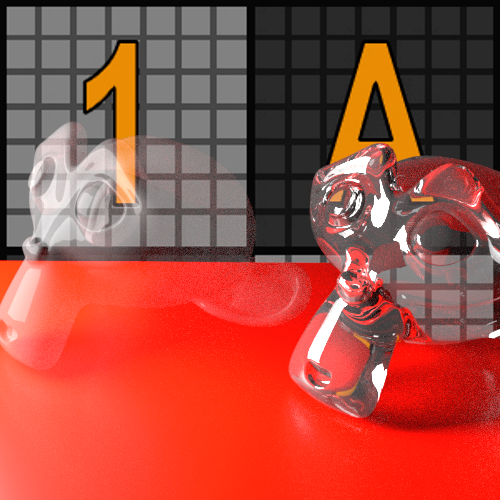
No issue at all when you comp it correctly:
Black background:
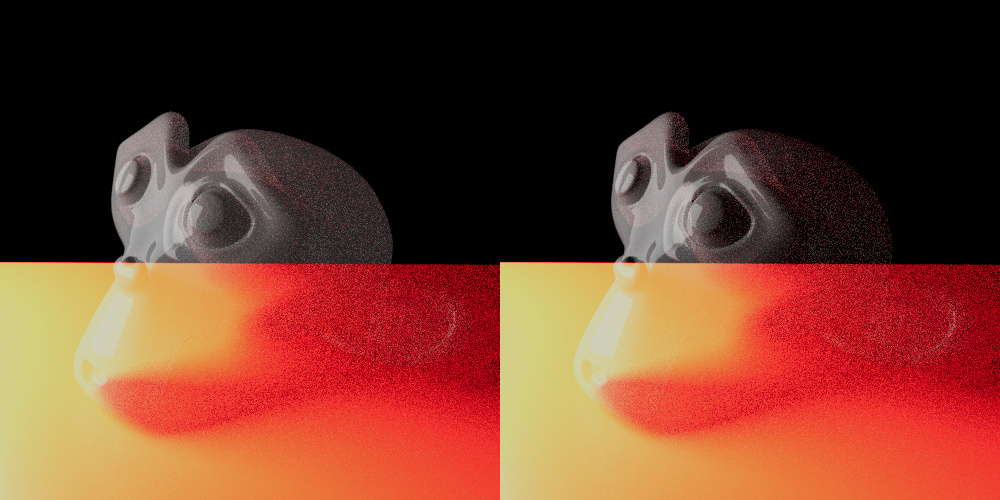
Gray background:
Transparent glass (on the right) lets the monkey blend with the comp background in both cases the same way it blends with the floor that’s actually in the render. Exactly as it was designed to work. (this was put together in Blackmagic Fusion, btw)
Tools are suppose to be useful.
They ARE useful, when you use them properly! The transparent glass files Cycles makes composite perfectly fine in any software that handles premultiplied alpha correctly. That includes Blender’s own compositor and most tools used for render post processing such as Nuke or Fusion. Where it does NOT work is tools that are unable to handle an alpha channel without constantly multiplying the RGB and A channels together.
None of this would be an issue people hadn’t made the mistake many years ago to make straight alpha a thing. It wasn’t supposed to be a thing. But someone somewhere, either due to a misunderstanding, or to try and make workflows feel like working with a physical art project, introduced straight alpha. Now we’re stuck with people using it because it’s what they first found when they learned about alpha channels, because that was probably through Photoshop, or something designed to mimic Photoshop, or something designed to work with Photoshop.
Straight alpha is still wrong, it still has limited functionality, and it’s only a matter of time before it bites you.
In straight alpha you simply can’t make an image where some sections are additive and some sections are not. But in the real world, that happens! Some things, like blooms and flares, reflections on glass, and flames, emit or bounce light towards an observer without obstructing other light coming from behind them. With straight alpha you can’t represent that, and breaking that physical correctness will have knock on effects down the line.
For example, if you make the glass reflections opaque - which you have to do with straight alpha - what happens when you add a really bright background behind the glass object? You end up with the reflections being darker than the object behind them! That doesn’t happen in the real world. Your desk lamp reflection off your window doesn’t block the sun streaming in the window. If you composite with “premultiplied” (maybe better called “associated”) alpha, this doesn’t happen in your comp either. The reflections are simply added to the background and you still get the sum total of both of them just like you do in the real world.
There is no good reason to use straight alpha except for compatibility with someone or something that refuses to not use straight alpha. Don’t ever use it if you can avoid it, and you won’t have problems with weird alpha stuff like this.
3 Likes
I don’t know if I’m crazy but I don’t see the issue here and I can’t recreate it.
The “issue” won’t appear in Blender itself at all(or in my examples) because that’s not where the problem is. It only shows up when you save the file as a PNG with alpha then try and add the background in Photoshop or GIMP, or upload it to a website as-is. Then you get darkening over the reflections unless you first add them to the alpha channel. (because straight alpha is unable to handle this situation without hacks)
2 Likes
When you save the file as PNG and want to use it in Photoshop, simply CTRL select the layer and press on the MASK icon to add a mask based on the image Alpha channel and it will look correctly.
The reason your file produces darkening is because its not a correct glass material. If you want a correct glass material Blender will render it correctly. But you want an IOR of 1.0 because you want to fake the placement of transparent pixels, the problem is that glass does not have an IOR of 1.0 and if you set it to that you get completely transparent object. To make it visible again you reduce the transmission but that introduces diffuse shading that is affected by your background and you get darker transparent glass.
Also your problem with having a reflection occlude a brighter pixel behind it is to be expected because your 0-1 value for that pixel is clamped to fit your output and your new scene has a different range that you are trying to compress.
The problem with disappearing object when IOR is 1.0 is solved in my material I posted and the use in photoshop I just explained, compositions in Blender and other software work correctly so what exactly is the big problem here?
Did anyone try to make something and got stuck because of this or is it a hypothetical problem?
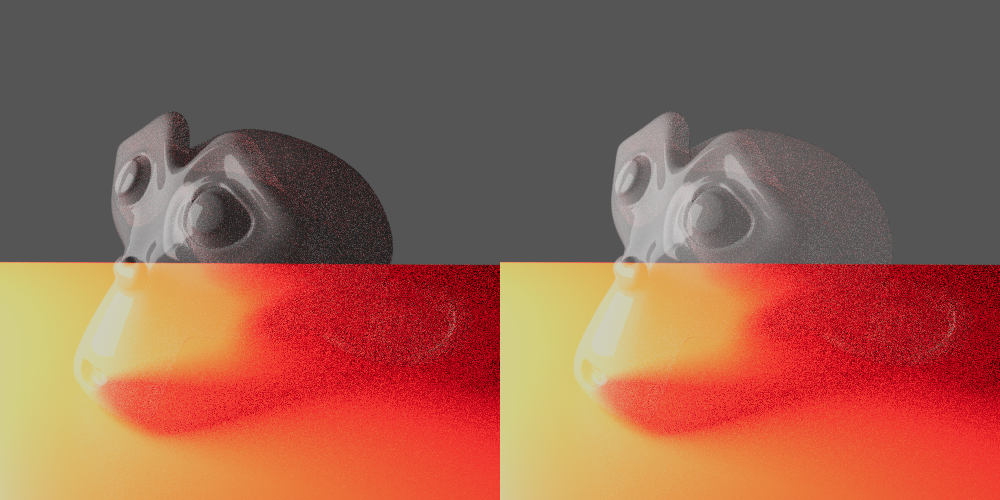
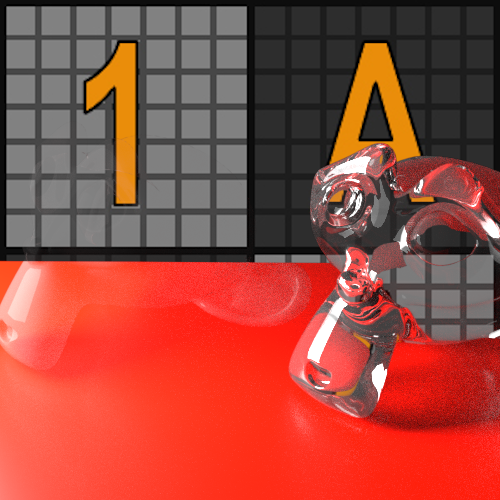
Actual glass material (IOR 1.0 with restored reflections) with grey background
with black background

IDK, I comp everything in Fusion so I’ve never run into this issue myself. The “transparent glass” feature in Cycles has always worked perfectly, I thought. I also wouldn’t use IOR 1 like was described here, I was just trying to explain to @choretortle why they were getting the results they were getting. Frankly I have no idea how they arrived at that particular shader setup.
2 Likes
Josip actual glass doesn’t have ior=1.0, and as people are trying to explain, the shader isn’t the problem, not using alpha correctly is the problem.
Can I suggest instead of using whatever alpha gets dumped in the file, you should take control of it. As J_the_Ninja says, there are options, there’s flexibility, there’s potential, and there are opportunities. There’s also a choice. Straight, or premultiplied. If you choose the one that’s suitable based on knowledge you’ll have control and get the result you want.
2 Likes
@J_the_Ninja, your definitely selling me on this (thank you for the extra effort). See, I am a traditional artist; and there is no amount of subsurface scattering or the illusion of luminescence I can’t “correct”. The idea of using three dimensional (at least to me) concepts in a two dimensional composite is like ingesting psychotropic mushrooms at this point (which I’ve never actually done lol).
Literally when thinking of additive behavior my thoughts went to “Am I suppose to use this to aid me in the partial determination of the density of a 3-D printed stained glass?!”…
But also my tools and lag in history have played a part. I’ve been in a very dark corner of the state of technology, with literally no way, hint, or indication of a way out, to even consider; So I am immensely indebted to you! Thank you!
2 Likes
I know we reached a poetic end here, but after trying to implement this, I’ve found the following to not work out for me:
@J_the_Ninja: The “issue” won’t appear in Blender itself at all(or in my examples) because that’s not where the problem is. It only shows up when you save the file as a PNG with alpha then try and add the background in Photoshop or GIMP…
@organic: … there are options, there’s flexibility, there’s potential, and there are opportunities. There’s also a choice. Straight, or premultiplied…
Every file output I select displays the same in the renderer and viewer and the “alpha” option isn’t available in the image panel of the image viewer, or the output panel, for any of the formats I’ve chosen.
A search for “premultiplied alpha” or “straight alpha” in the blender manual and on the web doesn’t return output options, only the “convert alpha” node, some other nodes, and an option in the “image viewer”…There is no way, as far as I can tell, to view this image as a matter-of-fact “successful render” without intentional cognitive manipulation. Now that might qualify as “proper comp”. But the idea that this problem is impossible to duplicate unless you’re exporting to png just simply doesn’t hold true on my machine. Blender does not display the alpha “properly.” Unless we’re selectively ignoring the fact that the result is visually much different from expectation because we are “in the know”(?) and we’re confident that it will show up right in another program …
The amount of difficulty I’ve encountered on this one task is enormous. … but I can always fall back on that very first hack provided.
Possibly I’m misunderstanding something. You didn’t show the difference between what you are getting and what you want.
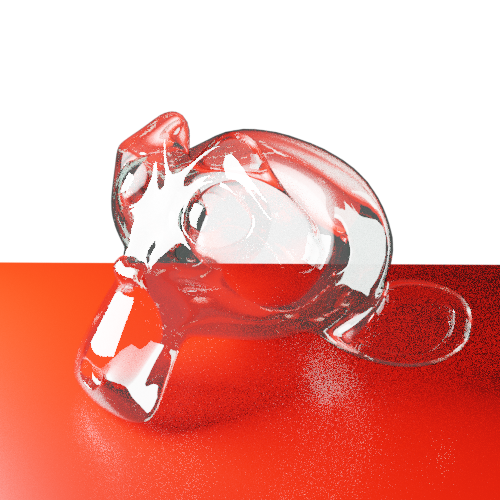
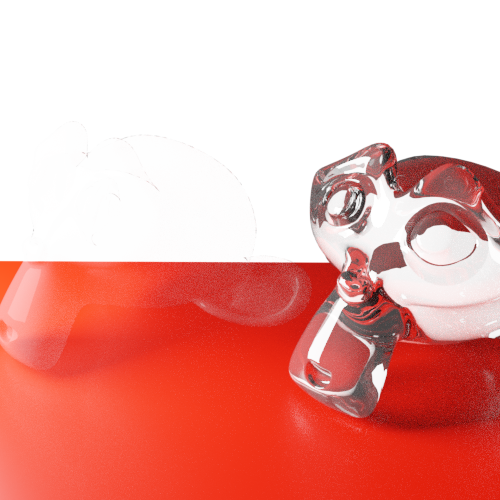
Does this help? -
RenderLayer
Composited RenderLayer
RenderLayer saved as image then composited (in Blender)
Saved as Image composited in Krita
Saved as Image composited in Gimp
The Suzanne on the left has ior 1.0 and on the right has ior 1.55
The RenderLayer image was saved as .exr, but uploaded here as .png.
As an aside. If you want to check whether an application handles alpha correctly, there is an excellent test image you can download from the link here -
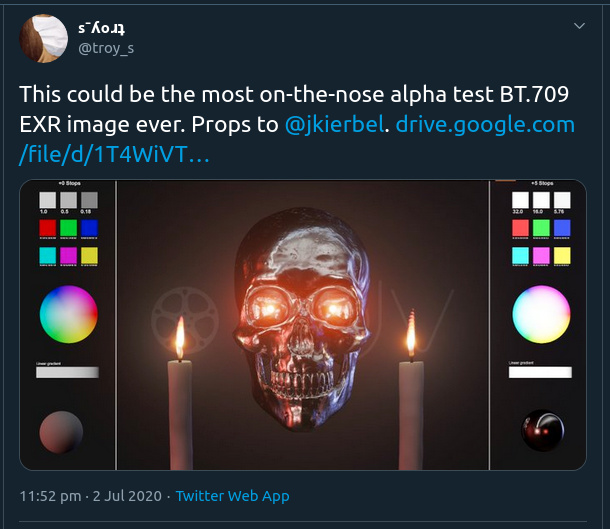
EDIT - Woops, wrong tweet. The thread is this one. There are many examples there of Adobe and others getting it wrong -
https://twitter.com/jkierbel
@organic: … You didn’t show the difference between what you are getting and what you want. …
@organic: Does this help? … [ que various images that have manipulated alpha channels?]
Perhaps but it only proves what I’ve said. Plus your pretending that the issue is IOR, I’m trying to get reflections that are present in opaque versions of the render; and I’m using an IOR of 1 so I can isolate those reflections.
That or there is still a property on my system that causes us to interact as if we are living in parallel universes. I opened my renders in Krita, I even downloaded a version of gimp that was suppose to recognize the incoming multiplied alpha in a .tif; it didn’t.
Why someone such as @Josip_Kladaric would say " I don’t know if I’m crazy but I don’t see the issue here and I can’t recreate it." or “Did anyone try to make something and got stuck because of this or is it a hypothetical problem?”… Has yet to be explained to me; Unless the explanation is exactly as I’ve said:
… But the idea that this problem is impossible to duplicate unless you’re exporting to png just simply doesn’t hold true on my machine. Blender does not display the alpha “properly.” Unless we’re selectively ignoring the fact that the result is visually much different from expectation because we are “in the know”(?) and we’re confident that it will show up right in another program …
Dude, I’m not pretending anything, I was trying to help you. Have a nice day.
@organic , it’s not a personal swipe; It’s a statement critical of the presented solution, in an attempt to isolate a solution. I still have no idea why people are pretending this is “no biggie” or why there aren’t countless tutorials that will direct people to a statement such as:
“Oh yes artists know when they see this… Here we know that the proper alpha is “hiding,” in fact completely not visible as it should be unless I open it in Fusion. A huge set of the population of graphic artists (who use Gimp and Photoshop) don’t have self-evident access to this secret, and there is much confusion here, for years…”
Instead of “dude… what’s the issue?” (quite a contrast)
Can you show me the issue in your project?
@Josip_Kladaric I can use @J_the_Ninja 's trick with nodes, or some solution with nodes. I just don’t have software that will “properly” display premultiplied alpha (Where I’m not even sure what that means because I don’t have the system or software that you guys have).
My issue this entire time has only been that alpha channels are “straight” interpretations of some data that I’m losing? … Not able to display? (trying to open in many different applications, saving in different formats)…
I’m operating under the premise that there is some place I can merely open my render layer, and my reflections–with respect to a transparent background–won’t be needlessly washed out… This premise may not even be true. We may simply being operating under a paradigm where a render is not a respected result unto itself ("… may I suggest not simply using whatever alpha blender dumps into your image")… That’s not a way of thinking I can get use to easily, where a render doesn’t have integrity without 2d manipulation…
It’s just disorienting and I can’t narrow down an external (or internal?.. is blender behaving right?) way of using this alpha. … beside @J_the_Ninja 's method of just changing the alpha to what I want…
I just don’t have a reference point, and maybe I just need to keep feeling my way through, being given some hints from you guys.
Can you show me the issue in a screenshot? PM it if its not for public, I’ll even sign an NDA if needed.
My goal is to understand the problem and provide a solution since I sell a glass material.
Well, I’ve posted the original; and then the link to @organic … and now I’m not sure if this is posturing on your part (sorry if not).
The “issue” is that every piece of software I own opens the rendered image’s alpha washed-out and invisible as in the left of that side-by side… No matter what format I use. It is apparently a “straight alpha” issue…something that I can apparently avoid…
Something that you can read over several times and wonder “what the issue could possibly be” … because it’s just so darn normal for that to happen…
So … very… … … useful.