Rendertime -- need advice to optimize


Submitted blender file to be inspected →

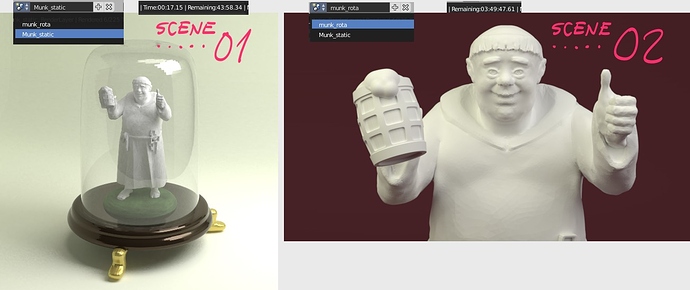
I would appreciate a lot if someone may be kind and inspect the submitted file containing two scenes, 01 and 02


Question A: Any suggestions?
Scene 01 consumes considerately less time (about 1h) to render compared to scene 02 (about 4h) and I cannot figure out exactly why.

Question B: Can I make scene 01 render even faster?
– and maintaining the quality?


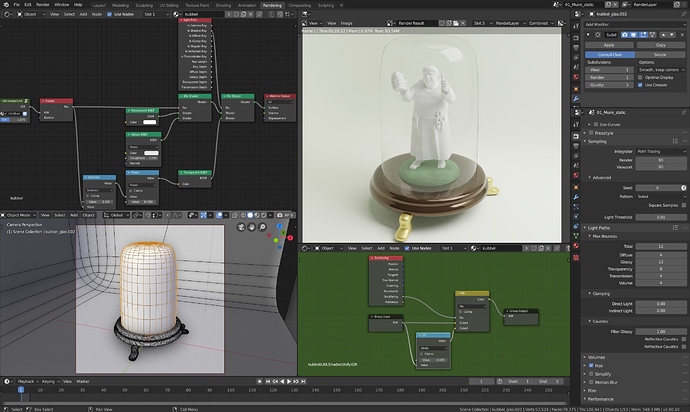
I have tried to exclude objects comparing the scenes back and forth to get an idea. Scene 01 also uses transparent objects and more samples which leave me somehow bewildered.

The handles in Blender seems – for a humble 2d-draughtsperson like me – to be plethorous, and picking the right ones – to me, by now – is like finding the famous needle in the haystack, thus any help in this proces of learning is received with utmost thankfulness :slight_smile:

Kind regards
Mikael

Scene 02 renders in about one minute in Blender 2.80 for me with the following changes:

Enabled CPU and GPU in Preferences -> System -> Cycles Render Devices -> CUDA (this depends on what hardware you have in your system) and change Device to GPU Compute in the Render Properties.

Changed Tile size to 16 for X and Y in Render Properties -> Performance -> Tiles

Changed Render Sampling to 16 (results in 256 total AA samples with your other settings there) under Render Properties -> Sampling.

Made sure Denoising was enabled in the View Layer properties (it was).

These are 2.80 specific settings but if you’re using a 2.79 Experimental build from builder.blender.com/download the same ones will work just as well though they may be located in slightly different places.

Changing Render Sampling to 8 drops the time in half again to 33 seconds and still looks pretty good to me.

You have "Square Samples on in the Sampling settings which multiplies the specified sampling value by itself, so your prior value of 80 was performing a very unnecessary 6,400 samples per pixel! So dropping Render Sampling to 16 results in 256 samples and 8 gives you 64.

Eevee renders it in 0.04 seconds.

Scene 01 renders in 6 minutes just enabling GPU Compute and switching to small tiles for modern Cycles and leaving every thing else as it was (128 samples, not squared) so maybe you just have a very old computer?

1 Like

Hello Gavin

I’m very glad for your answer!

And yes, indeed I have a very old computer :wink:

My system is an old Mac Book Pro with no CUDA (nor any compatible CPU) nor updated OpenGL version available. I still need to stick to this for a while (funding needed sigh … and gaining more hardware insight before any new aqquisition).

Thus I’m not able to use 2.80 for rendering for now.

I went through your utterly helpfuld, thorough and insightsful answer and it helped med a lot that you took your time to look in the submitted file. It narrowed down to the very core of the issue in which I’m looking to get wiser.

You write: “(results in 256 total AA samples with your other settings there)” —> May I ask you please explaining what “256 total AA samples” (as displayed when switching on) means (and especially a noobish question: what does the “AA” abrevate?)

From other sources (ie. Youtube) I’ve learned, that samples around 128 (2-5K are mentioned) are pretty low. Have I got it wrong, meaning the number could be arround the tenth of that matter?

You write: “…value of 80 was performing a very unnecessary 6,400 samples per pixel!”

Just to get it correctly: When reading online tuts (ie. this one: https://www.blenderguru.com/articles/4-easy-ways-to-speed-up-cycles) I have got the idea that the numerical value in the Samples field very likely should be in the range of 2,000 to 5,000 (according the article), yet impossible on my meager equipment.

Since you suggest a render value of 16 and mention the “unnecessary 6,400 samples per pixel!”. Question: Will that say that people actually refer to the squareroot of the large numbers mentioned?

Hope you understand my question. I suspect myself simply confusing ie. 128 and 128*128!

Anyway: You’re right about dropping the samples! Setting the Samples at 16 reduces time enormously and leaving square samples “on” maintain the quality. When the latter is put “off” (and Denoise still “on”) the result – especially on the monk’s front with the somewhat even surface – yields an unpleasent compressed, lossy and “marmored” look.

In any case I have discovered the interrelations between the settings mentioned and especially the “Square Samples” checkbox enabling me to reduce rendertime profoundly.

Thanks!

Kind regards
Mikael

I don’t really understand the purpose for the “Squared Samples” option. It just causes the entered samples number to be multiplied by itself so a small change makes a big difference.

In scene 02, you have this option on and had 80 samples set for render and 80 times 80 is where the 6,400 comes from. AA stands for Anti-Aliasing and is essentially the number of times Cycles will evaluate each pixel. Dropping it to 16 makes it 16 times 16=256 so Cycles is doing like 1/30 of the work. With denoising, you can often get away with much lower sample numbers, and your scenes have relatively simple materials that should denoise without issue I would think.

Before denoising, some scenes would indeed need a few thousand samples in order to clean up sharp, but often a few hundred might give acceptable results.

Scene 01 did not have Squared Samples set and had 128 set for the number of render samples so that’s just 128 per pixel (so half of what 16 was getting you in the other scene.

If you’re not able to do GPU rendering, then smaller render tiles (maybe 64x64 or even 32x32 say) would be good to try to keep all the CPU threads busy as long as possible at the end. You can experiment and see what works best for you.

If it’s possible to update your Mac to at least MacOS 10.12 then you ought to be able to run 2.80 and Eevee.

1 Like

Number of samples relies heavily on the scene and lighting. With de-noising I can render this scene with about 80 samples/32x32 on tiles at about 1m52s for the glass scene and 21s for the non glass scene. So the glass is definitely heavier as expected.

Some problems I found:

  1. Scale appears too big.
  2. Nothing has smooth shading enabled.
  3. Glass material is wrong. Frankly I’m amazed it even worked, it didn’t use to for cases like this.
  4. Glass appears to have too dense definition.
  5. Why multires modifier on the floor?
  6. Model is hovering above the floor.
  7. You’ll get additional noise from real glass with thickness and then relying on caustics to handle shadows. Unless the realism hit is too much, I would use transparency/glossy based glass (preferably thin). This require trickery with fresnel and manual handling of shadow, but should be somewhat faster for same amount of samples and less noise in the green pad area.

More samples would clear out the noise in the bottom shadow, but this is the general setup:

I assume the long time due squared samples is cleared up.
As for squared samples option, I can only assume it is faster to toggle the checkbox than to change the sample setting if you toggle a lot between preview and production samples.

2 Likes

Hi Gavin
Thanks again for your feedback, I helped alot fro me to understand how to get the best suited settings, how things works and the Square Samples relates. Great! Your inspection of my file and comments is received (and used) with grattitude! Also thanks for your info about the MacOs. I’ve got the idea, that an update would have no effect since the hardware is old anyway. I’ll go for an update very soon.

Kind regards
Mikael

Hello CarlG

Wonderful and thorough feedback! Very good comments, yet a few questions to your list:

  1. Do you mean the object’s scale (ie. the monk and the glass hood) in the scene? Does this matter anything?

Concerning 2, 5, 6: very good points. You’re completely right. I’ll remember :slight_smile:

  1. and 4.: Just for me to understand: In what way is the glass wrong? I’ve set the index to 1.57 like in your very instructional nodes setup. It should be ind the range of figures mentioned in the URLs beneath, or have I got something wrong? When speaking density (4); I would assume you mean the IOR are to high?
    https://en.wikipedia.org/wiki/List_of_refractive_indices
    Material IOR Value reference

I’m very glad for the helpful node setup for the glass hood. Indeed very informing which I will try setting up for further investigation.

Thanks for kind help and regards from Mikael

I think he means the glass material is weird and doesn’t make sense. You have a Principled shader going into the colour input of a glass shader. A Principled shader with Transmission set to 1.0, roughness set to 0 and an IOR of 1.57 will look identical to a Glass shader with Roughness set to 0 and an IOR of 1.57

2 Likes

The above. Previously connecting green shader output to a color input would result in a black color. Unless the devs are preparing for some access to closure data (in which I would like separate outputs for various things anyway), I think this should revert to producing black just to prevent crazy setup like that.

Density means the geometry density is ridiculously high for no apparent reason.

In my setup, since the glass is “thin”, refraction doesn’t exist. In real glass (with thickness), IOR controls how light is bent (but only inside the glass itself) as well as the mixing ratio between refraction and glossy. In this glass, IOR controls the mixing ratio only (in the fresnel node), whereas incoming normal is used for refraction (to eliminate it completely) thus IOR is unused. I will have an impact on refraction roughness for thin based refraction (which is why you would want refraction instead of transparency), but I’d typically leave IOR alone at default 1.45 and rely solely on roughness parameter.

Note that using this “thin glass” system on glass with actual thickness will lead to a “double glass effect” which isn’t correct. Furthermore it will lead to a double shadow effect as well, which is why I do the power function to make it thicker - arbitrary number - adjust until the visibility of that goes away. In real glass with some thickness, this effect is also visible as solid shadows will appear where the glass undergoes total internal reflection.

2 Likes