First of all, welcome to the Blender Artists forum.
Second, Is there no other way to retarget animation without destroying/modifying the rest pose?
If you modify the rest pose then all of the animations for that skeleton will no longer be suitable.
Third, I’ve tested multiple retarget addons for Blender such as Auto-Rig Pro , MrMannequin and Rokoko.
Rokoko wins because It has the most accurate result (just make sure you’re using a frame that matches TARGET and select option CURRENT POSE)
Fourth, Unreal Engine 4 is capable of doing this, for free. It takes just a few extra steps…
It looks good however as long as a manual process is involved the same thing can be achieved with constraints which is something I did already, or with scripting.
I am wondering if there are any workflow benefits of this one over going w constraints. I am talking more about the manual mapping part specifically since the node based flow is naturally provides a bit of more processing magic along the way.
Any plans for mapping templates or a way to create them manually?
Auto matching bone names?
Can it guess the bone rolls better than the other solutions?
When two bones have different rolls/axis-angles, if you try to transfer the transforms, the resulting animation will be off/broken. The program would need to “guess” how the two bones are supposed to rotate individually and then transfer the difference over.
In other words, doing a [Local-Space] [Local-Space] transform would give bad results on rigs not made basically the same.
An example would be the arms. If one rig’s arm bends (at the elbow) on the X-axis, and the other rig’s same rotation is on the Z-axis, their arm will break…sideways.
This isn’t good for actual usage but it is good as a concept (for me anyway).
It being a node system seems to be mostly a gimmick, as there’s only 2 nodes:
Rig Outputs (as Inputs) with all the operators, and
Bone Inputs (as Outputs) with their Loc-Rot-Scale parameters.
A node system should allow for customizability in between the input/output flow-tree, not just be technically nodes in a Node Tree.
The operators are also tedious for no necessary reason. You shouldn’t have to manually switch between modes before running operations; the operator can do that itself if it needs it done.
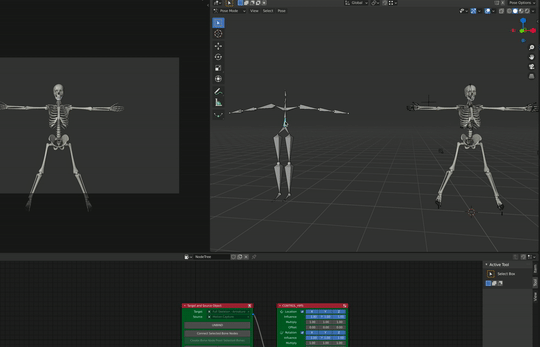
The addon creates tiny bones inside the Follower rig, hides them and creates drivers on their transforms to copy the Animated bone’s transforms, then a Copy Transforms constraint is used on the Follower bones to copy the transforms from the tiny Driven bones.
What don’t get is why you don’t use 3 Transformation constraints. Your nodes already look look like them. To my knowledge, drivers are way heavier than constraints, and I’ve personally had problems with them; enough to the point being they should only be used when needed, and copying transforms like what I believe is being done here, is not needed.
I don’t know how difficult writing code for nodes is so I’ll assume that you “can” run an update function when connecting nodes/toggling their properties, like you can do with bpy.props.
As such, that is when things should happen, not at a final step of clicking the Bind button.
If it CAN work like that, I think I will try to make things that run in a node window.
Placing things elsewhere easily makes the UI cluttered and I can think of things/tasks that can be more customizable if placed in a node tree.
yes this is what I want to achieve, from the start (design the workflow) and will done in next update, but back when I code, I just lazy for make blender switch mode, like you have to select the object and do stuff and back to old mode etc.
you’re right it’s just a gimmick but I have reason for that.
Easy to navigate
you can easily search any bone and arrange the node bone.
you can easily make preset or template so you can reuse the node.
you can easily bind and unbind bone just disconnecting the socket link.
you can easily tweak bone in action and see it live when its bind, because I want the same result like Unreal Engine retarget system do https://github.com/anasrar/Blender-UE4-Workspace/issues/14#issuecomment-670843204.
for comparison you can see my old project retarget animation in https://anasrar.github.io/Blender-UE4-Workspace/retarget-animation/.
it so much worse and take more time when I using N-panel (search list bones and do some tweak) and have to go to preferences to mapping bones and when you disable the add-on, the preset will automatically gone.
you are not gonna bind the armature forever right ??, that is why I add bake operator to bake the action so you can unbind and remove the tiny bones.
even if you want to bind forever you can just duplicate the armature and use it for baking the action and use the baked action to original armature.
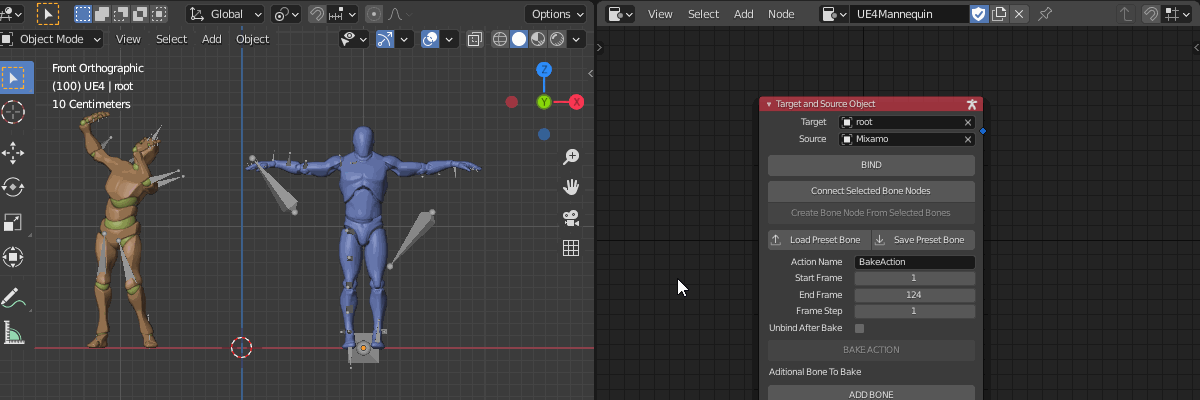
with driver you can do math and easy to remove, like with driver you can offset and multiply the value, make you can scale the transform for example if your rig has different legs height you can just multiply the pelvis or hips location, it see in video test there has different body proportion.
and many more with driver, you can limit transform with min max and if you do with constraint you have add the limit constraint and still do with driver to set limit value, and when you unbind you have to remove the driver and the limit constraint.
and as inspiration is new Houdini update.
and thanks for your feedback that’s really help me more better understanding user experience and workflow.
and hope this is make you understand why I take that decision.
It’s really not difficult unless you have the node tree active on an object that isn’t visible/selected.
I made a module for performing tedious yet re-used tasks like this (setting an object’s mode) but the most basic call for it Set.mode(context, mode, target=None), easily switches the mode: bpy.ops.object.mode_set(mode=mode)
The only noteworthy difference from the full function is that it doesn’t unhide/toggle hidden and unselected objects, and it can’t keep other selected objects from changing their mode (which is basically python trickery because the operator doesn’t even allow that)
Or you can create a new rig for this. The bones don’t have any role in either rig’s hierarchy, so it’s not needed to be in either.
Ignoring my issues with this, it does not work for linked rigs, and I will assume that there will be an error if someone tried to. Mode switching operator returns an error when trying to enter edit mode on a linked rig, and since that’s what you do here, to add the bones, if you didn’t add a check or error bypass, it will error.
No you don’t. All you have to do is look for the constraint, and add it if it doesn’t exist
You have so many inputs and a long expression on all the transforms, it looked mentally complicated but re-looking at it, it’s probably only technically complicated (internal driver processing).
I have not considered limits. I gave up on using Transformation because getting it to do what I wanted was tedious (mouth controller). But I suppose that was because I wanted the controls to accelerate as well as run in positive and negative directions, whereas the Transformation constraint only does that straightforwardly in one direction.
I don’t see any limit options in this node.
Also, the values:
You should add a single value controller for values (influence/multiple/offset).
I can imagine someone wanting to turn down single axes however I’d see someone more wanting to turn down all the values. They’re not in a single column, so you don’t have the option to slide them all at once.
Maybe add single values that controls the xyz-values, as in the values in the node, or more variables in the drivers. Or, a toggle between single and triple…though this would probably still do one of those (edit the nodes or add variables to the driver).
I know nothing about the details of Houdini and I plan to keep it that way.
I’ve tried it like once or twice and I’m just not interested in the process. I think I understand the “benefit”, I just want to not touch it. That’s a 2hr video that I have 0 intent to watch.
Given my limited understanding of Houdini, and refusal to watch the video linked, I fail to see the inspiration/connection to Houdini/Houdini 18.5, beyond there being a motion capture segment in the video (I think that’s what I skimmed).
Maybe due to the fact that I am using a beta version of the Blender, the Rococo does not work correctly. Your solution worked, and the node system is a very good approach. Thank you, it helped me a lot.
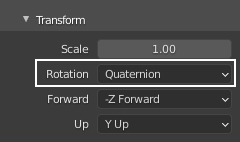
just some quick note, the animation rotation should be quaternion to prevent gimbal lock when using euler
so when you import any bvh file make sure you change rotation to quaternion
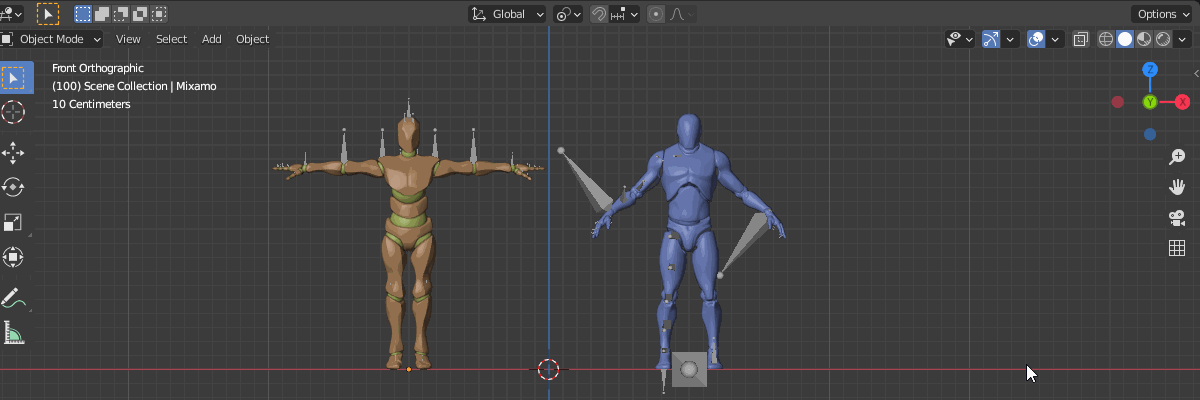
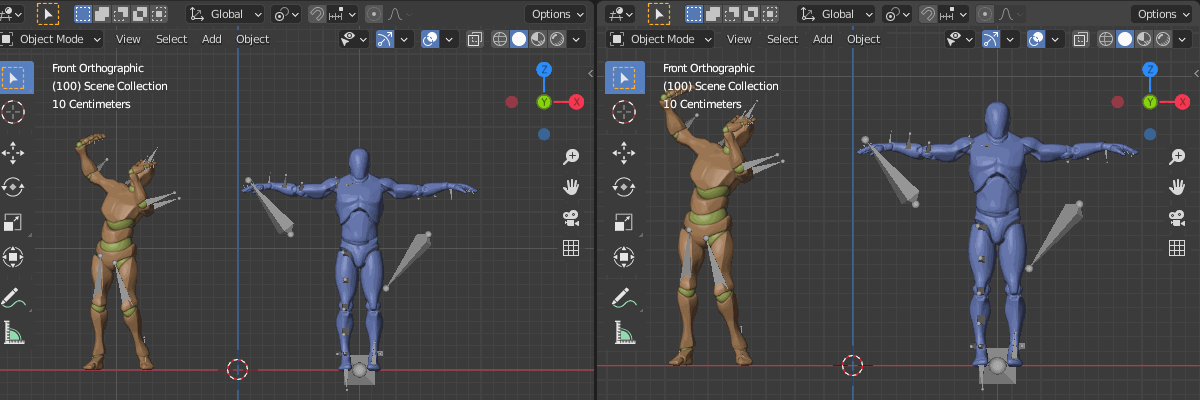
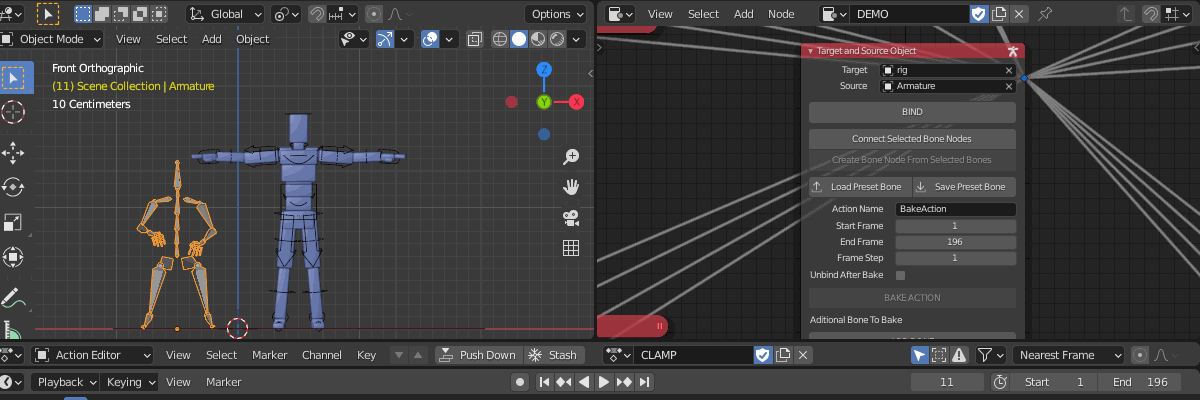
I have binded two rigs (source and target) together and made the ROOT hip bones match.
When I enter POSE mode on the SOURCE and move the hips everything matches and my TARGET moves as well. But when I press PLAY on the timeline and the animation of the SOURCE plays, the TARGET jiggles but it does not move with the SOURCE hips… Why is this happening?!