Shoulder Rig Question / Challenge / WIP

There are an amazing number of tutorials on how to rig legs. Quite a few on hands and fingers. But the one area that gives me fits is not the extremities – it is the shoulder. And I can’t find any tutorial on how to do that…

So, I’d like to open a thread with the sole purpose of discussing ways to tackle the shoulder rig.

Anyone who wants to contribute a rig… great!

If you don’t want to / can’t share your model and rig, I am offering my mesh to whomever wants it – all I ask is that you participate in some way in this thread. (Even if it is just to try the ideas and comment on the results… This won’t work unless people participate!)

It isn’t a world class model… but it is based on the articulate mesh found here:

http://hippydrome.com/
http://hippydrome.com/Images/Modeling/WingSpanFrontSmall.jpg

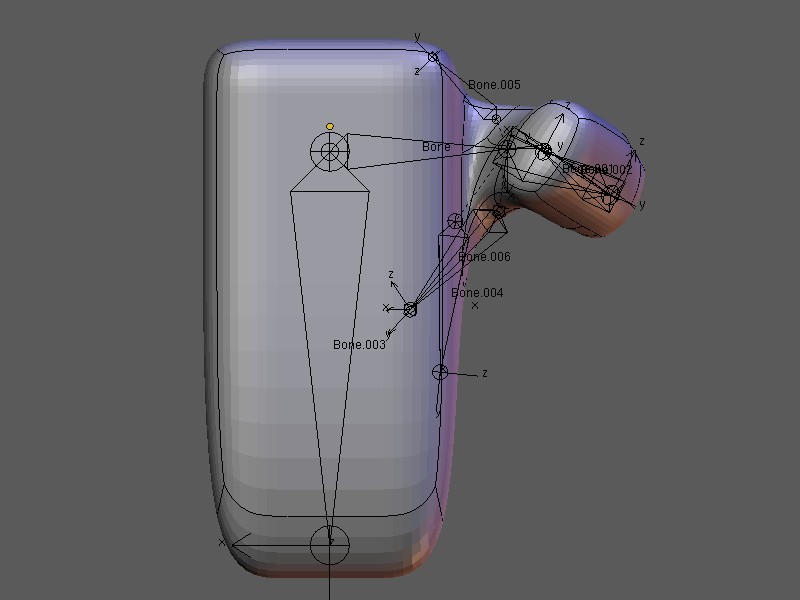
Here is a screen shot of the model:

http://www.digitalartistguild.com/Tests/SiloWIP/ArticulatedMesh/Wires.png

And here is a shot of the kind of problem I see whenever I try to rig a realistic shoulder:

EDIT: Old Pictures of problem removed to make this thread more easily readable. The good stuff happens below when FeelGoodComics shows off his rig

This, btw, is just a simple bone/joint with some weight painting. I have some ideas of how to beat this… maybe a shape with an IPO driver. Or a lattice to help the deformation… but I am wondering what you all do to tackle this?

I will post some animations of my mesh moving a little later as well as rig screen shots… but I am sure someone else is better at this than I am.

Anyone game for a shoulder Rig dive?

(PS: if anyone wants the mesh, PM me and give me an email address. I will be happy to send it.)

Funny… Shoulders are my bane also (modeling & rigging)… so I had been experimenting (with something I can topographically butcher at will) and failing. I was attempting to reconstruct the major muscle flow with bones and constraints. At any rate, it’s painful & shameful, but I’m definitely interested in this too.

Attachments


Glad to have you aboard, Quandtum!

I don’t understand the image you attached though… what am I looking at there?

BTW, clearly soldieroscar (on Youtube) has this nailed… wonder if we can somehow entice him to come to the thread and give us some pointers:

http://www.youtube.com/watch?v=RYxehrB6Yx8

lol, proof that I’m also stuck (& suck). It’s just the default cube extruded, then knife cut up to try to follow muscle flow. Then bones were added in to try to stiffen those muscles up. It was how I spent yesterday morning. I’m also going a step beyond the more dense, better laid out mesh that you have and trying to see just how minimalistic (vertex wise) it can be done. I want to understand it to a realistic model (like yours) but also apply it to toon animation.

Aye, that vid has it good. It somewhat reminds me of Mancandy’s lower torso (which I have yet to fully figure out) applied differently.

Hi all,

Let me first say that this subject is a bit more complicated than the simple rigs I make, so feel free to tell me to shut up at any point. I do however read up on rigging when and where I can, cause you never know when those ideas might percolate in the brain and come in handy later on. So maybe you might find these links useful:

http://rigging-repo.blogspot.com/
Lots of example rigs and stuff there, and also try:

http://www.jpbouza.com.ar/ESP2/descargas/blenrig-3/id/en
jpbouza has created a complex rig that seems to work nice from the looks of his videos. I’ve never tore apart that rig to see how it works, it over my head right now, but I am impressed by it.

Hope you find some good material to research,
Randy

PS: I agree that video is good, but at about 16 seconds into it I see an accordion affect with the upper arm…

It’s been awhile since I’ve seen a rigging ideas thread! How can I not join in!? I can’t, obviously :slight_smile:

I consider the ‘shoulder’ to be composed of 3 parts, and therefore 3 separate issues:

  • The clavicle (placing the pivot point in the right spot)
  • The scapula (getting it to follow the clavicle rotations properly)
    
  • And the deltoid (getting it to deform properly, and not fold into itself)
    

The best deltoid deformation I’ve seen so far was actually shown to me here. Just a simple segmented B-Bone makes all the difference in the world! I’ve attached a minimalistic shoulder rig using this bendy B-Bone approach, made using Ben Dansie’s Lyra model. The weights are default. It is only meant to address the deltoid deformation issue, as more bones could be setup for the scapula and clavicle. But for a cartoon rig I think it would work just fine as is. It could be improved as well with an auto-clavicle setup, which I am looking into at the moment. Feel free to use it as a base for your own experiments, just make sure to credit Ben for his excellent model!

I’ll keep experimenting and see what else I can come up with…

Attachments

Lyra-Dansie-FGC_shoulderBase.blend (718 KB)

Actually, I was hoping you’d chime in! Welcome!

Thanks for the input… I am going to download this and study it.

In the meantime, here is the result of my latest thrashing…

This was based on Larry Shultz’s LW rigging DVD. He shows it off in a vid here:

http://www.vfxcast.com/playlist/lw_rigging/

He does a couple of interesting things. First off, he emphasizes his belief that a model does not have to be in a certain pose to rig right.

I mention this, because in Arild Anfinnsen’s (Second Reality) execllent tutorial, he makes this comment:

The rotation of the arms is to get them into a more relaxed state. Arms kept in a straight T-pose would cause faulty shoulders when animated because most of the time the arms will be close to the body.

(Tutorial here: http://www.arildwiro.com/tutorials/modelling/body/body01.html)

Larry does one thing I have never seen,a nd which is interesting. The bone nearest the joint (ie bicep) he uses for moving the joint, and then he adds 2 other bones for “twisting” only. An interesting setup.

He also adds a “sternum” from the back of the neck to position his collar bone more anatomically correct.

he is rigging for Lightwave, which deforms differently than Blender (which deforms differenlt than Messiah, which deforms differently than… insert favorite animation program here…) So it is not an exact science… but still, it made for an interesting afternoon!

The end result is slightly better, but I still end up with an oversized shoulder when I pull the arm down.

EDIT: Old Pictures of problem removed to make this thread more easily readable. The good stuff happens below when FeelGoodComics shows off his rig

I’m glad to see I wasn’t the only one rigging this nice Sunday afternoon :smiley: I will check out the tutorial links you’ve given after I post this.

http://i.imgur.com/FRear.gif

I followed this Maya tutorial series by Aaron Holly (which is unfortunately no longer available for purchase apparently). I’d been meaning to get around to learning this setup. I have some sad news - the autoclavicle setup does not seem to be possible in Blender, it just creates a dependency cycle. But I made do without it, getting pretty similar results.

I’ve created a demo animation in the file to show off the shoulders, so I will let that speak for itself. I will explain some things about the setup though because it is overwhelmingly complex (part of why it’s taken me well over a year to actually get to learning it! But fortunately it’s far easier to do in Blender than Maya :wink: - in fact I have been studying Maya tutorials to learn advanced techniques and I’m always pleased how fast Blender is in comparison).

So… in summary:

  • The scapula is controlled by a series of 4 locators. One of them marks the position of the sternum (where it is found), another one tracks the position of the clavicle tip, and the 2 others are parented to that one and are used to aim at the first locator, effectively dampening the effect of the rotation on the scapula. There is also a complex rotation dampening happening here, where ‘mch_scapfollowFK_*’ rotates fully backwards, but not forwards.
  • The clavicle is split into 4 deforming bones to create a bendy ability. This was done instead of segmented B-Bones because it could also be turned off (by disabling the influence of the copy rotation constraints linked to the clavicle controller) to create a straight clavicle if preferred. *I did not add this control, but it could be easily added.
  • I added the bendy b-bone into the shoulder region. This is basically the alternative approach to the auto-clavicle. Since I made this up, I’m sure there is room for improvement :slight_smile:
  • **Note that I made a touchup to the B-Bone shoulder, but otherwise the weights are default bone heat. This could be greatly improved with proper weighting!

All in all I’m incredibly happy with this, and it meets my needs (I mostly do cartoons anyways). Hopefully it helps you guys out too!

If you have any further questions, please don’t hesitate to ask :slight_smile: (this is probably the most complex component I’ve rigged in Blender yet!)

Attachments

Lyra-DansieFGC_AaronHollyShoulder.blend (623 KB)

Yeah, we were both rigging… but you were having a better time! This looks really great, thanks!

I am going to spend tomorrow taking it apart and then I am sure I will have many many questions.

This is simply default bone heat? Wow… very nice! I need to put this rig on my model and see how it does there.

Thanks again! What a great way to end the day of rigging!

Here is an explanation file of the setup. Again, I’m not completely satisfied with the B-Bone shoulder solution (the B-Bone is the way to go I think, but the configuration needs work). I think the clavicle and scapula setup is really solid though. The file explains it all in detail, just read along and fiddle with the color-coded demo armature… should answer any questions about the setup :slight_smile:

By the way there is a short thick B-Bone in the middle of the bicep in the last file which has no use, so it was deleted. I had to change a few parent relationships and other odds and ends as well, so I would suggest referring to the setup in this file if you intend to learn it.

Let me know if anything is still unclear!

Attachments

Lyra-DansieFGC_HollyShlderExplain.blend (673 KB)

OK… a timley post – I had just started my take-apart…

I found a bone on the left: mch_scap_Kpole_L that seemed to have no similar bone on the right… But maybe that was just part of the cleanup.

I will download the new Blend and start going through it instead. I am using 2.5, so it takes me a little bit f fussing to get things where I want… Be back in a bit…

Thanks!

(BTW, this rig looks great!)

It looks like the FK IK switch is broken in 2.5… I built the rig in 2.49b so I would recommend analysing it in that version, then rebuild it in 2.5 if you like. If things are broken or working differently in 2.5, it may just end up being more confusing…

mch_scapIKpole_L is the pole target for the scapula IK bone that follows the clavicle rotations (which is explained in the file), so it should have had one on the right as well - I must have missed it when mirroring.

Really? Because it was working here in the rig you sent last night.

The Text file is very helpful, thanks for doing that. I am going to take tonight and work on this and play with it. I probably won’t be back with more questions until tomorrow.

This rig is really sweet… I can’t tell you how much this means. I have been playing around in 3D (hobbyist) for about 6 years now – tried everything from LW to MAX to Messiah to XSI… this is the first time I felt like a shoulder rig that worked was in my grasp.

Very cool!

OK, this has been really educational. I have taken the text you included with the last rig and expanded it into a document, with screenshots that show bone placement. I will make that available when it is done… do you want me to send it to you so you can do a quick edit?

I am also playing with the rig to make things easier for me to dissect it… I’m new to this so I am sort of learning as I go.

So far, I decided to put all of the bones that deform on a different layer than those that don’t. Next, I will break the parts down into different layers (ie Clavical in one layer, Scapula in another, etc) This – I think – will be helpful when I go to reuse this rig, as is, on a different mesh, since everything has to be replaced, and some of that is tricky because there are often several bones stacked on top of each other. After everything is in place, obviously, the parts would be consolidated onto one layer.

The idea is to make this rig a nice starting point – an artist can import it to a scene, scale it and place it as needed, then use that as a starting point for a complete rig of his own… (I still wish you could import rig sub-assemblies – that would be cool!)

Does this make sense? Is there some other thing I could do when breaking the rig down you can think of?

When I am done understanding this, if it’s OK with you, I will probably do a full blown video tutorial on it… I have found explaining something helps me understand it better… what do you think?

I think the best way to learn the rig would be to build it yourself, I understand the rig as well as I do because I’ve built it (and because it makes sense to me).

Making a full tutorial sounds good :slight_smile: I was actually planning to make a video tutorial for it anyways, so I can take care of that part. If you’d like to organize the file and create a more presentable written version of the tutorial though, that would be very helpful :slight_smile: I can post it on my rigging blog when it’s done, and credit you for it. Just let me know when you need me to look it over.

There is no doubt you are right… and I will do that after I am finished with my playing and experimenting…

Part of what I want to do is check out the different poly-flows in a few meshes I have laying around, and see how they do with this rig.

I have built several models, and they always failed when it came to the shoulder deformation… I was never sure: Was it my modeling? Or my rigging? I know a great rig can overcome a not so good model… but how much of the problem I was seeing was from me being a lousy rigger… and how much was me being a lousy modeler?

So, now I have a rig that looks good on Ben’s model, I want to see how it does on mine… so I can start answering some of these questions that have been nagging me.

That would be great. For me, part of my problem is learning Blender as I go. When you talk about constraints and targets, I am only vaguely sure of how to check those (or set them) so a video would be incredibly helpful!

BTW, so far everything has been working great in Blender 2.5!

has anyone tested a fan bone rig at all? I’m guessing a “realistic” rig would require more fine tuned nuances, but I’m guessing unless you are dealing with a shirtless character more basic setups would suffice. here is a basic idea: http://www.pasteall.org/blend/1723

Are you using 2.5 alpha? Because it works for me in alpha, but not the latest release. I think there was a recent change to the driver code, but I’m not really privy to such things…

Anyways, I spent the afternoon finalizing the setup for presenting. Made a few more small changes :slight_smile:

I found the B-Bone works best when overlapping the bicep bone and is used in a corrective way, instead of a structure all it’s own. Distributing the deltoid 50/50 between the bicep bone and B-Bone creates a great starting point which can then be finessed a little. Also had to add a pole target for the B-Bone to keep it from twisting improperly, which is parented to the bicep.

I’ve attached the properly weighted version (auto weighting is great, but the intricacy of this setup requires a little tweaking to get right - particularly the deltoid). The arm looks good now when it is raised up as well (which it didn’t before in my opinion). This is likely about as good as it will get with just bones and mesh, so I will use this setup as the basis for the video.

Attachments

DansieFGCHolly_ShoulderWeighted.blend (521 KB)

(jay), that’s an interesting idea! Did you have a specific use in mind? I’ll fiddle with it and see what can be done…

Yeah, 2.5 Alpha. I can’t use the later version because of strangeness in the UI. The one thing that has (finally!) made Blender accessible to me is that I can change the UI to mirror my modeling app (Silo). I used to stare at my fingers in frustration when they would hit something without my knowing… So, the UI is a deal breaker for me (I’m just too stupid to learn two apps, I guess…)

So, I have been using 2.5 for everything. I really am liking it! (Can’t wait for Alpha 2). I tried several builds, but they wouldn’t let me use ALT-Mouse Wheel to zoom in and out – which seems silly, but man am I used to that! (Even Photoshop recognizes that – which I found out by accident when my fingers just did it while I was squinting at a photo!)

Back to the Rig:

OK… after spending a few hours tonight playing with placing your existing rig on a couple of my models, I think I am going to have to do what you suggested and build it from the beginning. The placement of things – especially the rotations – are just too inter-dependent to just grab bones and start moving them. Everything breaks when I do.

Not a bad thing. As you said, I should do it from scratch to learn it properly anyway. But when we’re all finished, I would if it would be possible to build a layer of “Rig Handles” than can be used to grab them and move them into position.

I don’t mind doing it once from scratch, but it sure would be nice if I could easily reapply it to later meshes… Do you think something like that is possible?

OK, I’ll download the latest and greatest and play with it.

@(Jay) Nope… don’t know what a fan rig is. I will give the file you suggest a look though…