Simple IK question

Sorry if this is an ultra newbie question, but I created a simple IK chain emulating a truck with trailer I attached below. My problem is that when moving the timeline backwards I lose the initial position with the truck and trailer aligned… Do I miss something in that simple rig?

Thanks!

ikTest.blend (756.1 KB)

Hi, your Ik chain is not so simple.

You have 2 dependency cycles which will lead to problems.

To show the dependency cycles load blender from the command line.
https://docs.blender.org/manual/en/2.79/render/workflows/command_line.html

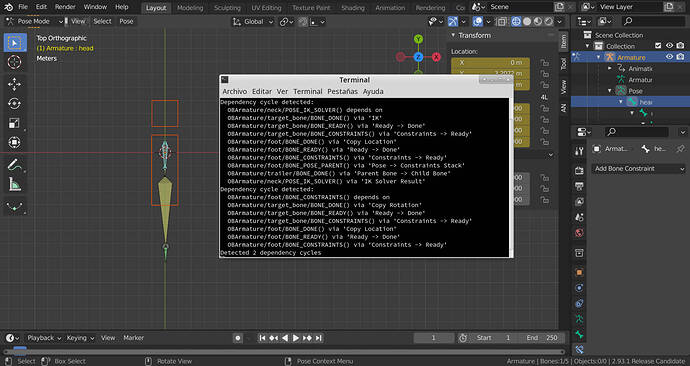
Then you will always have the terminal in the background (click it to see it in foreground), this is very useful for rigging as the terminal will report dependency cycles (which lead to calculation errors when animating.)

Here is your file with the terminal open:

As you can see there are 2 dependency cycles.

Your next question: What are dependency cycles?

Well they are constraints that cyclically depend on each other and therefore can not be calculated correctly.

Basically your target bone copies the location of a bone called foot that is a child of the trailer bone, via a copy location constraint on the target bone.

The trailer bone has an ik constraint that targets the target bone, that means that the position of “foot” also depends on the position the target bone. The target bone depends on the location of the trailer bones child (via the copy location) and thus the calculation goes round in circles.

edit:
ie “foot” location depends on “target” and “target” location depends on “foot”

I hope that makes sense.

There is a similar cycle with your foot bone’s copy rotation constraint.

These dependency cycles are what cause the bones to position erratically.

2 Likes

Nice explanation! I must say I copied it for another thread about rigging a trailer https://blender.stackexchange.com/questions/81872/how-to-rig-a-truck-trailer-so-that-the-trailer-follows-the-truck/81979#81979 .
If somebody could give me an alternative to solve it, I would appreciate it.

I am not sure of the “correct way” to do it.

You could try this method (the answer marked as solution) it is a little complex but will work well for getting your truck and trailer (or multiple trailers) to follow a curve forwards and backwards.

I also found this Tutorial but it does seem more complex when you get to do the animation and it involves the rigacar addon

EDIT (again!)
I have adapted the file I did for this answer (last year) to include a trailer, it uses the method explained in the stack exchange link.

Here is a new file with a trailer! :smiley:

TrailerCurve.blend (132.2 KB)

you can scroll forwards and backwards, the wheels rotate correctly and the front wheels even turn into the corners (a bit exaggerated but you can tweak that by shortening the front bone and vertices of the drive control object.)

1 Like

Wow! That’s an answer! Thank you. I found some of that solutions but I tried to do it by rig because little changes in animation. I suppose the curve solution is what I’ll have to do finally.

From all my tests (I animated a traction engine) I found that following a curve was by far the best way to go. It makes it very easy to define the trajectory change the speed, accelerate, stop, reverse etc

Batfingers (stack exchange) method has many advantages to it, I recommend you recreate it your self to understand it properly.

The best bit about it is that you only animate the drive control object on one axis forward to go forward and backwards to go backwards. The curve defines all the turning round.
The drive control object can be a simple line of verts (I made an arrow shape to make more clear and easier to select.)

As the drive control object only animates in a straight line on one axis you do not get problems with the wheels switching rotation when you go over 180º. The wheels rotation depends on a driver that references the drive control’s real position (not its position following the curve).

The angle of the bone in front of the cabin is what gives the angle to turn the front wheels (my original example was more like a go cart (or the traction engine) where the front wheels turn via the axel, for a car there is no axel and they should turn individual on there own pivot.

I even used the turning angle to drive the steering wheel rotation of the traction engine!

If you are interested take a look at the videos I posted in the traction engine thread. (sorry for the self promotion but I am quite proud of it)

Have fun, vehicles are fun! :smiley:

1 Like

I started to use it and, yes, it has a lot of advantages as you say. I used vehicle autoriggers in other softs I used so I never take into account any alternative… until now.

It sounds very interesting that thread, thanks again!

I get the job done… the only thing it’s how to solve the reverse gear… I think in this project I can avoid that problem but it would be interesting a way to do that (not using the previous path but new)
That’s not a question :slightly_smiling_face: :sweat_smile: just a thought

See total edit below.

1 Like

This post is actually an edit of my last post but as the edit is so drastic I have deleted the answer and started again, I wanted to leave a better example for anyone who reads this in the future:

Ha, ha, that is the most interesting “none question” I have heard for a long time! :rofl:

I presume you want to go down a road stop at a certain point, back up into a cargo bay, unload and go forwards again resuming the original road. …To tell the truth I saw it coming!

The “none answer” is a bit more hacky and has taken me a while to think out!

The main idea is that to change from one curve, using the curve modifier as a path, to another you need to change scenes.

Key-frame the drive control object in the point you want to stop for reversing. ( I stopped at frame 358)

Snap an empty to the tip of the first bone at that point in the animation,

Make a new scene and choose the option “full copy”.

Go to the new scene.

(if you have a lot of scenery you do not need it to be duplicated as “new objects”, so you can delete them in the new scene and instance them from the old one, so as not to have a huge file)

You can edit the curve rotating the handles before the a point before the truck stops.

You will notice that when you rotate the curve handles the truck will change its position a bit at the key-frame where it stopped. This is because the first portion of the curve will change its length slightly.

That is the reason for the empty. To compensate this, so the truck does not jump when you change scenes, you can shorten the start of the curve (by moving the first few handles) until the first bone lines up with the empty again on the keyframe where you stopped the truck.
If you select the curve in the second scene in the example file you will see the selected handles I scaled using the cursor as transform pivot. There is no visible jump of the truck position.

Now you can key frame the reverse motion and copy the key-frame of the stopped position to get back onto the road after unloading.

The idea is that you render the forward motion up to the key-frame when you stopped in the first scene and from then on render the second scene.

Here is the new example file:

TrailerUnload2.blend (175.8 KB)

I have given the curve more handles as the movement is smoother and converted it from bezier to nurbs curve so it does not distort the drive control plane as much. I put both curves in both scenes to show the old and new trajectories.

I also changed the front wheels so they turn like a truck and not on an “axle”. The longer the first verts of the drive control plane and the first bone, the more the wheels turning will anticipate the curve (reminds me of my driving instructor “don’t look at the ground in front of you look the road ahead!”)

To get the wheel turn correct for reverse gear the front “steeing” bone should point backwards and track to the back of the trailer not the front vert group but I did not go that far!
1 Like