Struggling in follow reference when modeling the jaw

Hi blenders, newbie here (after 16 years after my few posts here)

I start model this a dummy character based on this reference: Deviant art - Average Joe Character Turn Sheet

I attached my blend file too for anyone who want to checkout what I did.

dummy_plane.blend (809.4 KB)

I had trouble of align this reference and I noted this when I were close to start modeling the jaw.

After a few try, I think I align a little better the front and right view.

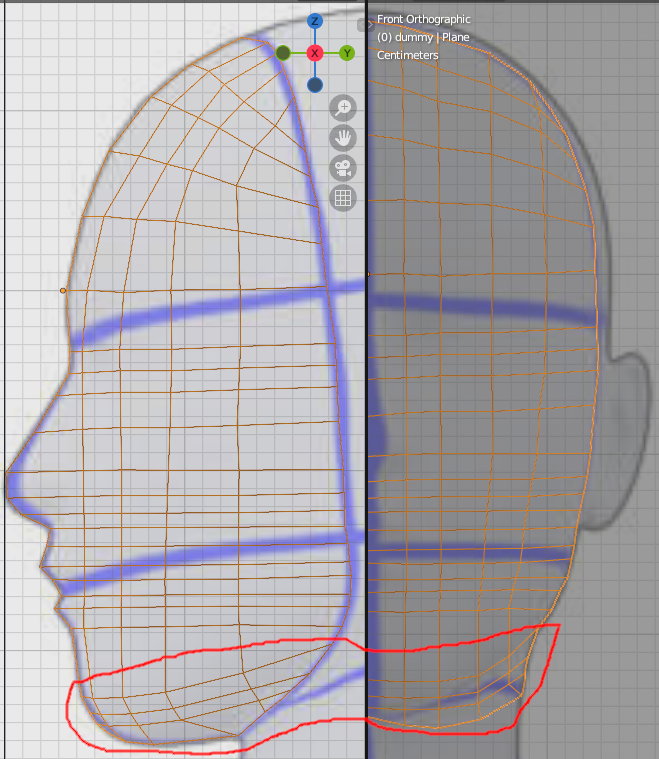
Still I think the jaw and below it could be something odd, there on the reference lines of the jaw and the neck

Anyone could give some hints if I’m doing in the right direction?

I’m using a plane object to do this model, but I planning do it again using a box, just to know what could be better for modeling.

I’m justin ‘extruding’ and transforming. Another better way to do? More professionally?

Thanks in advance.

Regards,

Samuel

1 Like

First you have to know about perspective and orthographic mode. Perspective is the natural way our eyes function, in that it creates a projection where it calculates distance to relatively scale and distort the size of an object we’re seeing. When you put an apple at one meter away from you, and another apple at two meter away from you, the first apple appears bigger than the second. That’s perspective.

Orthographic is a computational way where objects are projected onto a flat coordinate. If we use our apple example above, in orthographic mode, both apples will appear with the same size despite their difference in distance.

For a character example, this is perspective,

and this is orthographic.

The easiest way to tell whether a character reference is in perspective or orthographic is to see the feet. You’d notice that in perspective, the feet seems to be protruding towards the camera. Meanwhile in orthographic, they lay flat.

Now the problem with the character turn sheets you’re using is that it’s in perspective mode, not orthographic.

As I’ve mentioned above, things in perspective are bound to scaling and distortion. So the image taken from the front and image taken from the side will look slightly different. That’s why you have such difficulty aligning the reference image. No matter how you do it, they will not align exactly the same.

As for another better way to do it, well, you can learn about 3D human modeling and topology. If you’re interested, I’ve created a well topologized basic female 3D model and shared it before, and it seems to be interesting for many people, and you can get it here.

It may be an advanced 3D model, but I hope by seeing and learning that, you can get a sense of how to build your future 3D models.

2 Likes

If you plan to use this to make a human model, not just a dummy, I would not take this approach to modelling it. Your image can work okay as a reference for the overall shape of the body and the proportion for the had, but for an actual human face you’ll have an easier time with a proper face reference and even if you don’t plan to animate it, the model will be easier to work with if the topology follows the face.

For your first character, I recommend following along with a human modeling tutorial. It’ll make it easier to get the topology right, and make it easier to do your own thing for future projects. Recommendations:

All of these are female characters, males can be similar topology-wise, just follow male ref material. If you just want a basic face topology guideline instead of a tutorial series that’ll take weeks to follow, this image could be useful:

You can find lots of reference if you search for “face topology” “character topology” “body topology” etc.

I feel I should also warn you the arms’ A-pose is a bit extreme as well, so if you model them with that low of an A, you may have difficulties when you rig it if you want the character to raise their arms. A pose will make it easier to get natural looking shoulders with the arms down than T-pose, but this might be too sharp of an A.

It’s generally more professional to sculpt then retopologize, but I think polymodeling is a lot easier for beginners just getting started with character modeling, and a hybrid approach (where you polymodel the basic shape then sculpt) is easier than starting from a sphere even with experience. Whether the hybrid approach requires retopology or not will depend how careful you were with the topology for the base. Starting from a sphere is pretty brutal, in my opinion.

2 Likes

It’s perfectly fine to use a reference in orthographic view… but the problems starts when not having a perfect orthograhic image as reference or not perfect matching views (as this seeems to be) so you have to do some guess work (and that’s the problem for a beginner… if (s)he could do this then…) and start with very few polys like so:

If you look from above then you see there is something to do… and if you search for “head reference top view” (or even skull) you may see how the head is really formed…

Also the real reference is always the real thing but this has some perspective distortion (if not made with a special camera)… One trick is to really use a 3d model to make a good front/side/top view and use this… even at first trying to match the vertices of the model but to draw some points onto the surface and use this for your own exercise…

In the end it’s all practice, practice, practice and then also some practice… :stuck_out_tongue_winking_eye:

2 Likes

And of course you can just follow something like this :stuck_out_tongue_winking_eye: :

1 Like

Thank you for answers mates - I understand it much better now and with all those links I can take a deep breath and restart once more, but better.

Until next! See ya, Cheers