Hello, having trouble trying to stencil texture paint over a material that has “Mapping Scale” applied. If there is a thread on this already please link it, I couldn’t find an answer.
What I am doing is creating a ground material on a large plane then applying a Mapping Scale so it “fits” the space. The problem I am having is that as soon as I texture paint over this material, my texture paint also becomes tiled due to the scaling material below. I understand why it’s happening, but not how to avoid it.
I have tried baking the “base layer” texture then painting over that, still have tiling with my texture paint layer (which made no sense, am new to baking and probably screwed that up as well). I tried using a mask, scaling the UV, same repeat tiling issue persists.
I am failing to see how to “lock” the scale to the plane as a base layer so that the “top layer” (my texture paint) doesn’t start repeating as I paint.
This is probably an extremely simple problem to overcome, but for 3 days I have been on google, searched several sites, watched many youtube videos, and I still haven’t found the solution. It’s quite maddening because I thought for sure I could figure this out…I was wrong.
If you want to paint a non-tiling texture, and your UV map is designed for a tiling texture, you probably need a new UV map on which to paint your new texture (or to which you can bake your old texture, on its old UV.)
Thank you for the reply! I didn’t realize I could generate two UV’s from the same mesh. I will search for how to do this when I get home from work, but if you know the steps and feel like explaining it, I would greatly appreciate the extra help!
Make a new UV map by clicking the plus button in properties/object data/uv maps. Edit specific UV maps by selecting one from the list in the same place and editing normally-- you’ll be editing whichever is selected. To specify a UV map for materials, use UV map nodes. To texture paint, I tend to use Single Image mode from sidebar/tool/texture slots and specify a UV map to use for my painting.
Hey bandages, thank you again for the info. Unfortunately for me this is far more difficult than I had assumed it would be. I understood and followed everything you said, but in my first test (which I already had a texture paint setup over a base layer) it too repeated even though I had UVMap.001 selected, not the base layer UVMap.
So, I tried starting from scratch. Just made a plane, subdivided, unwrapped applied a single color (node) material. Then created a second UVmap, selected it, went to Texture Paint mode and that is where things stopped working. I am getting confused on what goes where, and then how to combine them back together so that both are visible. I just don’t understand how to do this from start to completion.
I am currently on youtube trying to find examples by searching “multiple UV texture painting”. Finding multiple uv’s applied, but not ones with Texture Painting over them. Still looking though.
I have been able to texture paint with a single texture, but putting together a texture painted “layer” over a material is just driving me crazy. It seems impossible to me that this isn’t a common method of texturing, there must be a tutorial somewhere.
If you or anyone has seen a tutorial that explains this step by step please link, thank you!
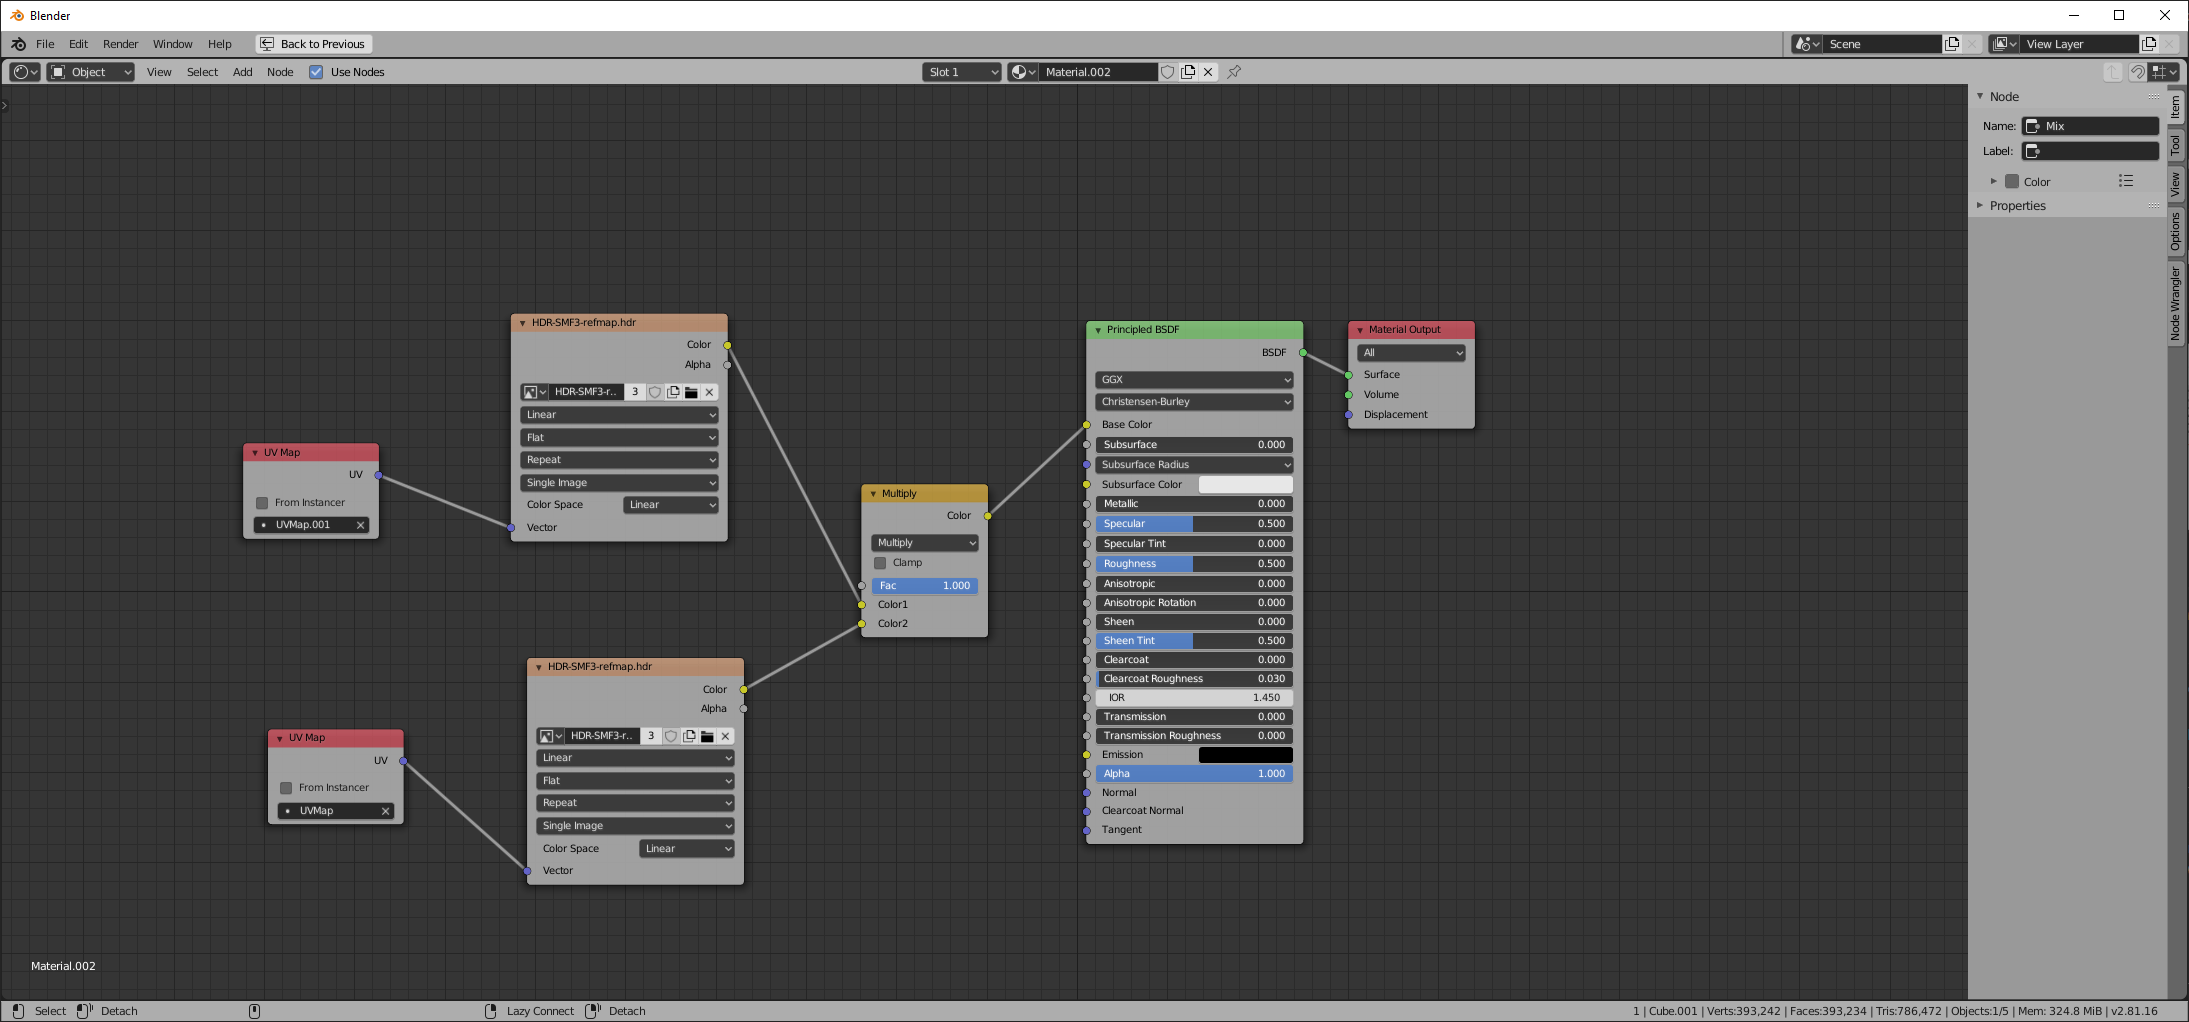
There’s nothing special about texture painting or about images made via texture paint. All that you’re doing is making an image. It’s an image you can use in your materials’ nodes, looking it up from any UV you want, mixing with any image in any fashion you want. Here’s one of countless ways to mix that you might use:
I really do appreciate your help bandages. I completely understand that Node Setup you posted. I’m just trying to add in a few steps. What I am specifically trying to do is make a landscape and then texture paint paths/dirt roads. This is something I need to accomplish one way or another.
Previous thread:
Originally, I was stencil painting textures over other image textures, it worked fine. But, that was at a 1 to 1 scale. Here’s an example of a basic results which was fine for that particular scene/size. And that stencil painted road was straight I need to make curved paths as well. Which is what started this whole mess.
The problem started as soon as I wanted to make bigger scenes and used a mapping node to scale the “base” ground texture. The repeating tile pattern was obscured by the foliage so it wasn’t a problem. But, then my texture painted paths were also tiling, stopped me cold in my tracks.
I figured I could combine all these newly learned techniques into doing what I did before, but it’s a VERY specific series of doing the right things in the right order and with the correct nodes to make this work. To the experienced easy, to someone coming to Blender from other 3D apps, not so much.
Now, everything I try fails because I am consistently missing one step or node setup.
I’m getting close to giving up at this method and just going back to exporting a top down render and painting everything in Photoshop and creating an all-in-one texture there. It’s what I did in other 3D apps. Was really hoping to do this all in Blender, but…it’s a very steep learning curve.
How was it that you were painting the roads before, that you were happy with? Were you painting directly on the foliage texture? What kind of brush were you using?
Yes, that “ground” texture is a poliigon free forest texture. What may not be obvious is that it is applied at a 1 to 1 scale. It just so happens that particular scene and render don’t make it obvious that the size of the ground texture is ridiculously oversized. True scale would be about 20 times smaller. I was using a stencil brush since the road was relatively straight it worked fine.
I then needed to make a mountain/chaparral scene with a very curvy path. Well, the ground texture I was using can NOT be 1 to 1 as it is too obvious that the scale was completely magnified. So, I used a mapping node to shrink it down, and again, at the view angle and chaparral bushes I was using, the tiling of that ground texture wasn’t really all that apparent. However, as soon as I started to paint in my curvy path (using custom “brushes” that curved via puppet warp/Ps) I switched back to shading workspace and to my dismay, there were like 50 painted paths. I understood what was happening, but not how to separate that specific “path texture” from my scaled ground texture.
and…here I am. Basically, I got lucky on the first test, second scene different environment, all went to hell! heh heh
Somehow there isn’t one, and I don’t remember ever making one. I’ll take the file home after work and take some screen shots to post.
I just checked the scene and there is no mix mode, i.e. I got lucky that it worked at all, but don’t know what I did to get it to work. I do see I have a texture in texture paint slot with the road painted over the grass texture, but it’s all one texture now, not mixed. Which is fine for my purposes, but again that won’t work when I use a mapping mode to scale the base/grass texture.
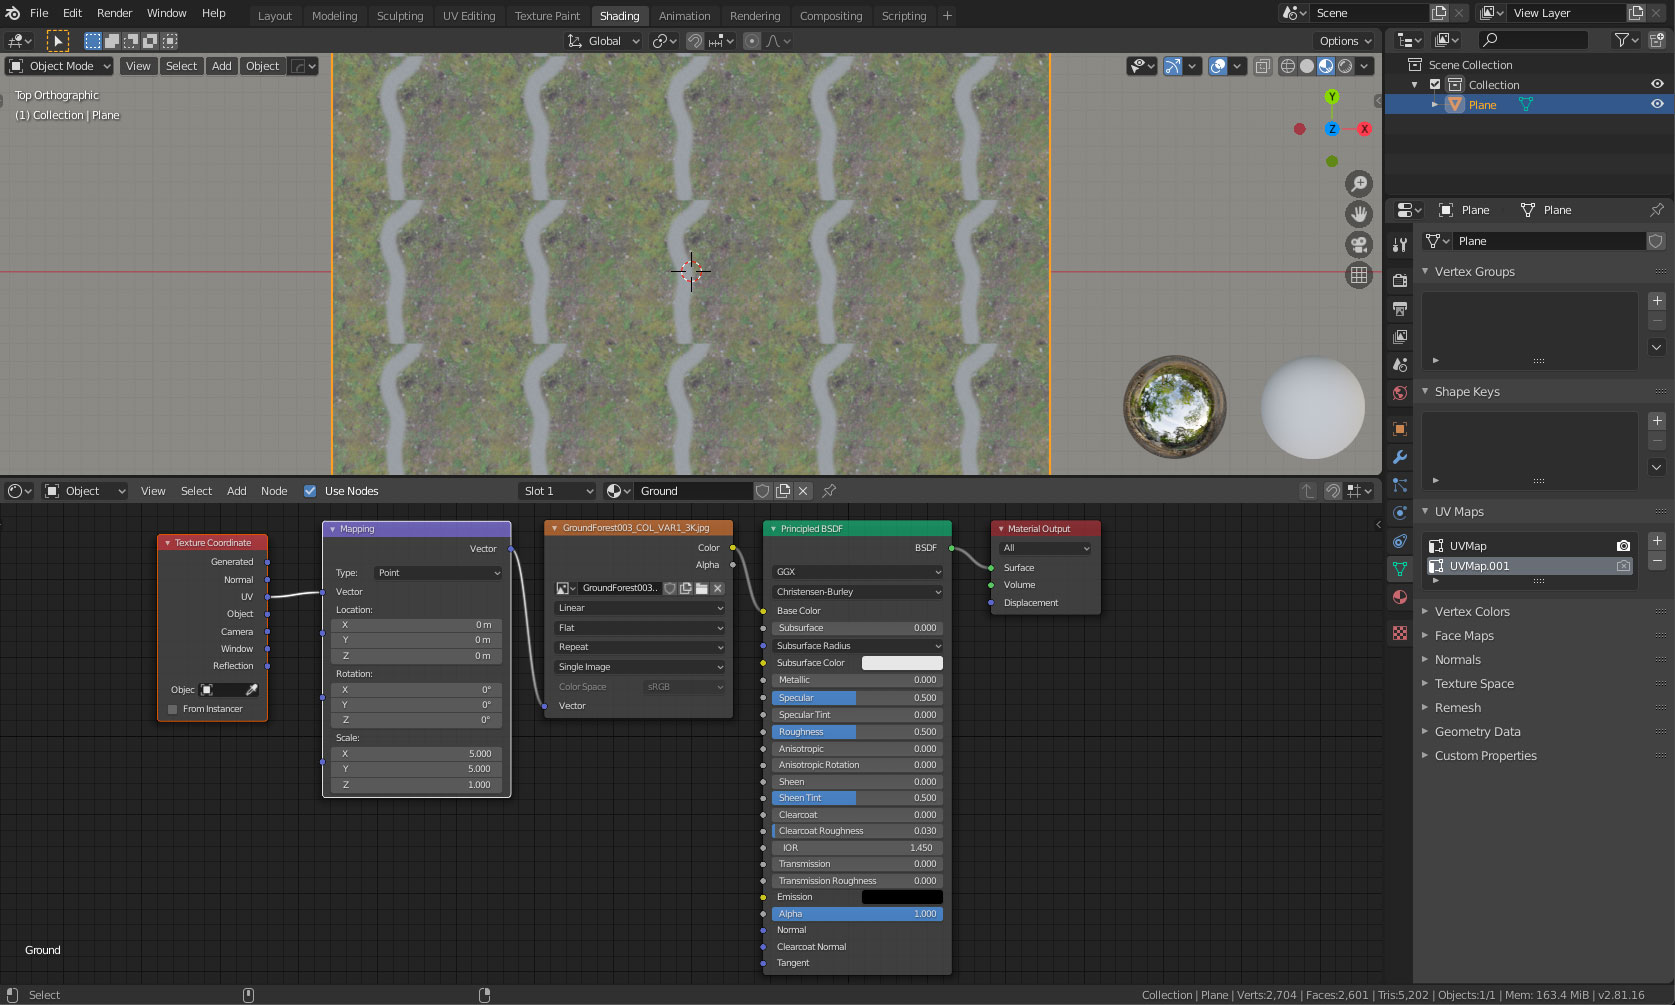
Got it, makes sense. So here are screen shots following your directions as best I could. I am obviously missing a step, and I am guessing it may be the lack of mask? I tried changing the the Blend mode from Mix to several different types, nothing changed the tiling. I also tried adding a Mask choosing UVMap.001, same tiling.
Can you see from the screen shots what step I am missing or screwing up?
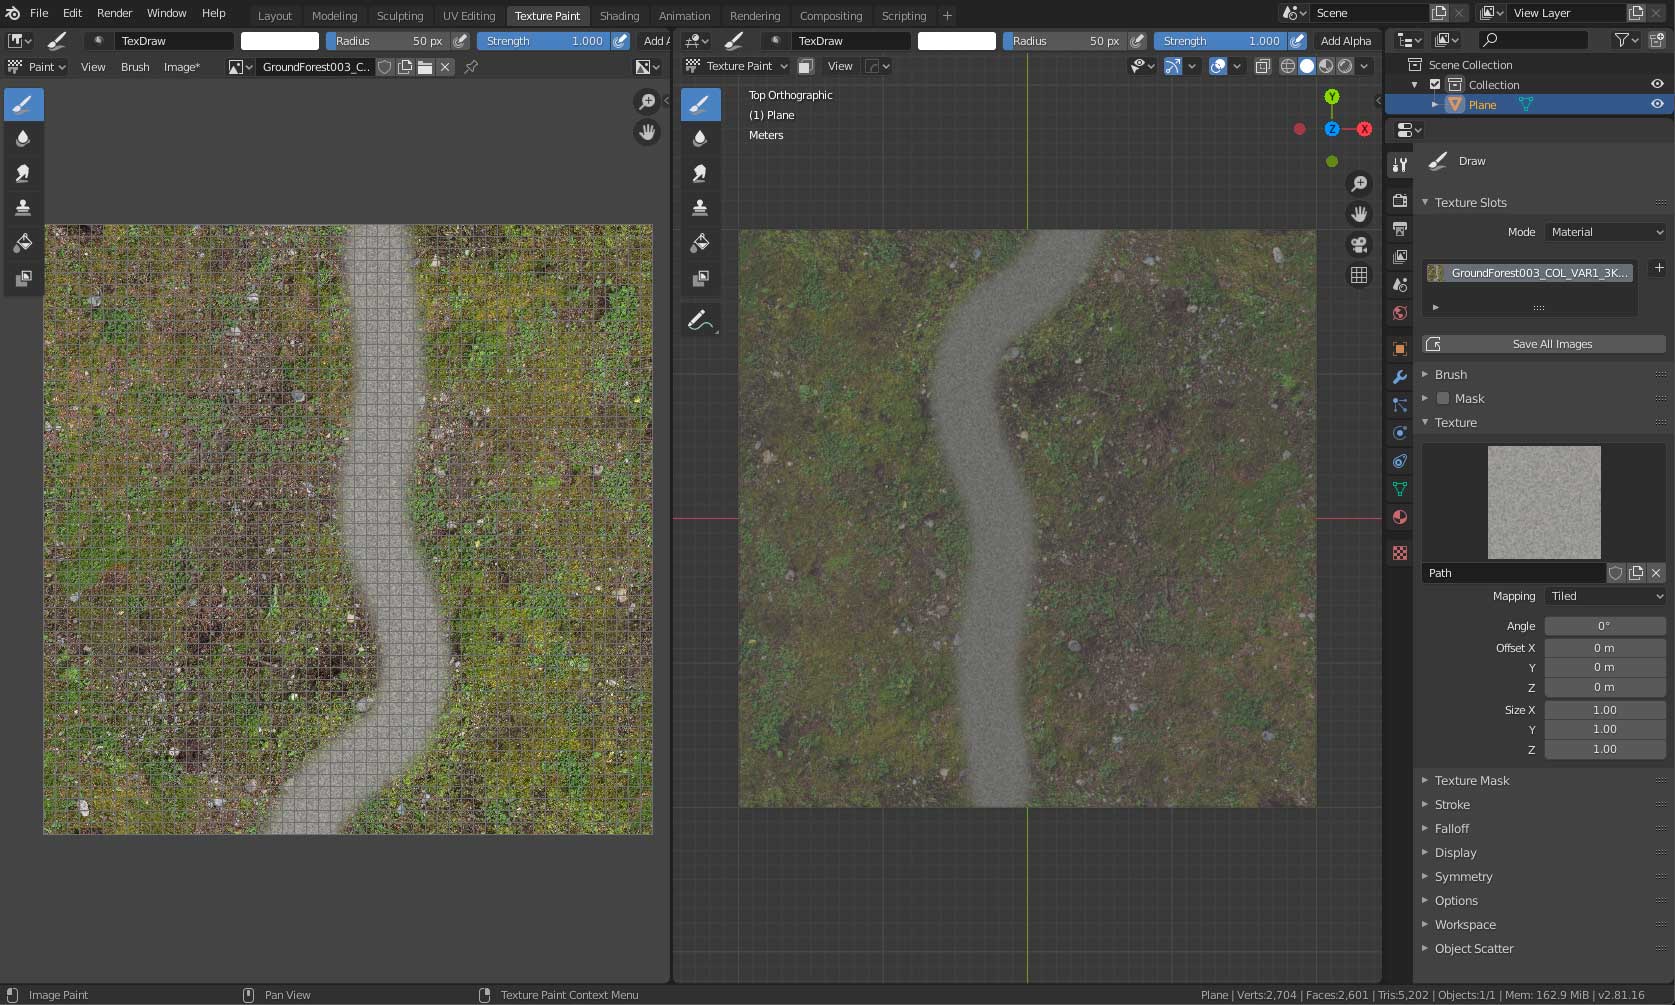
Also, any idea why as soon as you go into texture paint the Mapping Scale is ignored and you are painting on the 1 to 1 scale of the “base” ground texture? I see that as another issue that is causing the tiling, but can’t figure it out.
Well, you have one texture, being accessed from a single UV map. If you have multiple UV maps, use a UV map node to generate your UV vector. And of course use multiple images. Generally speaking, you can only use a single UV map with any particular image.
Texture painting doesn’t know about your nodes. It doesn’t matter-- instead of using a mapping node, edit your UV map instead. To see multiple textures, perhaps one with mapping applied, try using two 3D viewports, one in rendered preview, one in solid for texture painting.
Thanks for trying to help bandages, I really appreciate your effort. But, I simply don’t know how to do what you described. I think you can see what I am attempting to do, but every answer adds in another step that I don’t understand without seeing it setup.
Sorry to waste your time, I know this seems easy to you, but it really isn’t for me. I have searched everywhere for a tutorial showing how to do what I am attempting to do, but either my whole method is incorrect, or this is more than just a basic setup and no one really does this often enough to make a tutorial for this method of texturing. I have bought several training vids, learning a lot about this app, but I don’t even know if I am attacking this in the correct way.
I was hoping to see others setups for this type of texturing, but apparently this isn’t a common method or isn’t the best way to achieve what I am trying to do. And, I thought what I was trying to do would be a common process among 3D artists or even game designers. Just want to paint paths on a landscape and it’s ridiculously difficult to do.
Just in case any noobs like me are looking for a way to do what I was asking about. I finally figured it out with the help from user @bandages and this video:
Part of the missing link for me was incorporating an alpha (may not be needed to “mix” the two textures, but I prefer to use it). Using @bandages info for utilizing 2 UV maps (thanks for that), I combined that info with the steps in the video to create an alpha material that I could paint on.
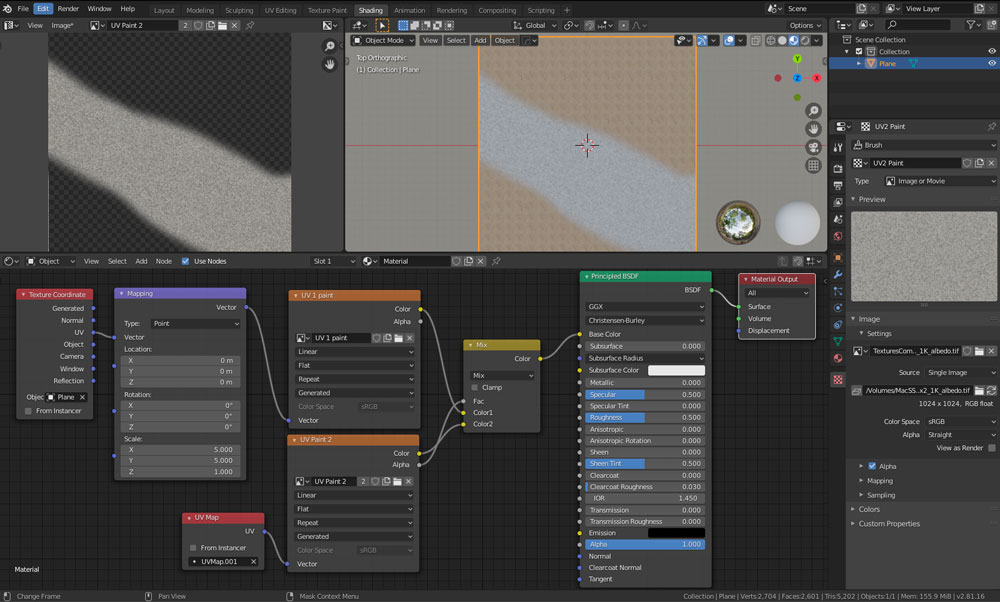
This allowed me to do exactly what I wanted, paint over a base layer that could have a mapping node or whatever I wanted on it, that wouldn’t affect the top paint layer. Quick example of the node setup:
I’m fully aware this is common knowledge for experienced users, but I was missing a couple steps that prevented me from getting the result I was looking for.
The Texture Coordinate/Mapping Node is using the original UVMap used in “UV 1 Paint”. UVMap.001 (the second UV map) is being used in “UV Paint 2” which has an Alpha.
To further add to this, getting rid of the repeating tiling base pattern is not difficult, 2 quick ways.