New blog about the asset browser has some info regarding brush management.
12 Likes
In texture painting, we can use textures as well as texture mask, I just noticed we don’t have a texture mask to use with textures for sculpting. Is there a reason why this wasn’t added? or is there a workaround to adding one?
Do you mean use a UV mapped texture as a mask?
No, Here is the texture mask for texture painting. In sculpt, there isn’t something like that:
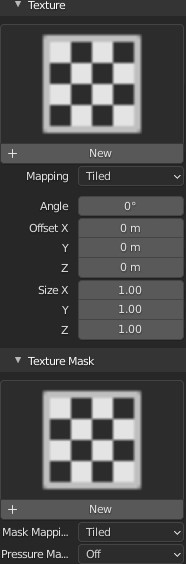
So, when you sculpt with a texture:

I am trying to solve this issue where I want to overlay the brush stroke over the previous ones without them blending together. I wondering if a mask will solve this. Tried the layer brush. It is not working.
EDIT:Seems the layer brush works but you have to set the height each time after enabling persistent and establishing a persistent base. I am wondering if there is a way to get the brush to increase the height each time you paint a stroke by a certain incremental vaule as an option?

Also I think a texture mask can also be useful if you want to add further modfications to the alpha texture you are using but you can always do that in an external software.
I found this. Seems ZBrush has a better way of doing this.

Using the layer mask with persistent enabled, if I use a lower height, it doesn’t go under the previous shapes, it cuts through them.
4 Likes
Anyone knows what this is about? ![]()

Sounds promising: a brush to create quick duplicates of strokes or isolated mesh parts, and a brush that hopefully improves on the Rotate brush? (although Move Elastic’s Twist mode already improves on that)
1 Like
He started to code it on twitch the last Friday you can see it in action at 2:15:00 or so
10 Likes
There’s a way of doing that with the tiling option, in the symmetry panel.
Unfortunately… it’s a bit wonky ![]()
That thing would be amazing for sculpting hair, if it followed the geometry and the spacing of the dots was controlled by pressure.
5 Likes
I can’t watch the video… but I hope it’s useful… ![]()
Pablo said that dyntopo is needed for that brush.
I could test sculpt-dev branch.
To me, it looks like Twist brush is another way to relax topology.
Pablo created a new brush instead of a new mode for Relax brush.
And Array brush is duplicating a mesh part.
It looks like there is no proper Brush UI ready, yet. There is no way to specify how many instances are wanted.
It looks like masking/automasking is not working as intended.
Although it may limit duplication to one part, it is also moving masked parts.
Status of brush is probably very far from what Pablo has in mind.
It is so easy to duplicate and scatter things with Geometry nodes.
That brush looks poor and unnecessary in its current form.
Enabling dyntopo in temp-bmesh branch is producing an instant crash. So, testing is impossible.
2 Likes
Are the any plans on the horizon to allow the sculpting brushes to use alphas with mid grey values?
I brought a pack of skin pore alphas to use in Blender (which were sold as such) only to notice some unwanted displacement. Some quick googling around and I found a post on rightclickselect that basically said you can’t use such alpha with a mid grey meant as zero displacement.
So in Blender it’s basically black for no displacement and any value above that will add or subtract based on the overall setting of your brush.
I believe alphas that has mid grey as zero allows you to add or subtract at the same time.
2 Likes
2 Likes
Thanks I will try and run some test if I have some time.
I saw that the are some workarounds but the all seemed to just remove the unwanted displacement from the mid-grey value and the brushes still only add or subtract and can’t do both at the same time.
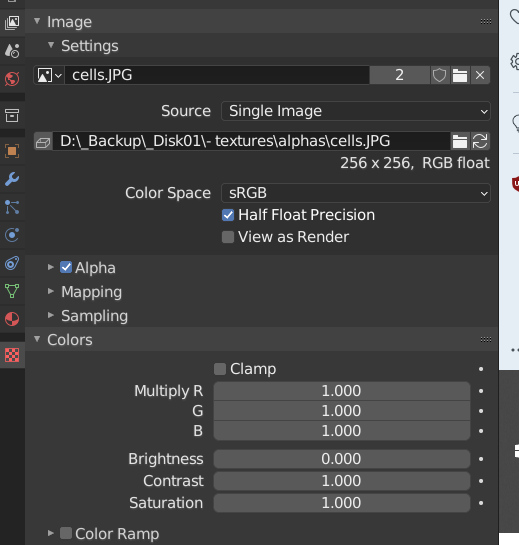
I set the brightness between 0.5 and that works well for pretty much any alpha.
EDIT: Just tested to confirm and it’s between 0.5 and 0.75 for the brightness, problem is, there’s no way to have a completely neutral (as in not influencing the mesh) mid grey like Zbrush does, so there’s always going to be some adding/substracting even in the grey parts of the alpha.
1 Like
This is probably due to gamma correction. Not very convenient. ![]()
2 Likes
I don’t have access to Blender right now, but even if you adjust brightness, Shouldn’t be the color space configured as linear?
I was told on sculpt-paint chat that it’s to early to talk about specific UI Sculpt Brush solutions.
My assumption is that the main reason is that Brush Management will be done in Asset Browser, and it itself is very much WIP.
For a map that you are only interested in scalar values wouldn’t you also set it to Linear or non color like you do with normal maps?